Getting Started
Thank you for choosing Money Pro and welcome!
Money Pro is a comprehensive personal finance management application with powerful features that are easy to use. Money Pro is the next generation of the Money app (over 2 million downloads worldwide).
Money Pro was built with a vision. It is a set of tools for keeping track of accounts, bill planning, and budgeting which all work in unison. At the same time, it is much more than that. Our goal is to give you a means for taking control of your personal finances and, ultimately, your life as a financially free man.
In this user guide, you will learn how to start managing your personal finance with Money Pro on your iOS devices and Mac. The guide is divided into five areas: Accounts, Budgets, Bills, Reports, and More. These areas correspond perfectly to the five tabs of the application.
Accounts
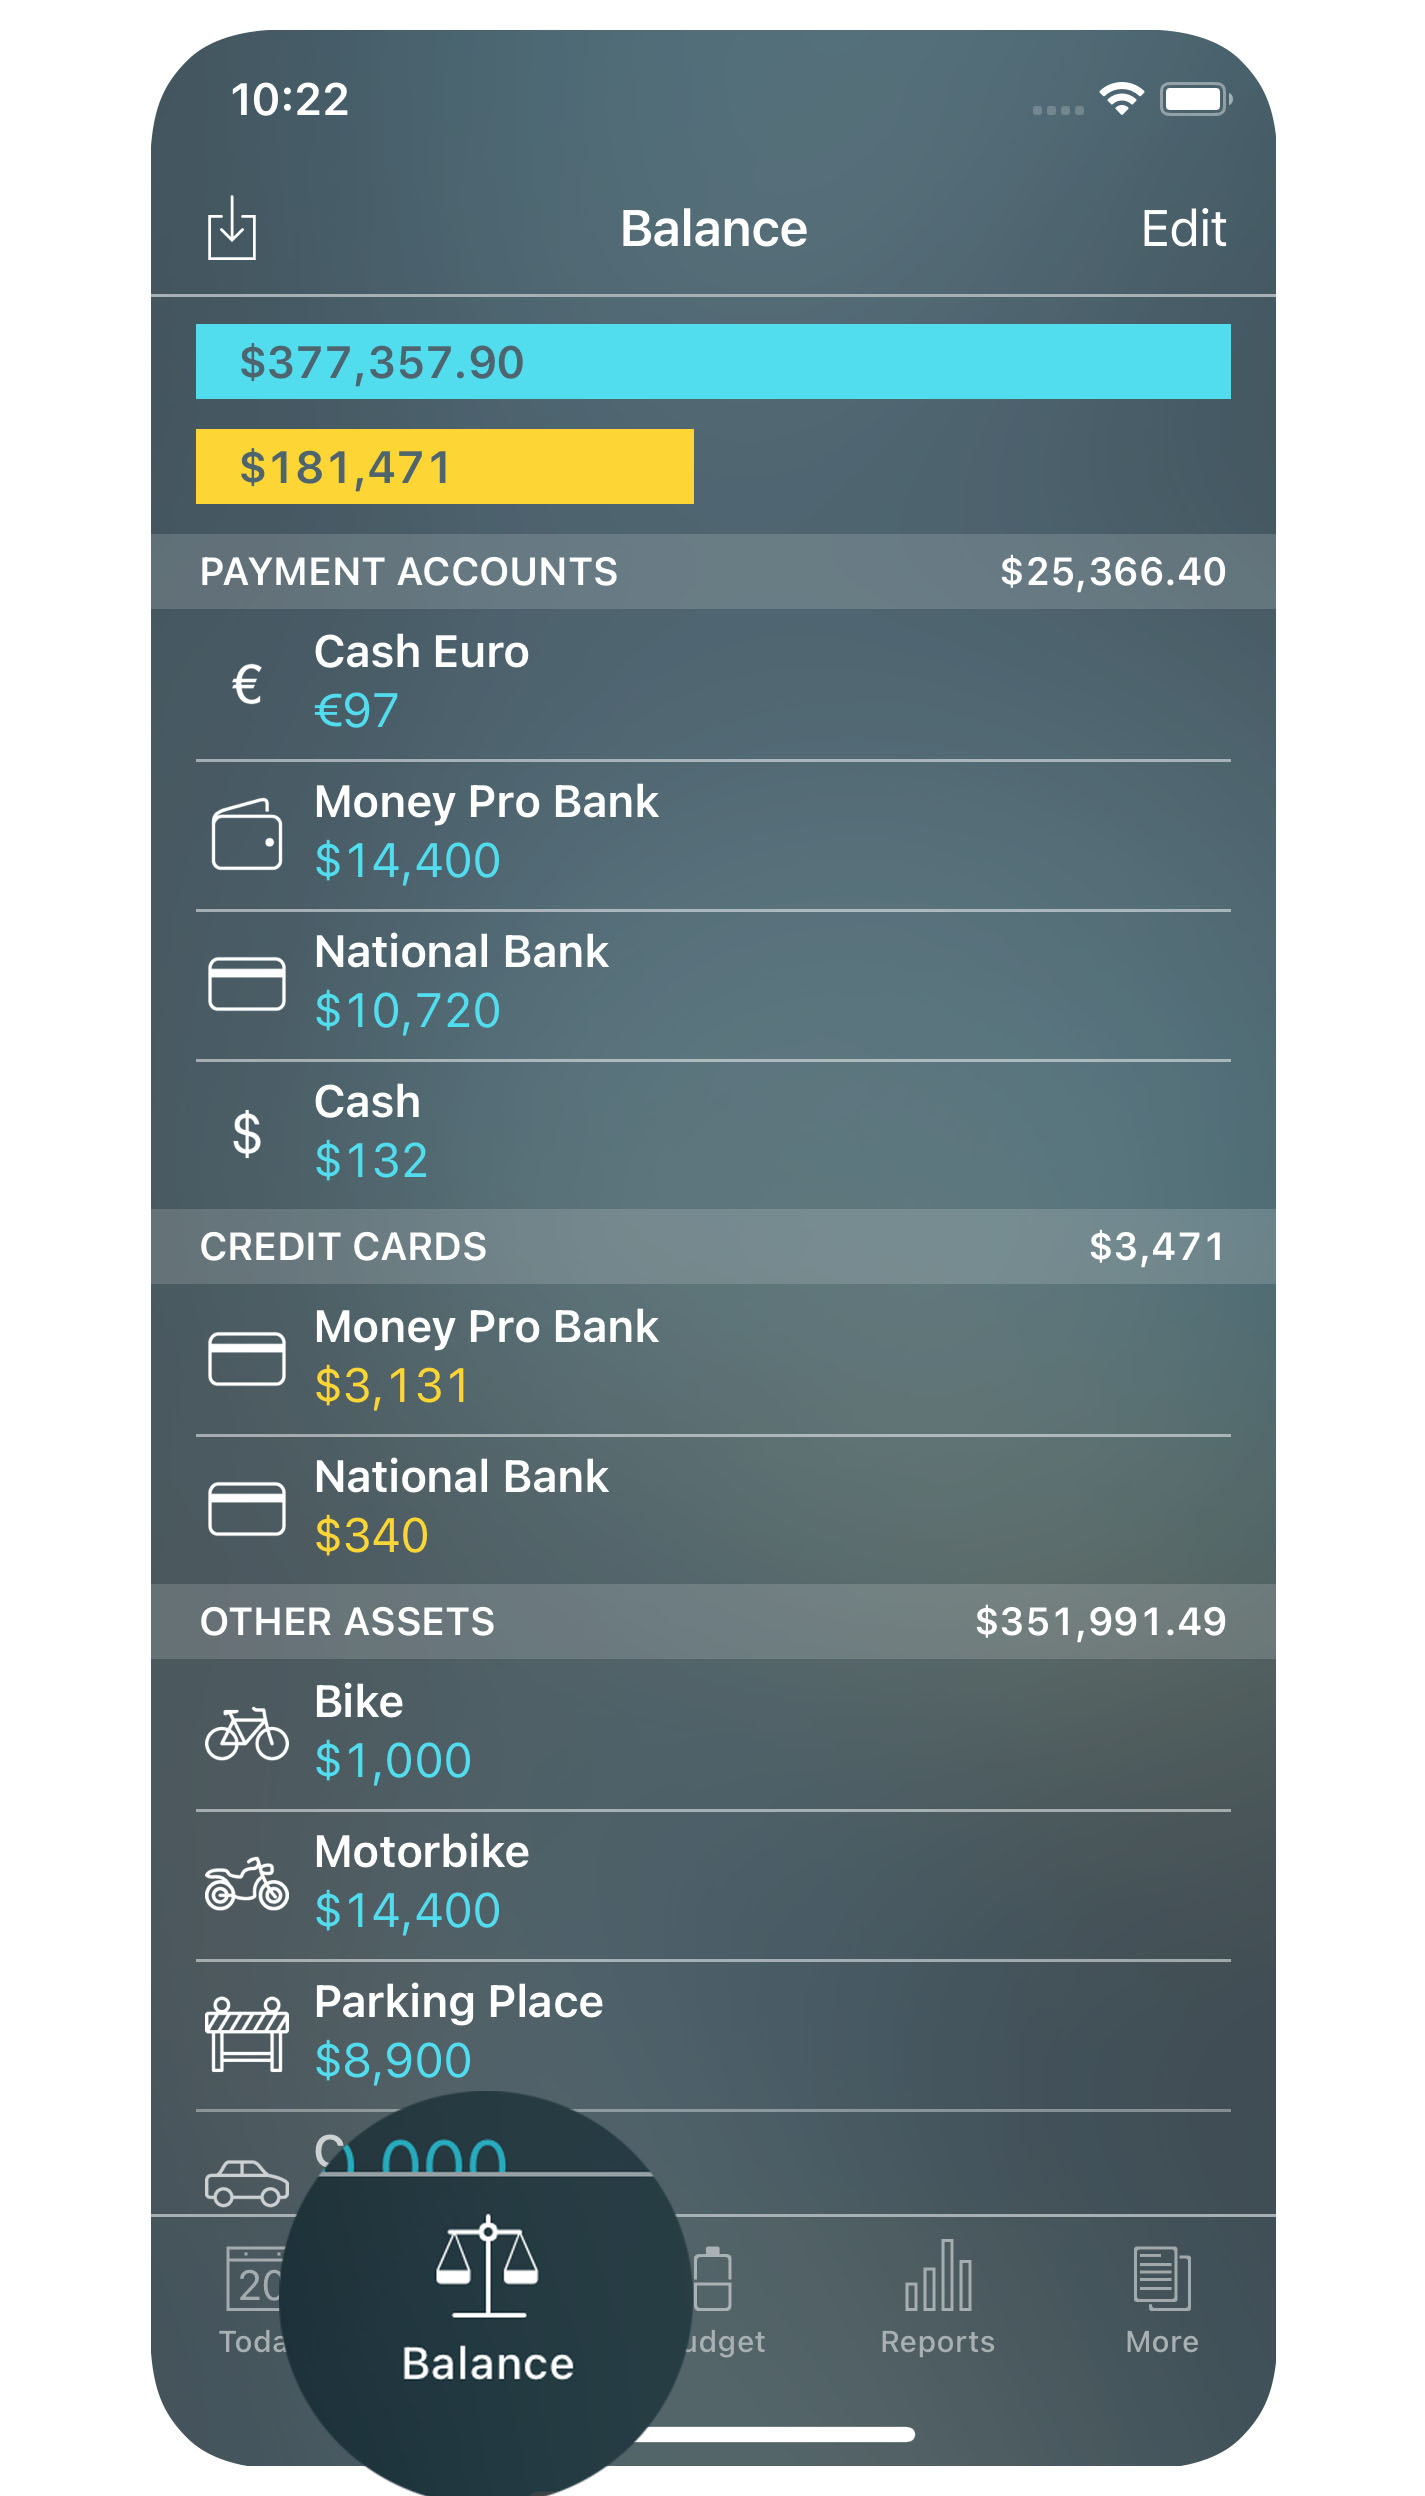
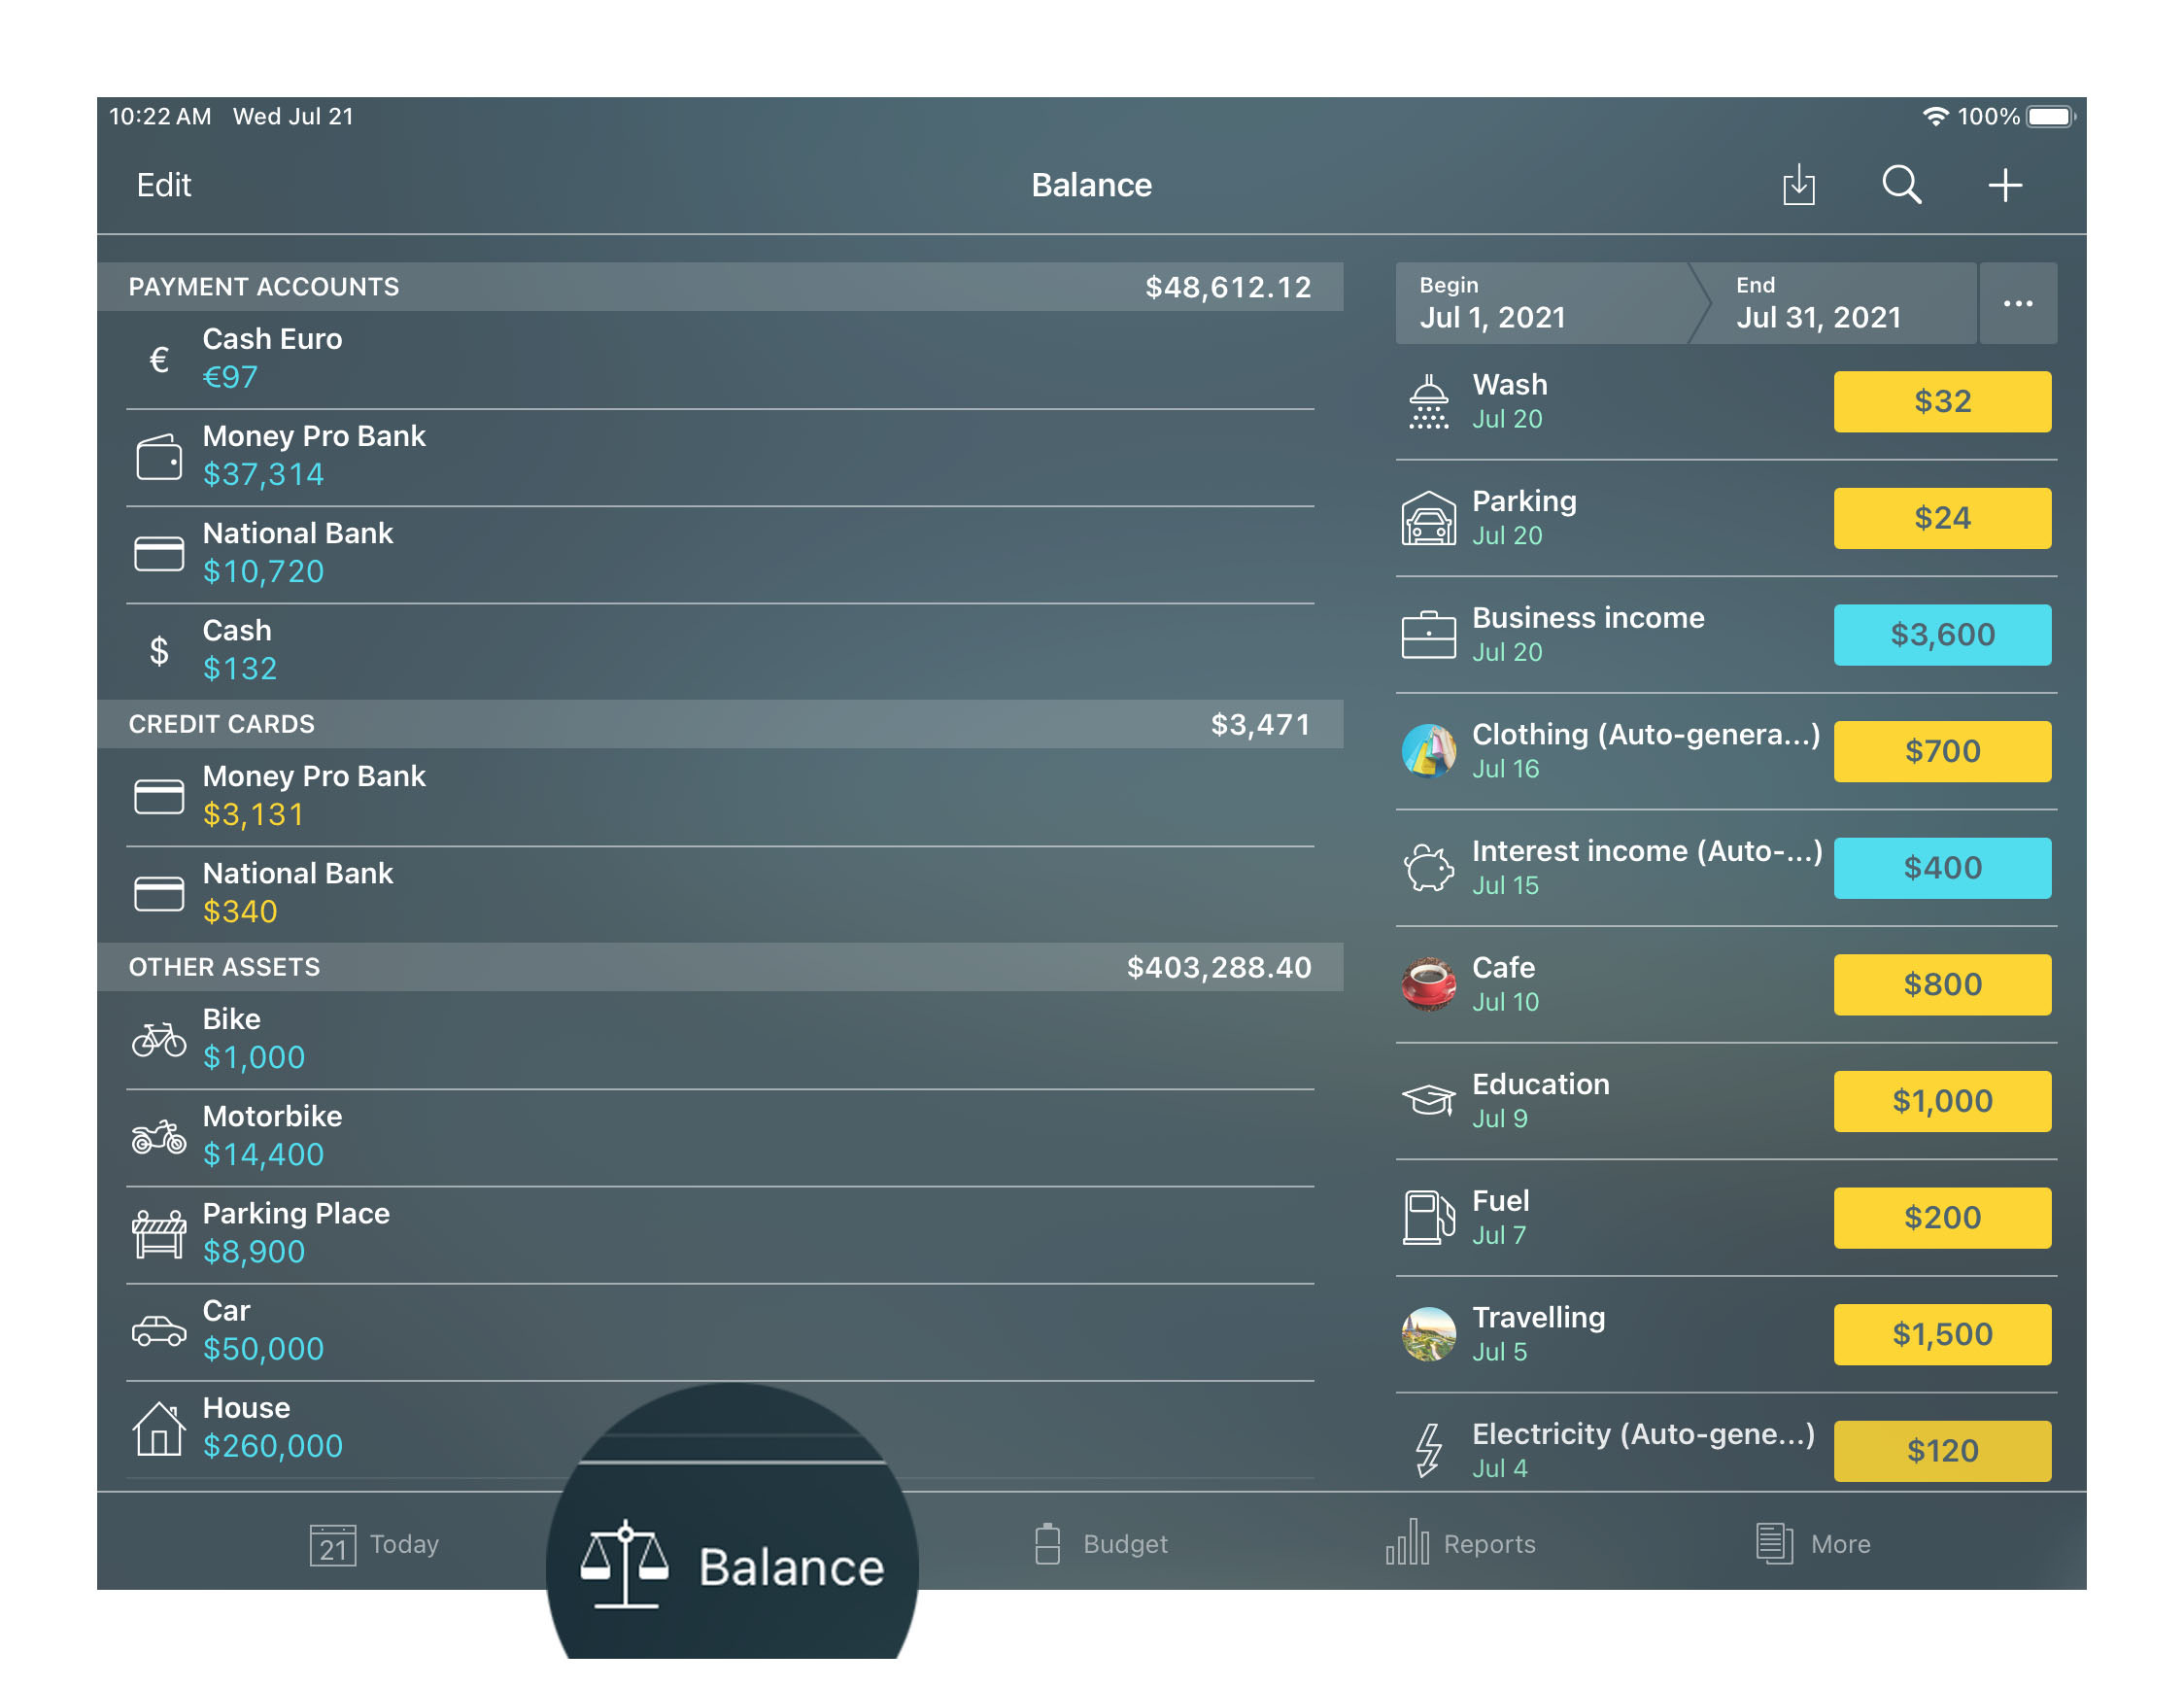
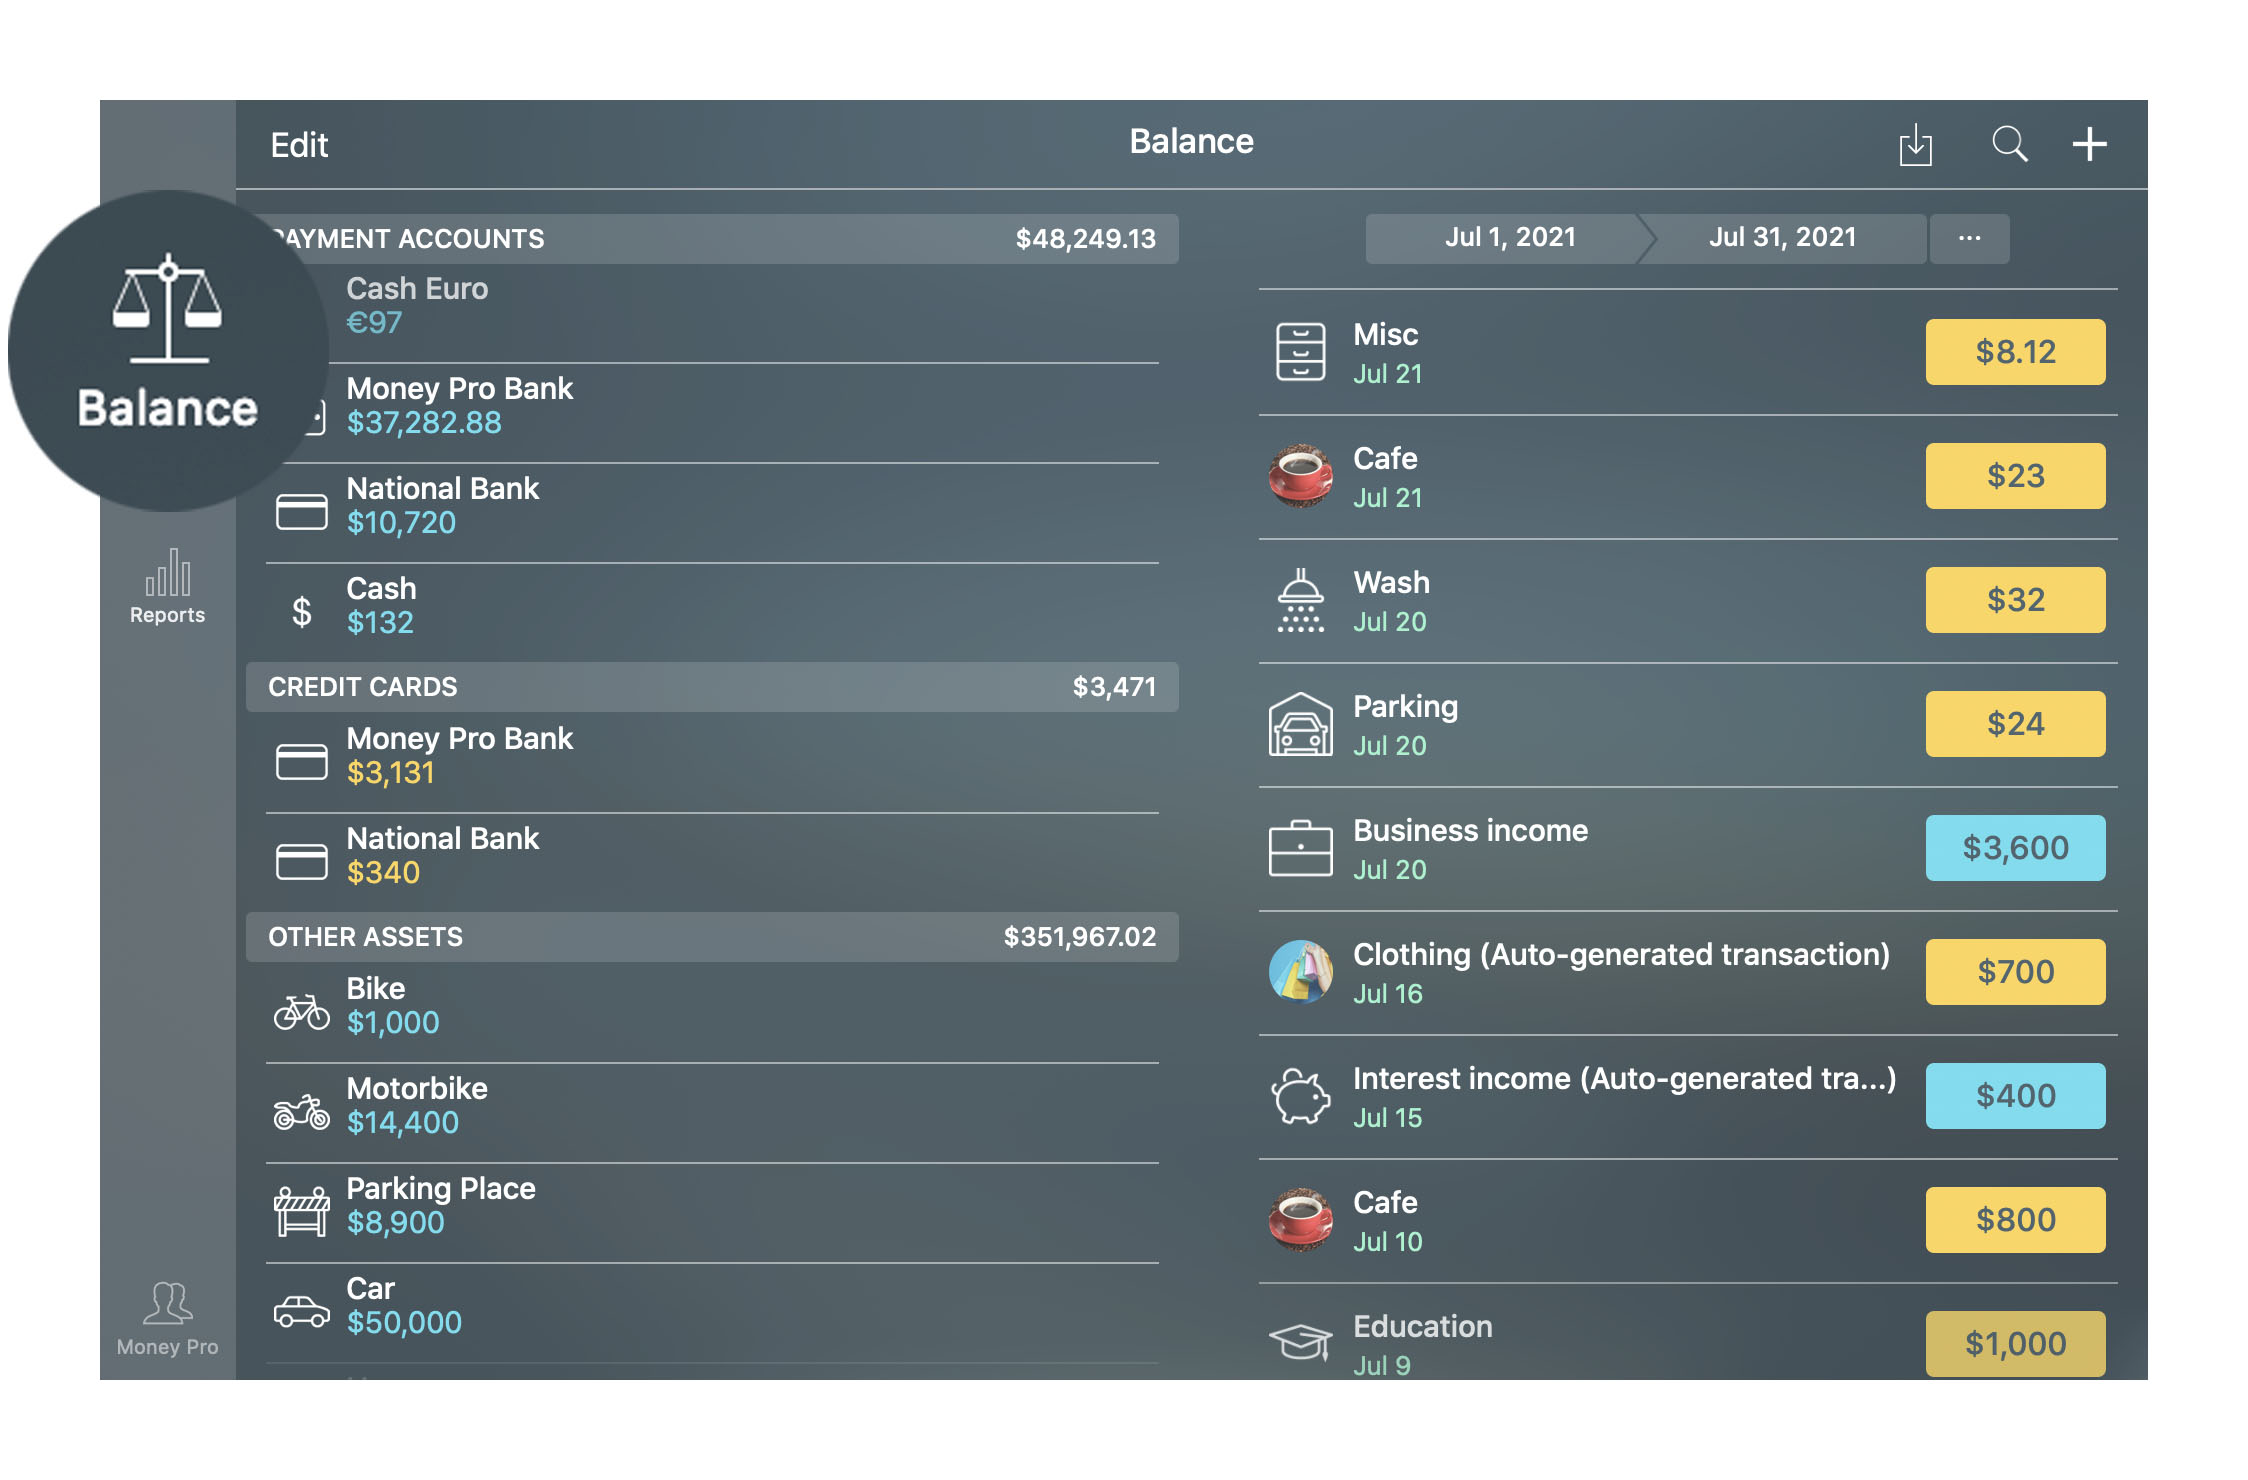
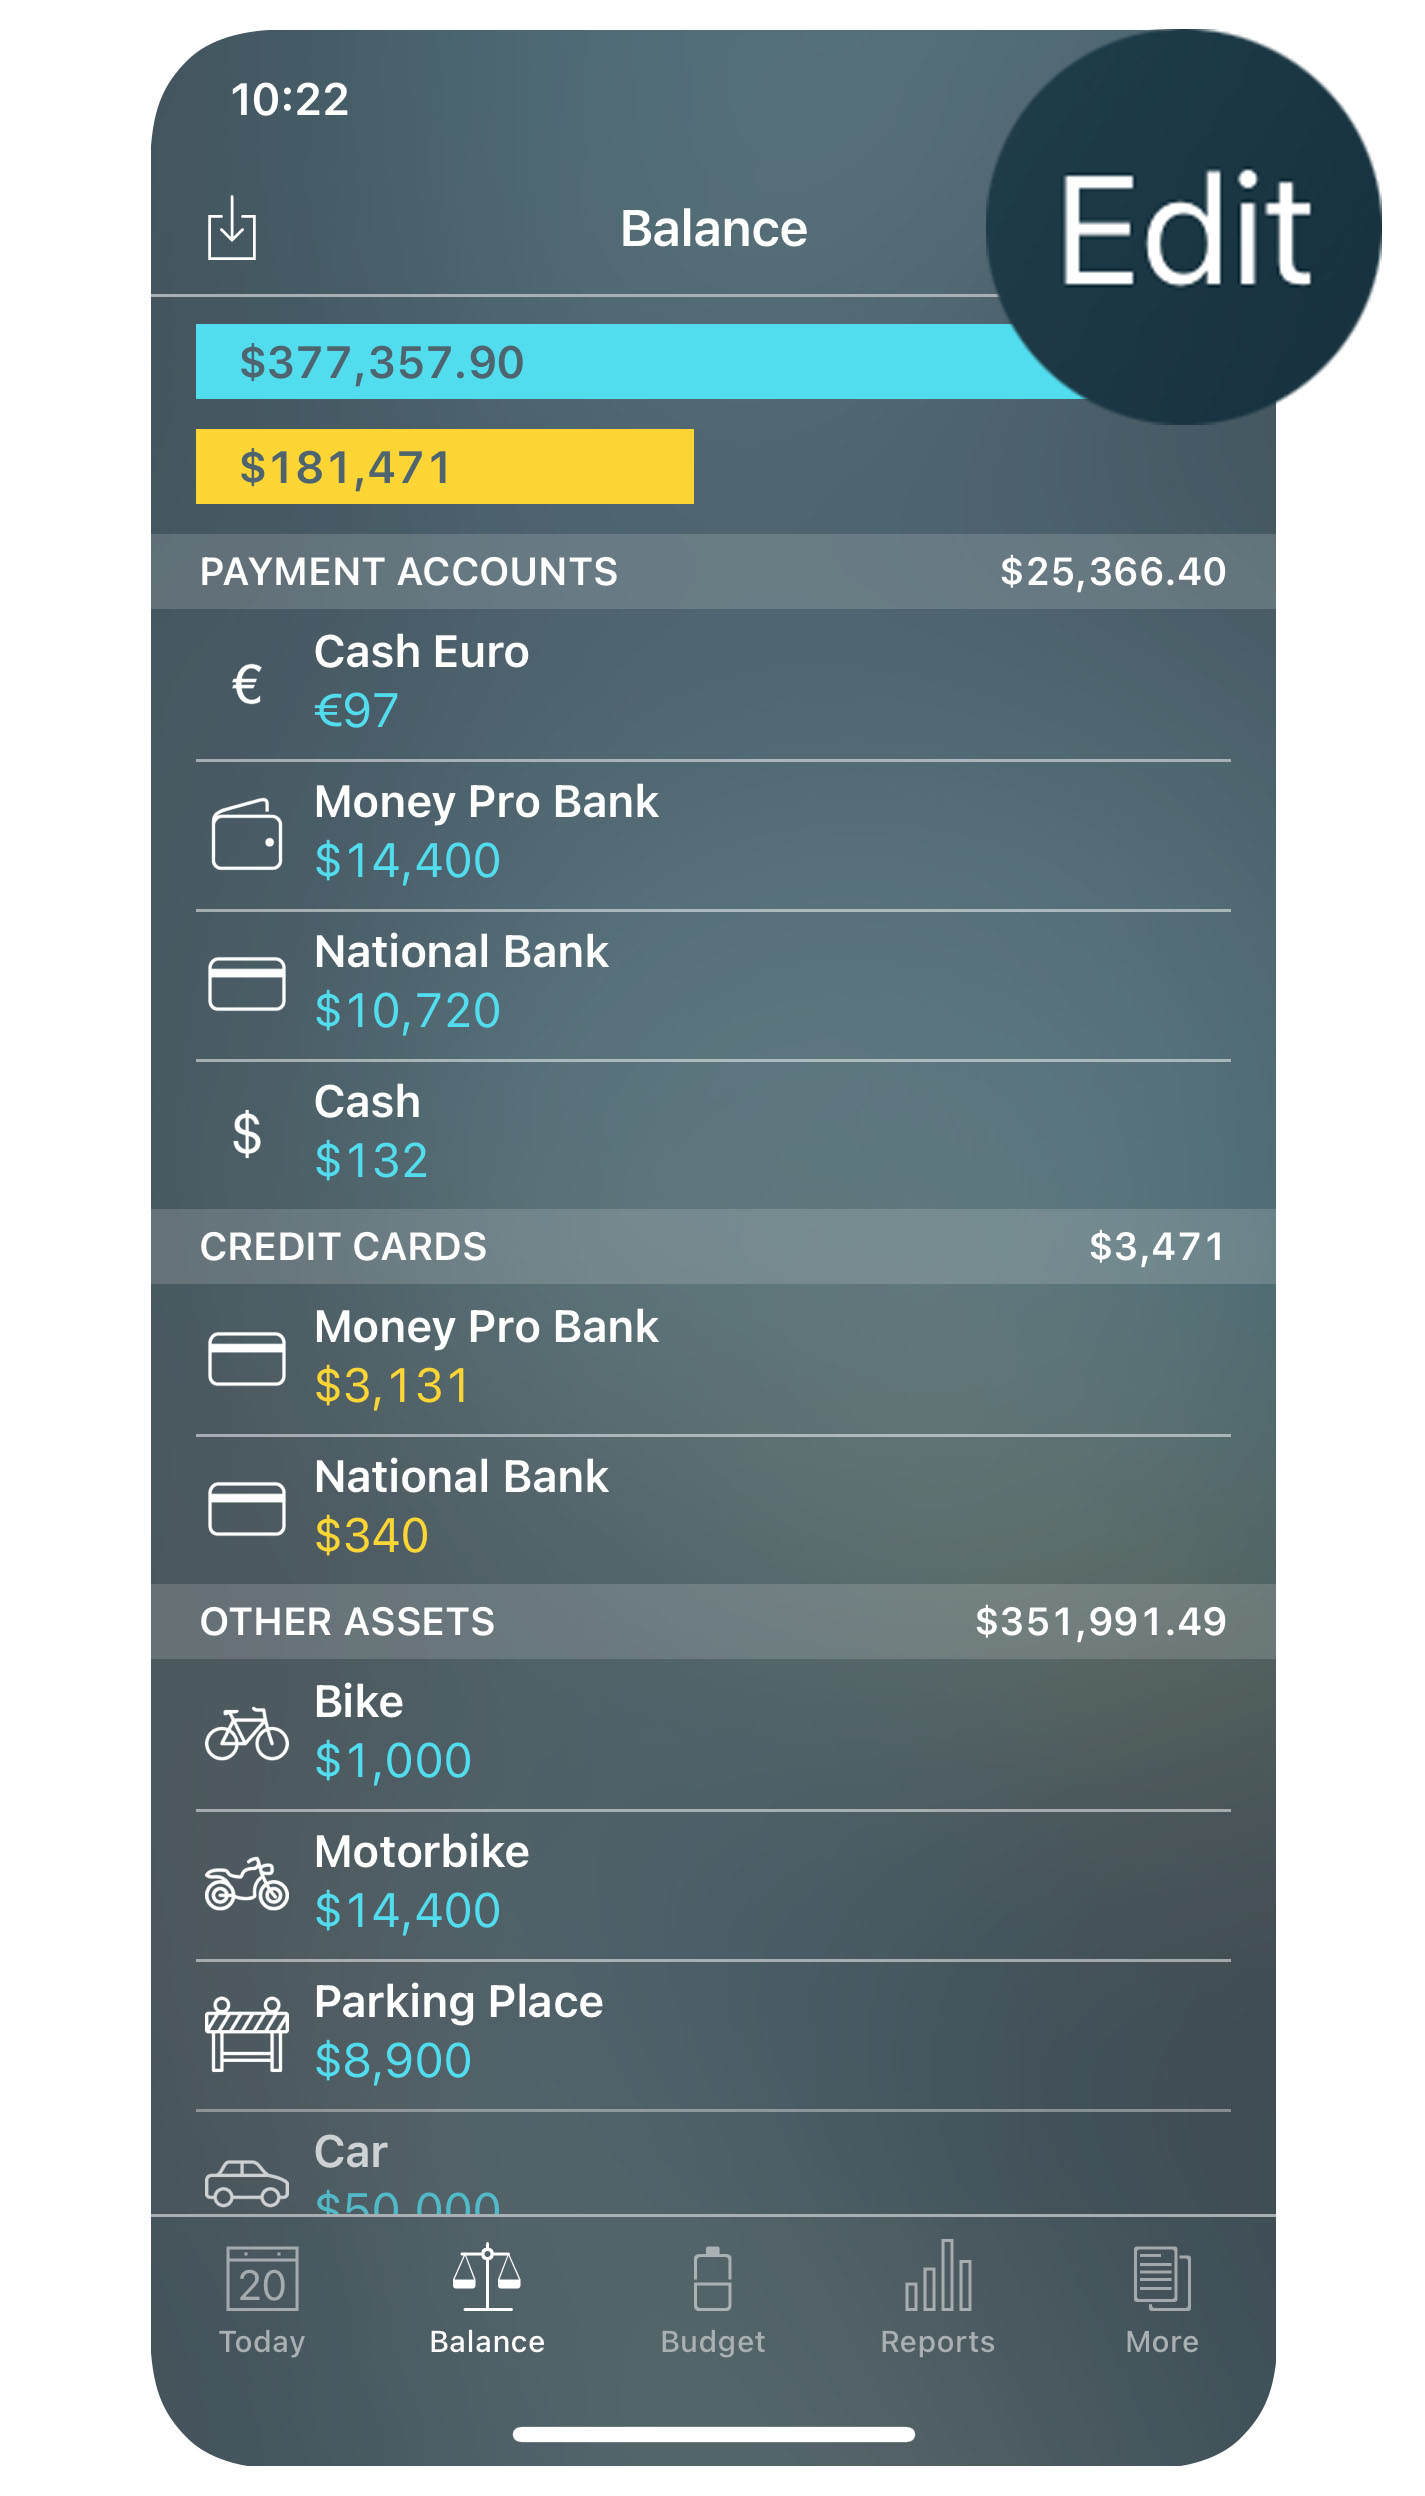
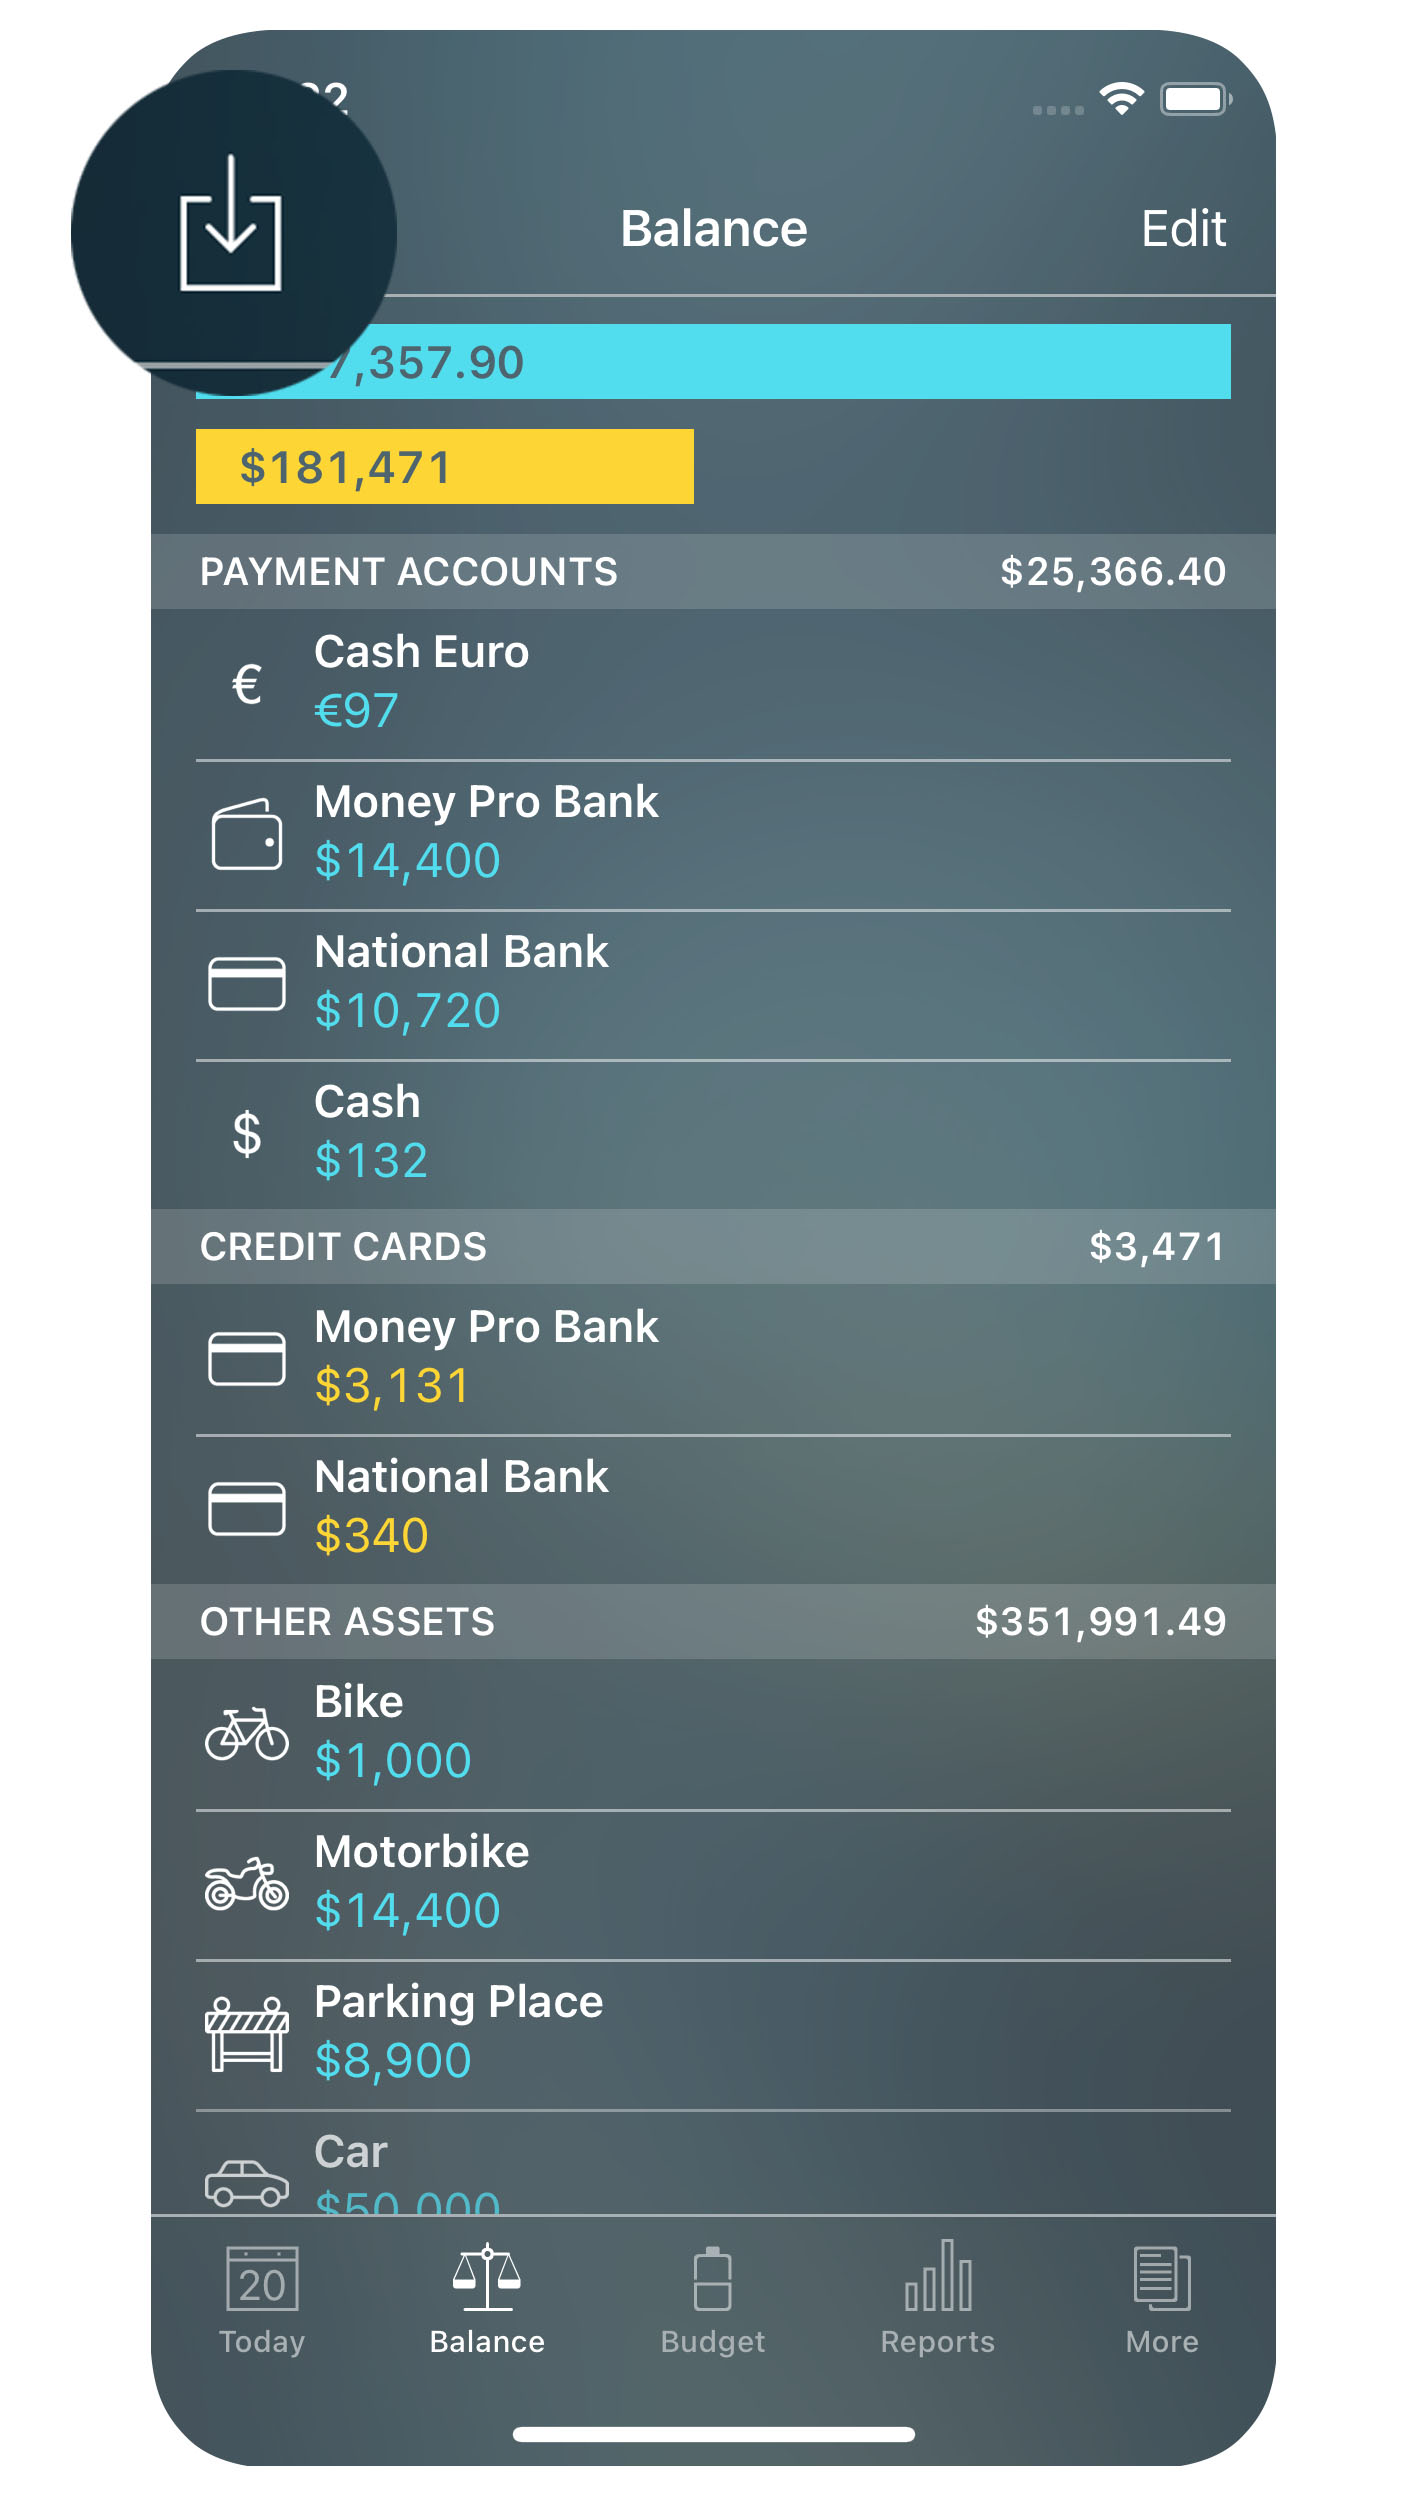
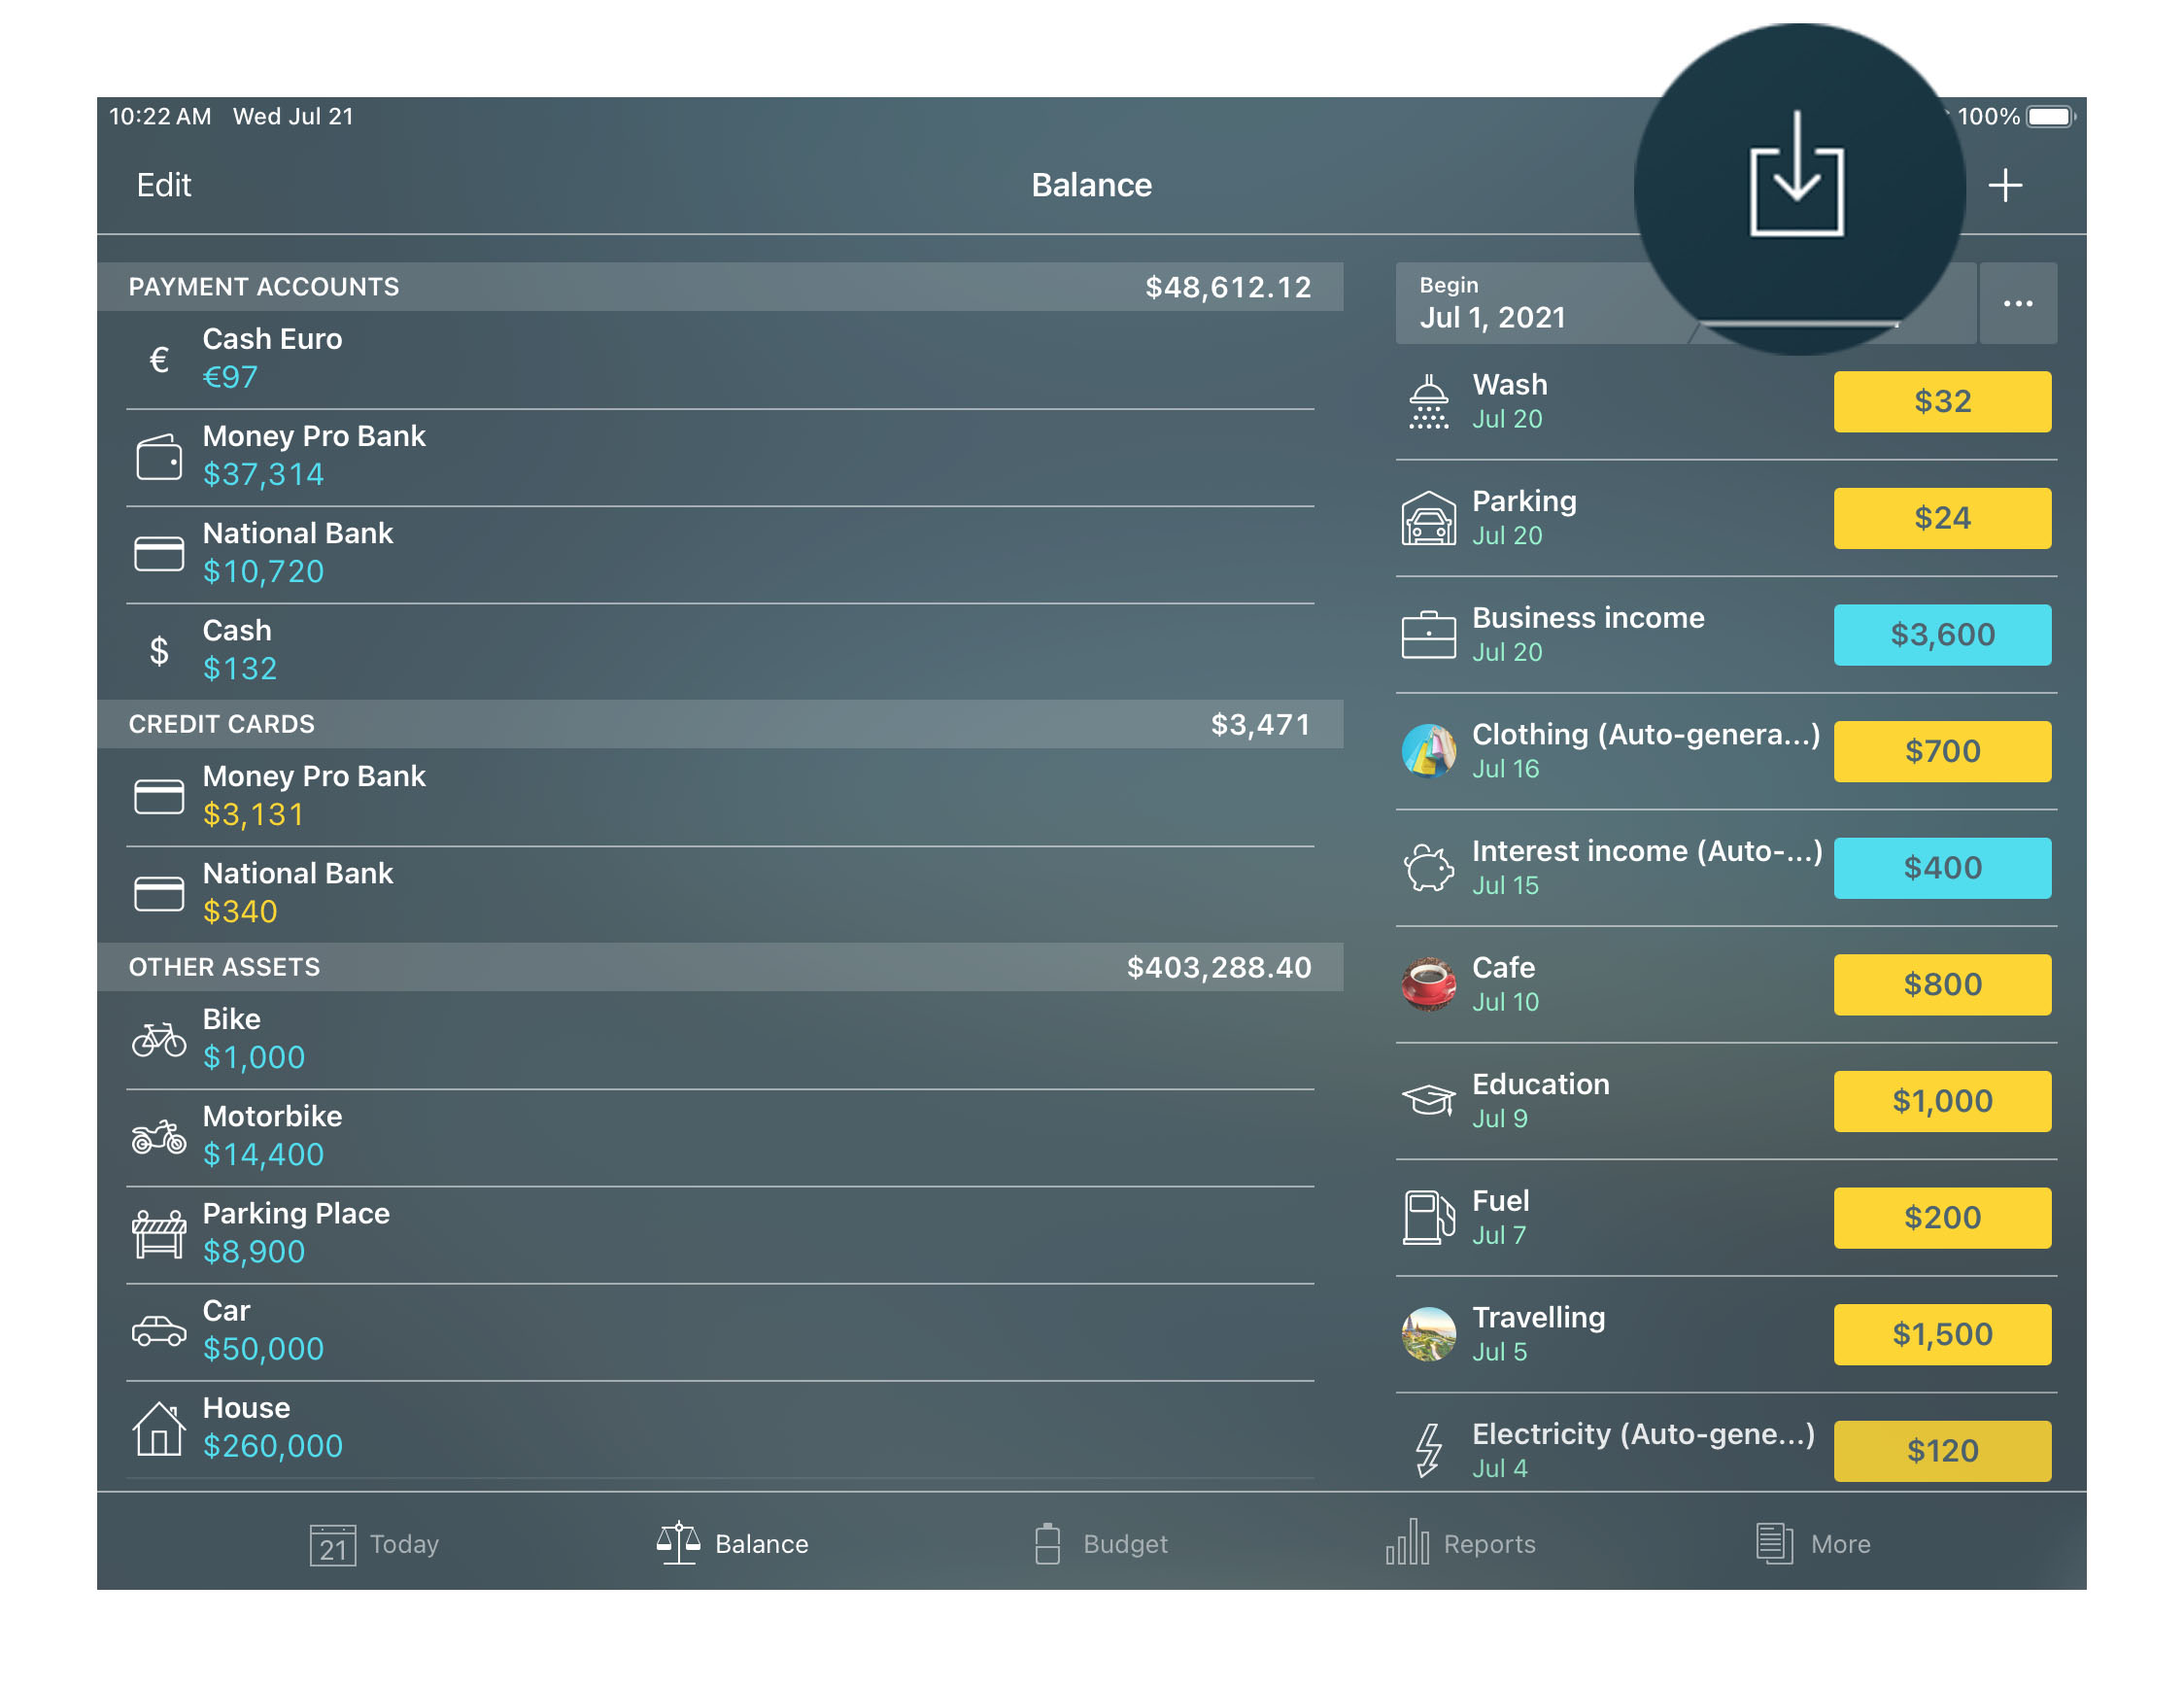
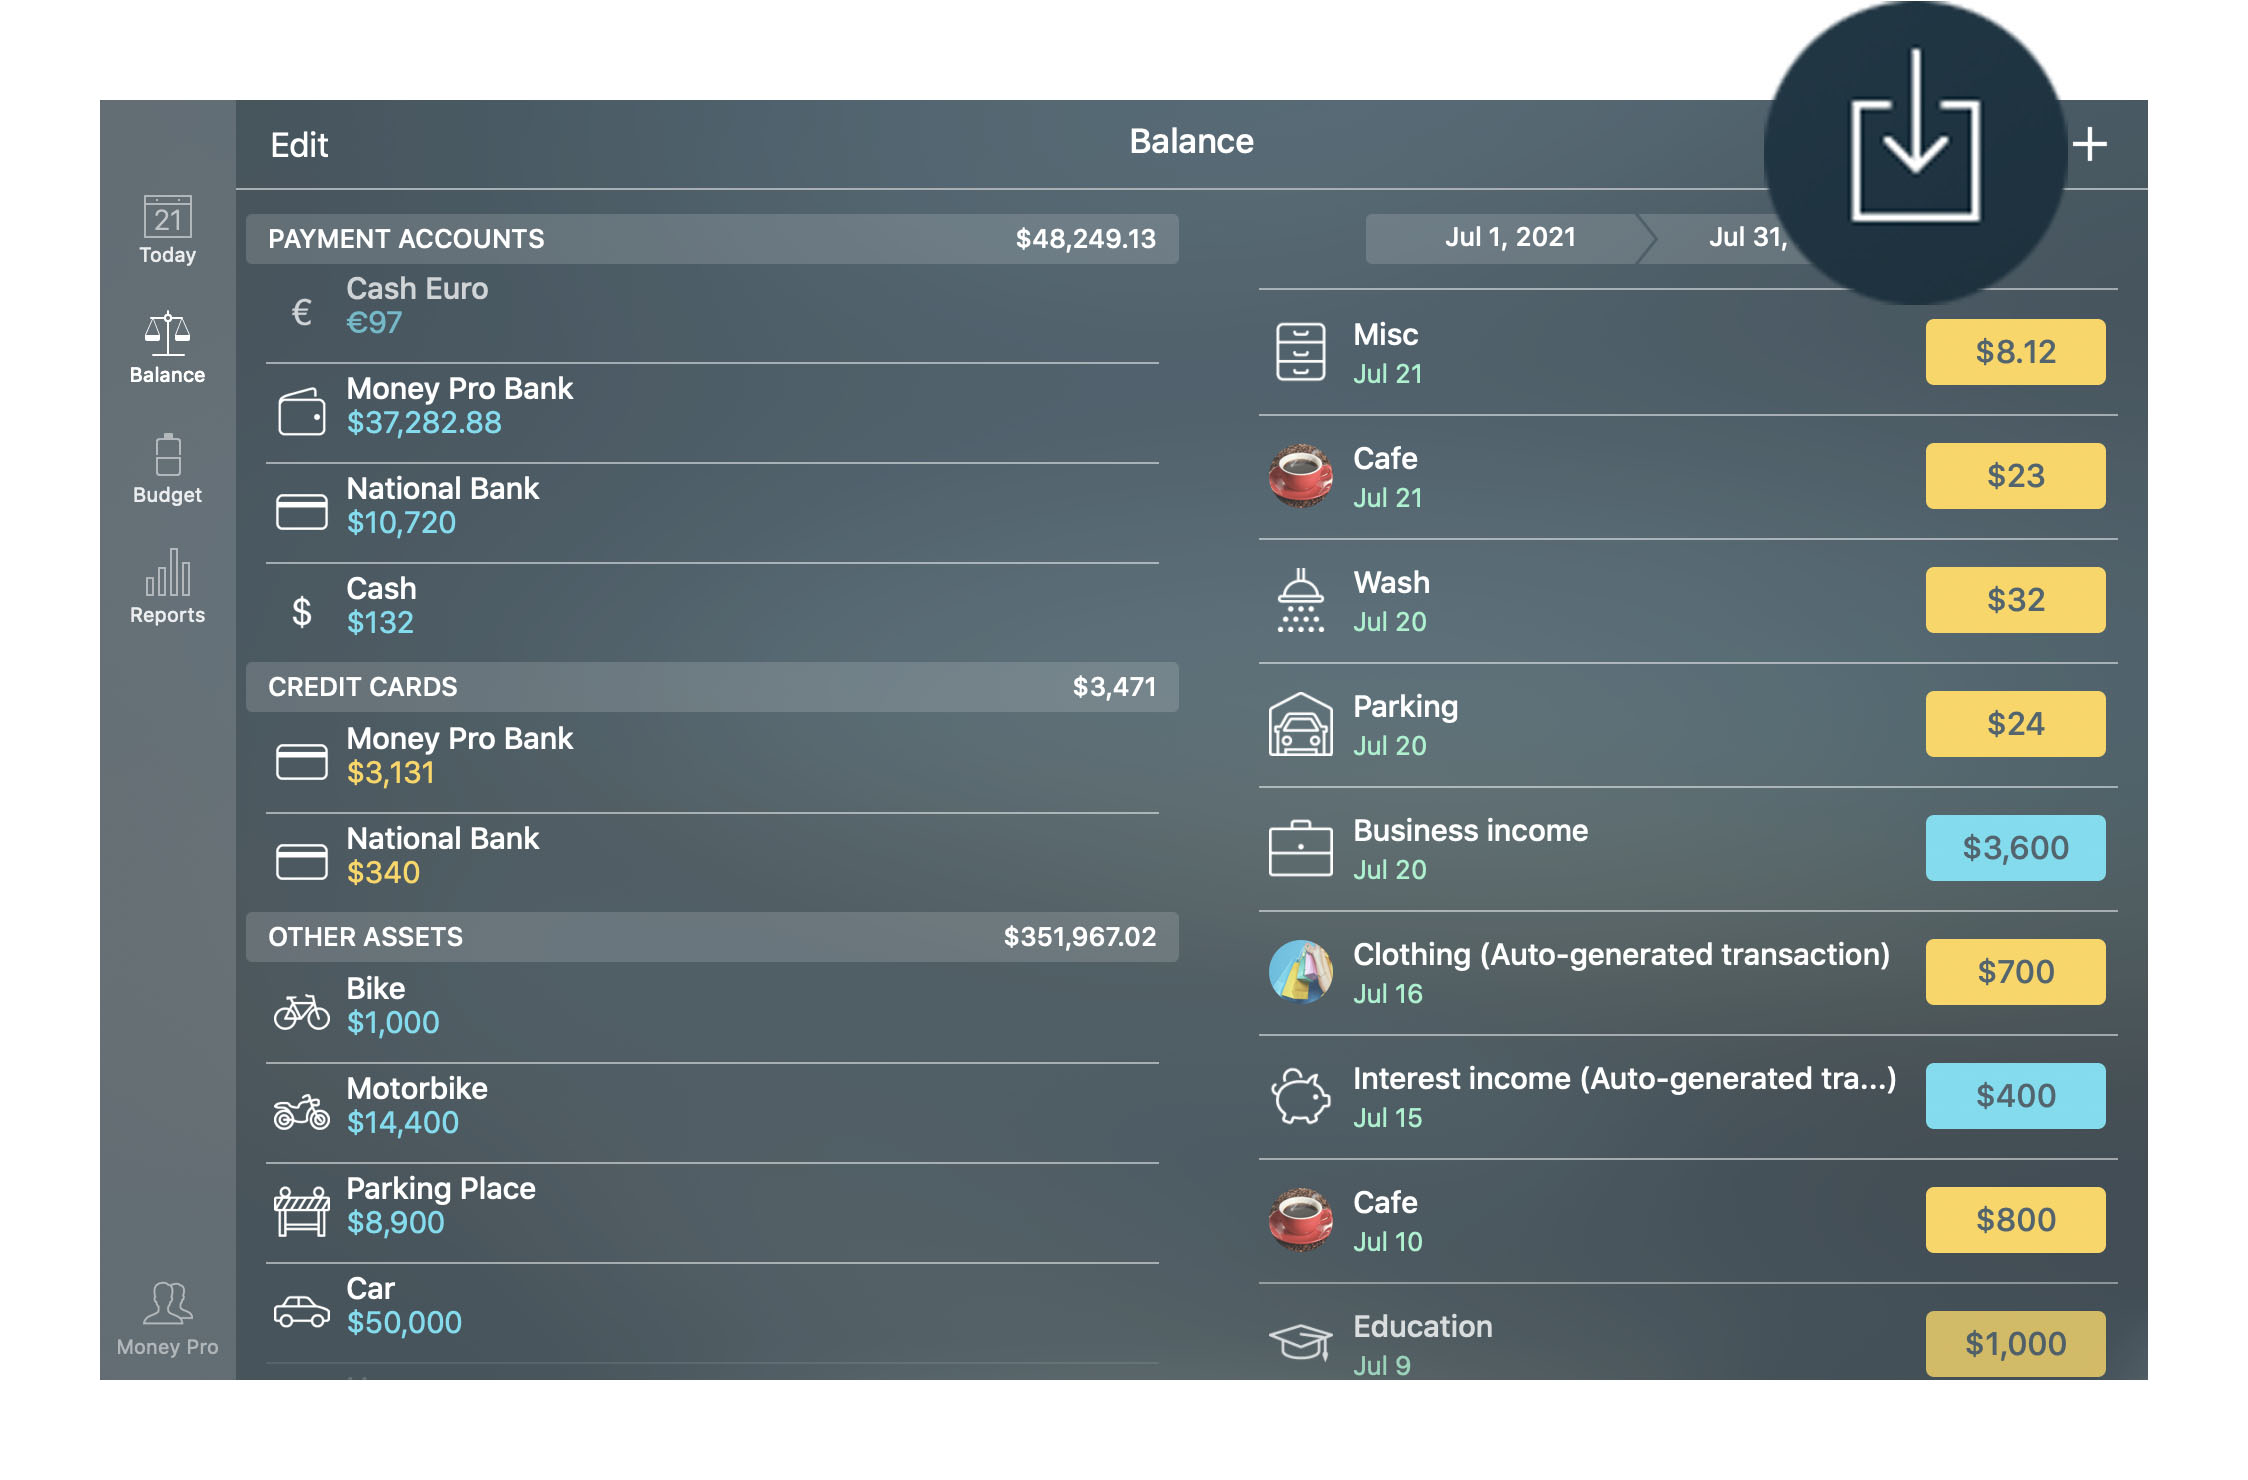
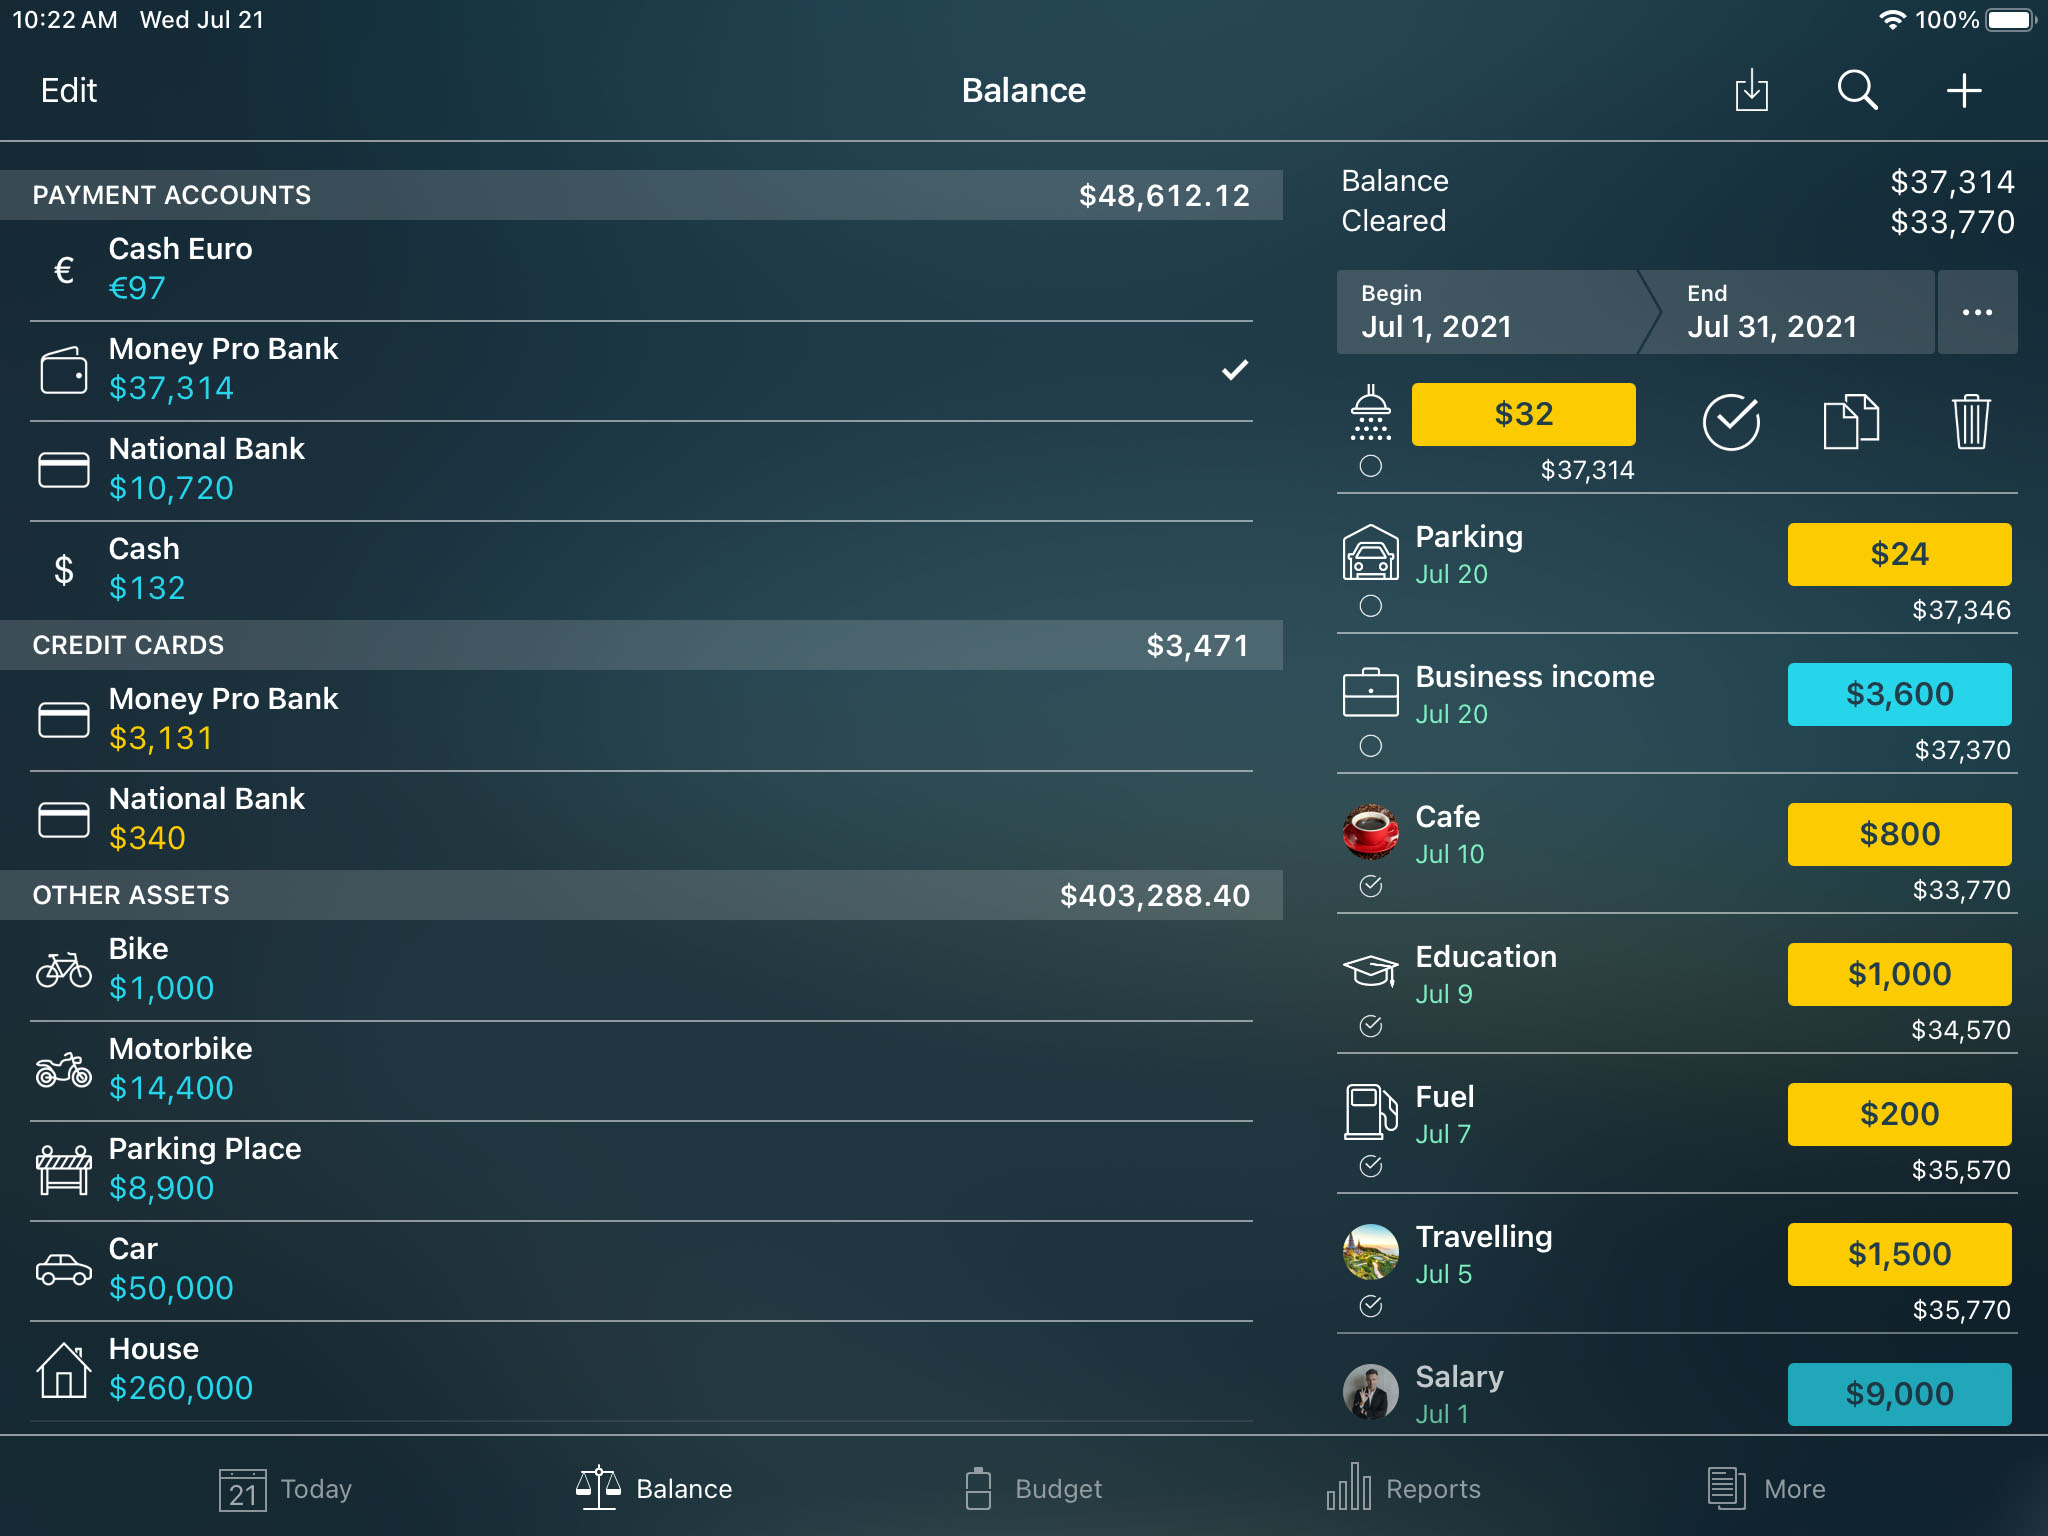
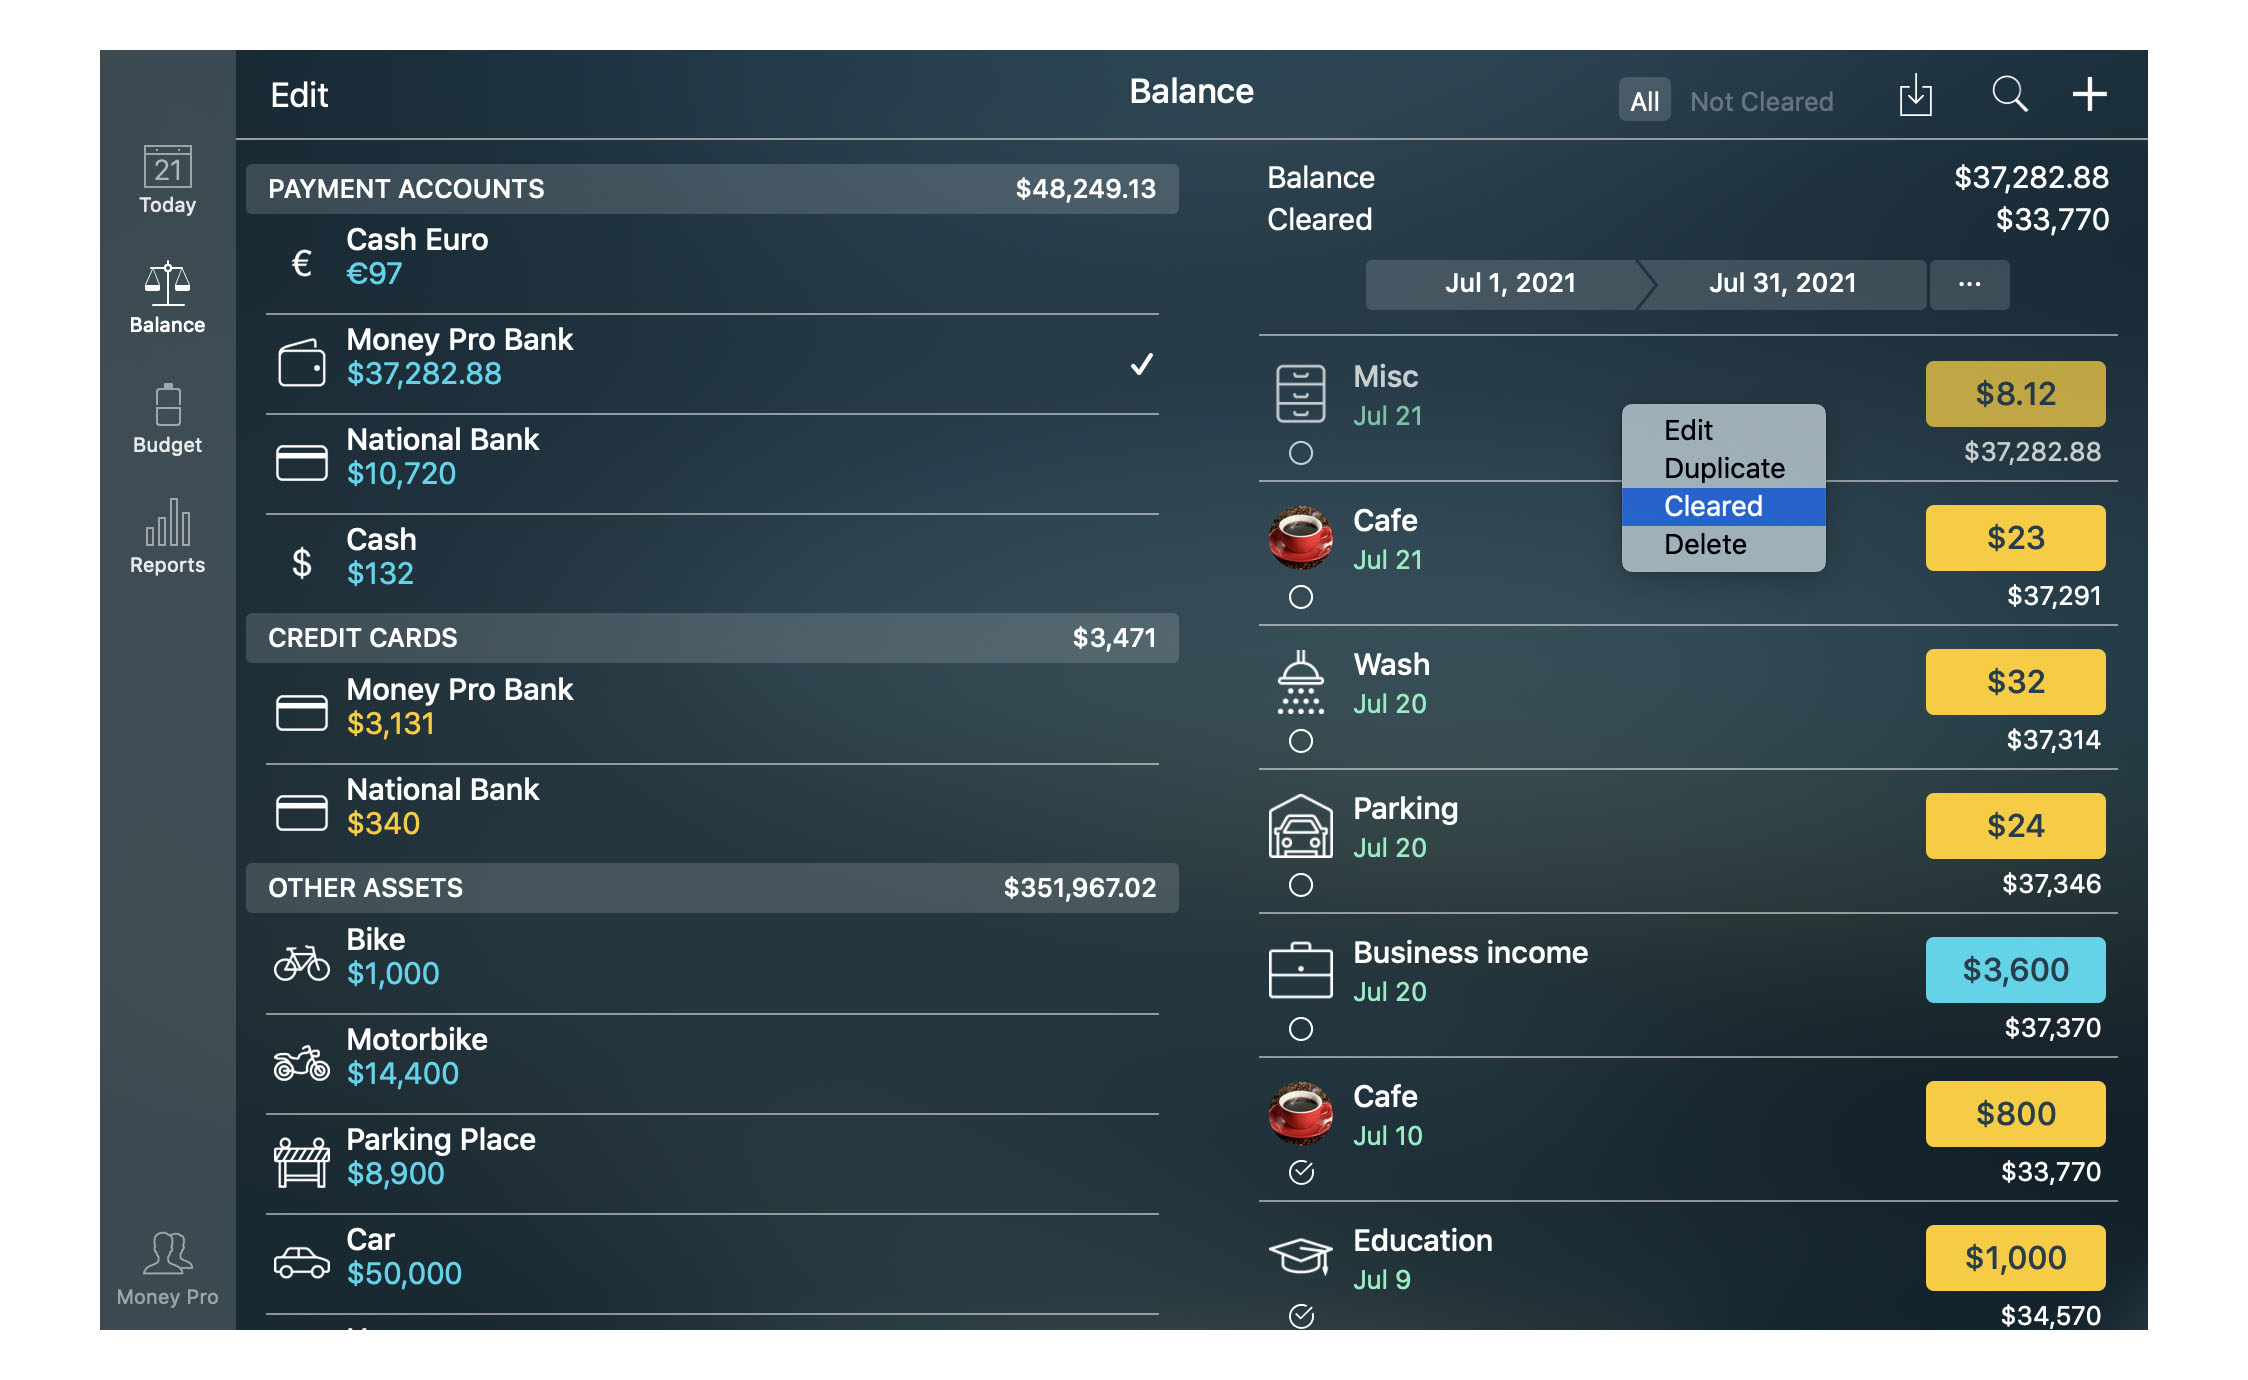
The first thing you do with the app, you fill in the information for your Balance Sheet (Balance tab). A balance sheet is a type of personal financial statement. It provides an overall snapshot of your wealth at a specific period in time. It is a summary of your Assets (what you own) and your Liabilities (what you owe). Yellow color means debt. Blue color means money.
Assets and Liabilities
Even though you might find a more distinct classification of assets, there are two types of assets suggested in this app:
- payment accounts: accounts used for payments such as cash, bank account, debit cards, Internet accounts, etc.;
- other assets: all other assets of great value - house, vehicle, shares, etc.
Liabilities are also divided into two parts:
- credit cards: your credit cards only;
- other liabilities: loans, debts, mortgage, etc.
Credit card accounts show your current debt to the bank. Income transactions assigned to credit card accounts decrease the debt amount.
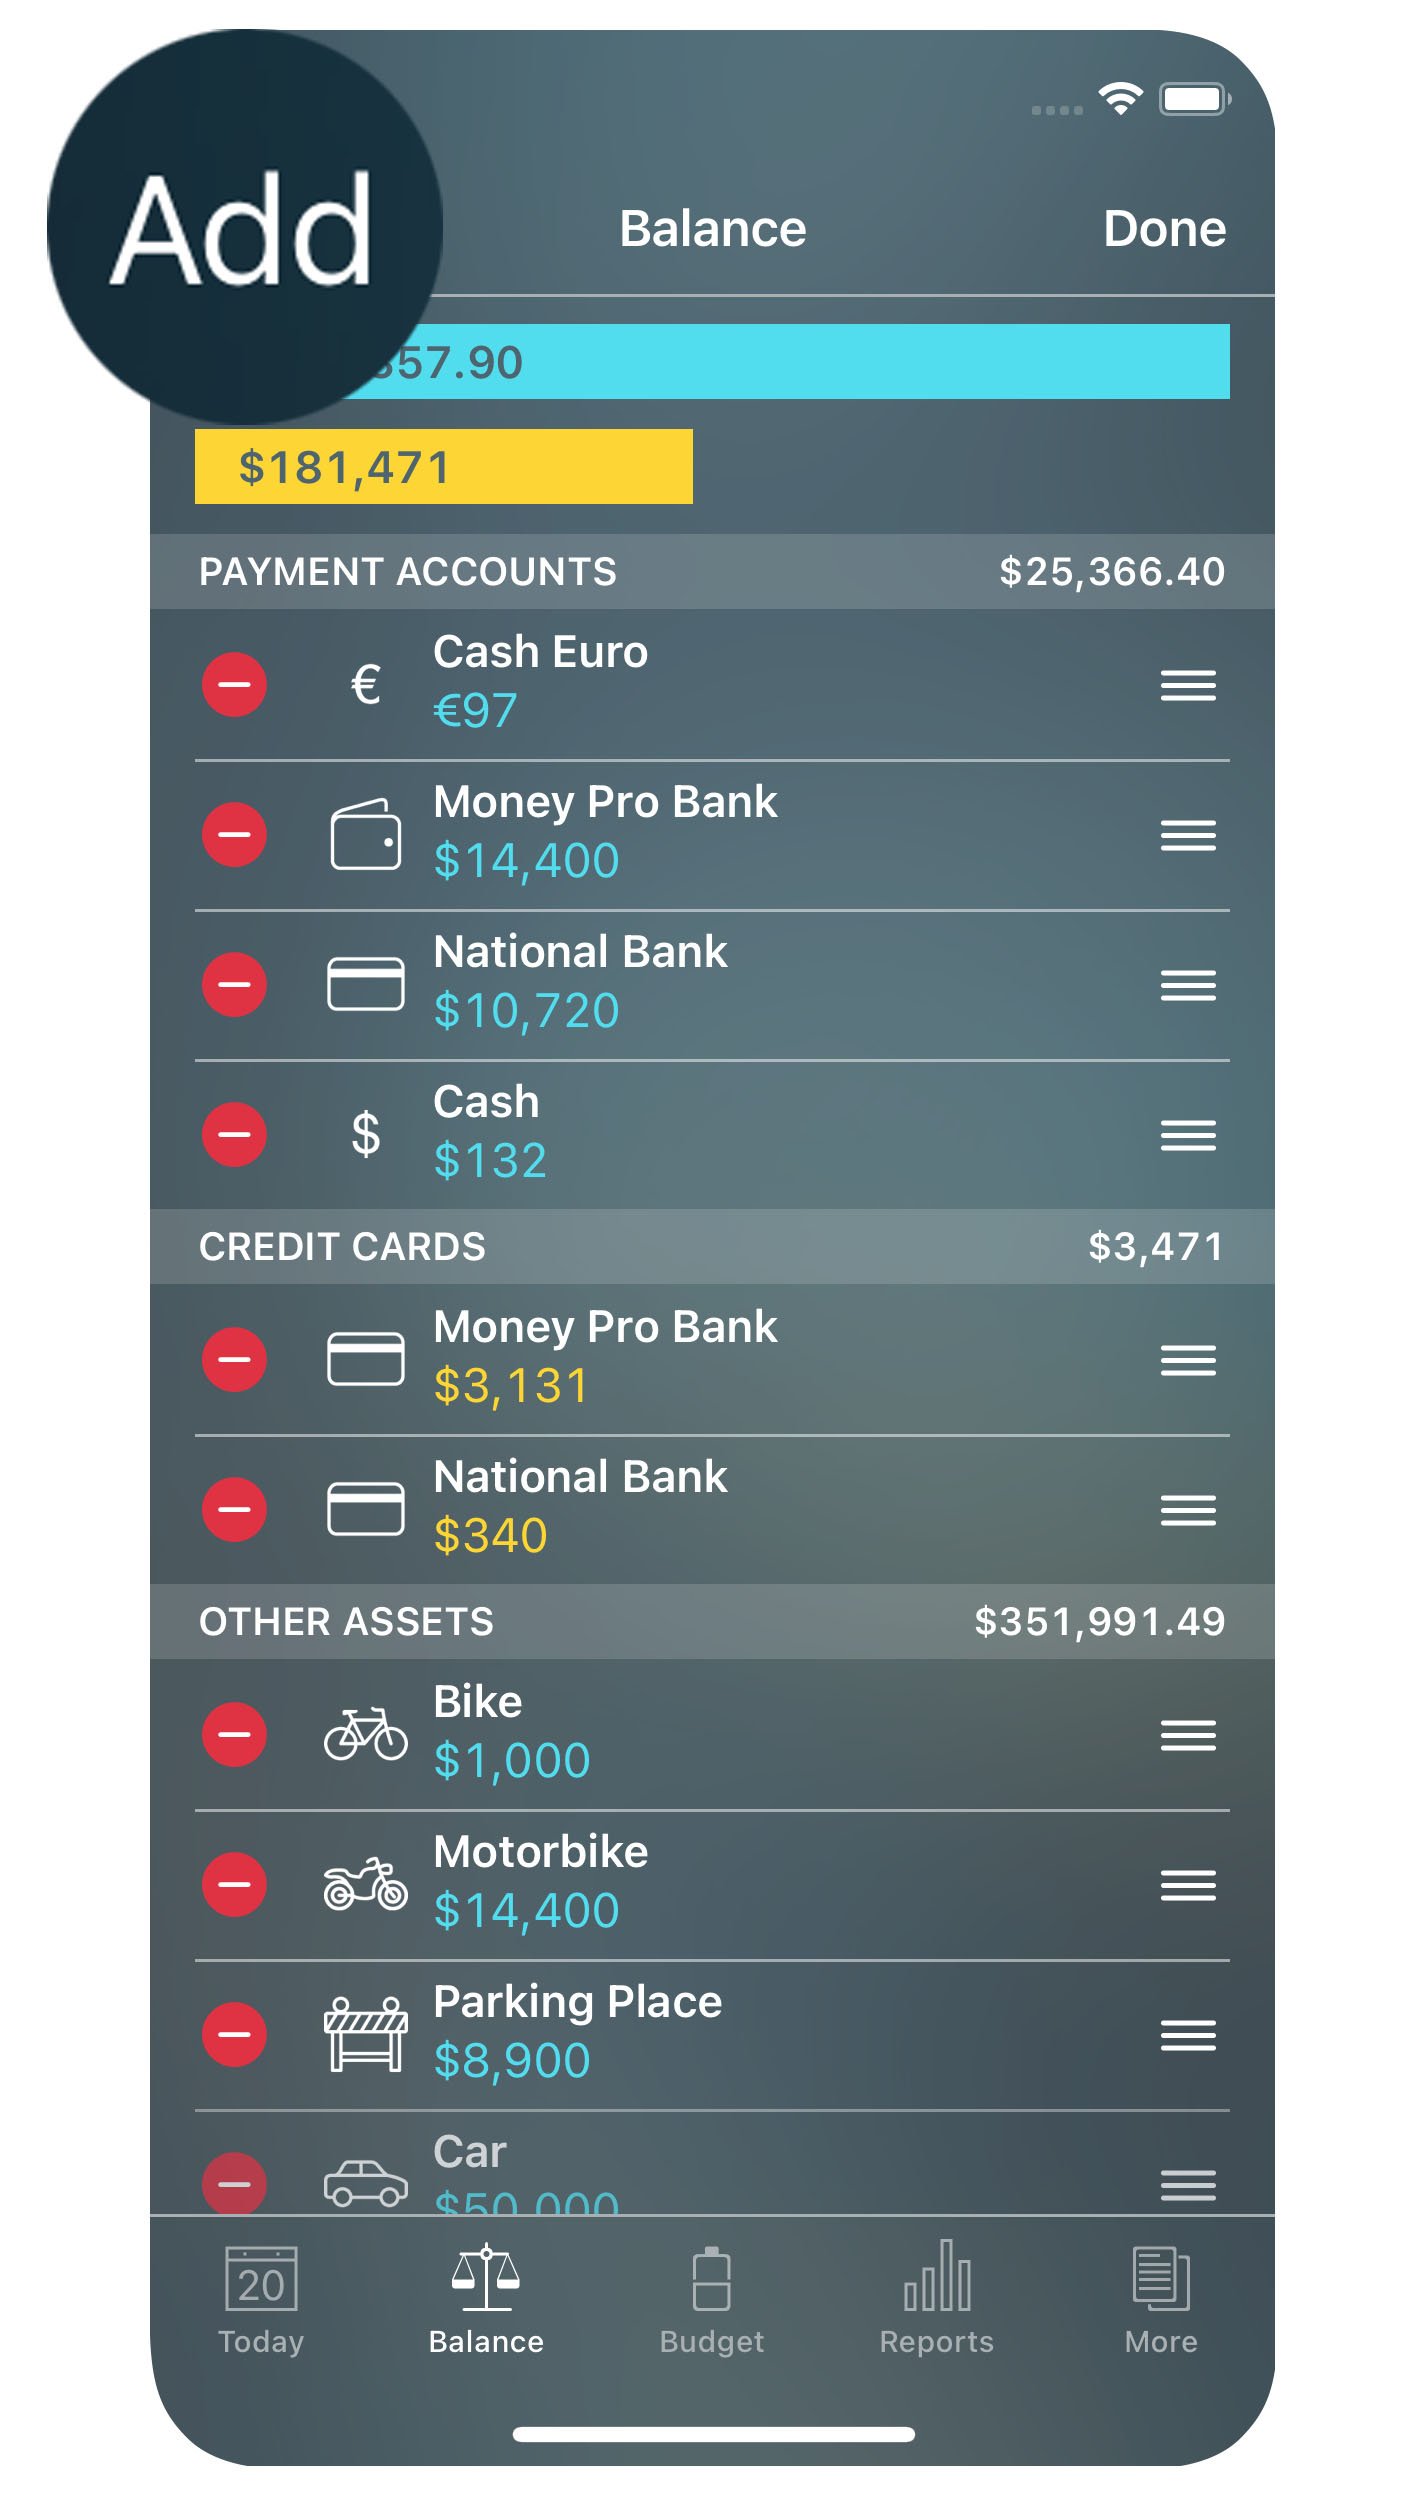
Adding accounts
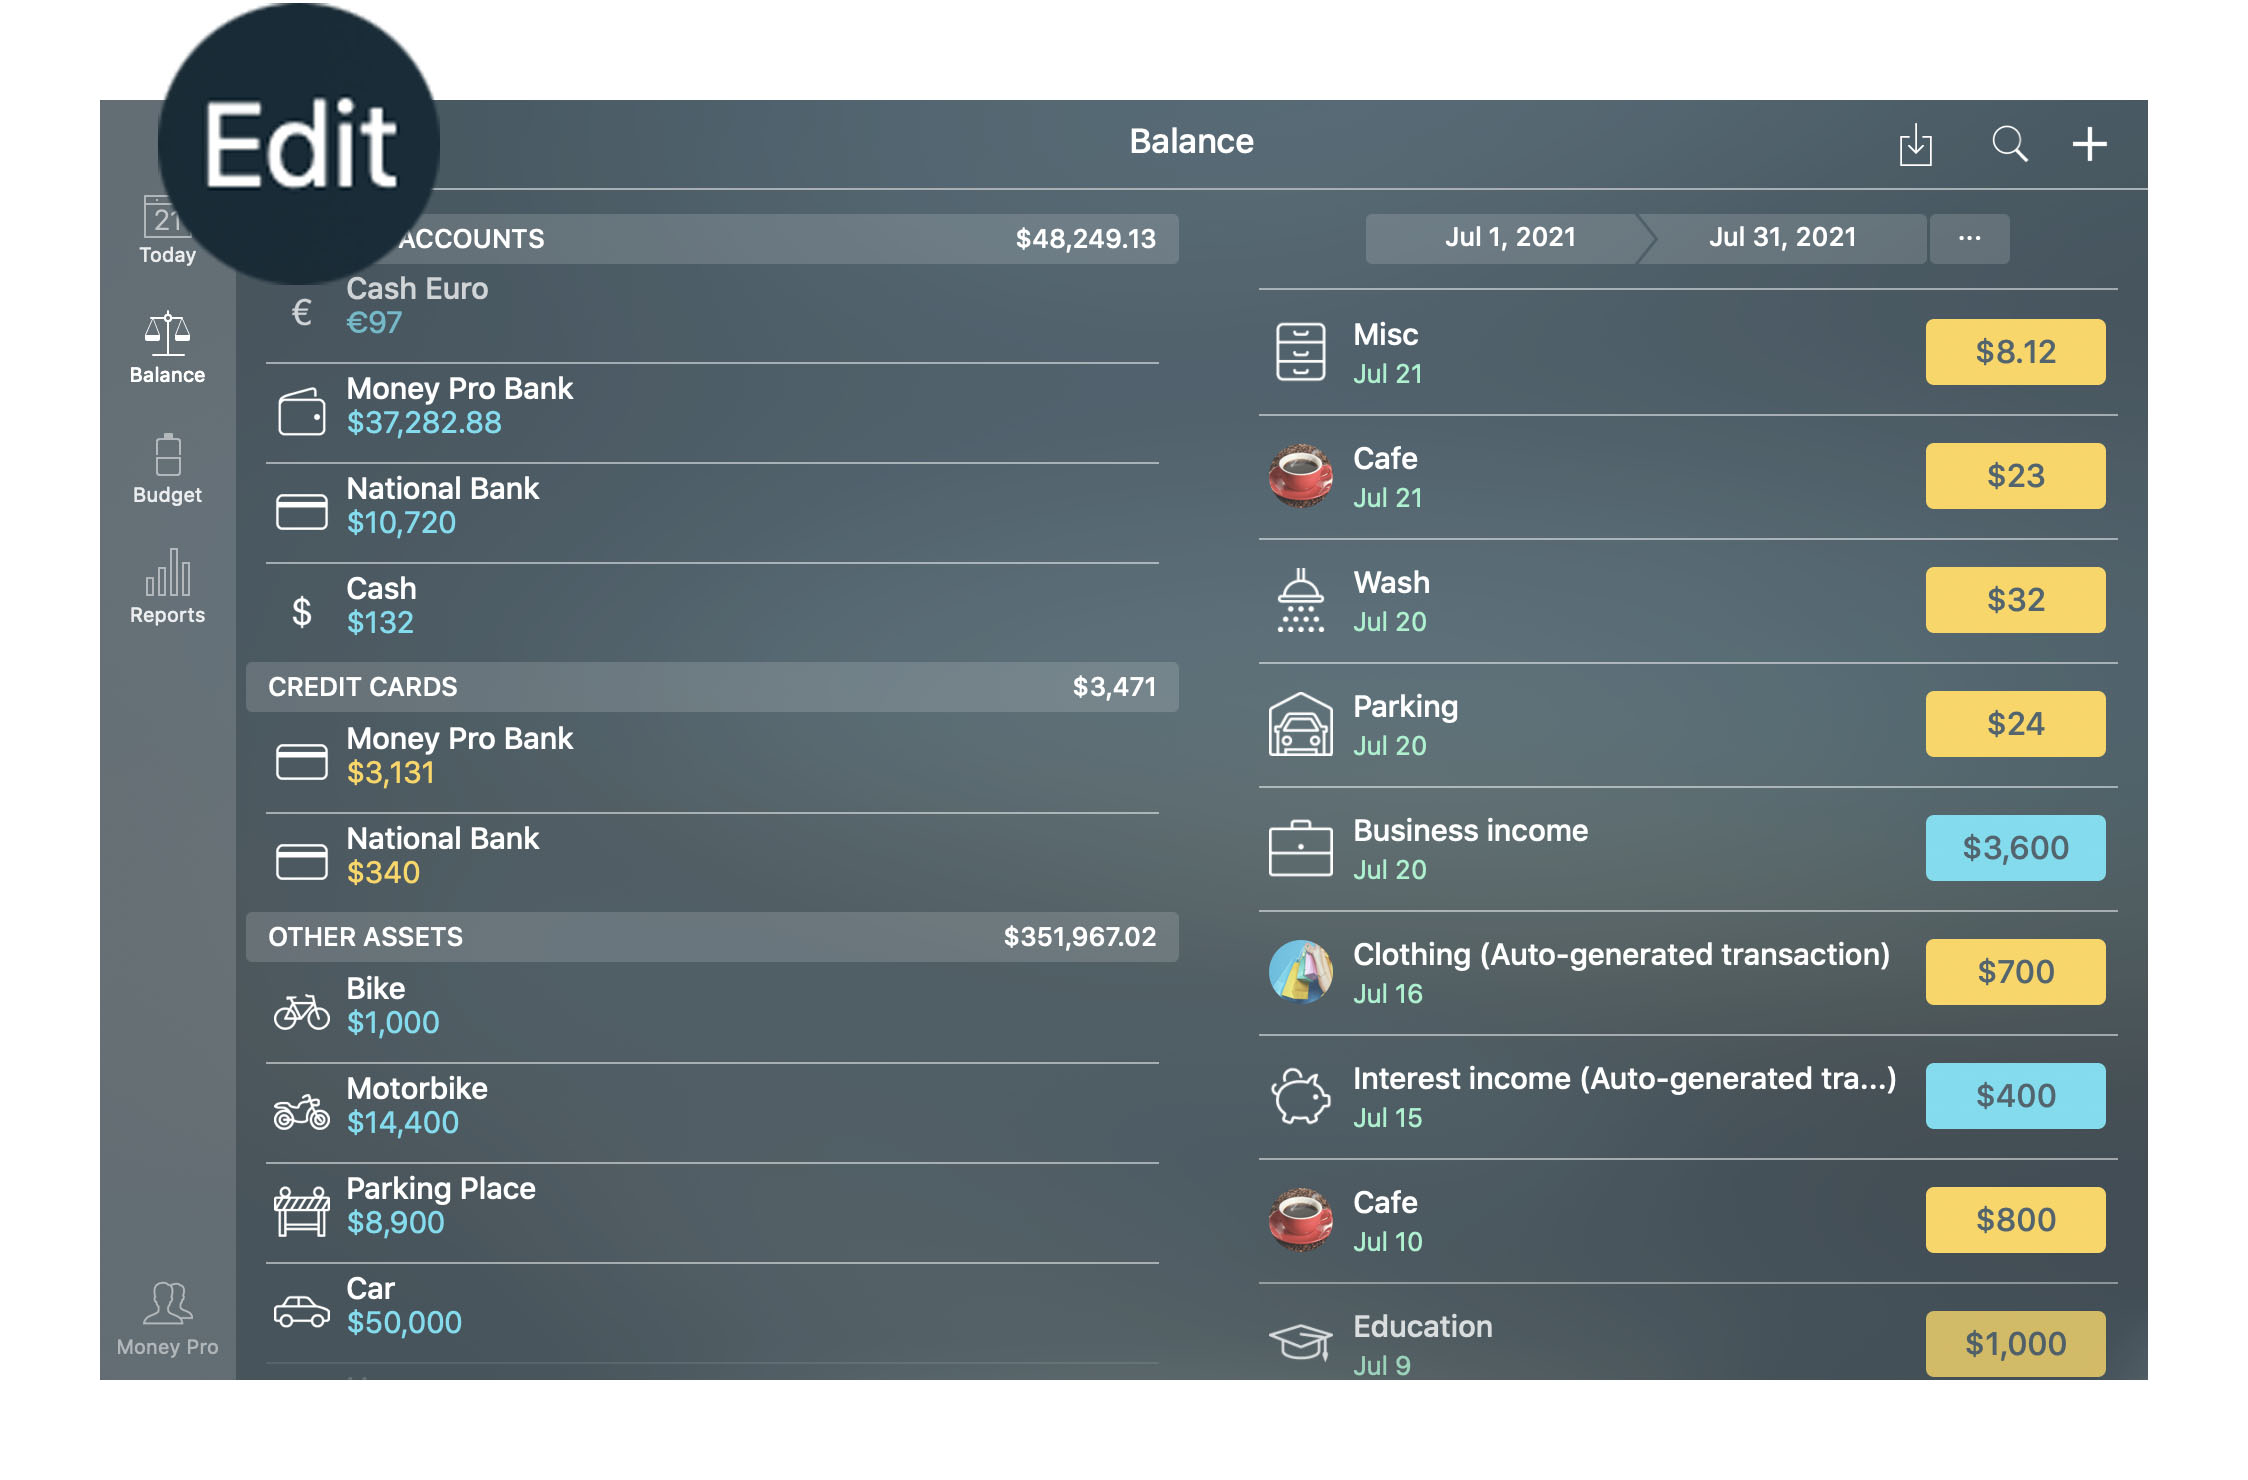
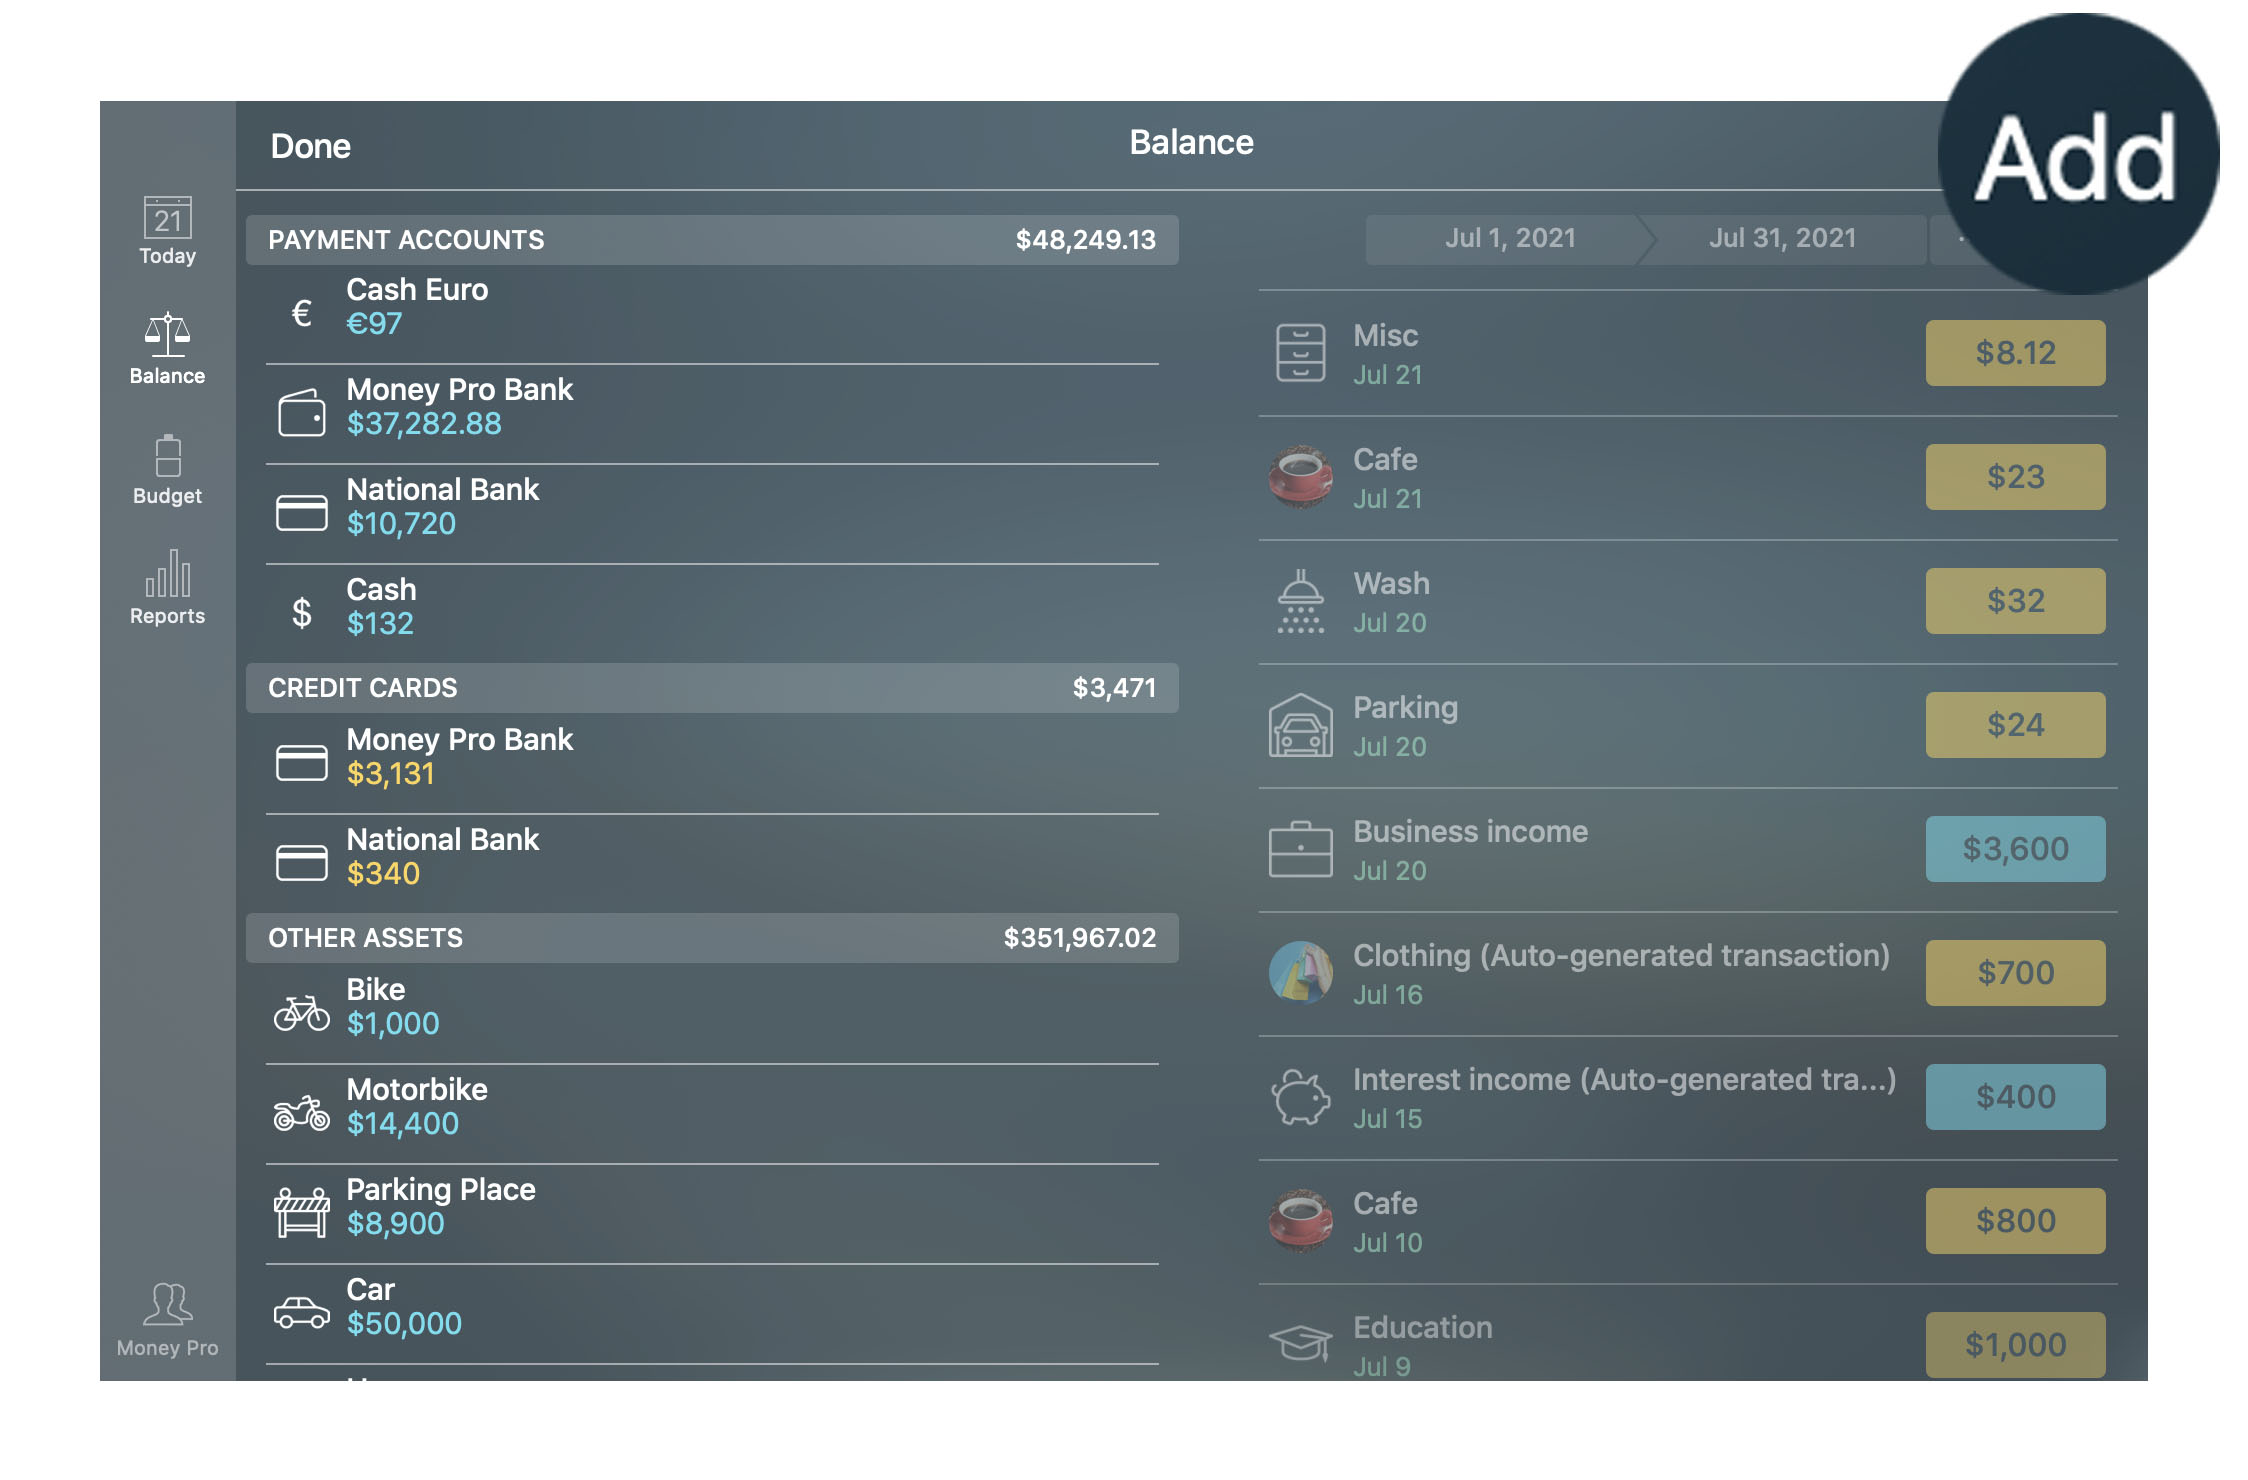
To add an account, tap/click “Edit” > “Add” and select the account type.
Enter the account details:
- Icon: choose an icon from the list of 1500 icons or add your image via Icon manager;
- Name: a short name to find it in the list easily;
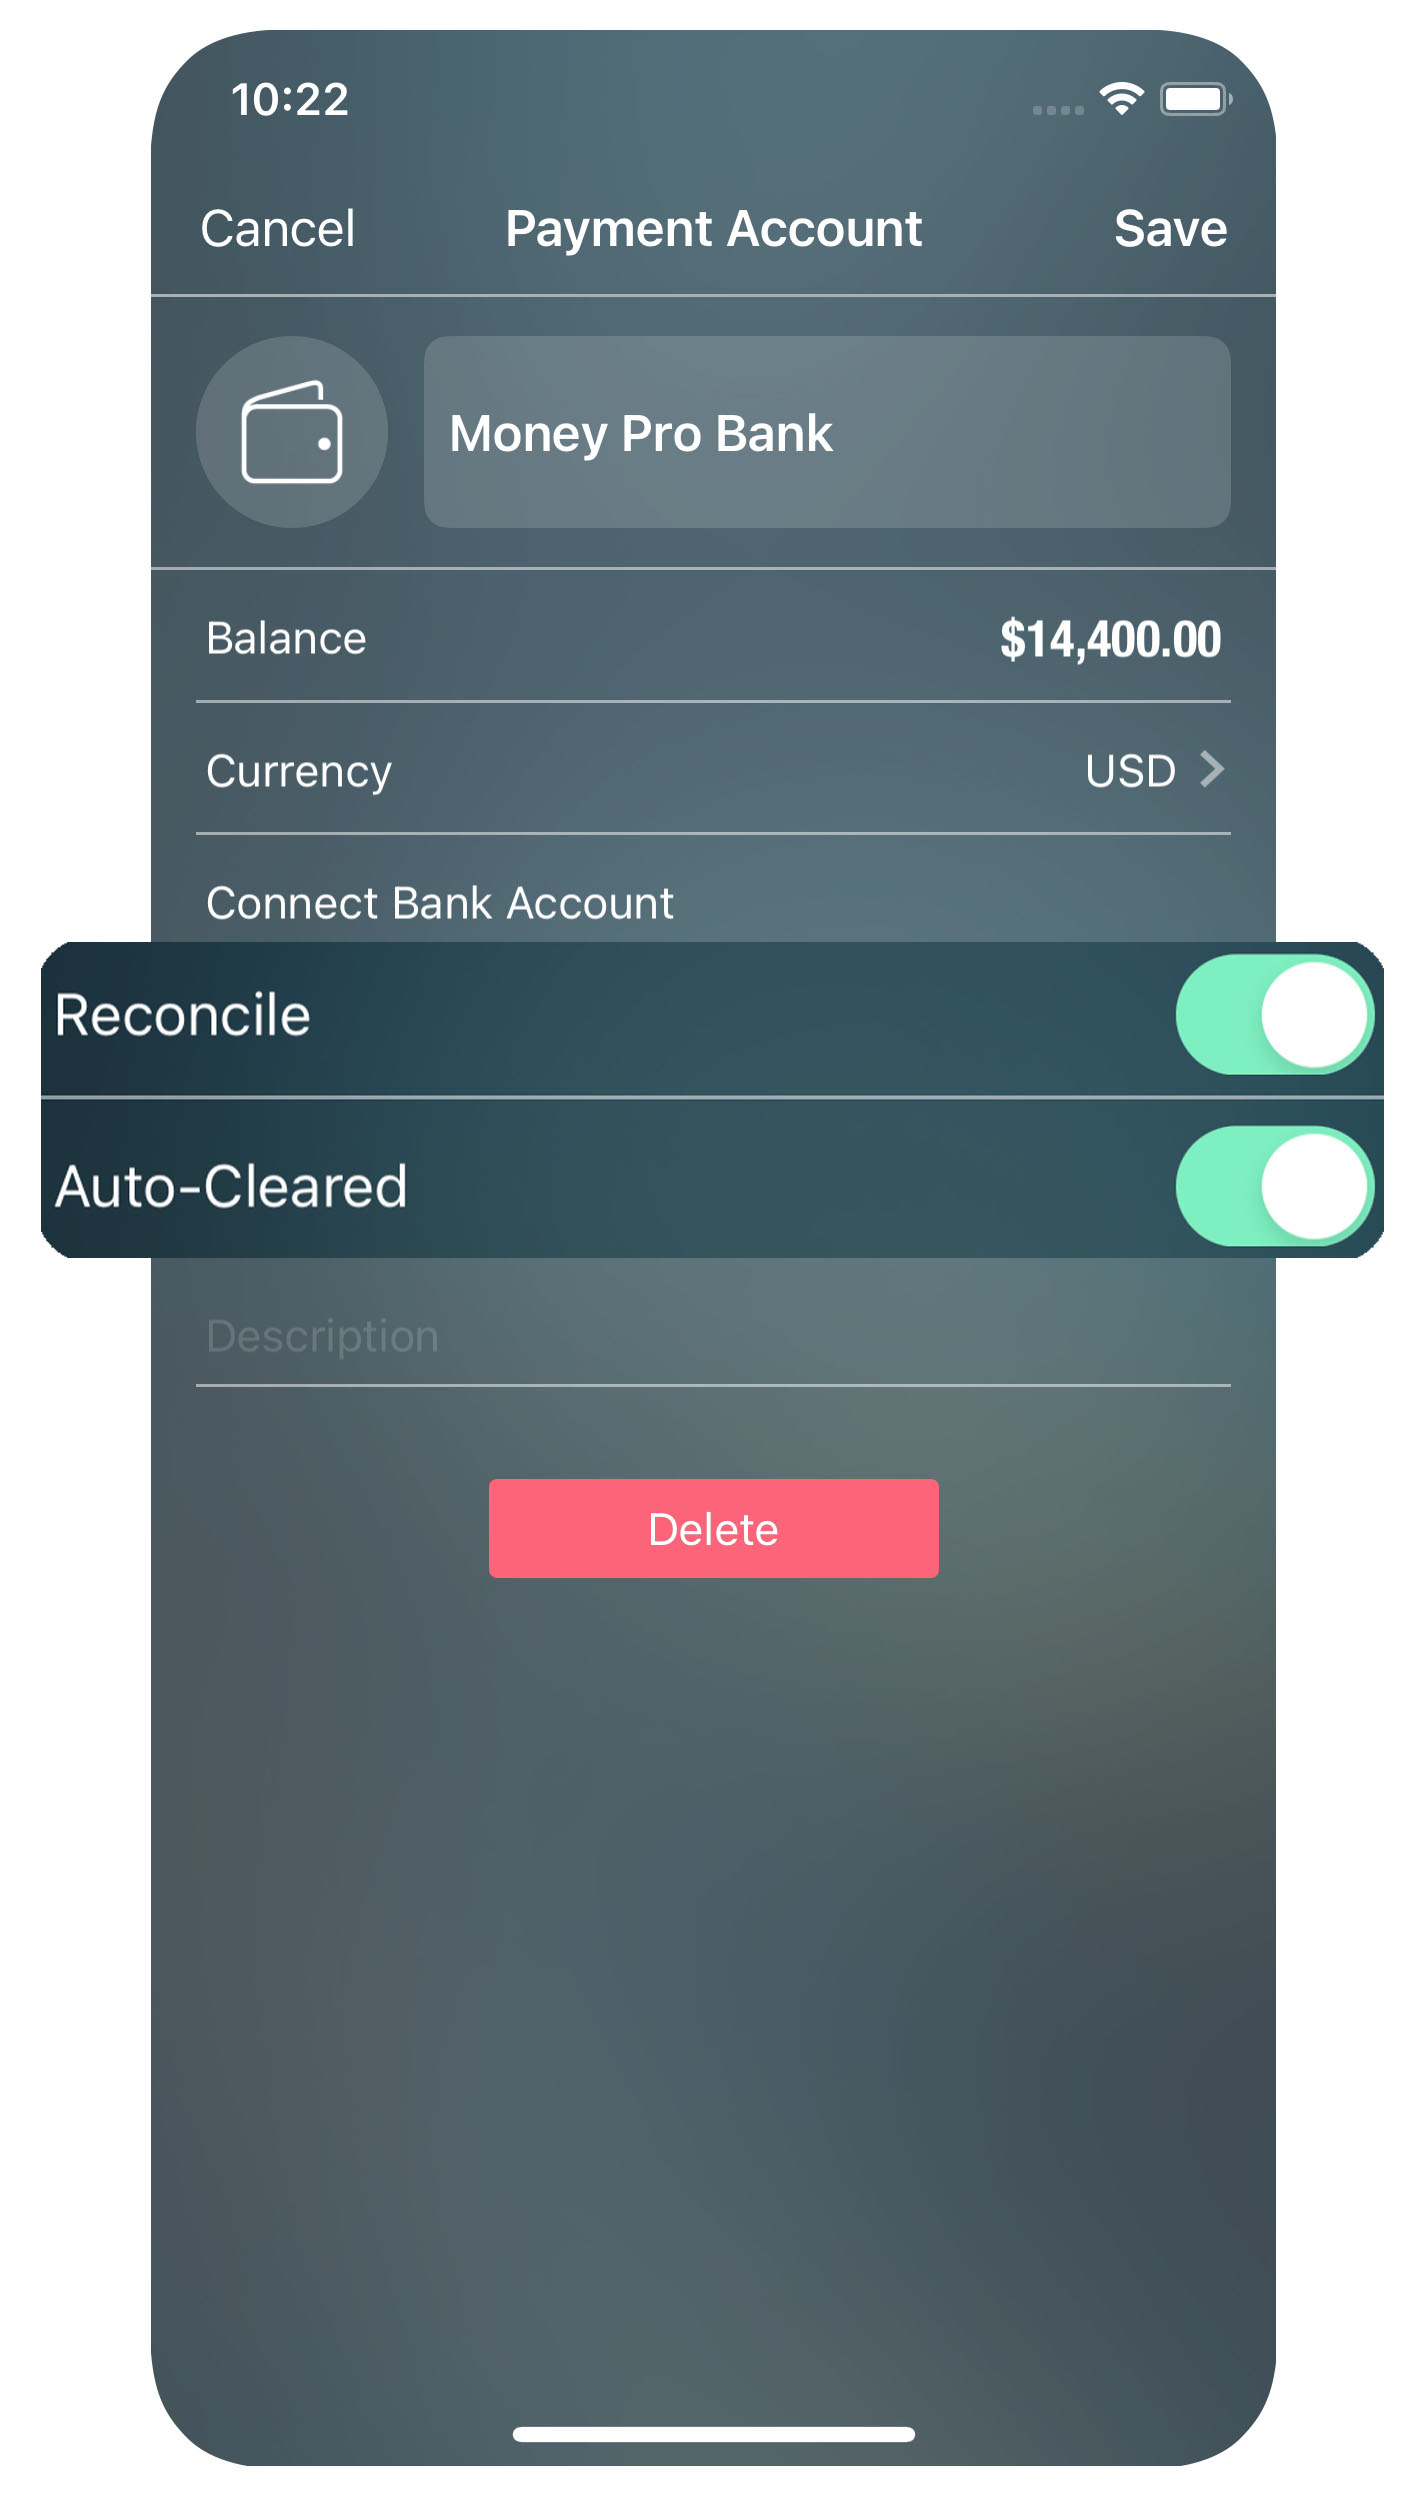
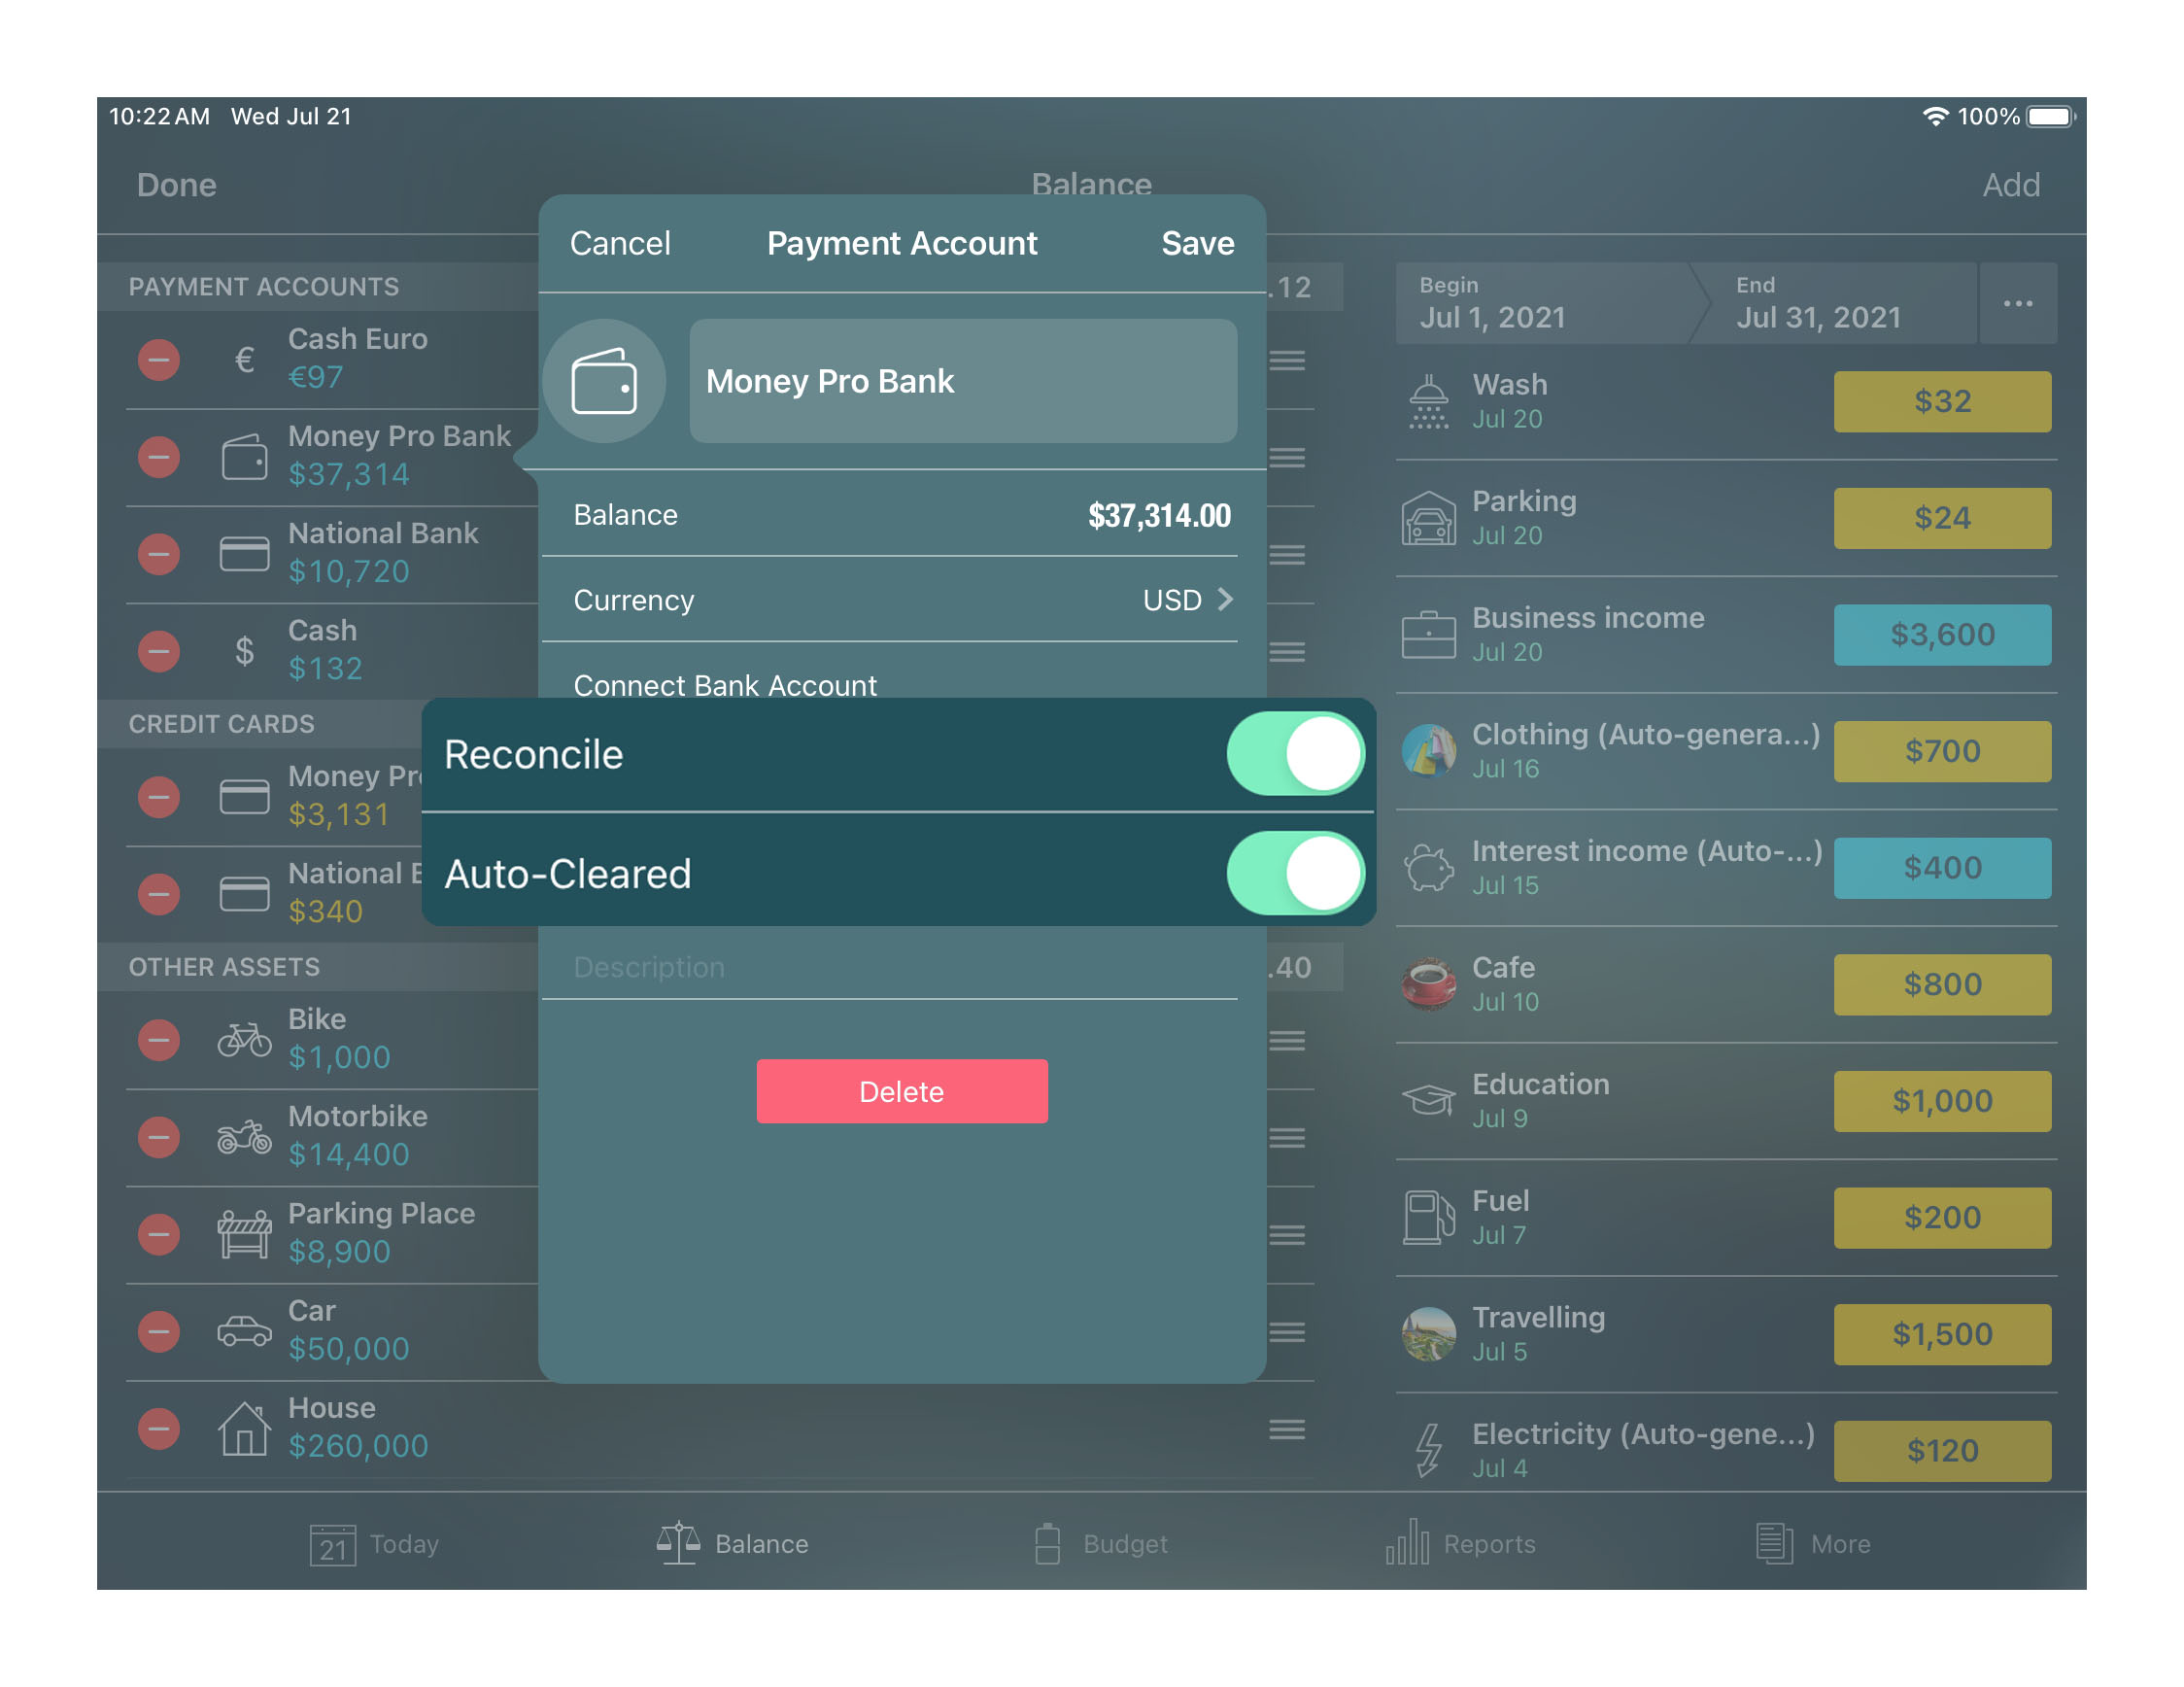
- Balance: the current value for your asset/liability; for a credit card you should fill out two fields - “Debt” (the amount you presently owe to the bank) and “Limit” (the total limit for this card);
- Currency: for this particular account. The currency of all assigned transactions will correspond to the currency of the account;
- Reconcile: turn on account reconciliation;
- Auto-cleared: new transactions will be marked “cleared” by default;
- Description: a long name and notes to the entry.
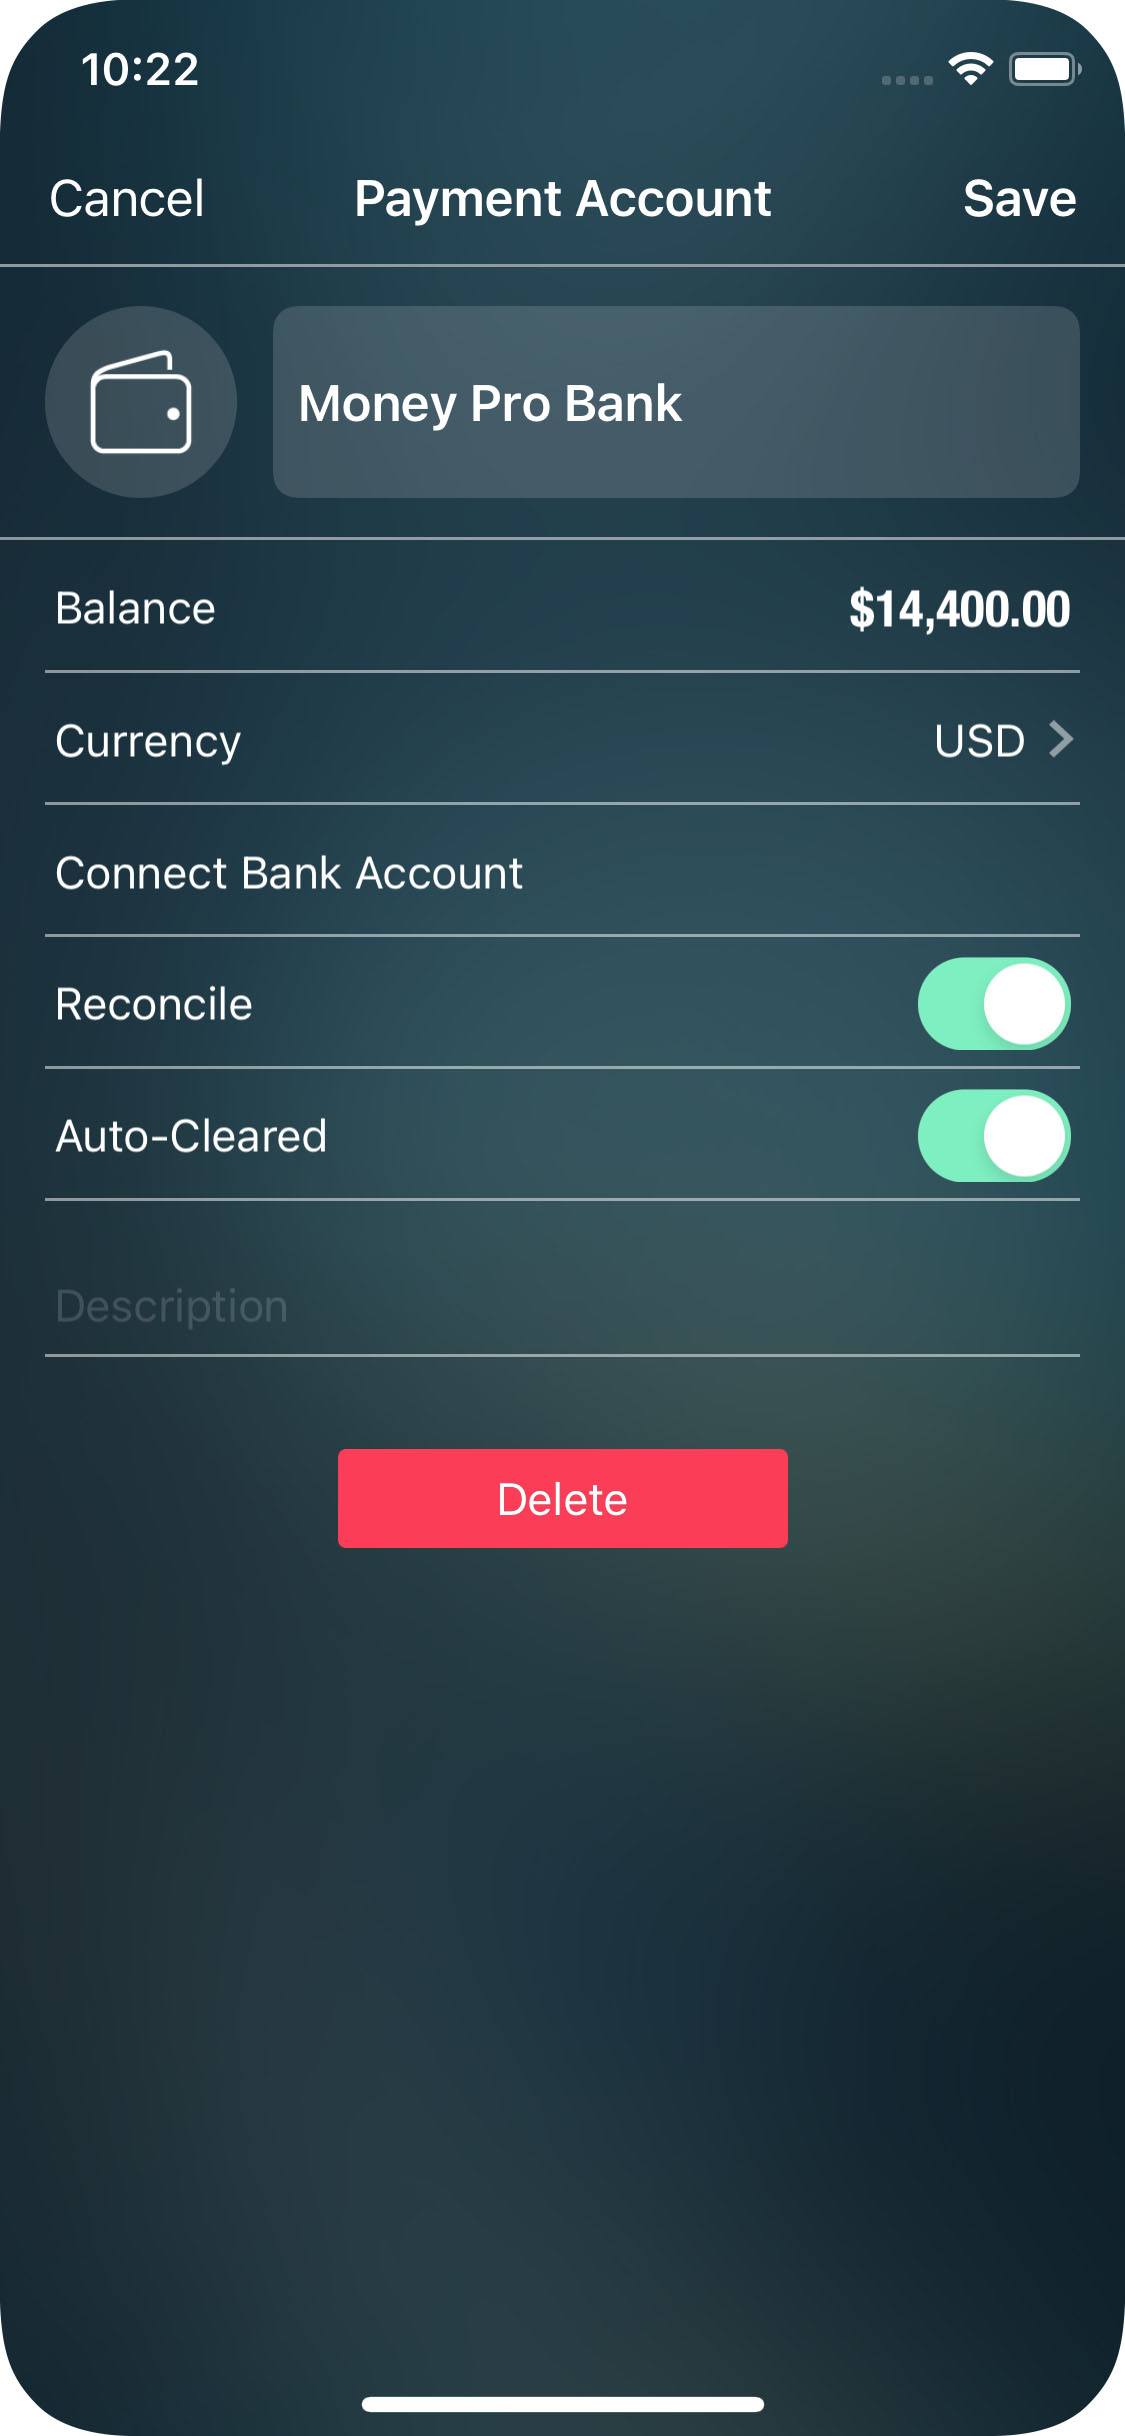
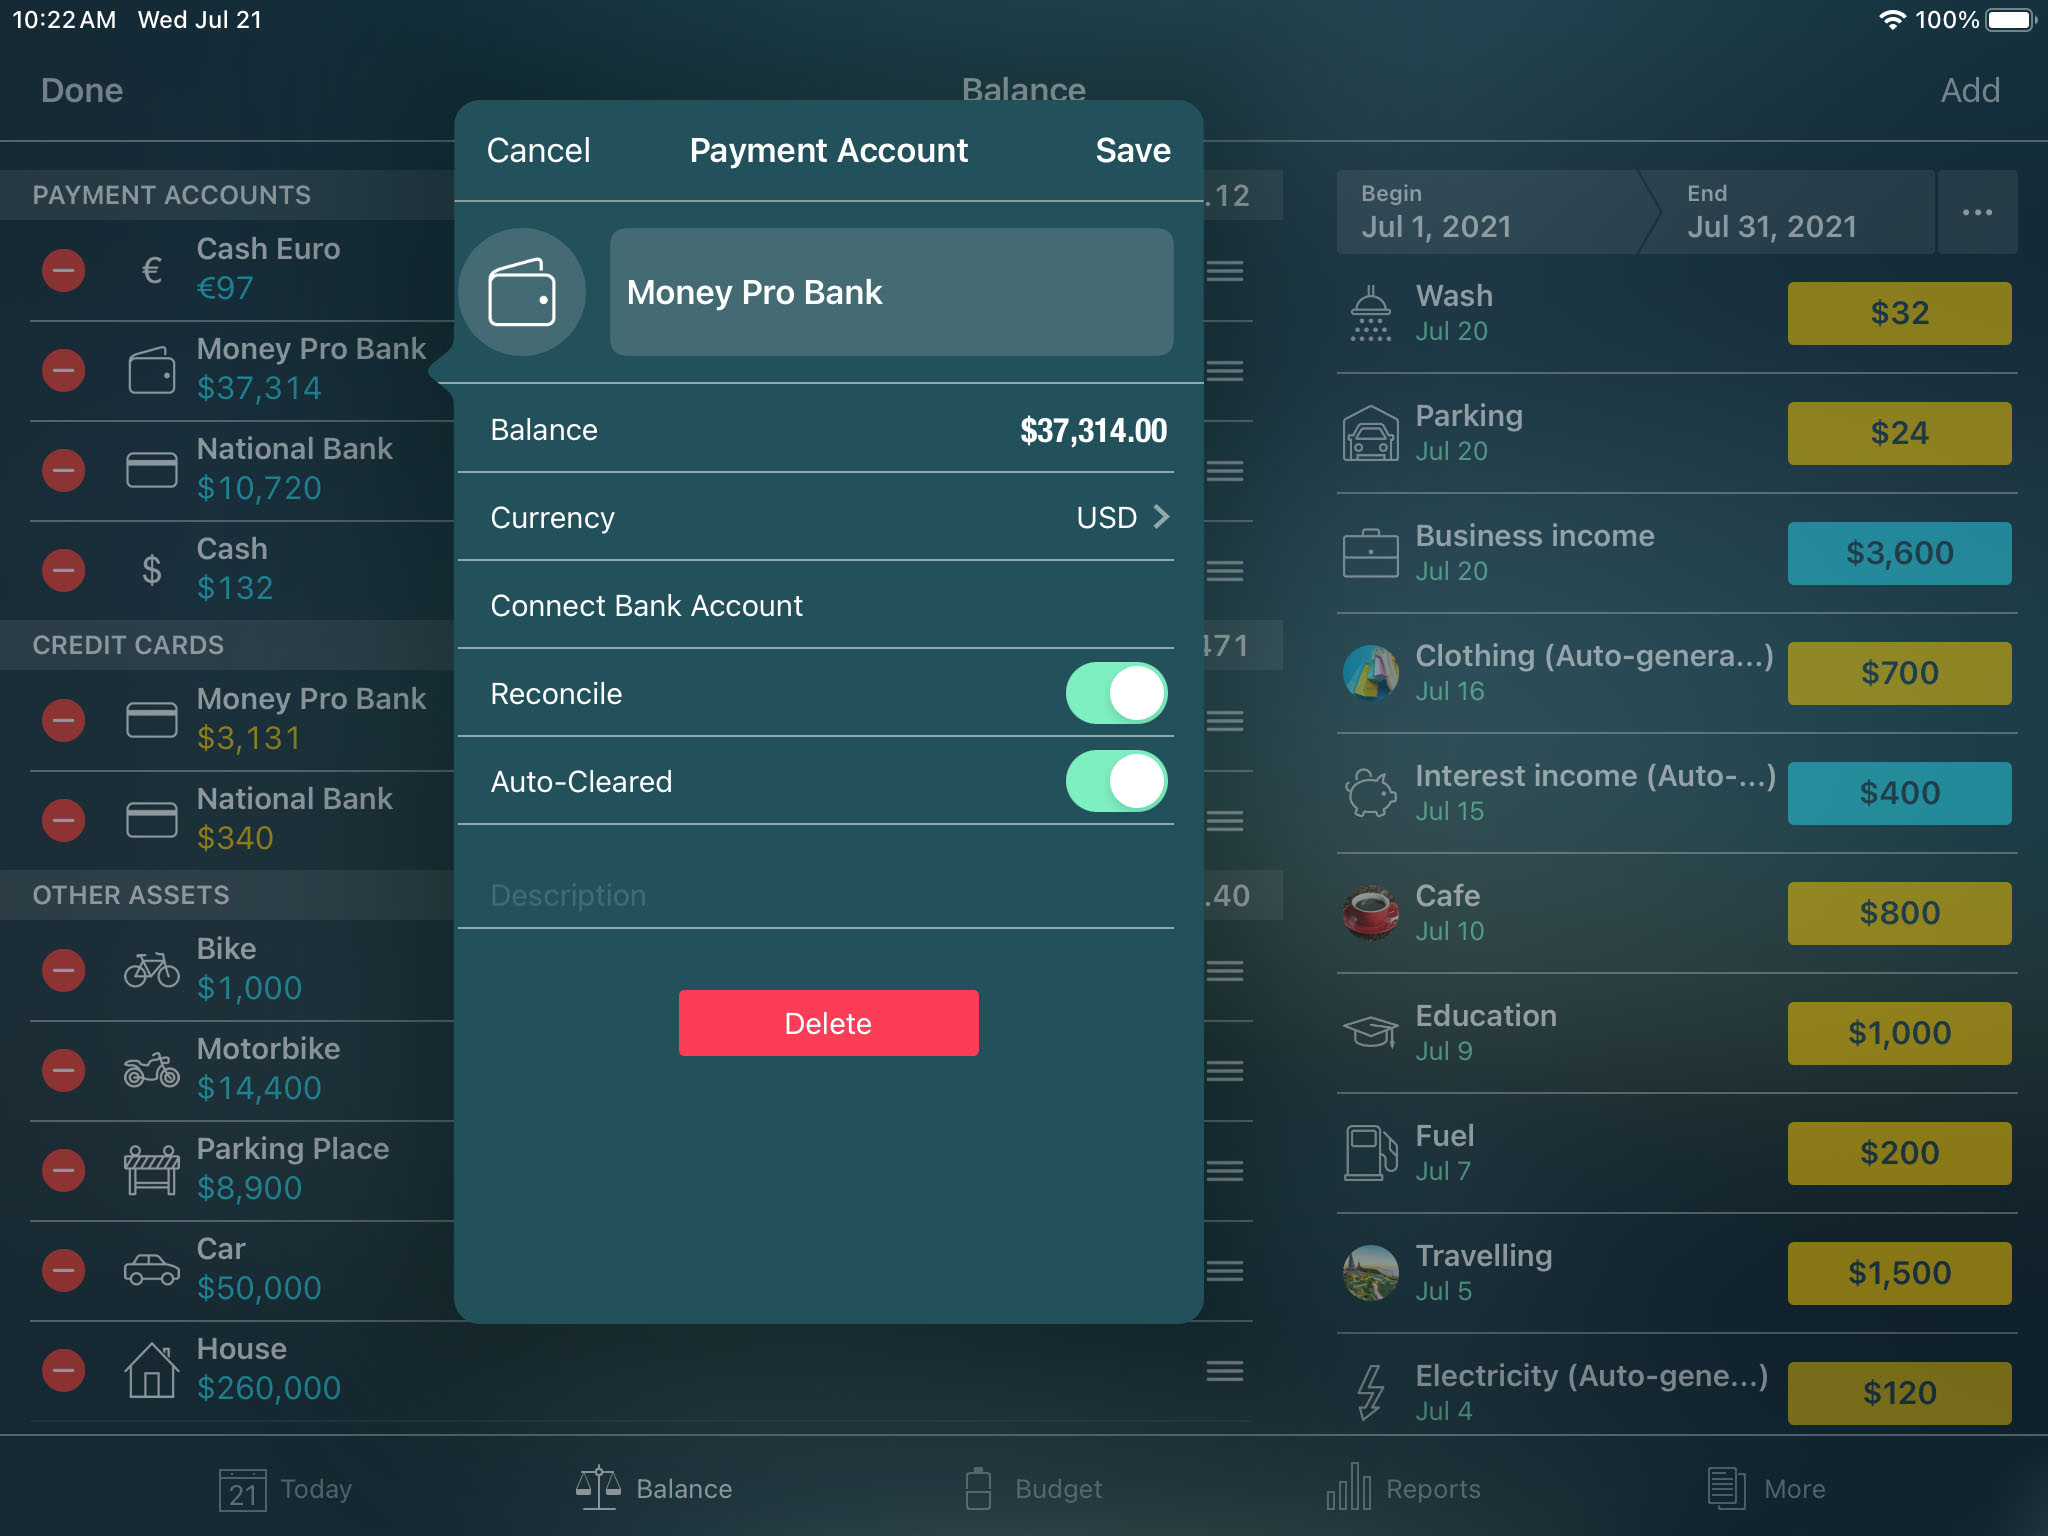
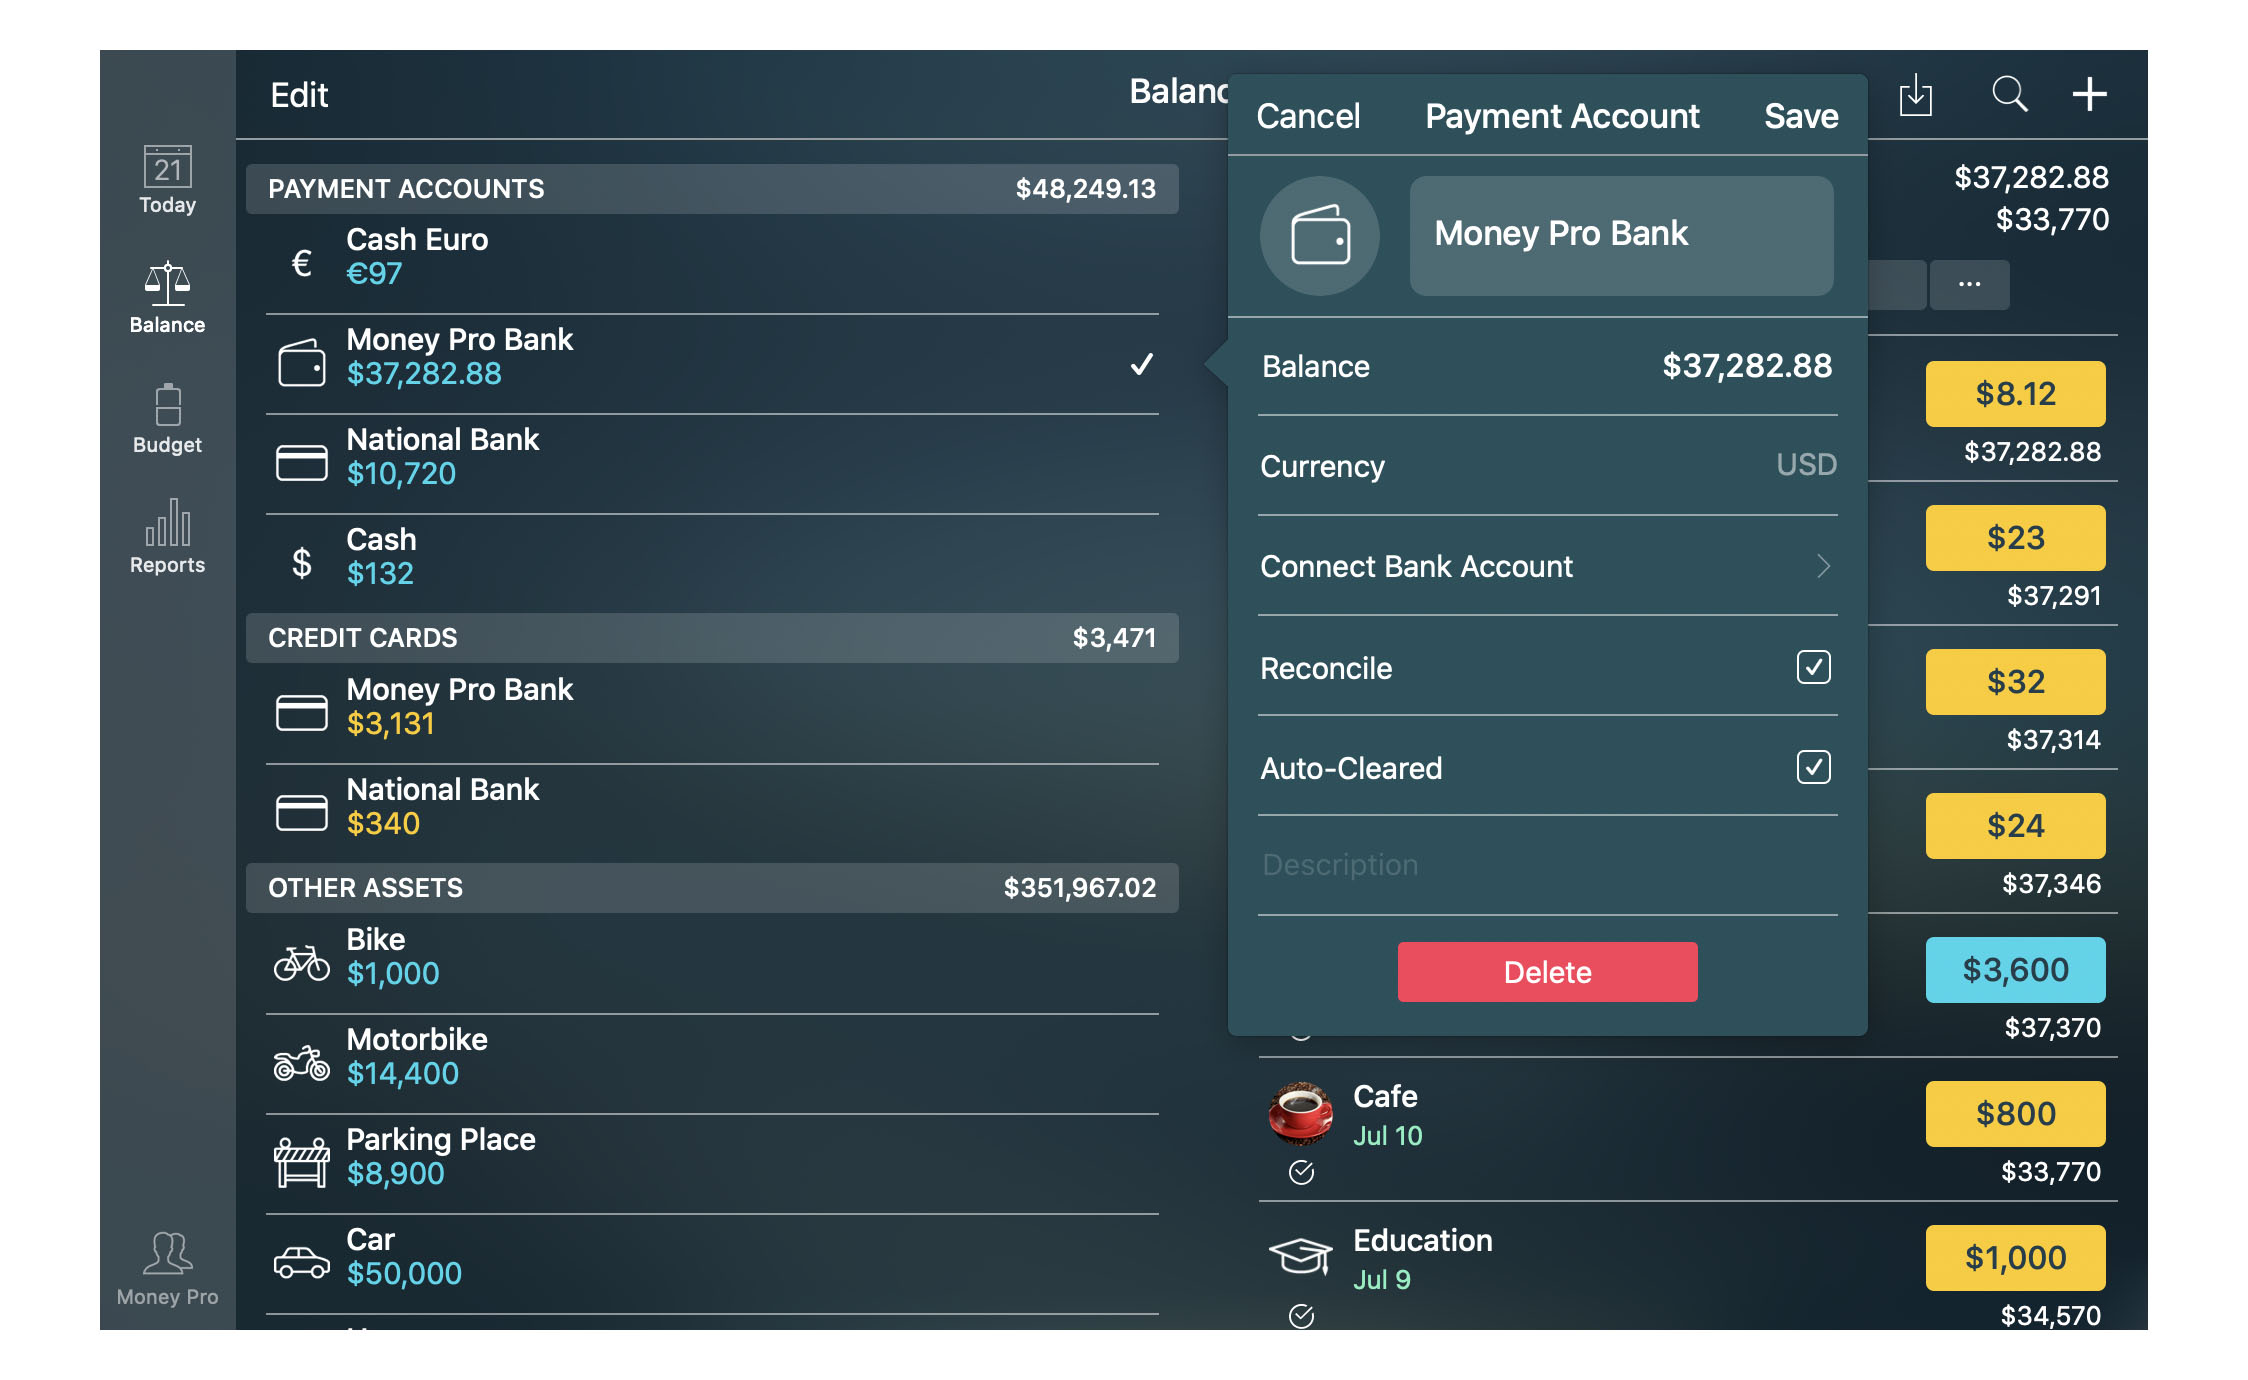
When you have finished, tap/click “Save”, then “Done” on the main form.
You can sort the accounts alphabetically or according to your desire. On your iOS device:
- On the Balance tab, tap «Edit» in the upper right corner,
- The new appeared screen structures the accounts by classes: Payment Accounts, Credit cards, and Other Assets, Other Liabilities.
- There is an icon of three stripes to the right of each account. It can be called an account mobility icon.
- Tap and drag the three stripes icon of the needed account to the right place in the list of your accounts.
- Repeat this operation with other accounts as well. Please note that you can change the order of the accounts only within a particular class (Payment Accounts, Credit Cards, etc.).
Once you make the desired order on your iOS device, you’ll be able to transfer it to the Mac app by syncing.
Online Banking (requires GOLD subscription)
Online-Banking allows connecting Money Pro to your bank to sync your transactions which will significantly reduce your manual entries.
Open the Balance tab, tap/click “Edit” > “Add” > “Online Banking”. The app will offer you to register a Money Pro Account (if you haven’t done so yet) and activate a Money Pro GOLD subscription which provides Online-Banking service. If you want to connect Online-Banking to an account that already exists in the app tap/click “Edit”, select the account, and tap/click “Connect Bank Account”.
Are your banks on the list of supported banks in Money Pro? Most probably, yes. Before you buy a Money Pro Gold subscription please tap/click “Check if your bank is supported” in the subscription window. You can also contact our support team.
You will be asked to enter the authorization data you use in the Bank’s Dashboard. When connected, Money Pro will display all the payment accounts, credit cards, and savings accounts you have in the bank. Once you add them, they will appear in the Balance tab. Along with the accounts Money Pro will download all the transactions for the last 12 months. The last transactions for a specific period (depending on each bank individually) may be downloaded with a delay.
Money Pro will automatically categorize the downloaded transactions. However, it might be impossible for some of the transactions due to the lack of information from the bank. Once you open the Balance tab tap/click the synced account to look through the transactions list. Uncategorized transactions will be marked with a question mark. Tap/click it and select a category. In the future, Money Pro will predict categories more accurately based on your previous actions.
OFX, CSV import
You can download your bank statement from your bank’s website (supported files: .ofx and .csv). Use iTunes to upload files on iPhone and iPad:
- connect the device to iTunes;
- access the Apps tab under the File Sharing section;
- drag and drop files onto the Documents list;
- the files will become available for import.
Tap/click the import icon, select the account the information will be imported to, and select the file you want to import.
In the opened form, select appropriate categories for the transactions (if needed). Money Pro learns how you categorize transactions and predicts categories for the transactions being imported. Only “New” transactions will be imported. Previously imported transactions will remain untouched.
When importing a .csv file you should specify the type of information for each column individually in case the app hasn’t determined it automatically. You can learn more details about the CSV import from the following article.
Account reconciliation
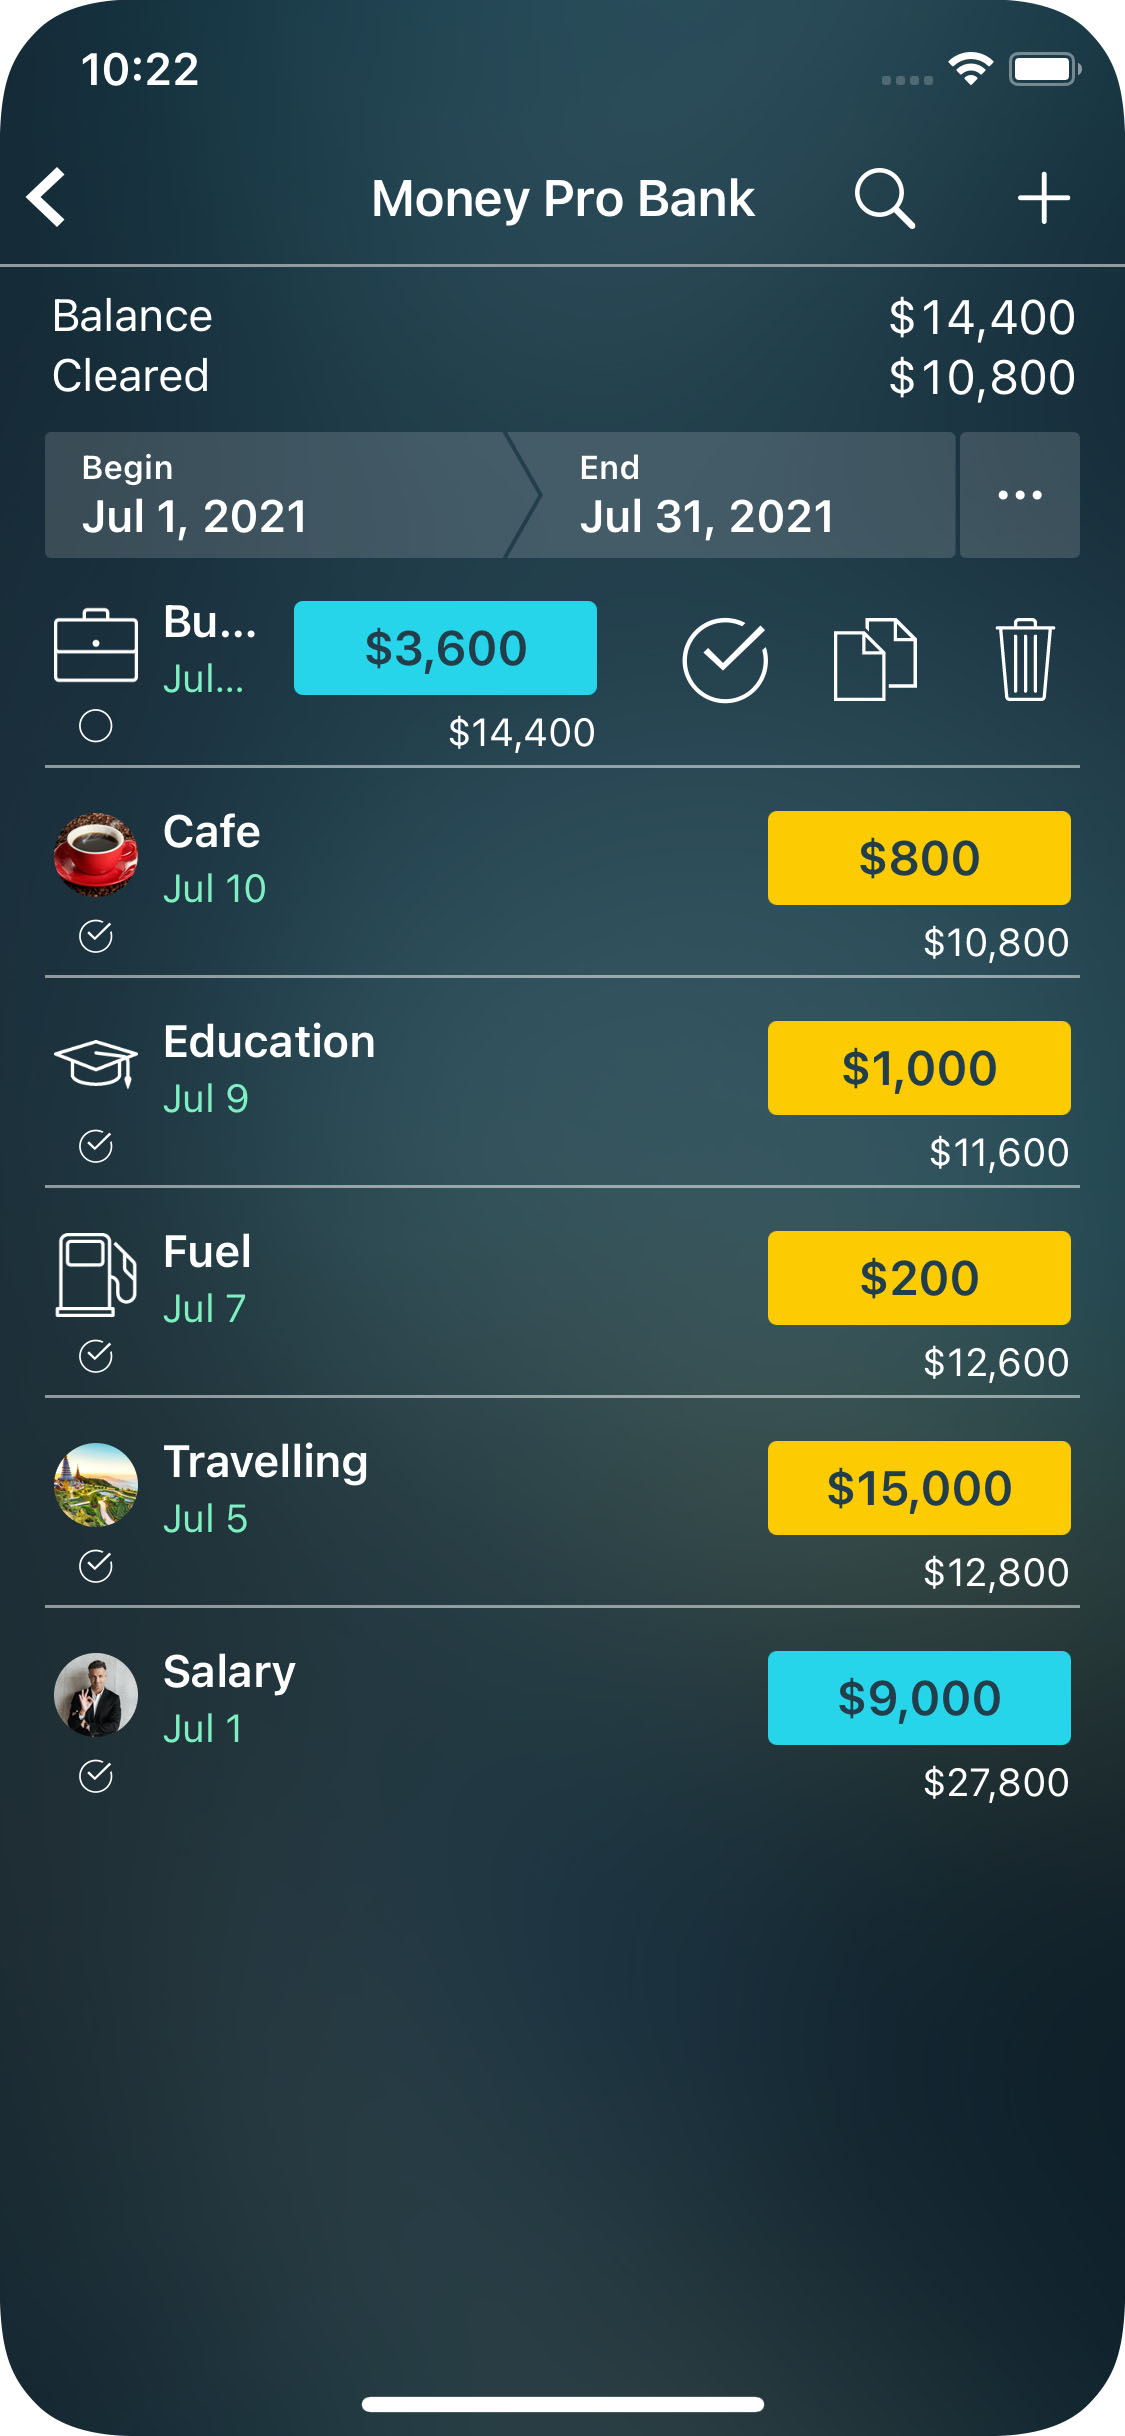
You can record transactions and clear them later on. Available balance and cleared balance are calculated automatically. You can use account reconciliation for any of your accounts. Go to the Balance tab, tap/click “Edit”, select the account you need, and turn on “Reconcile”.

To reconcile your accounts balances with a bank statement, compare the transactions list (Balance/Account name) to those on the printed statement from your financial institution. When a transaction matches, use a context menu to mark it “Cleared”. For iPhone and iPad use a left swipe to mark a transaction, or you can put a checkmark in the field “Cleared” when adding or editing a transaction (in the main transaction form, see “Bills & transactions”).
Adjusting account balance
In case you haven’t entered the transactions for a while and, for some reason, you don’t want to input the skipped information, you can adjust your account balance.
On the Balance tab, tap/click “Edit” and select the needed account. Enter the correct amount and tap/click “Save”. In the transaction list of that account, you will find a “Balance adjustment” entry.
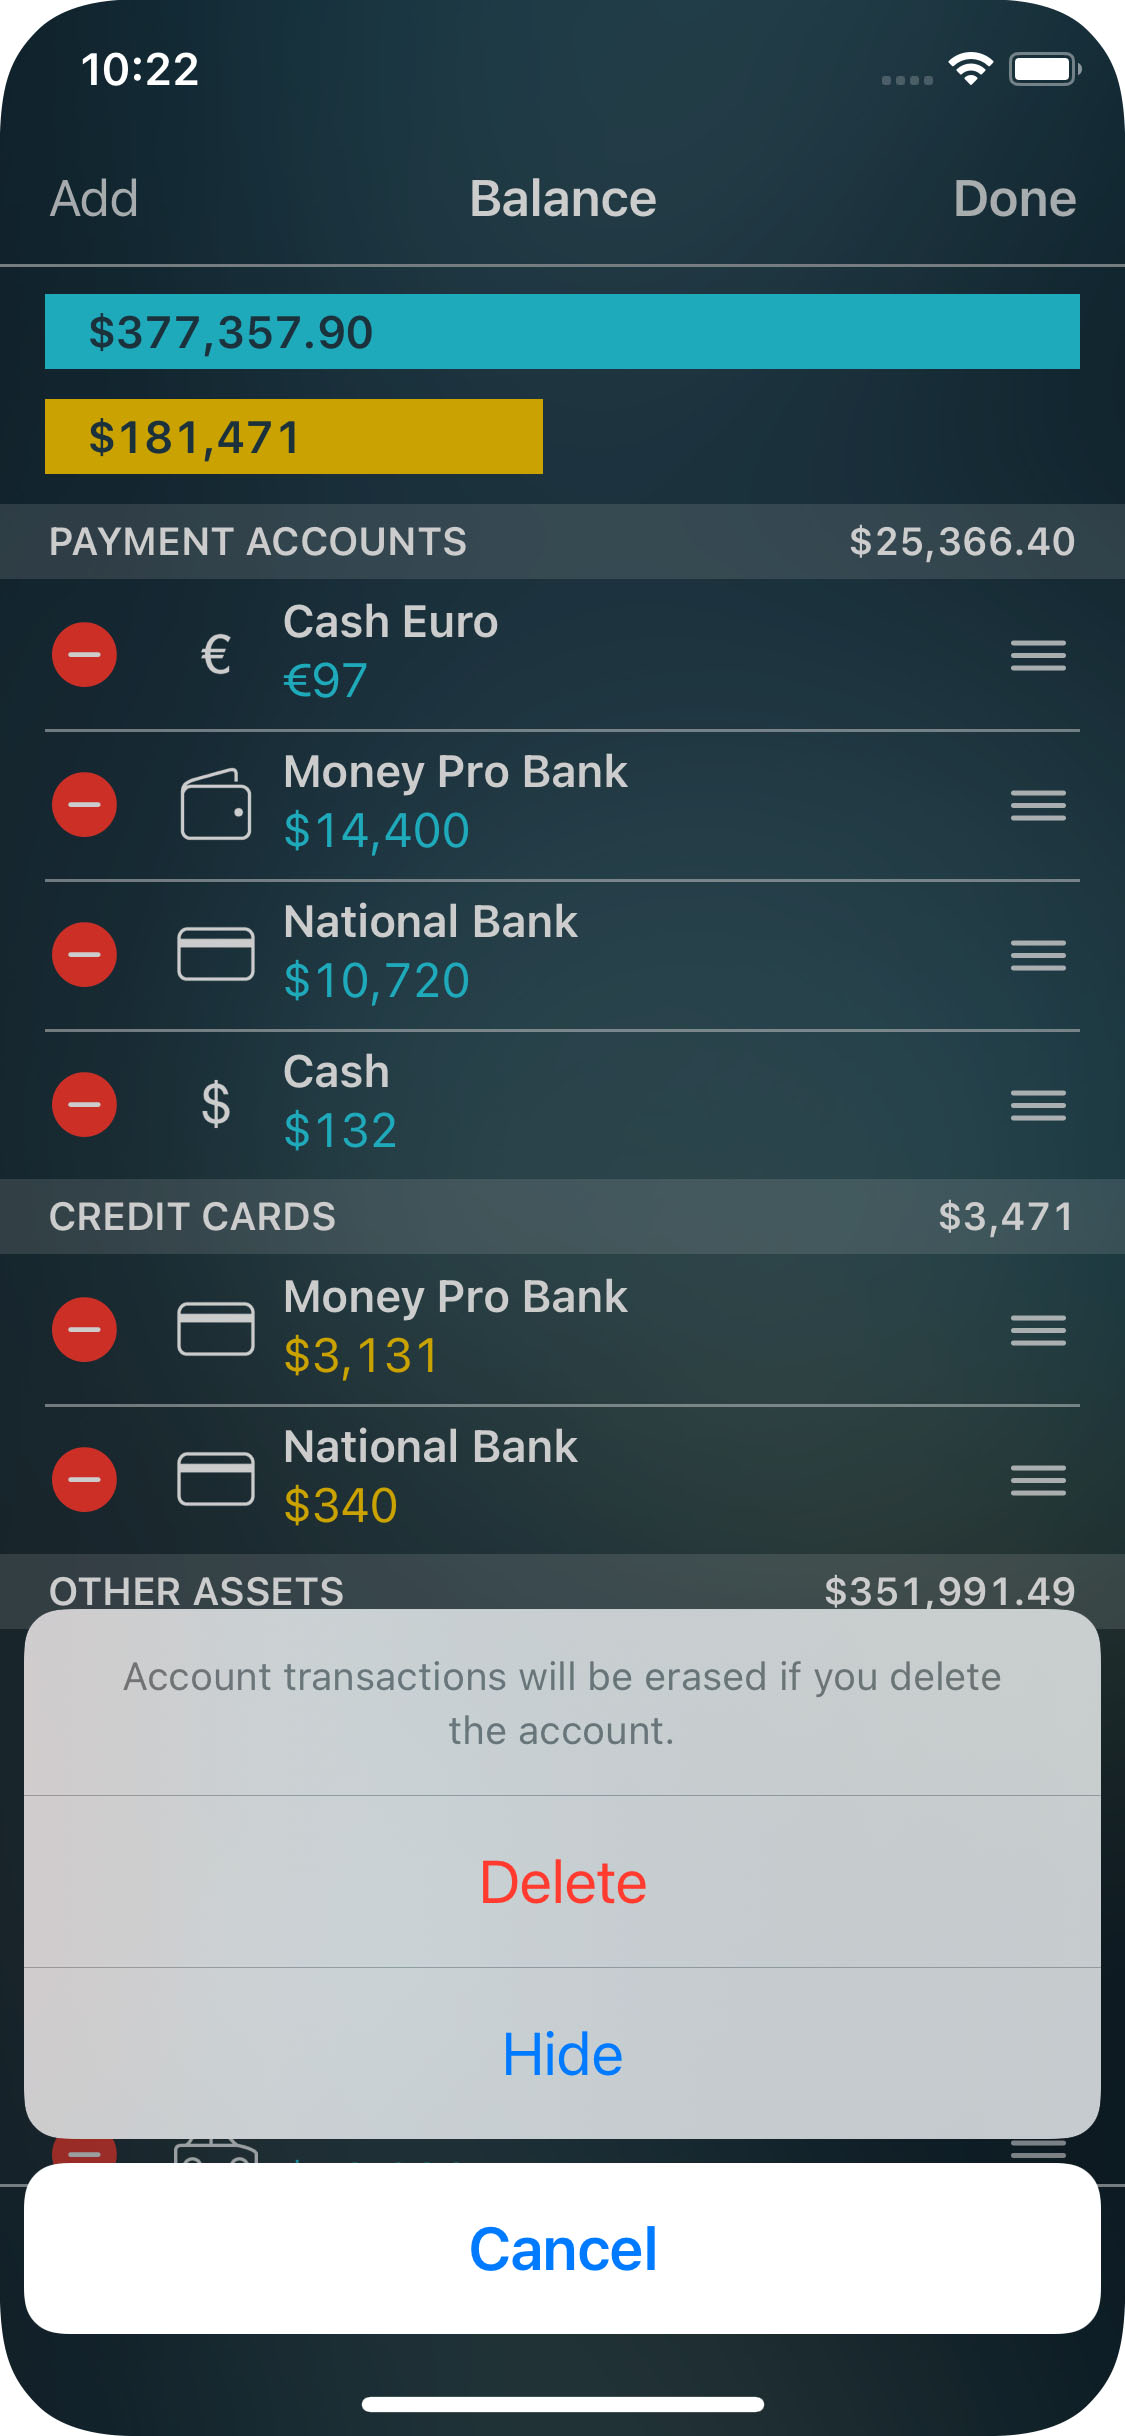
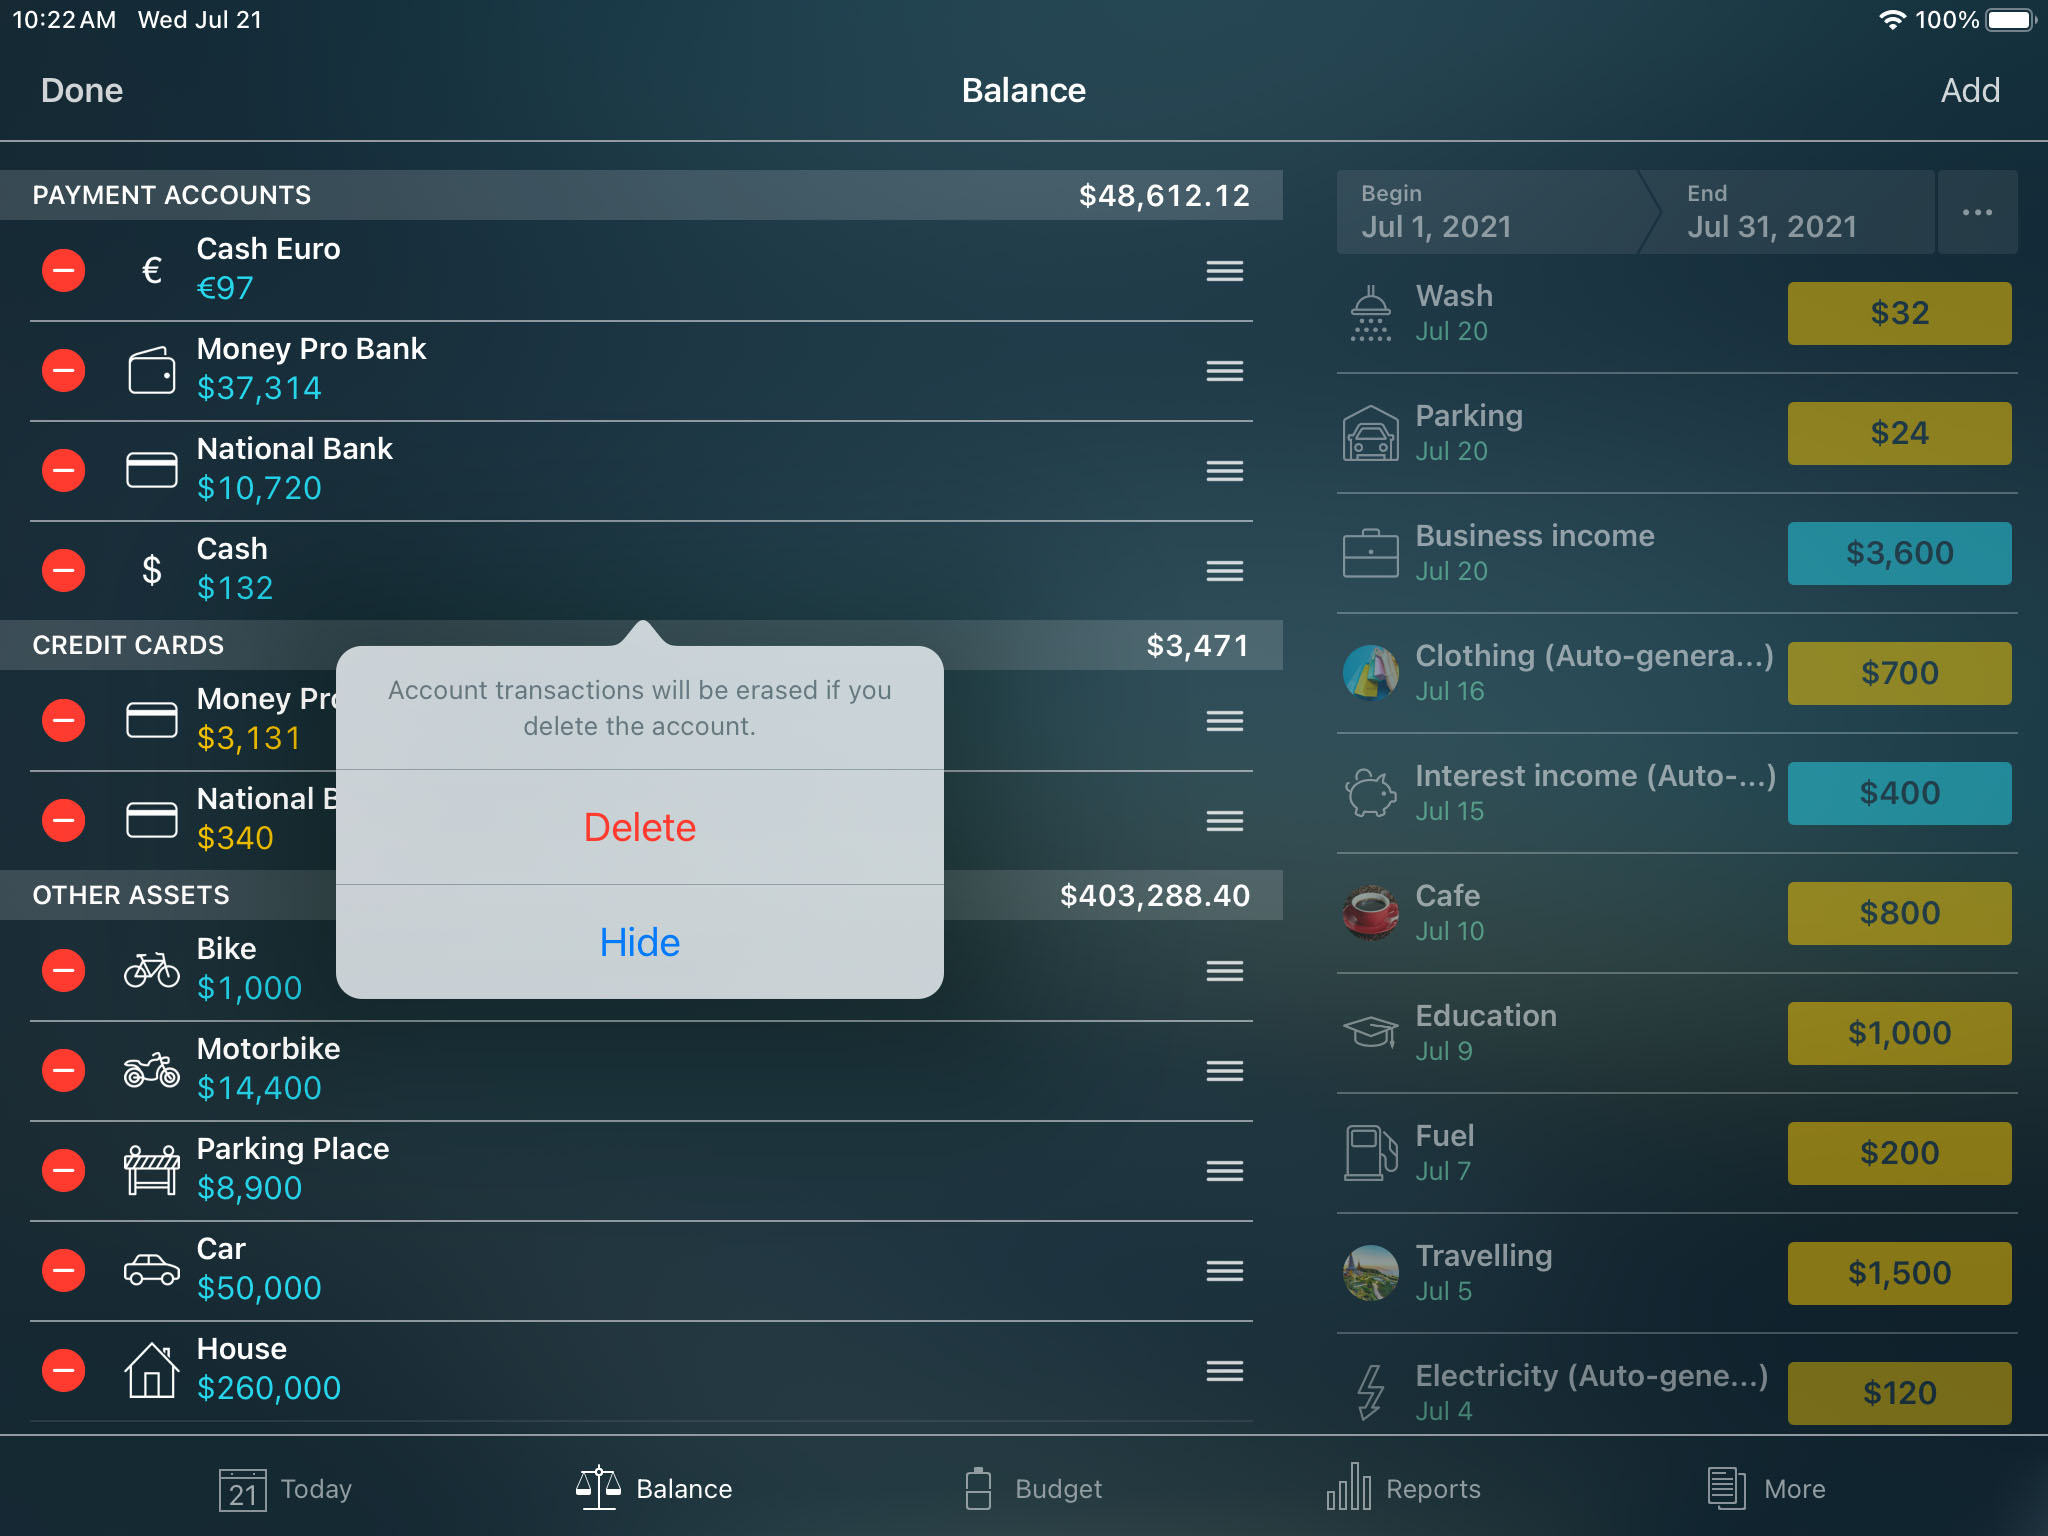
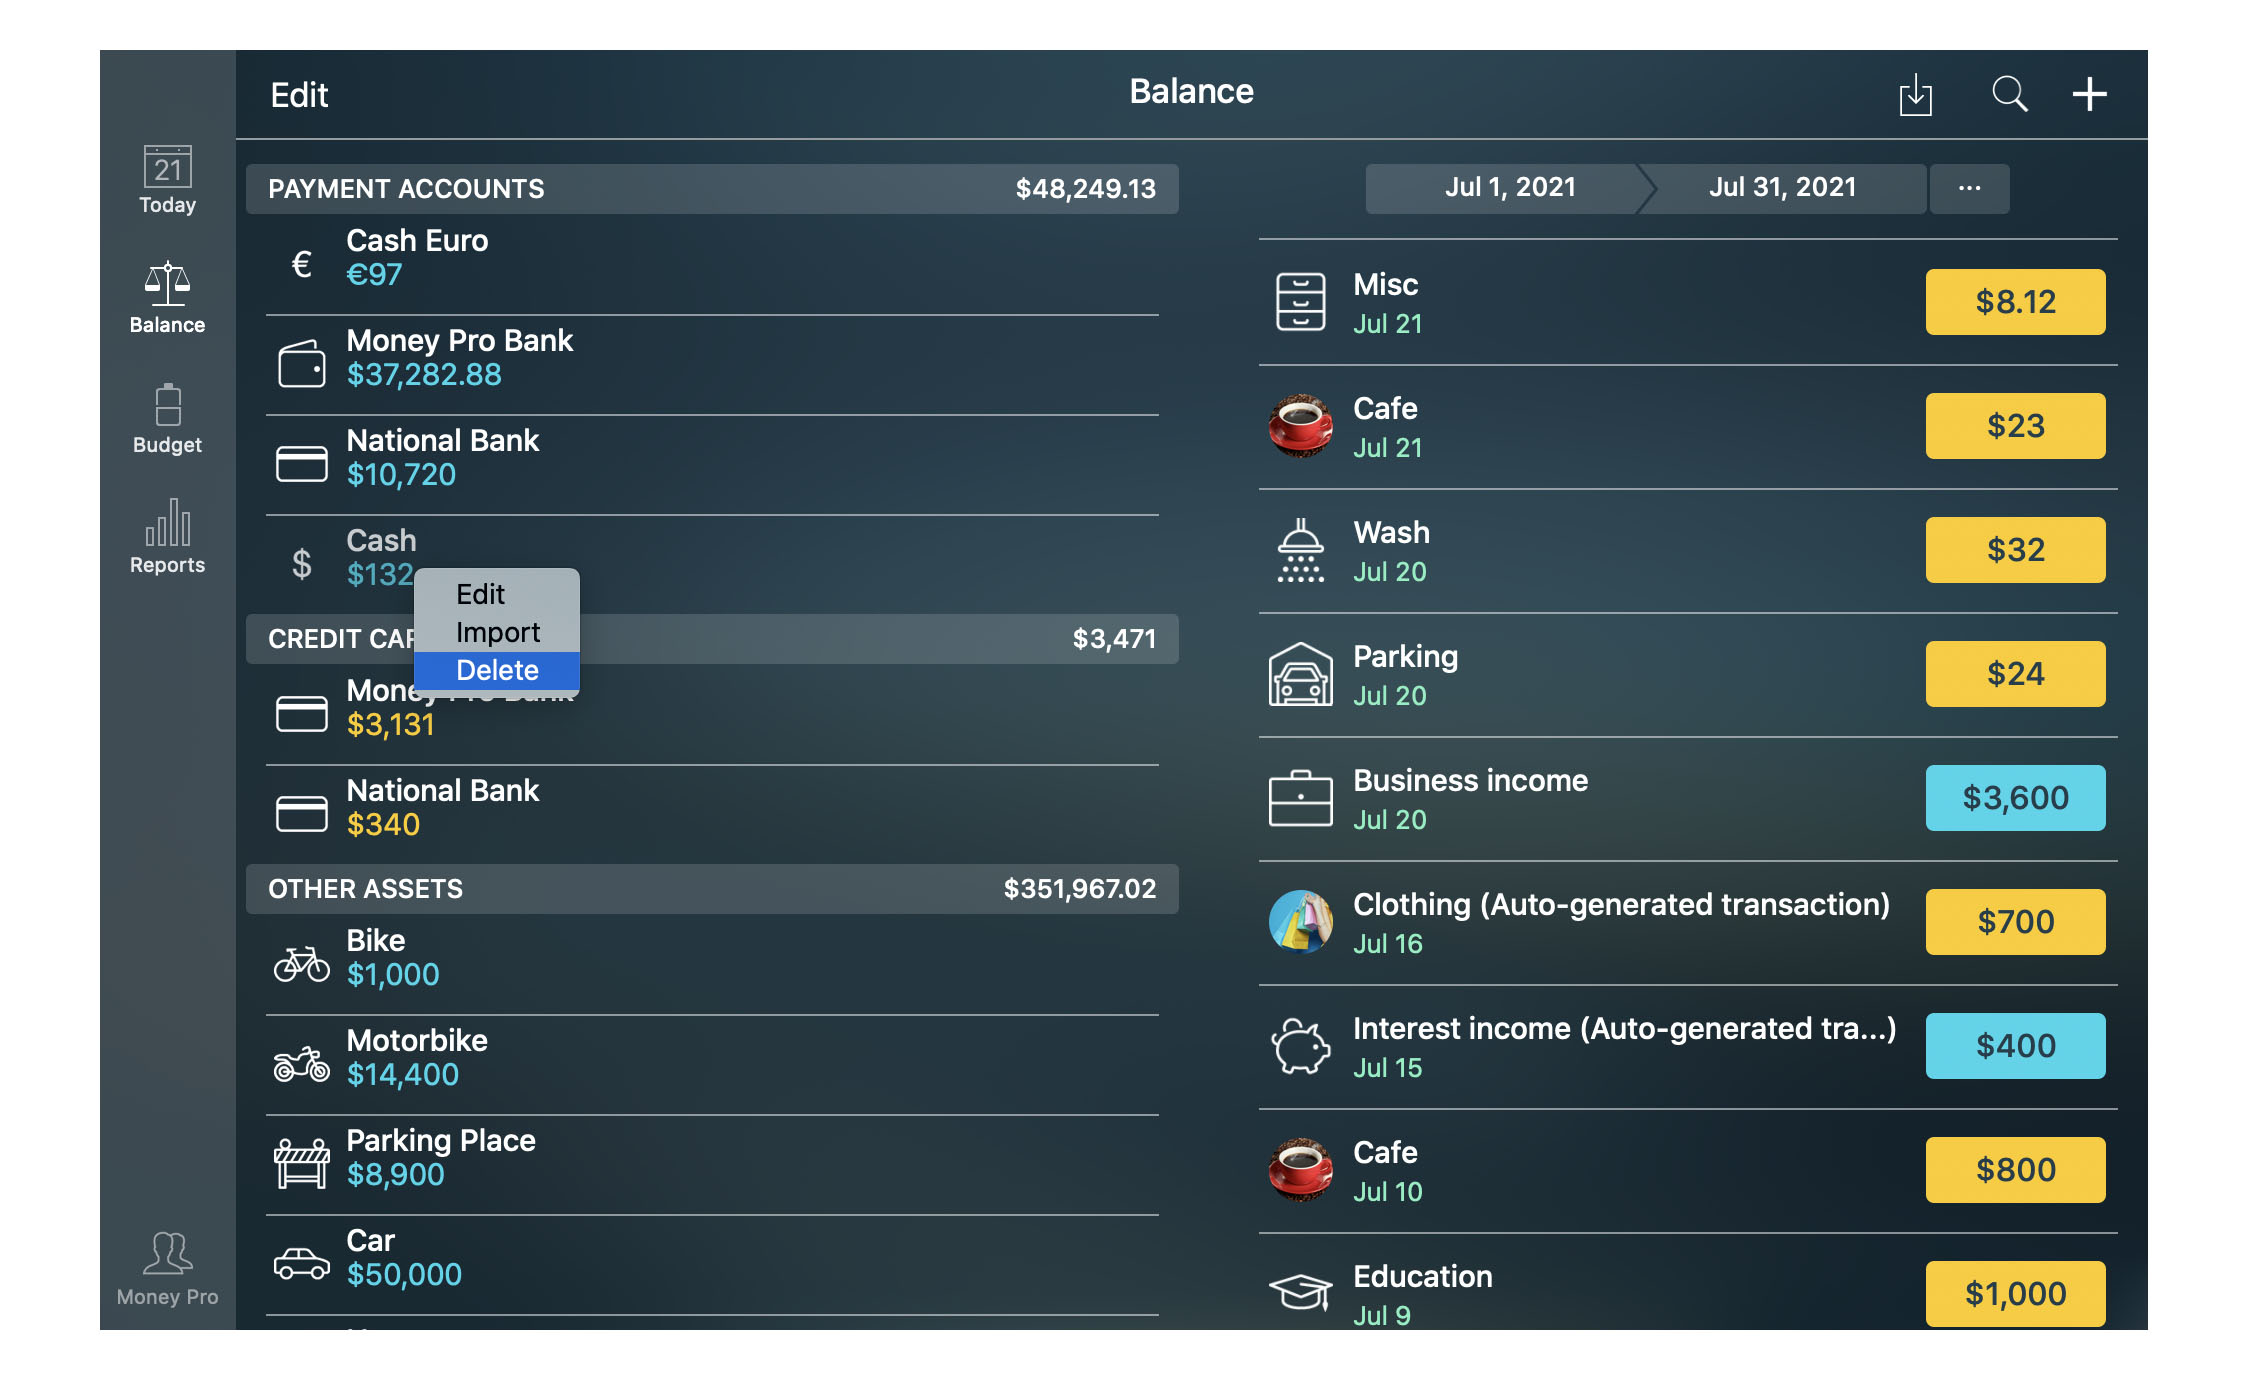
Deleting an account
To delete an account, go to “Balance”, tap/click “Edit”, select an account, and in the opened menu choose “Delete”. You will be offered to “Hide” or “Delete” the account.
Budgets
Money Pro can handle all your budgeting needs. Budget is one of the main tools to get your expenses under control so that to save extra money for a big planned purchase in the future, to get out of debt, or accumulate wealth.
Categories, subcategories
To make this tool efficient, you should first think of the structure of your budget. Think of all possible spending categories you can put all your expenses into. Mind that categories may have double hierarchical structure in the app. So there are categories and subcategories. Remember, once you’ve set up a budget, you should use the same categories while recording your expenses.
If you want to remove transactions but keep all the categories, you can delete your accounts. In this case, the account transactions will be removed while all the categories will remain unchanged.
Please be aware that it is only possible to delete a category by reassigning its transactions to another category.
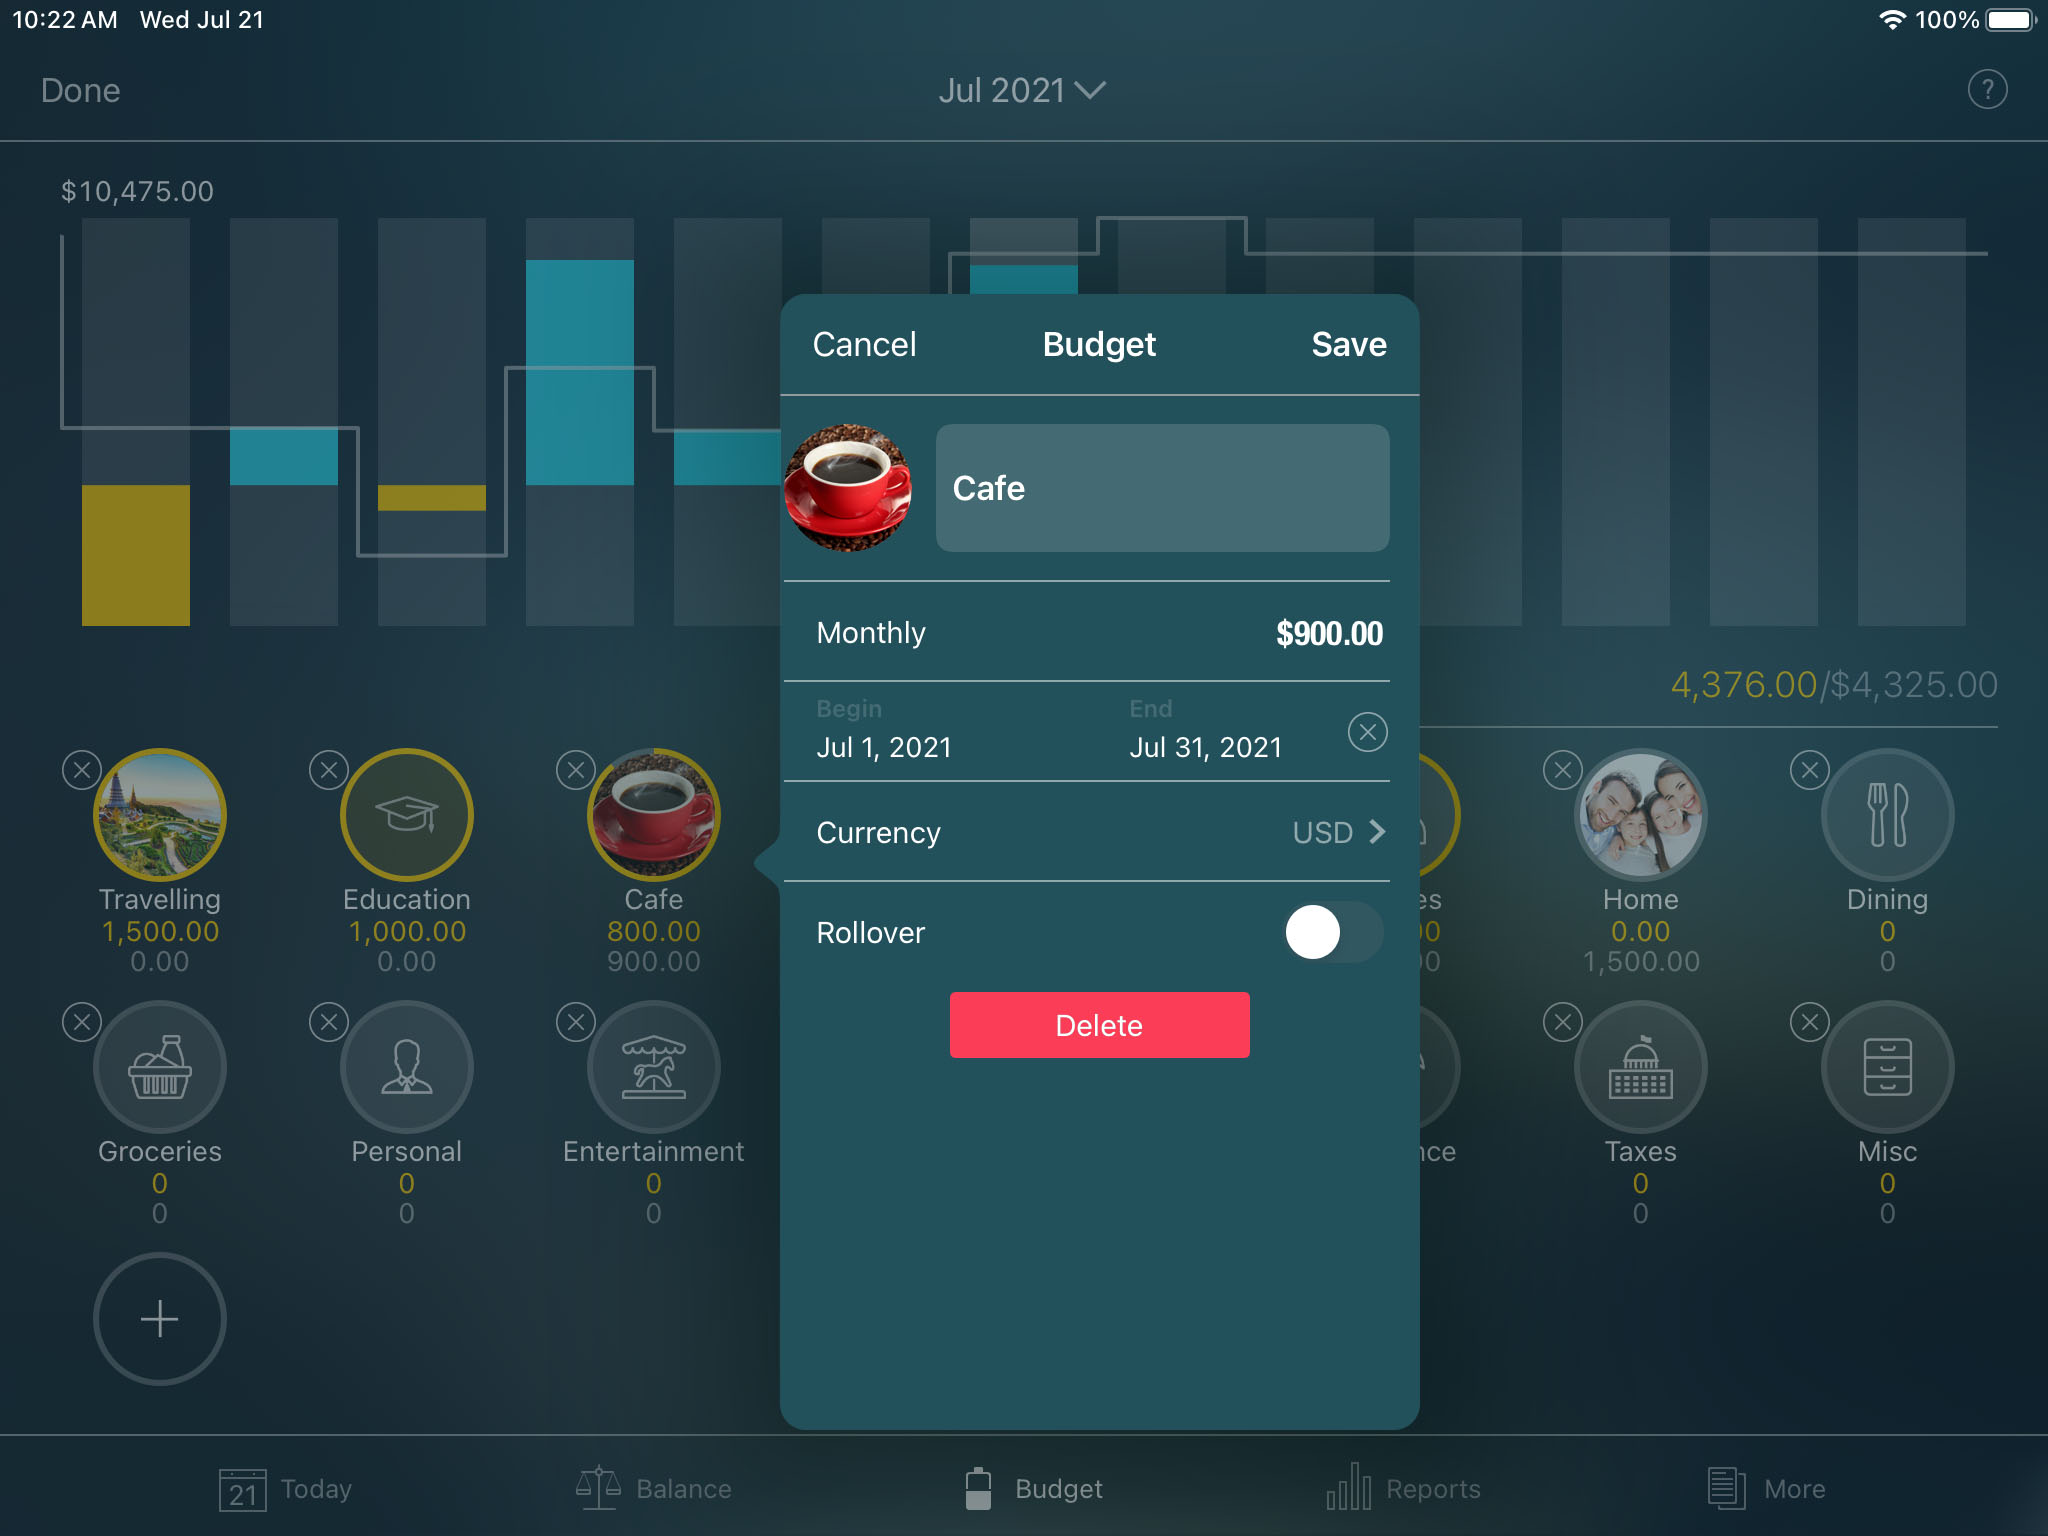
Setting up a budget
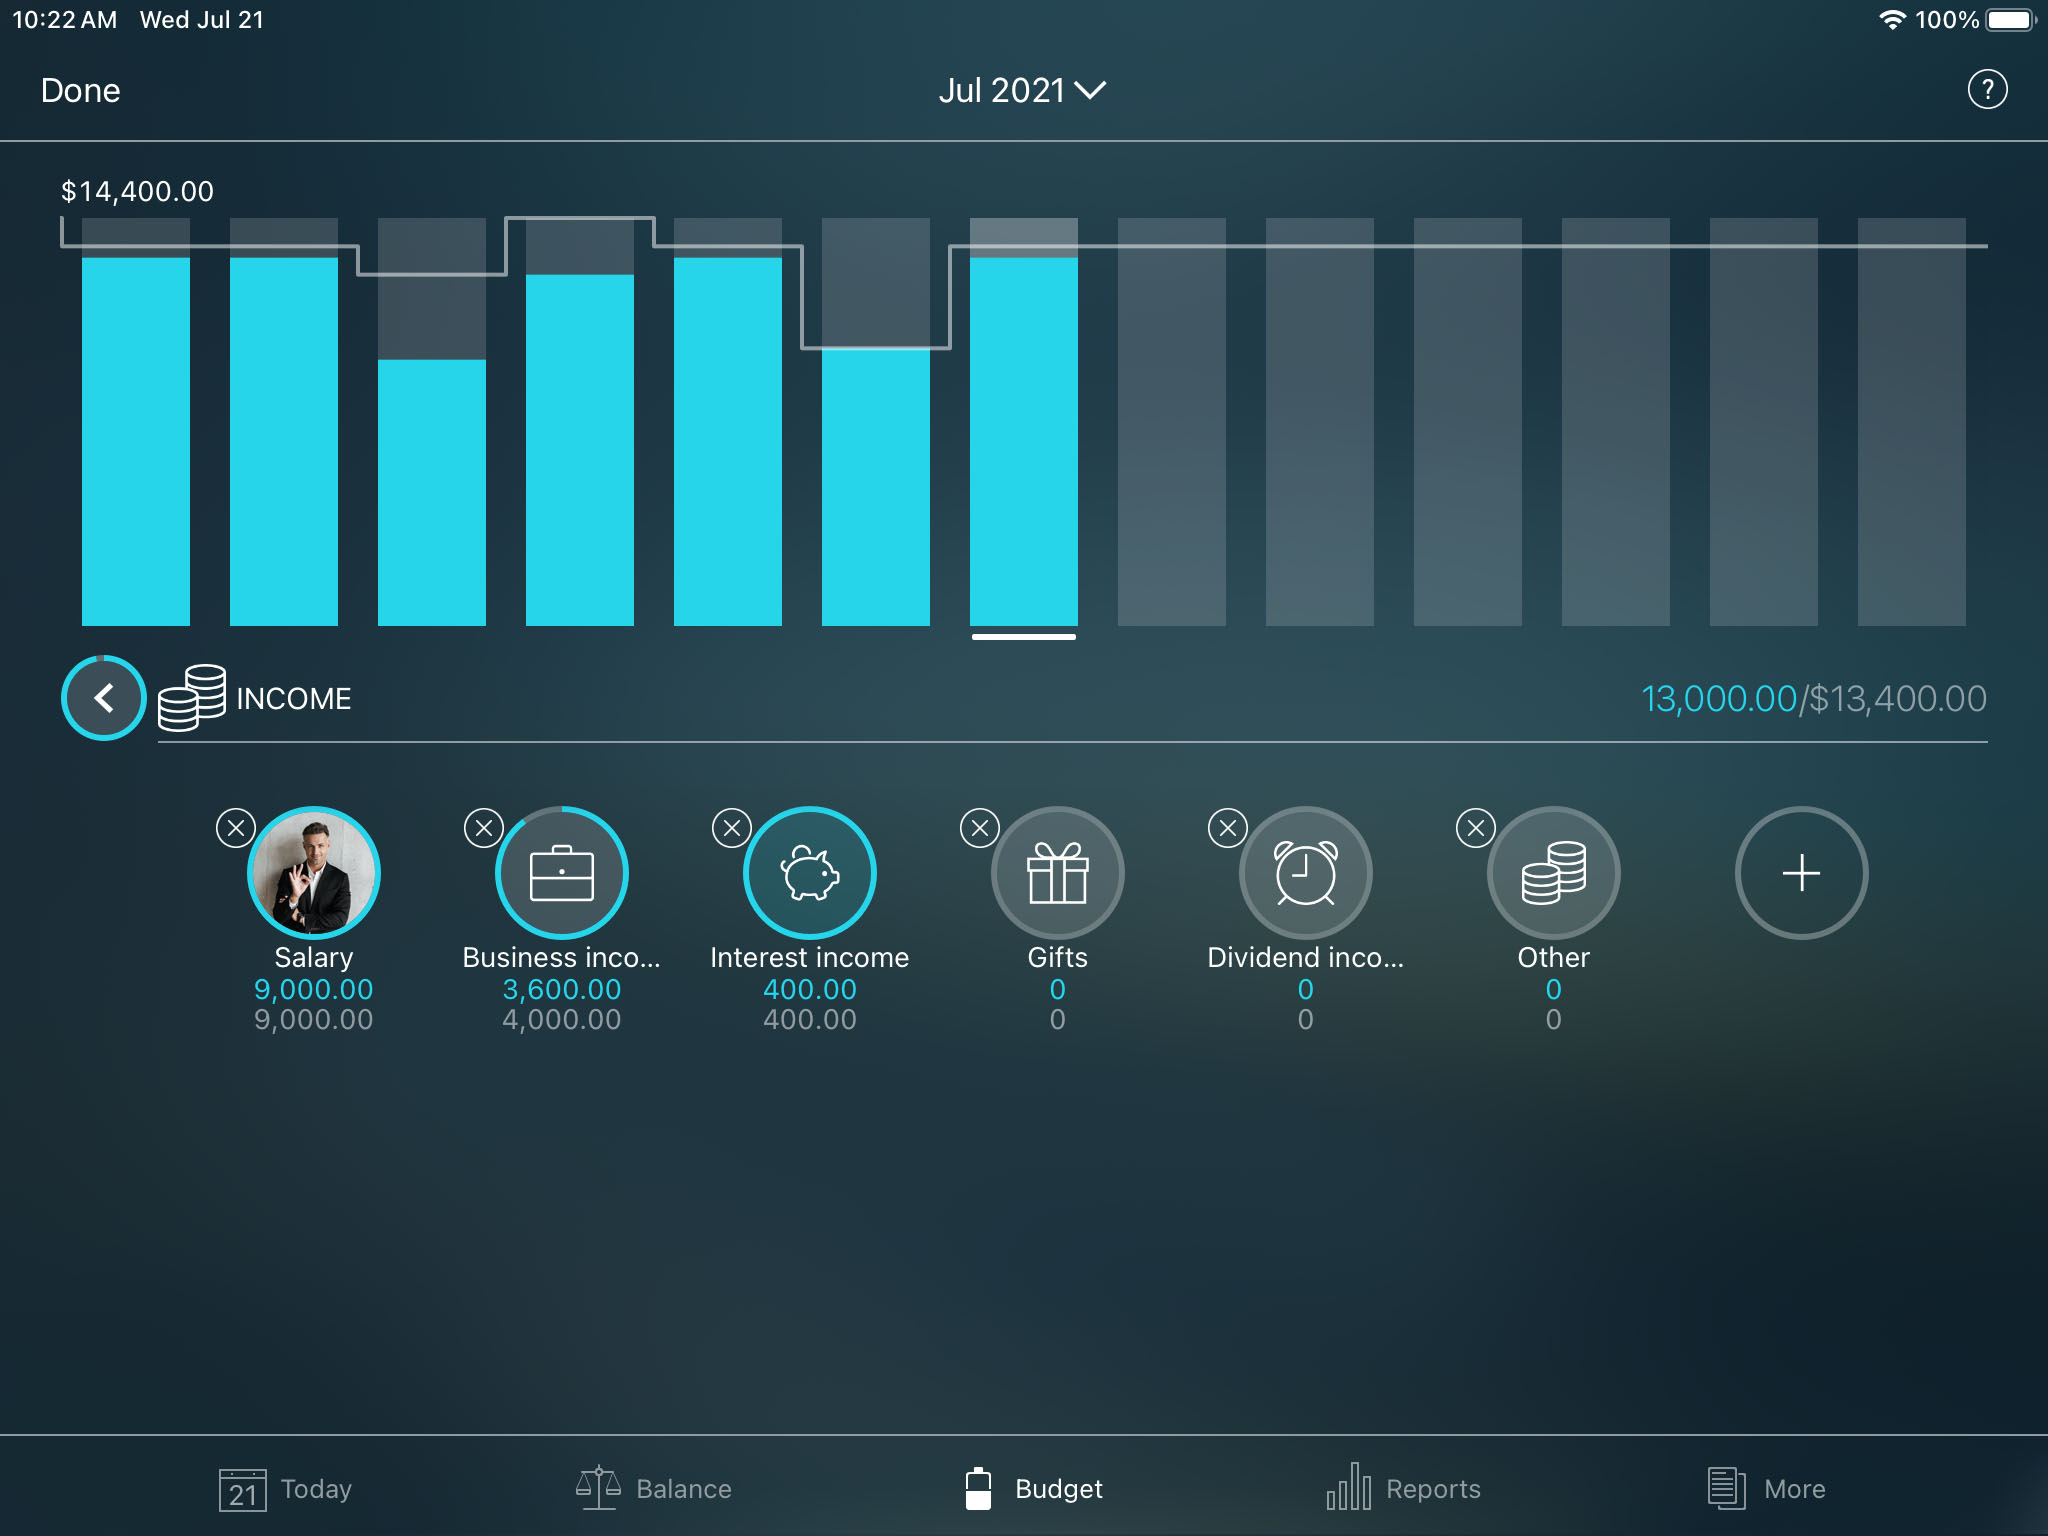
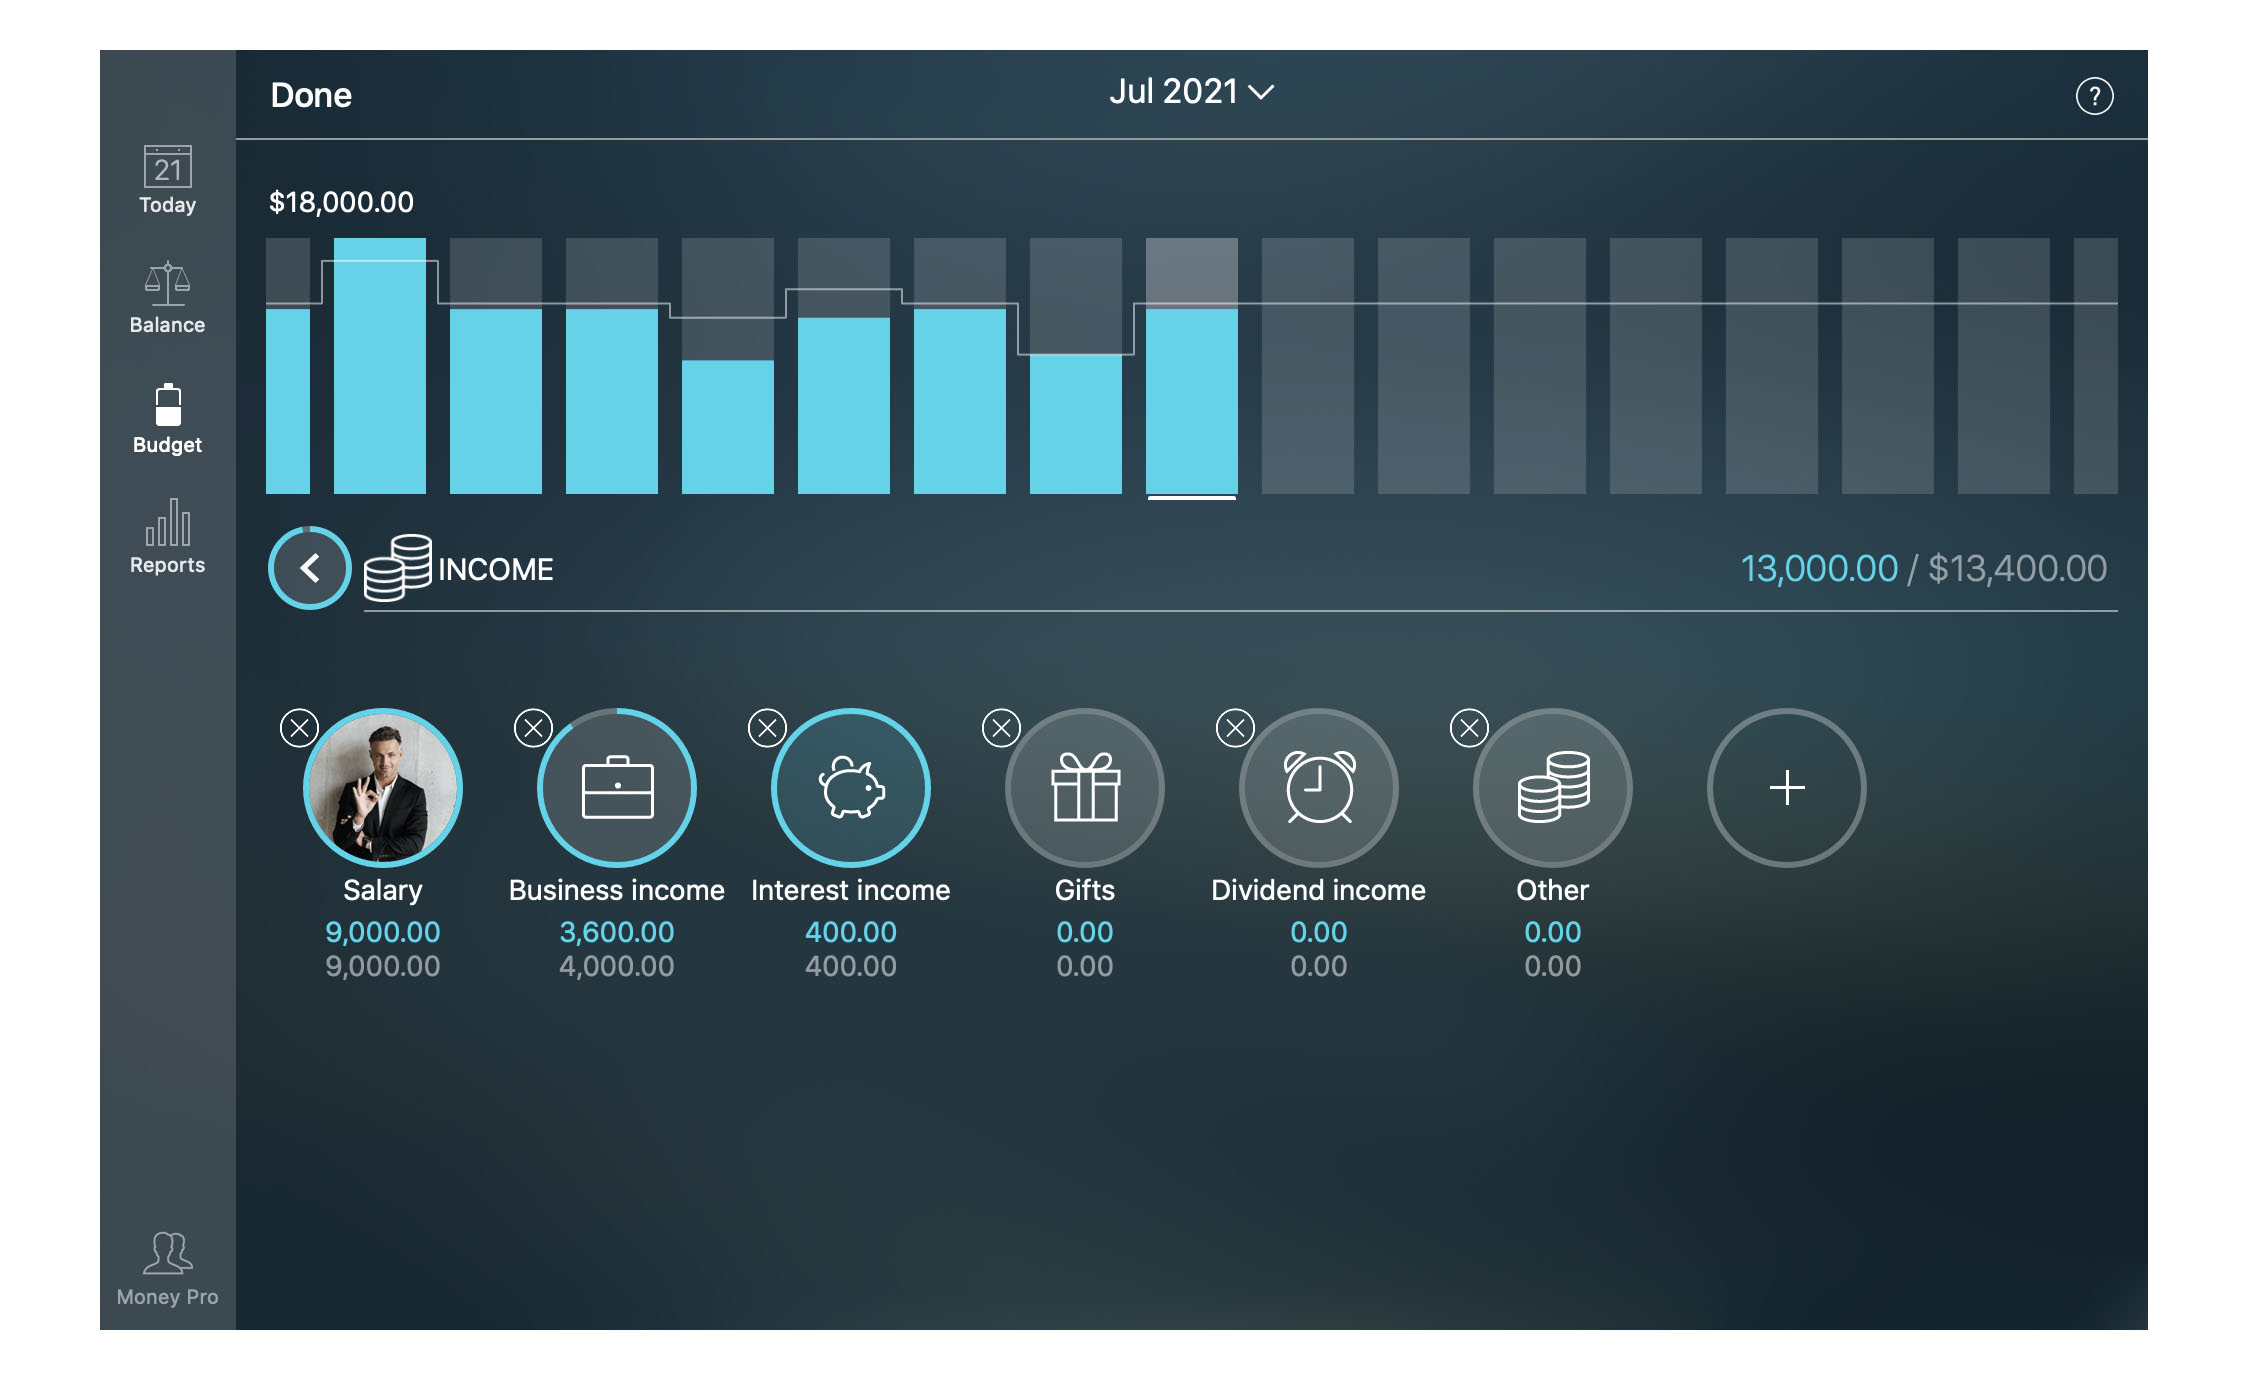
Go to the Budget section to create a budget. You can set up multiple budgets (one per category/subcategory). The budget limit for the category which has subcategories is calculated automatically as a sum of budget limits for the subcategories. Similarly, the Expenses budget is calculated automatically as a sum of individual expense budgets. The same way works for the Income budget. The Total amount gets calculated as the difference between Income and Expenses.
Tap/click “Edit” and set budget amounts for your income categories: salary, business income, dividends, etc.
Then set budget amounts for your expenses: utilities, dining, fuel, groceries, childcare, mortgage, etc.
You can set up your budget using the preset categories or add new categories by pressing “+” at the end of the list.
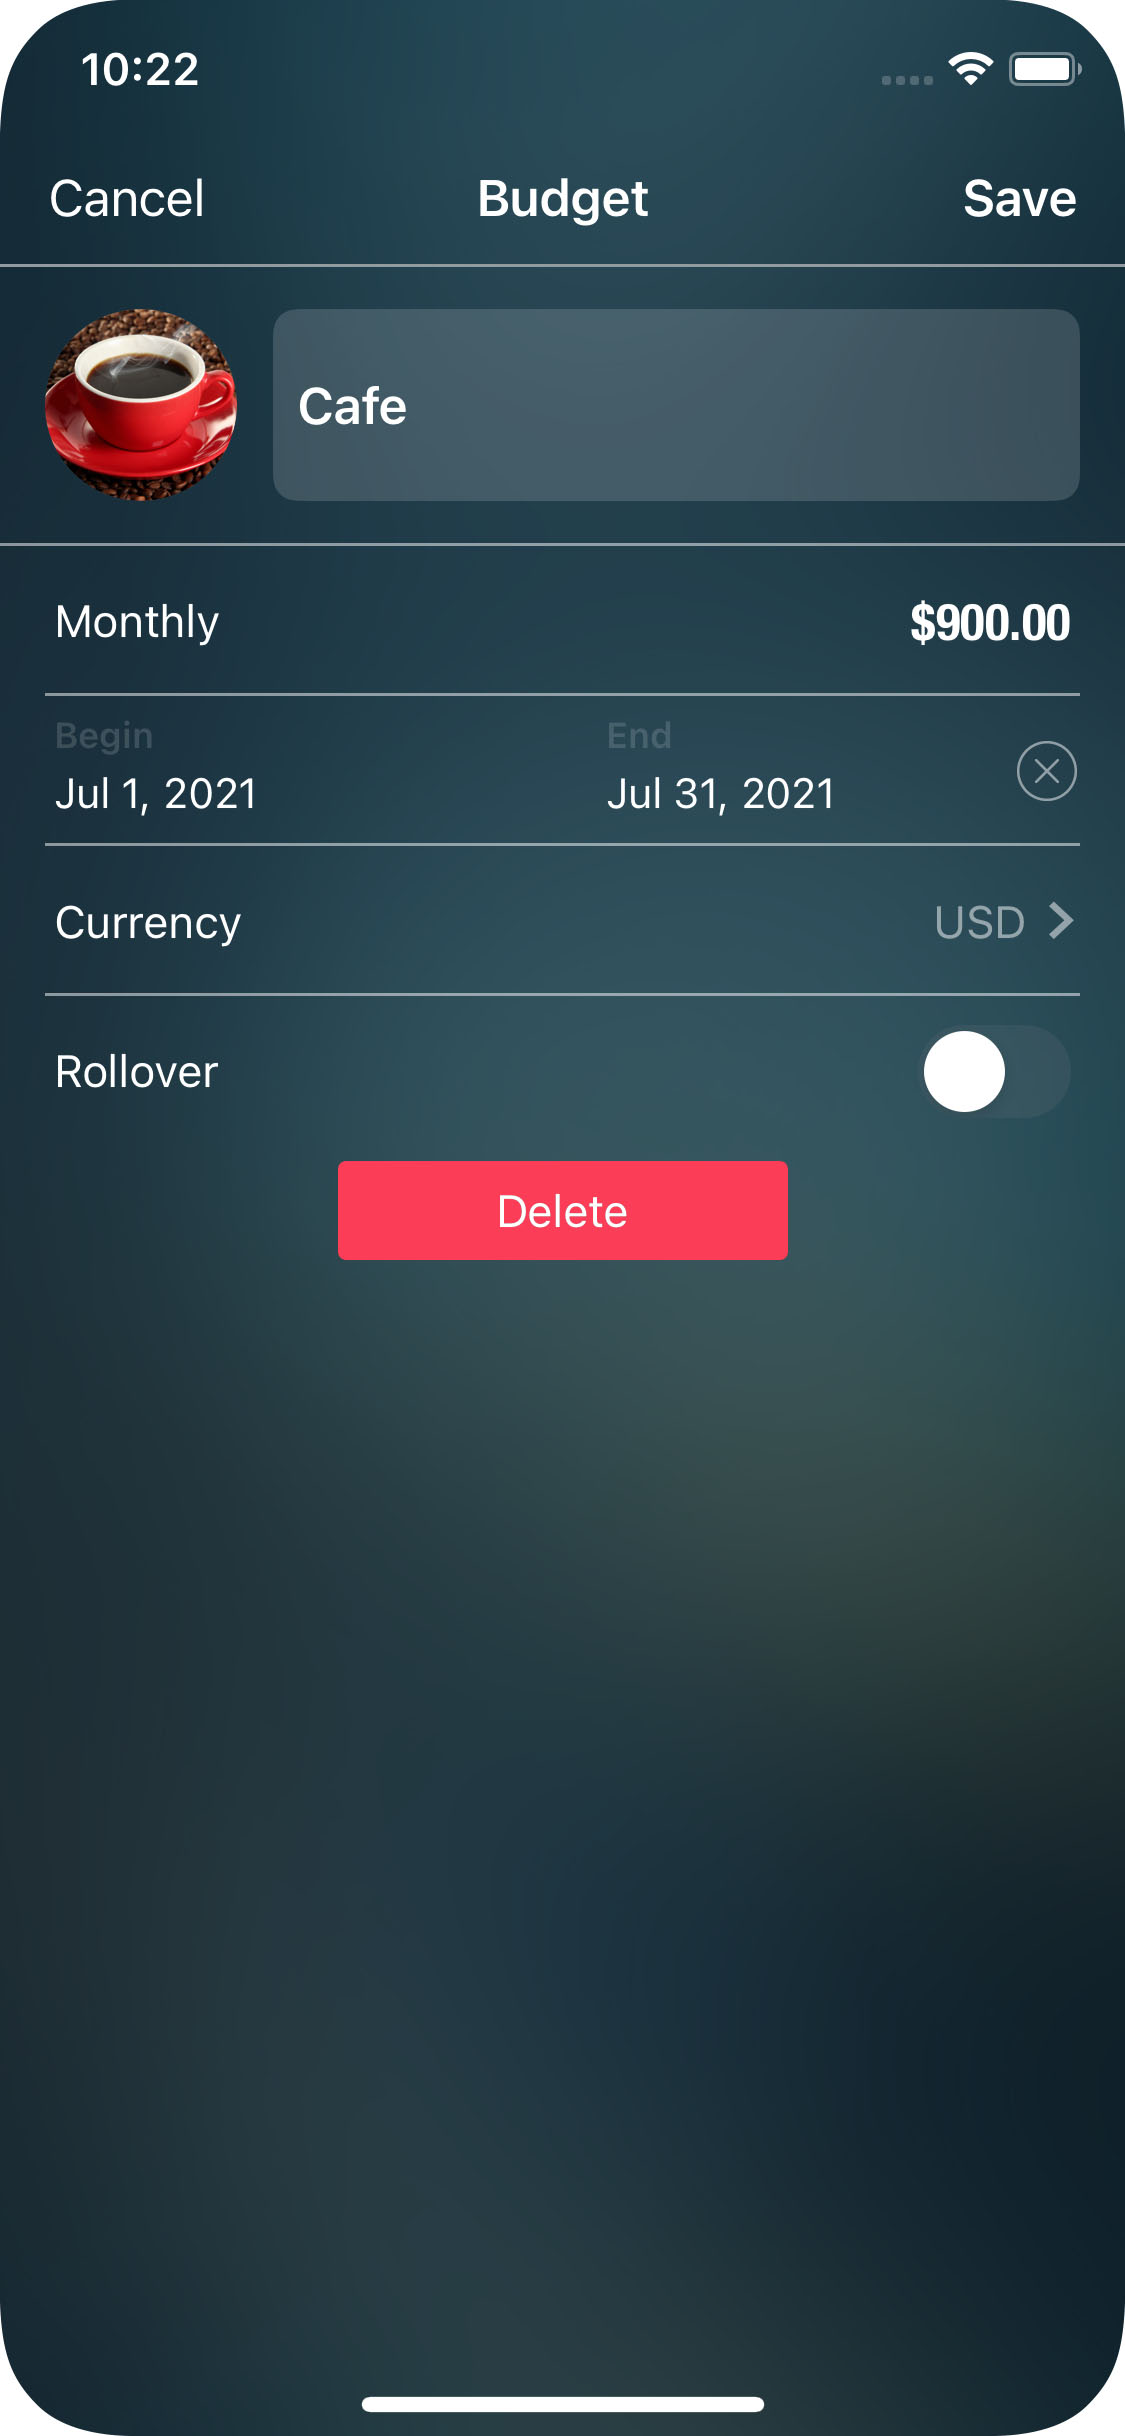
When the category is selected, fill in the rest of the fields for the budget entry:
- Periodicity (“Monthly” by default): The periodicity is set up only for the given budget entry. You can set your budget to repeat “Every Day”, “Every Week”, “Every 2 Weeks”, “Every Month”, “Every Year”, etc.
- Amount: The maximum amount you are willing to spend on this category (on this budget).
- Begin date and end date: If the end date is empty or far enough to include several periods, this budget entry becomes recurring and will be automatically generated with the selected periodicity.
- Currency: You can use different currencies for your budget entries.
- Rollover: This option transfers the leftover of the current period to the next budget period.
Tap/click “Save” and set up other budget entries similarly.
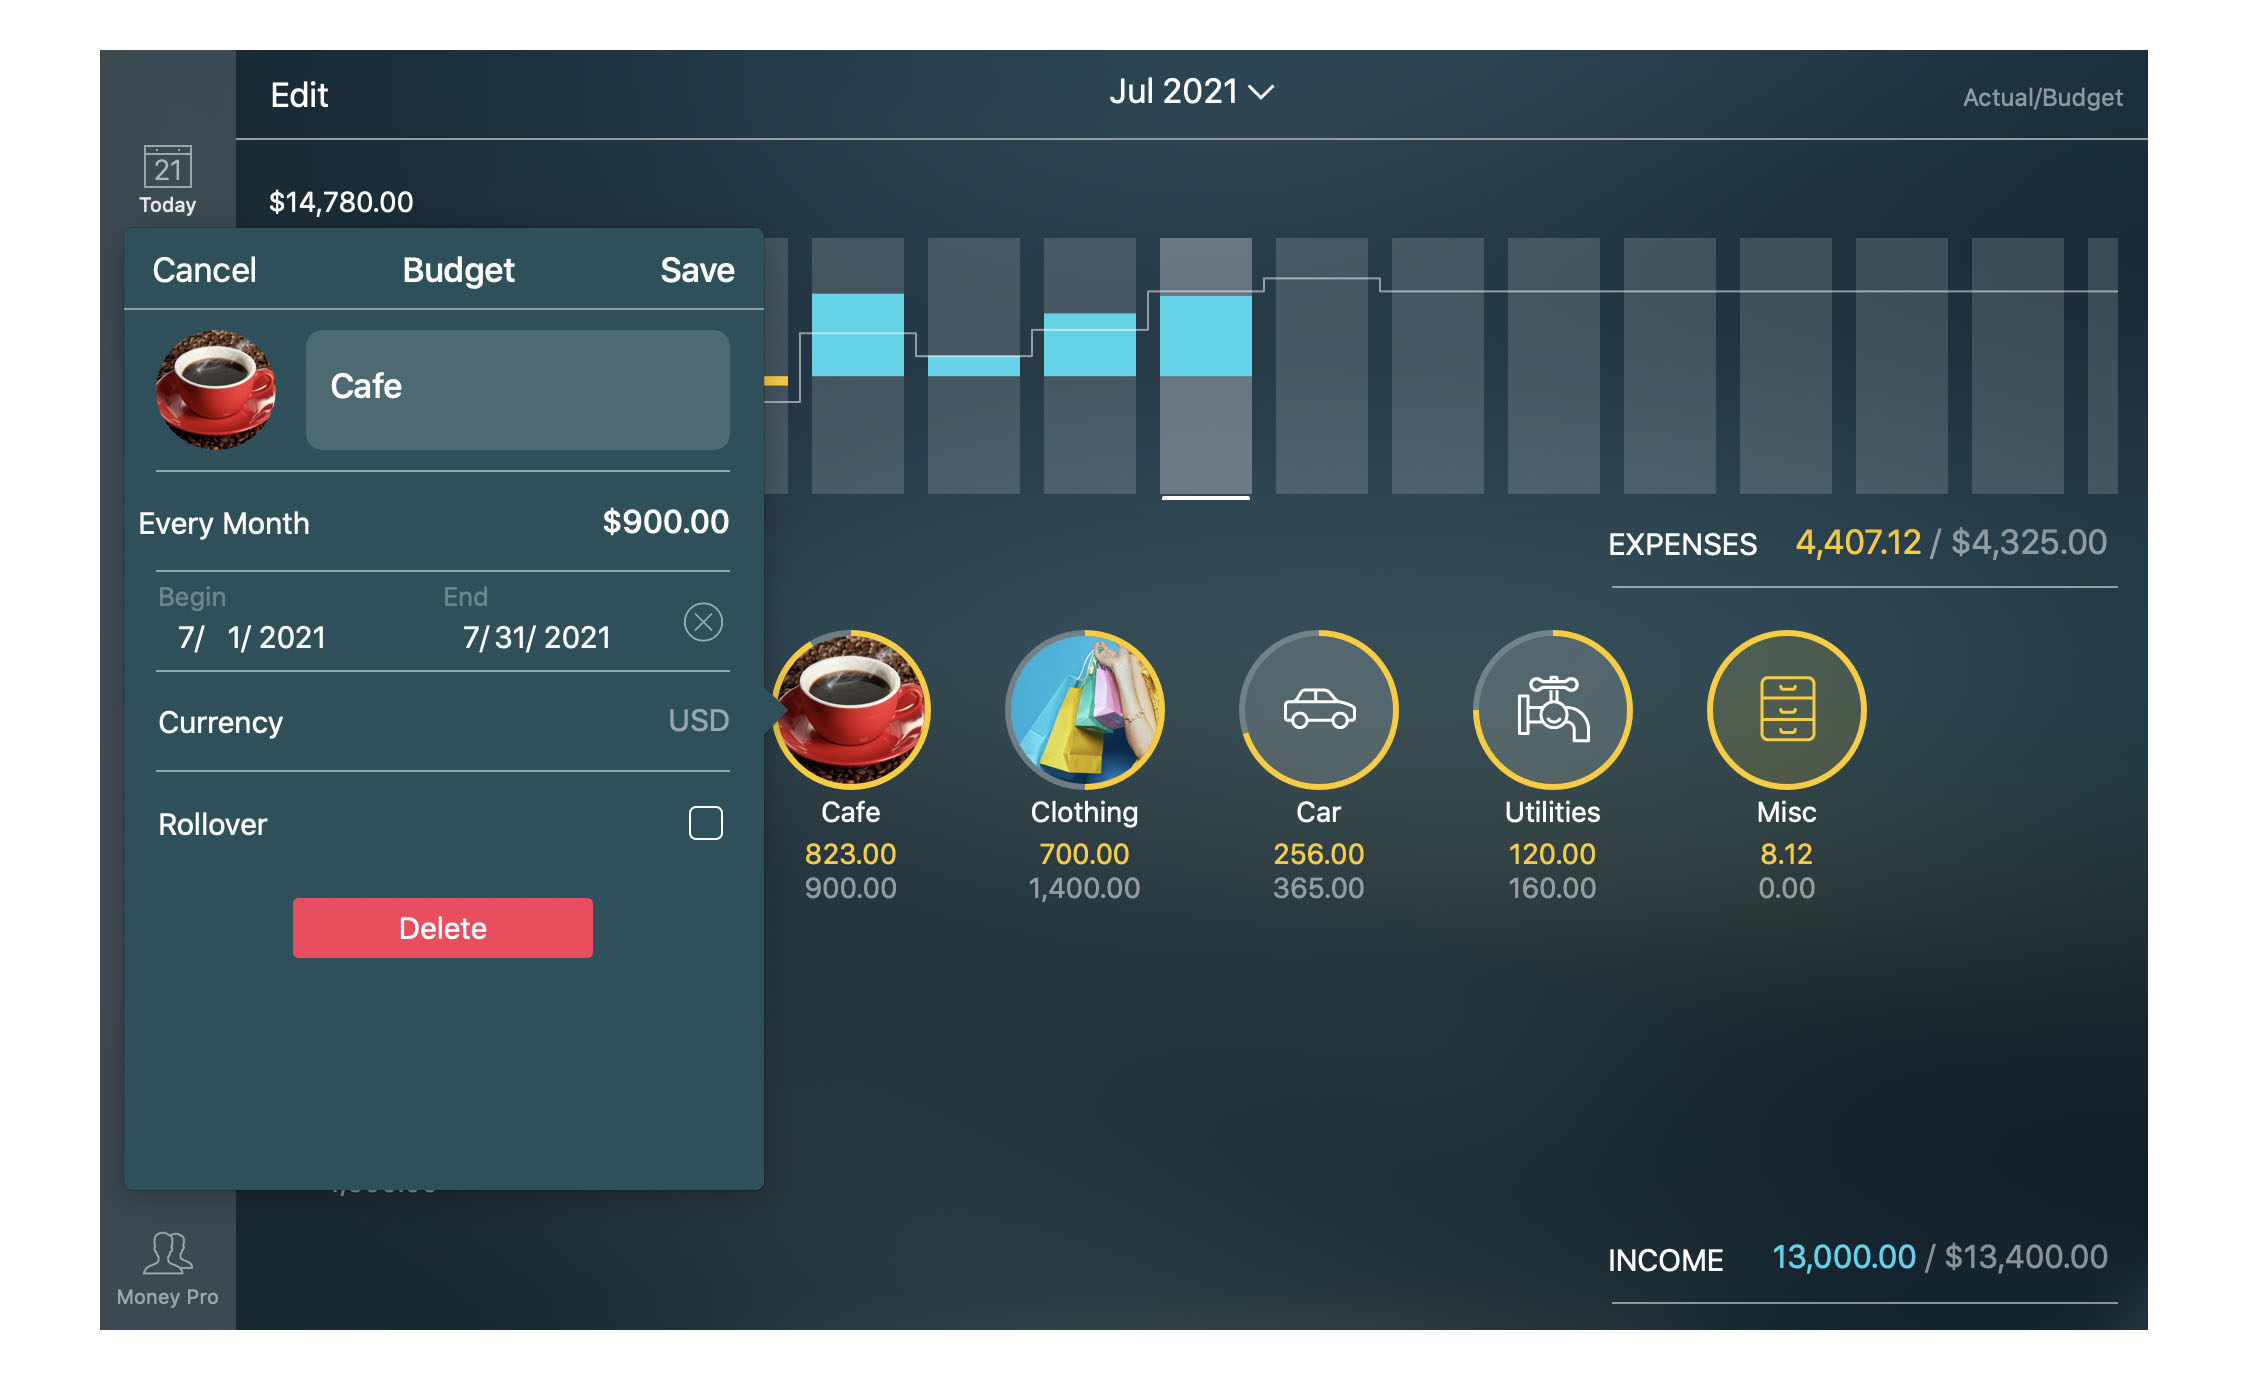
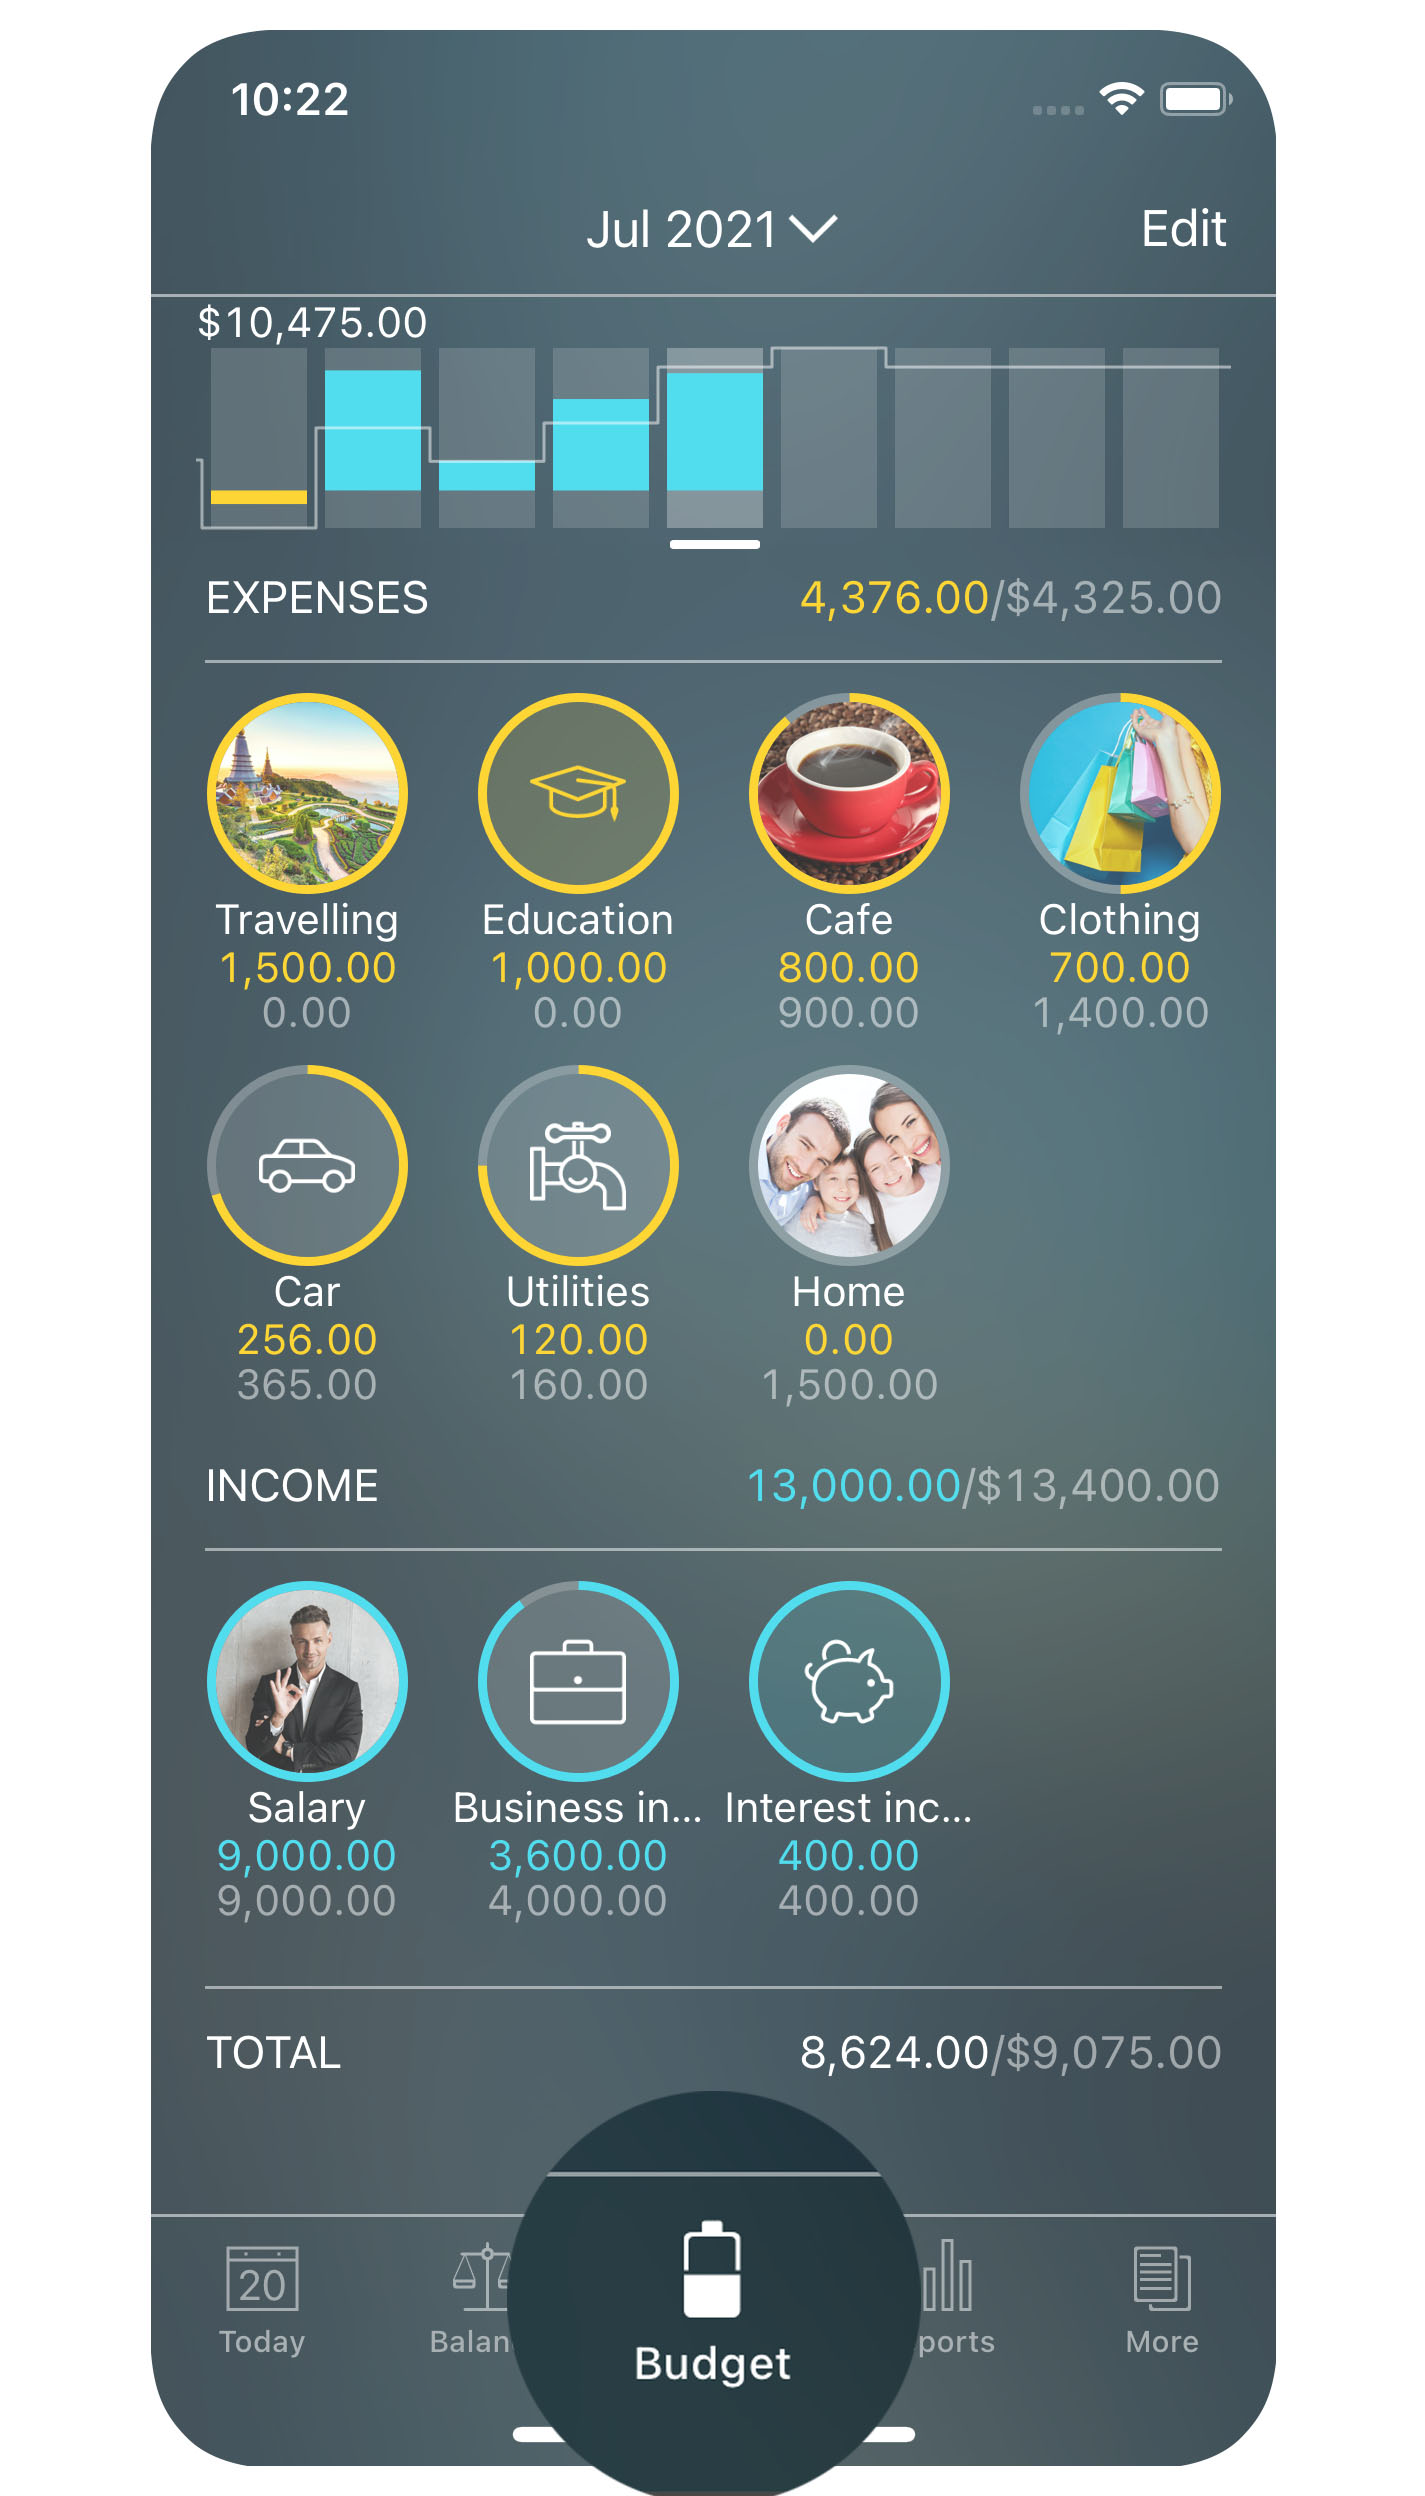
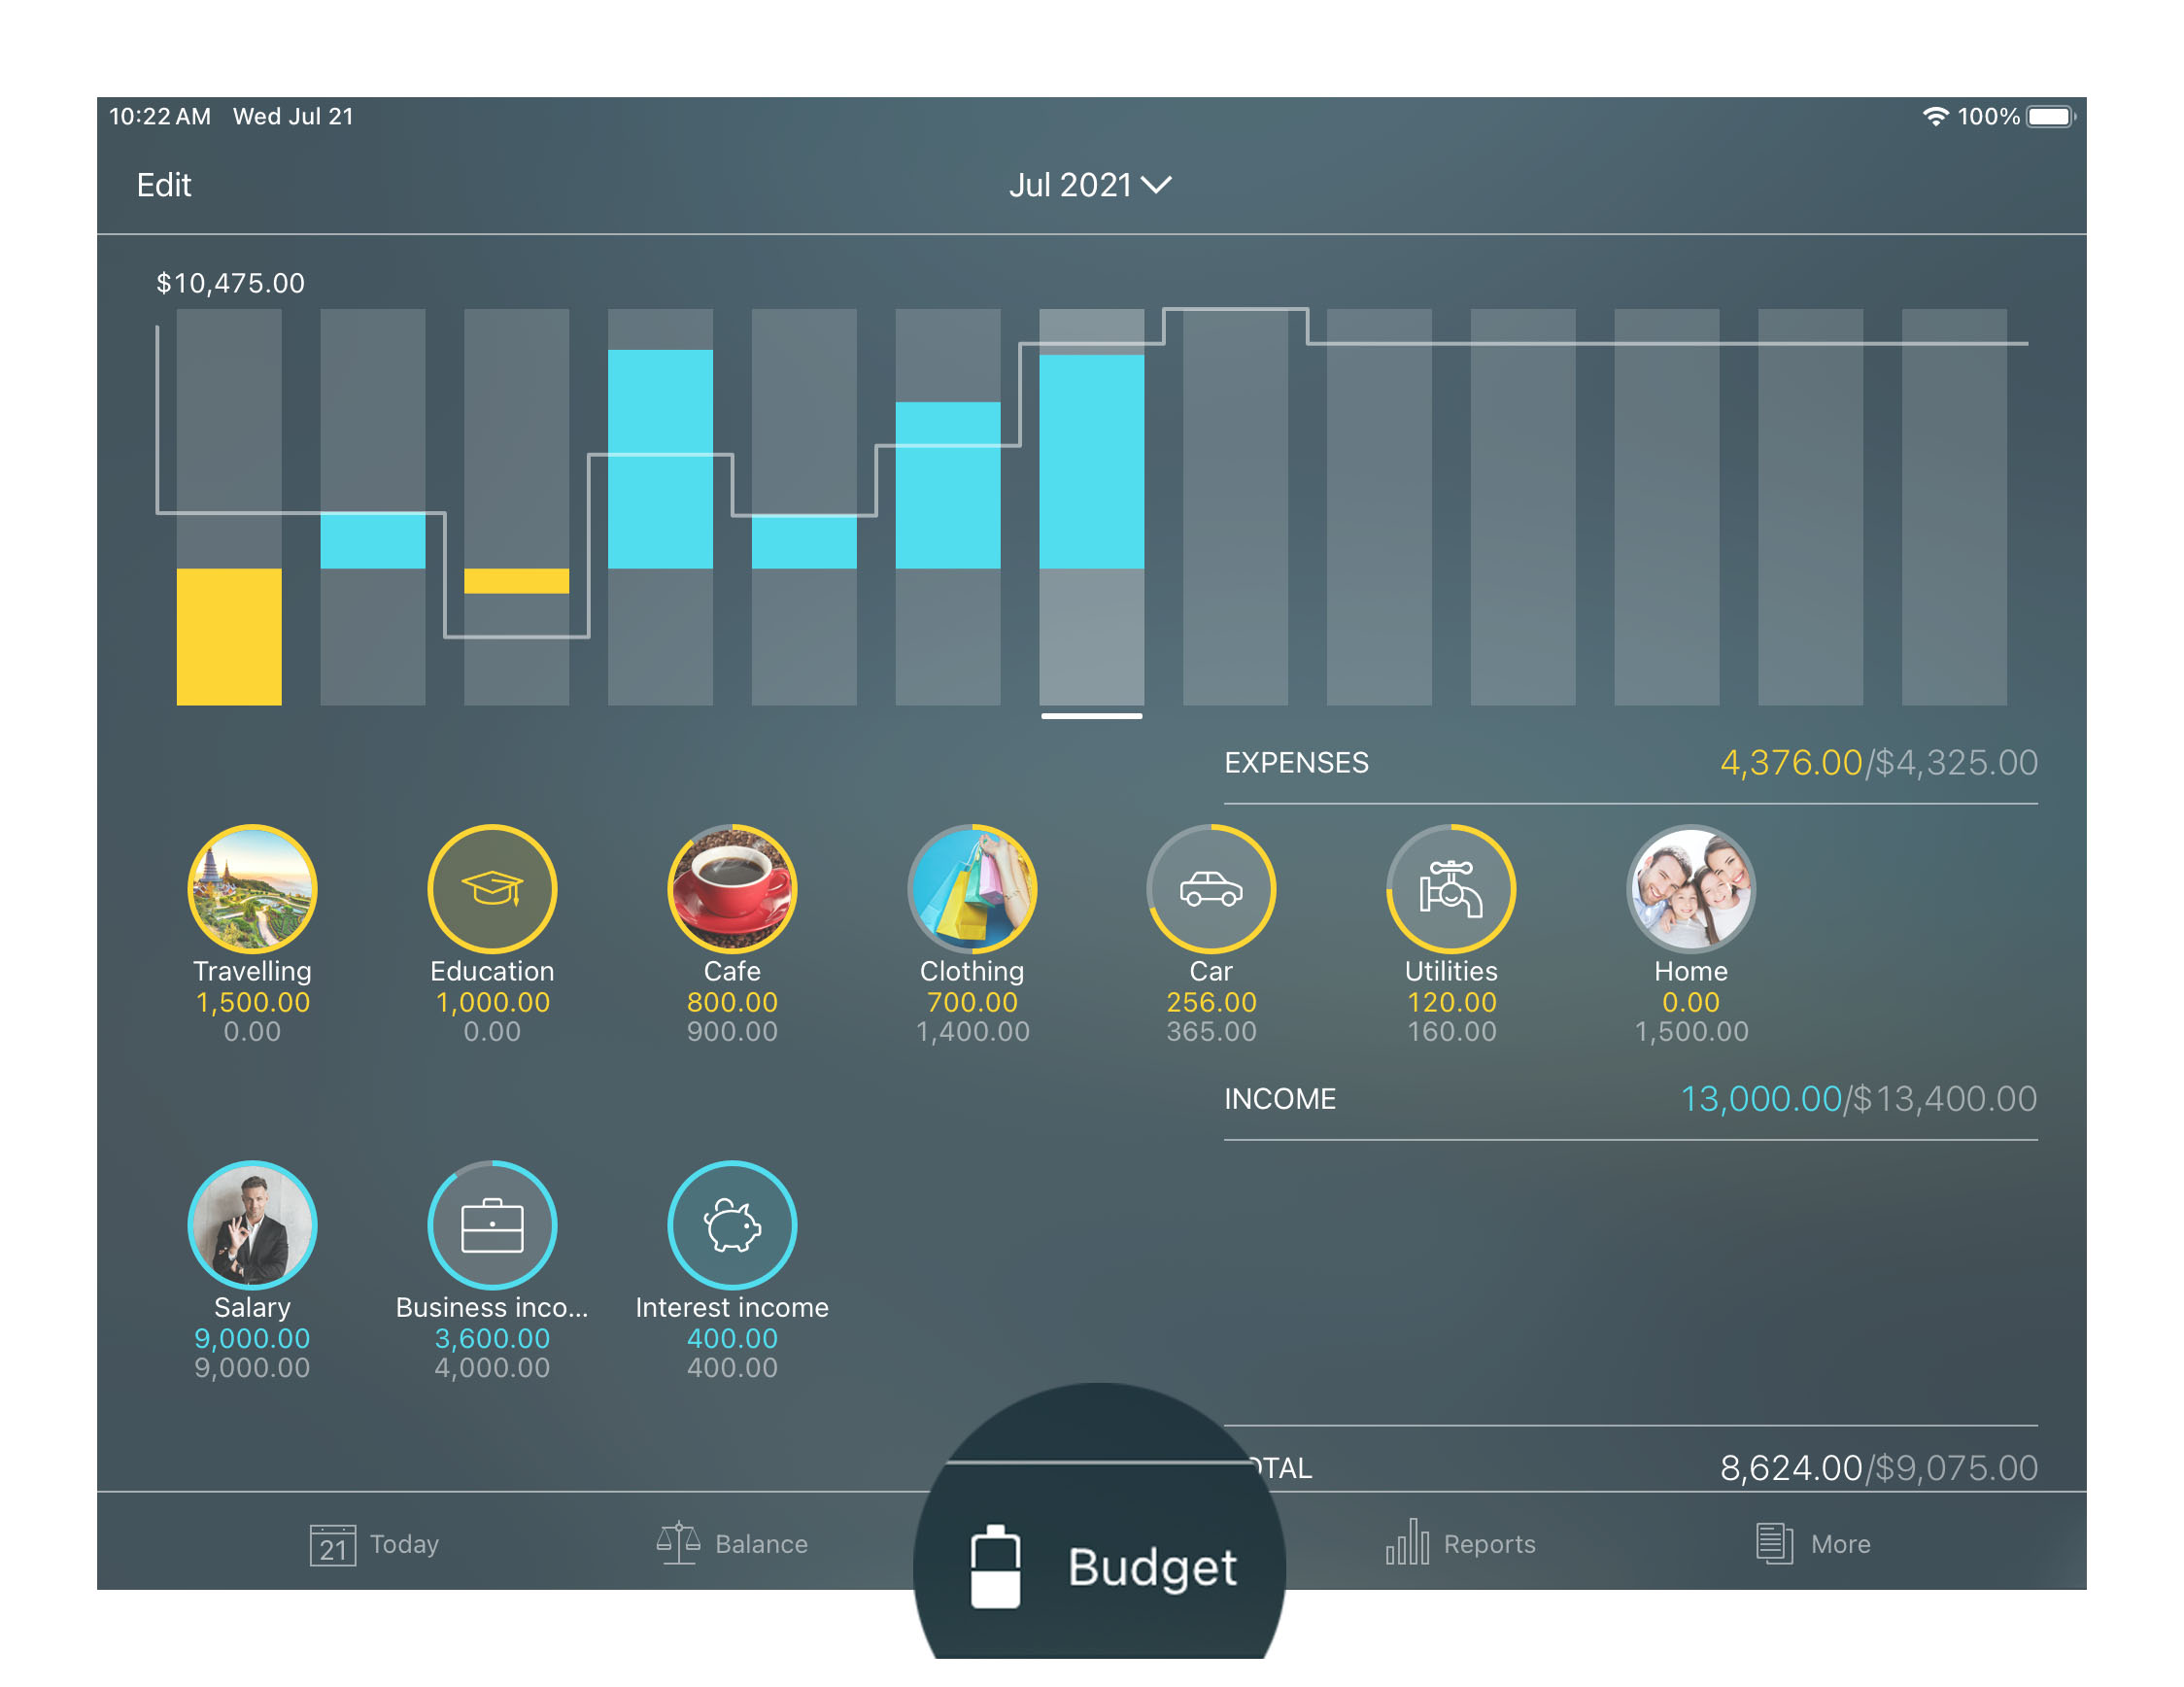
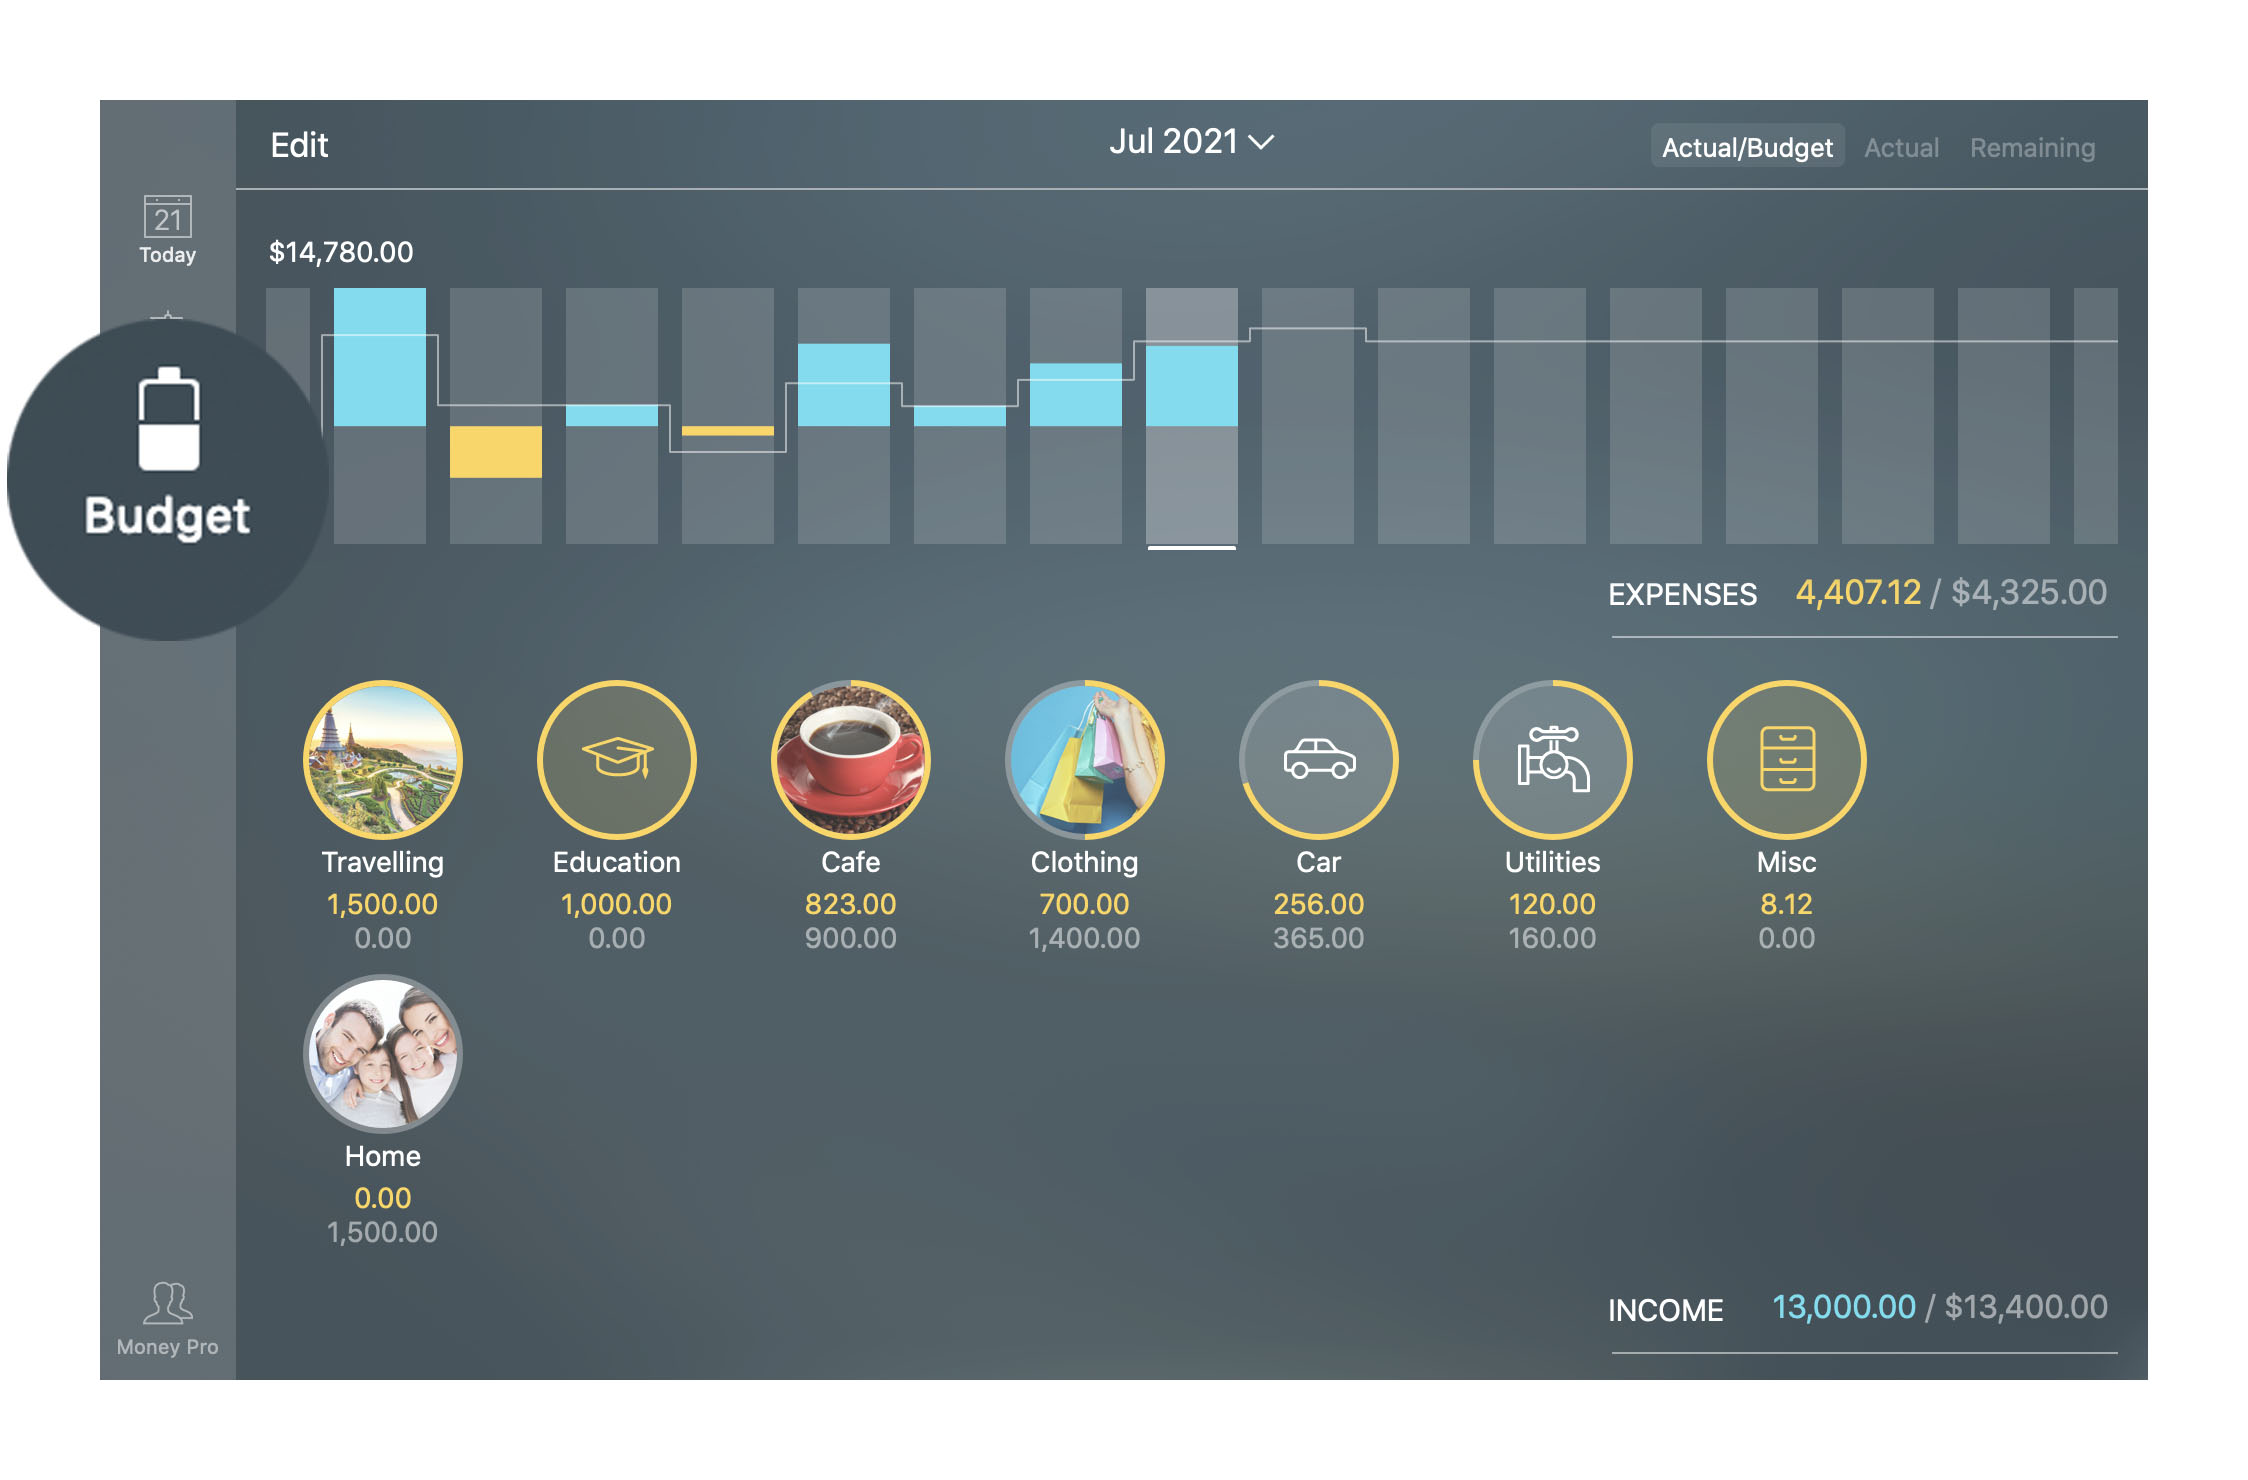
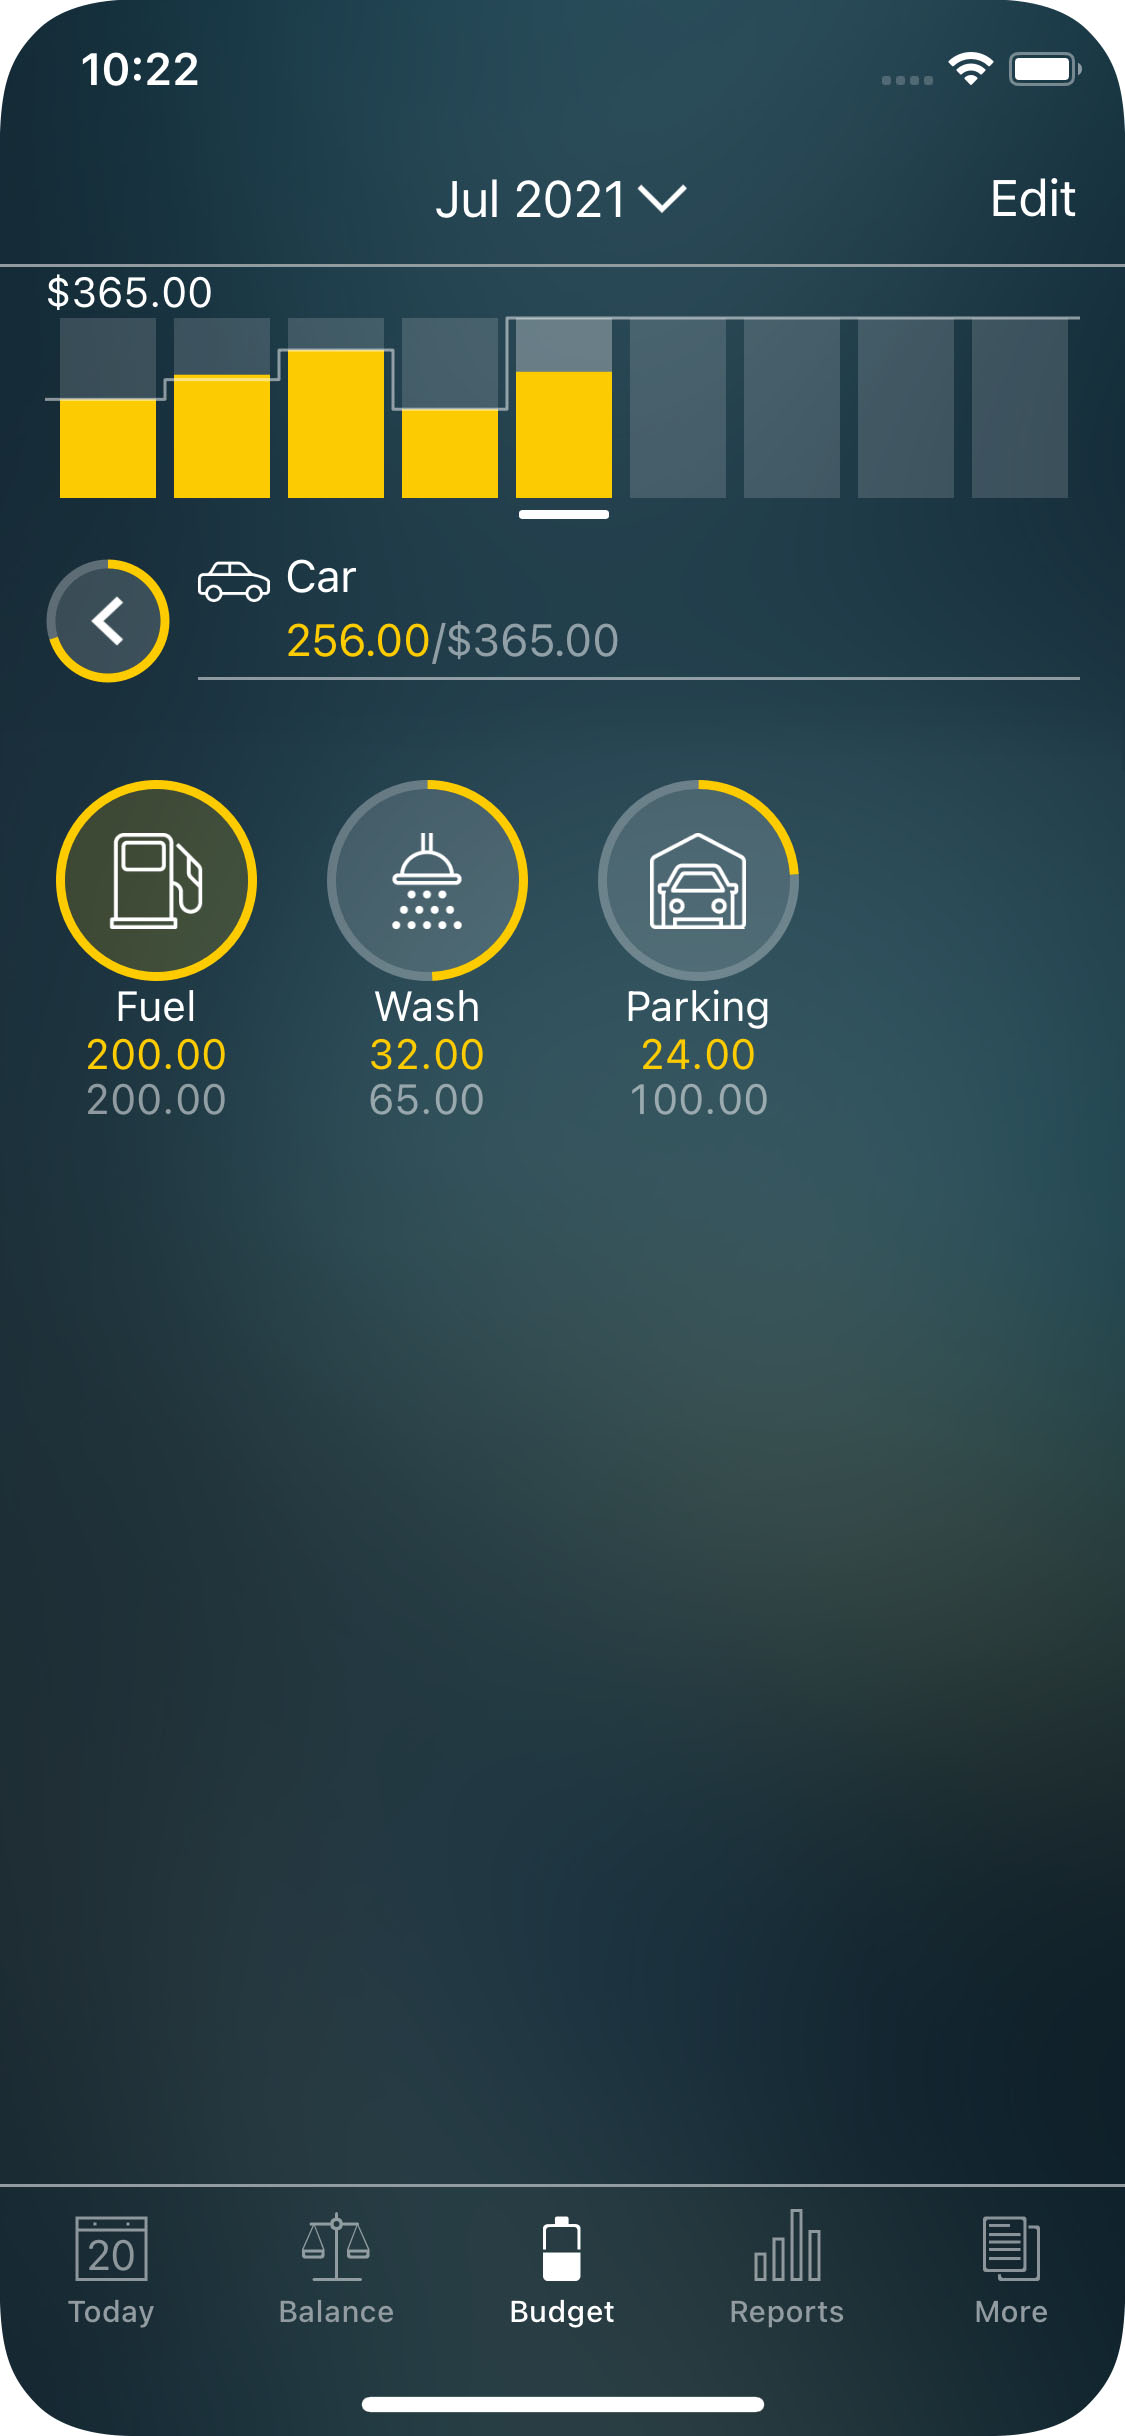
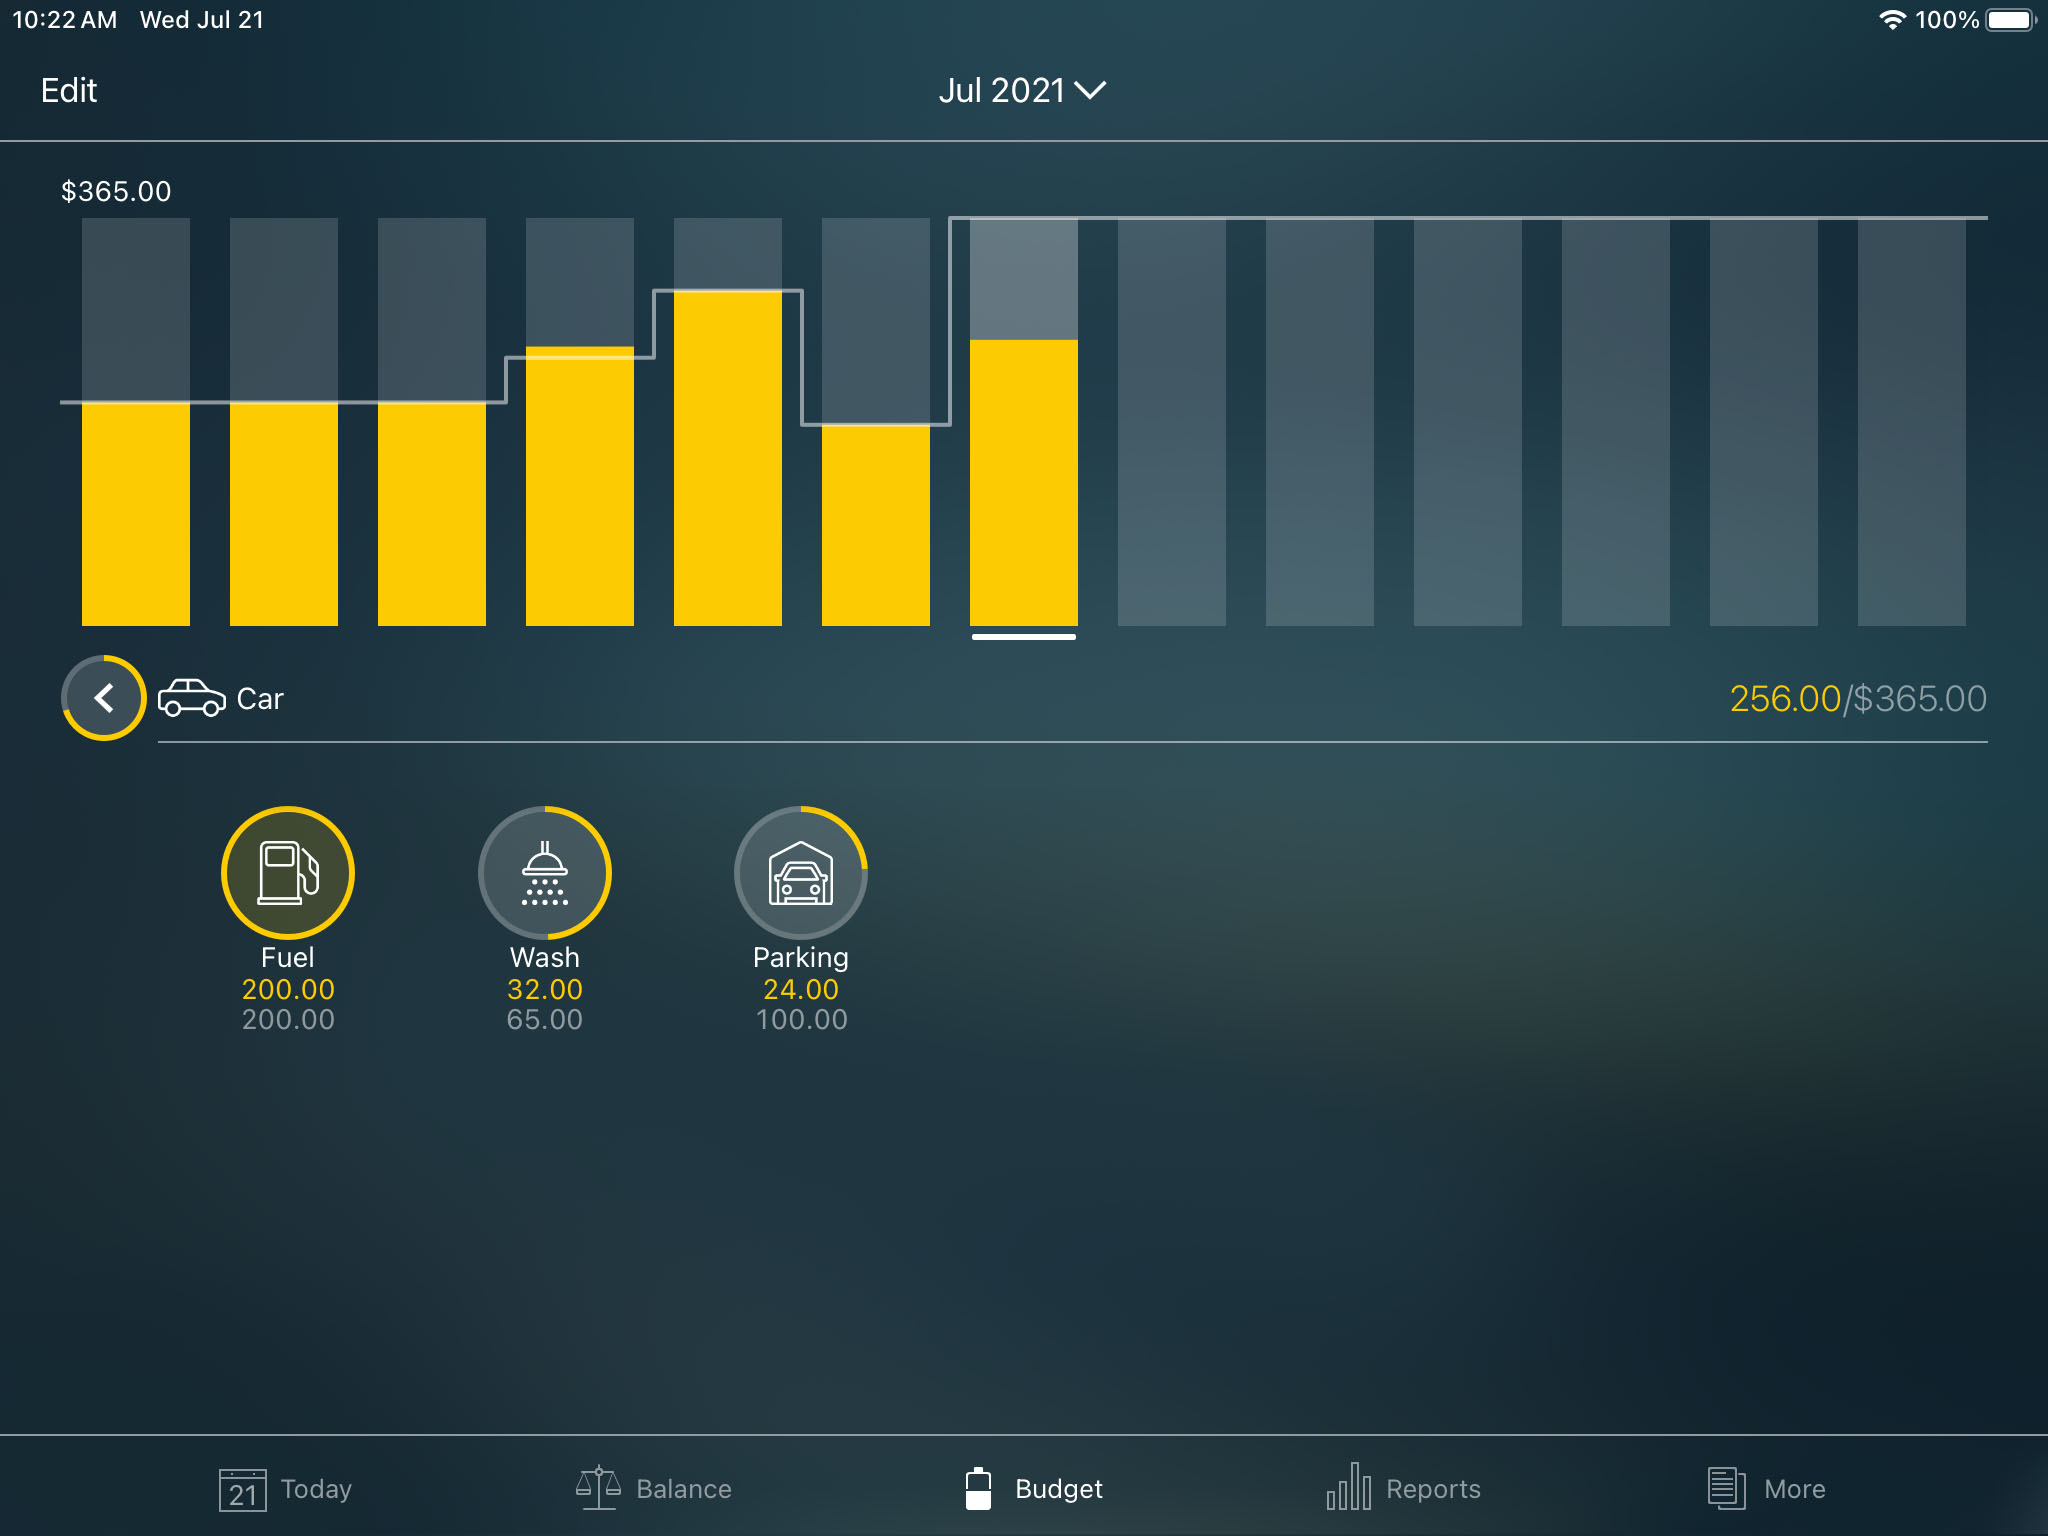
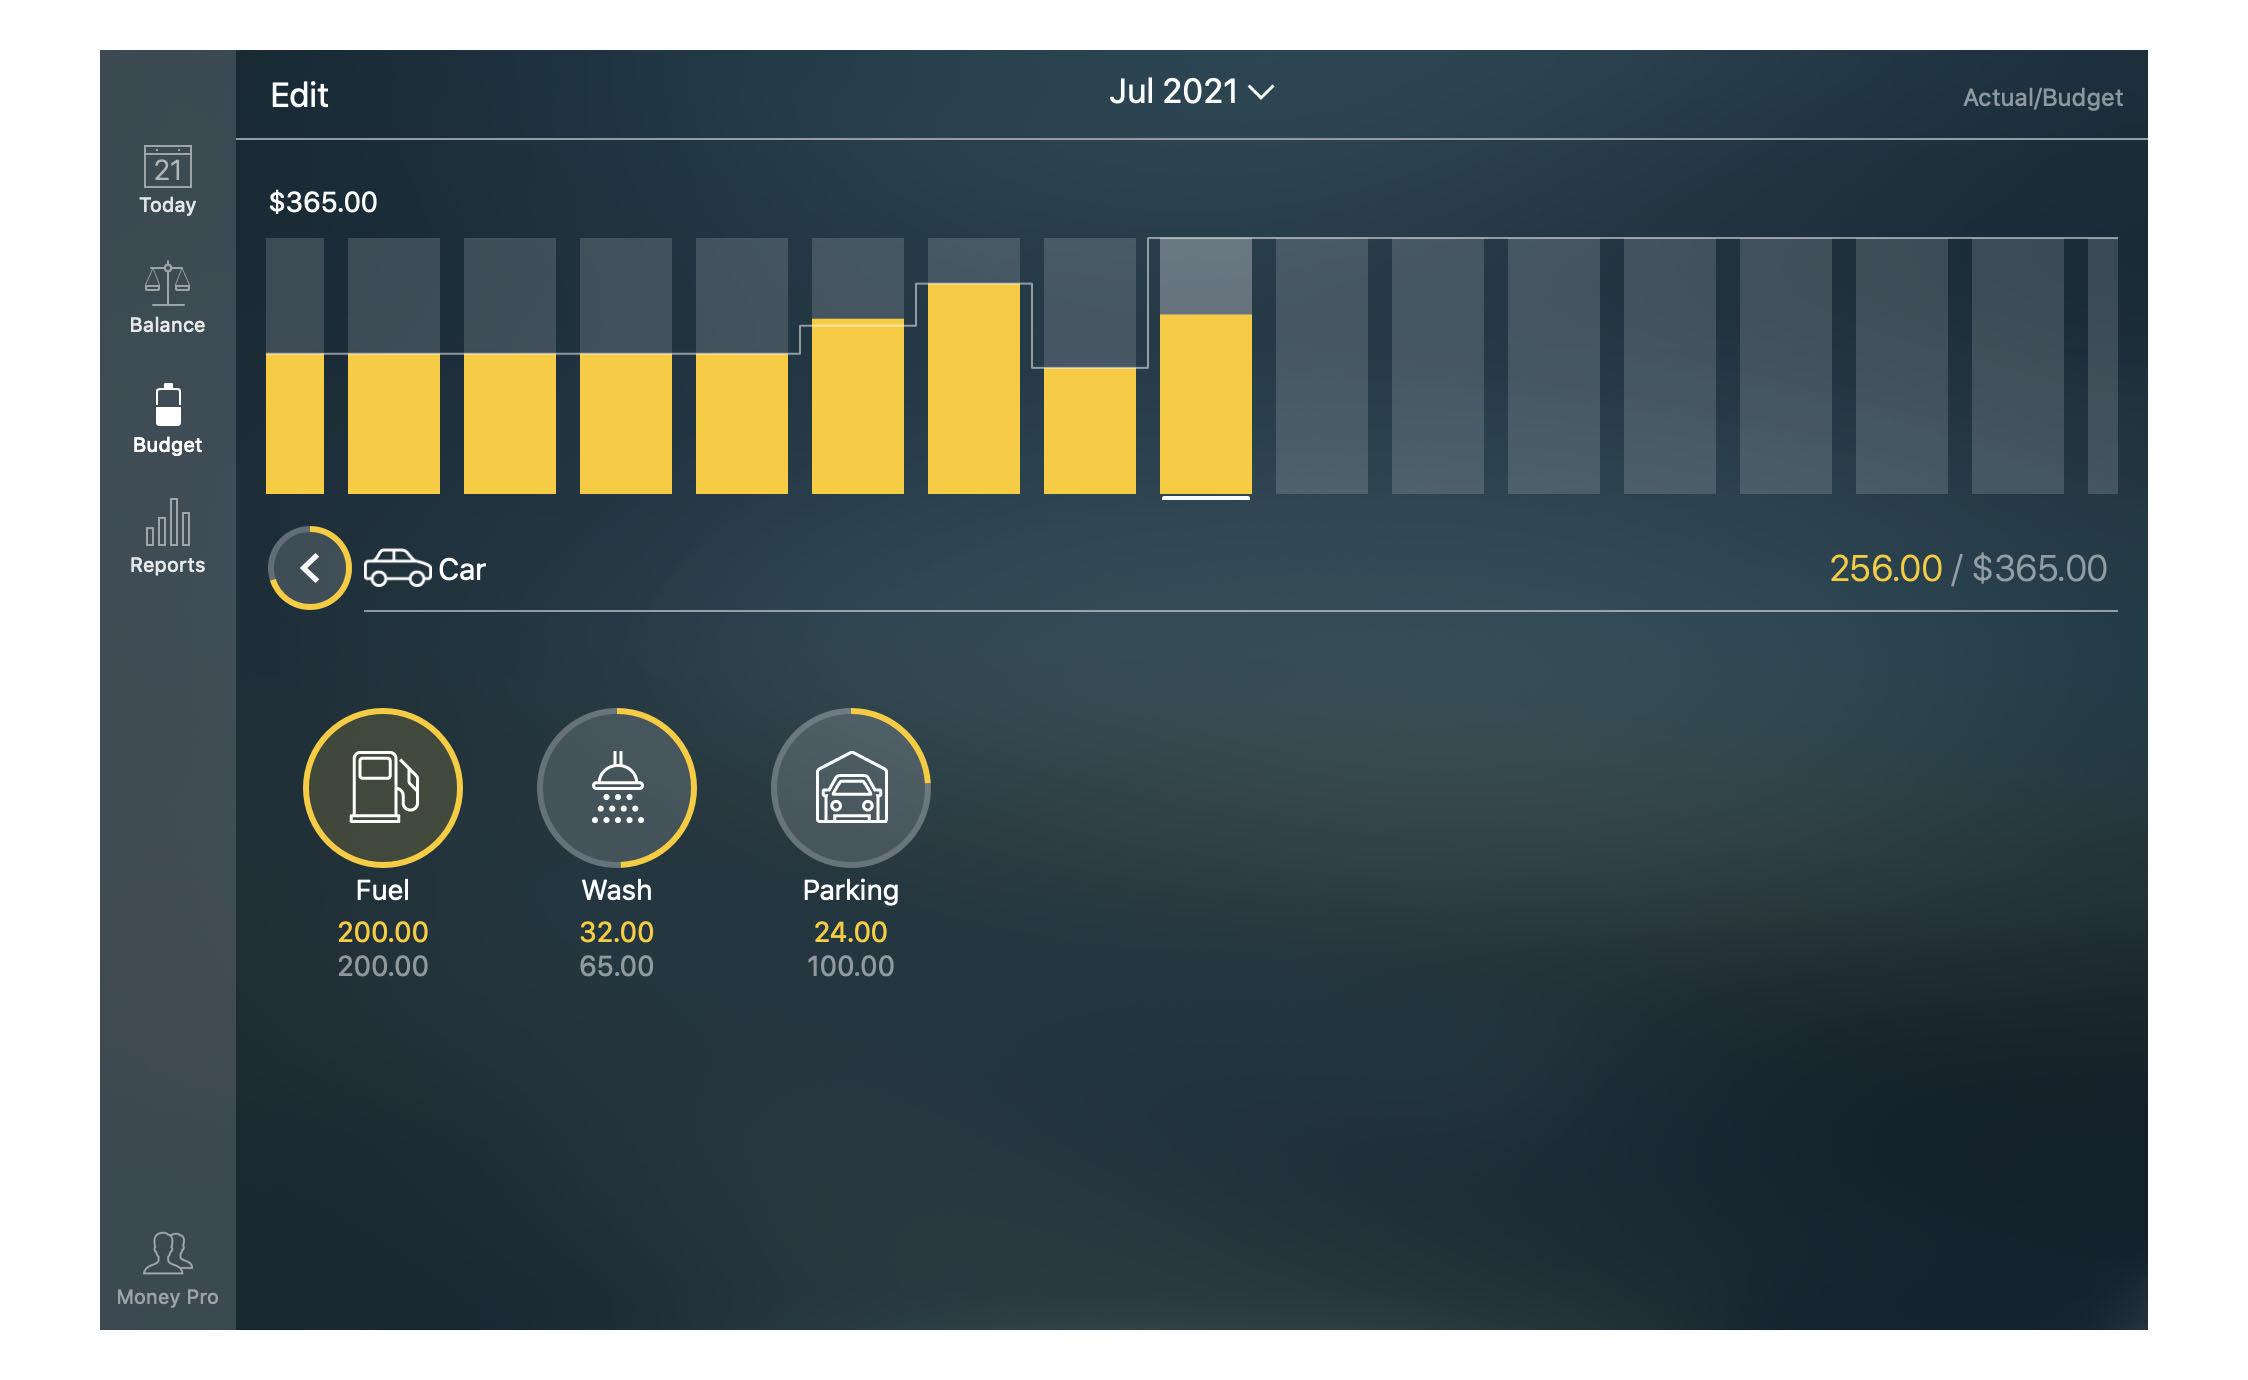
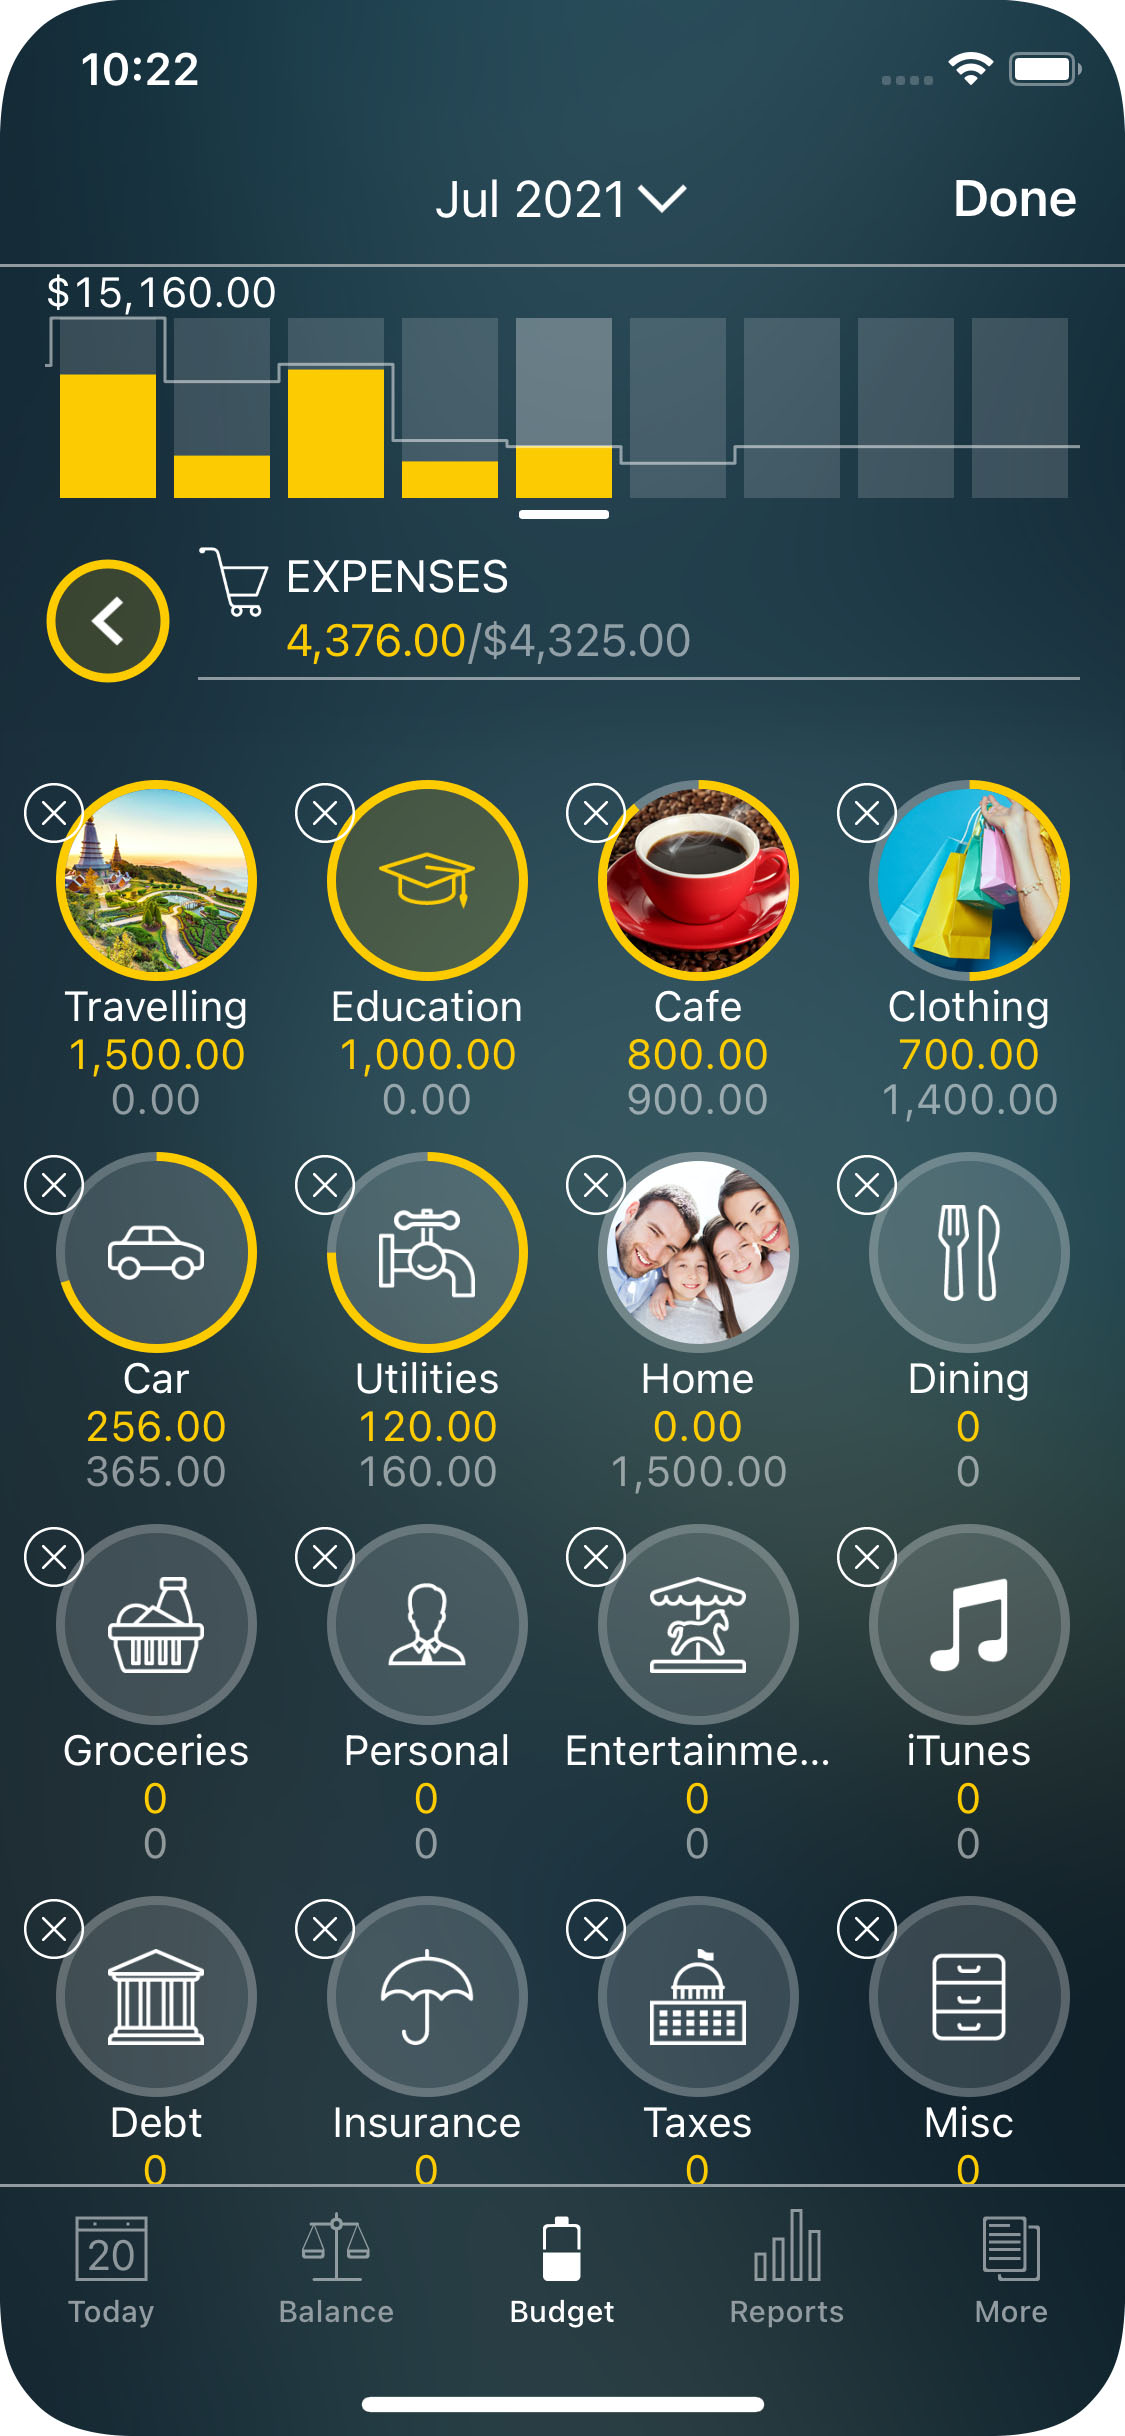
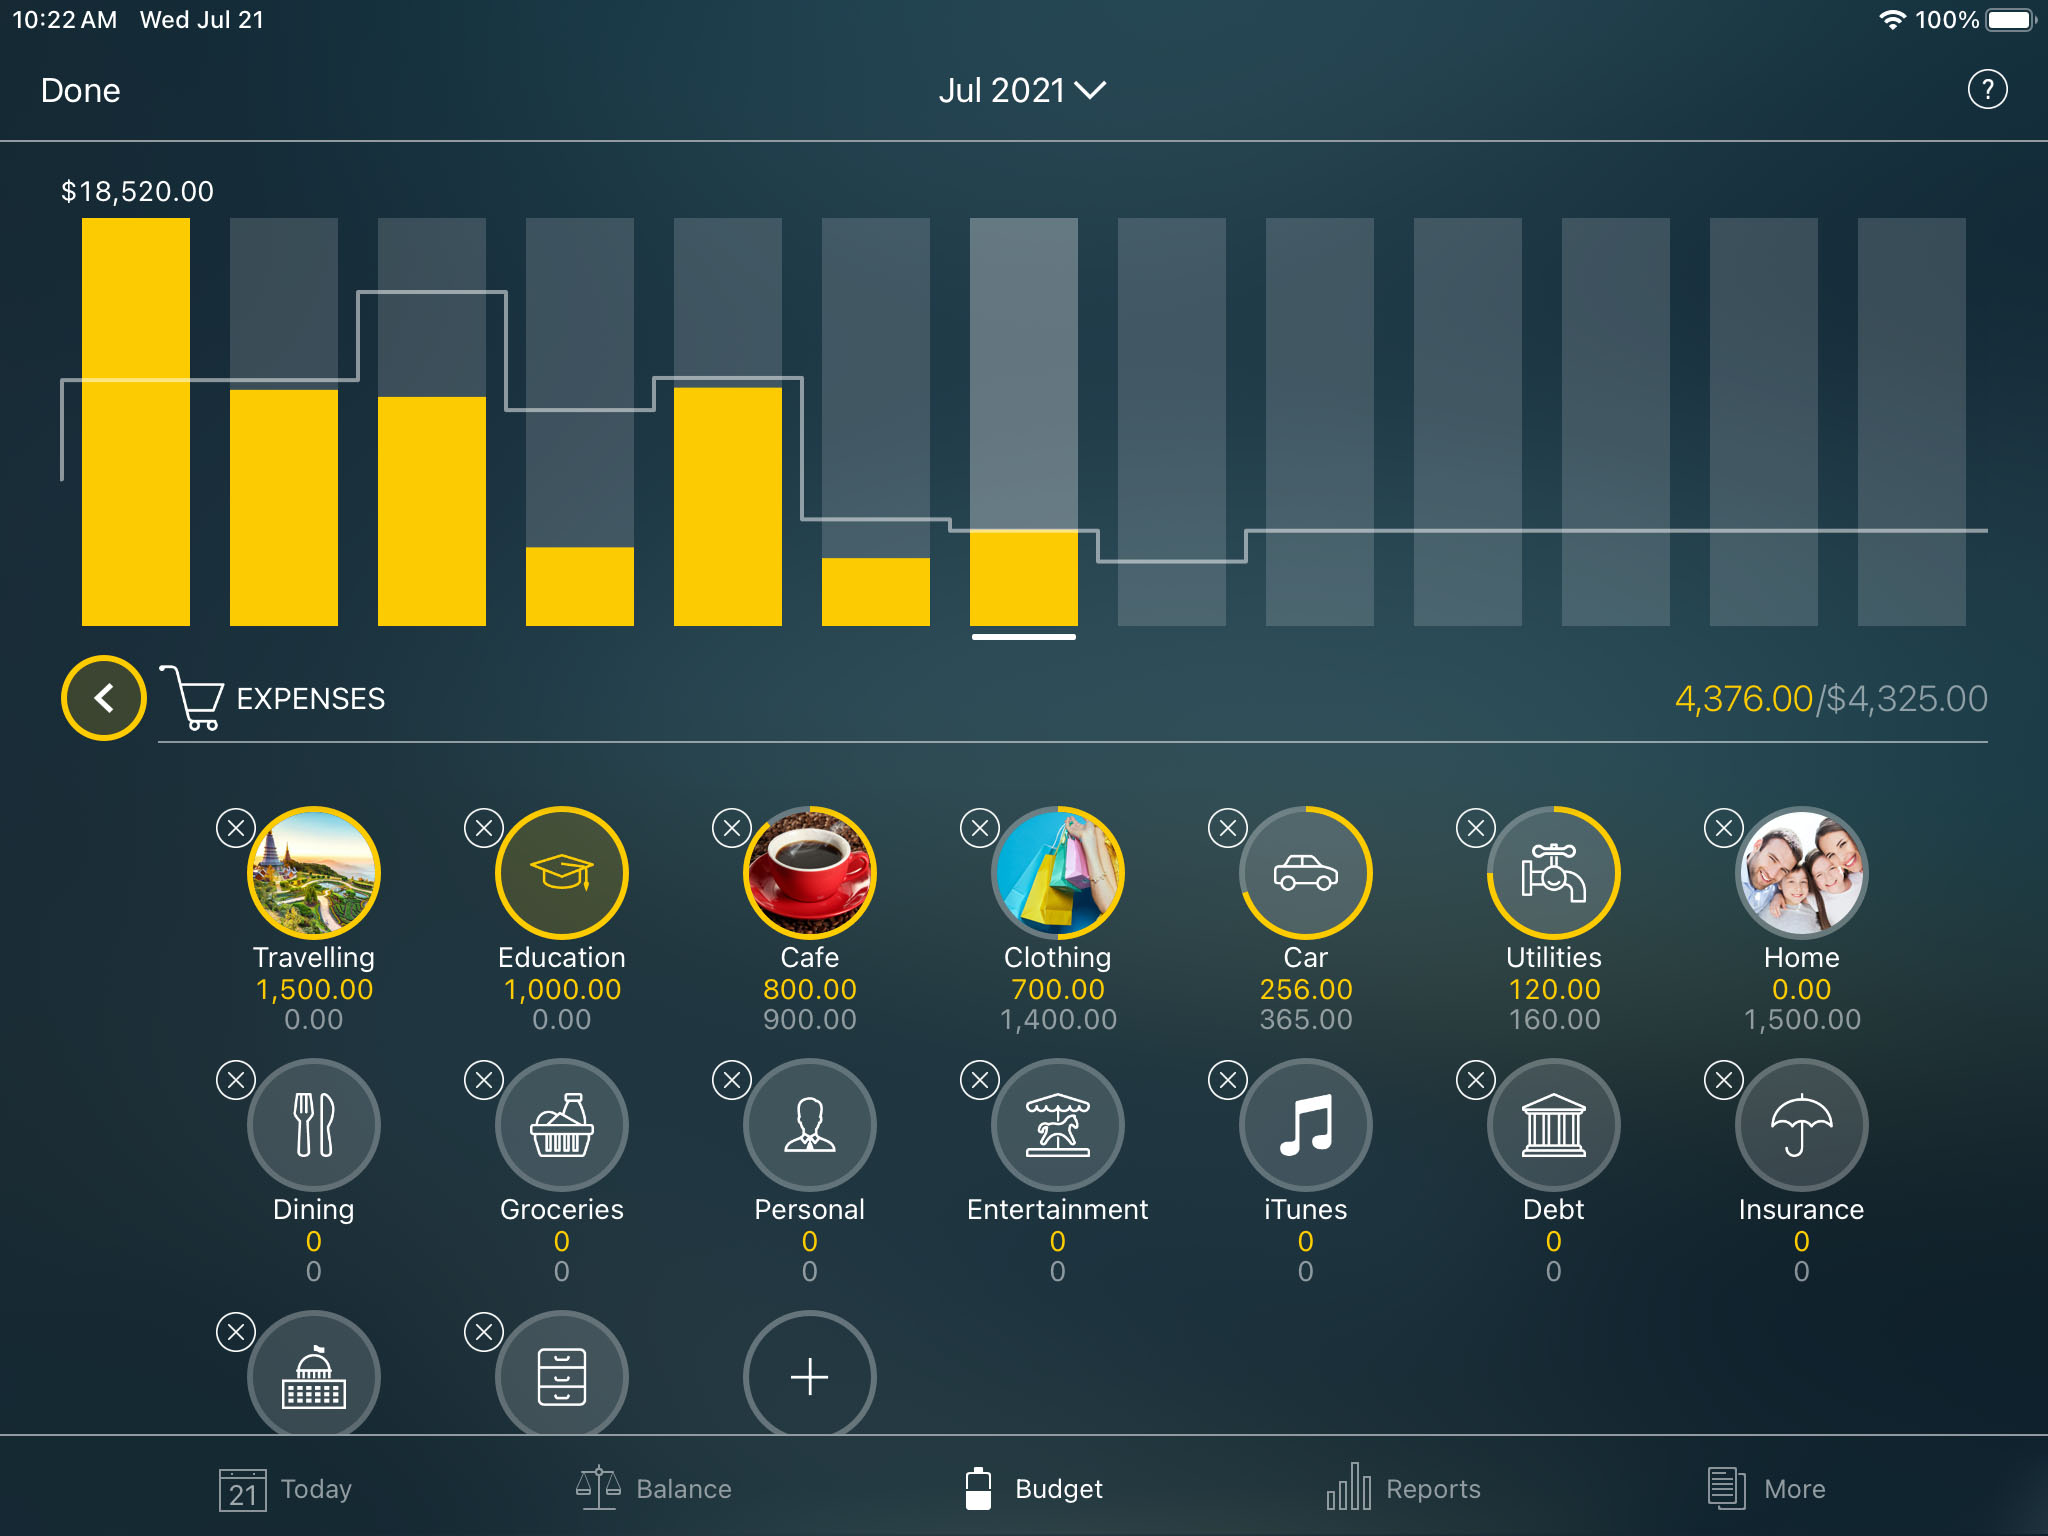
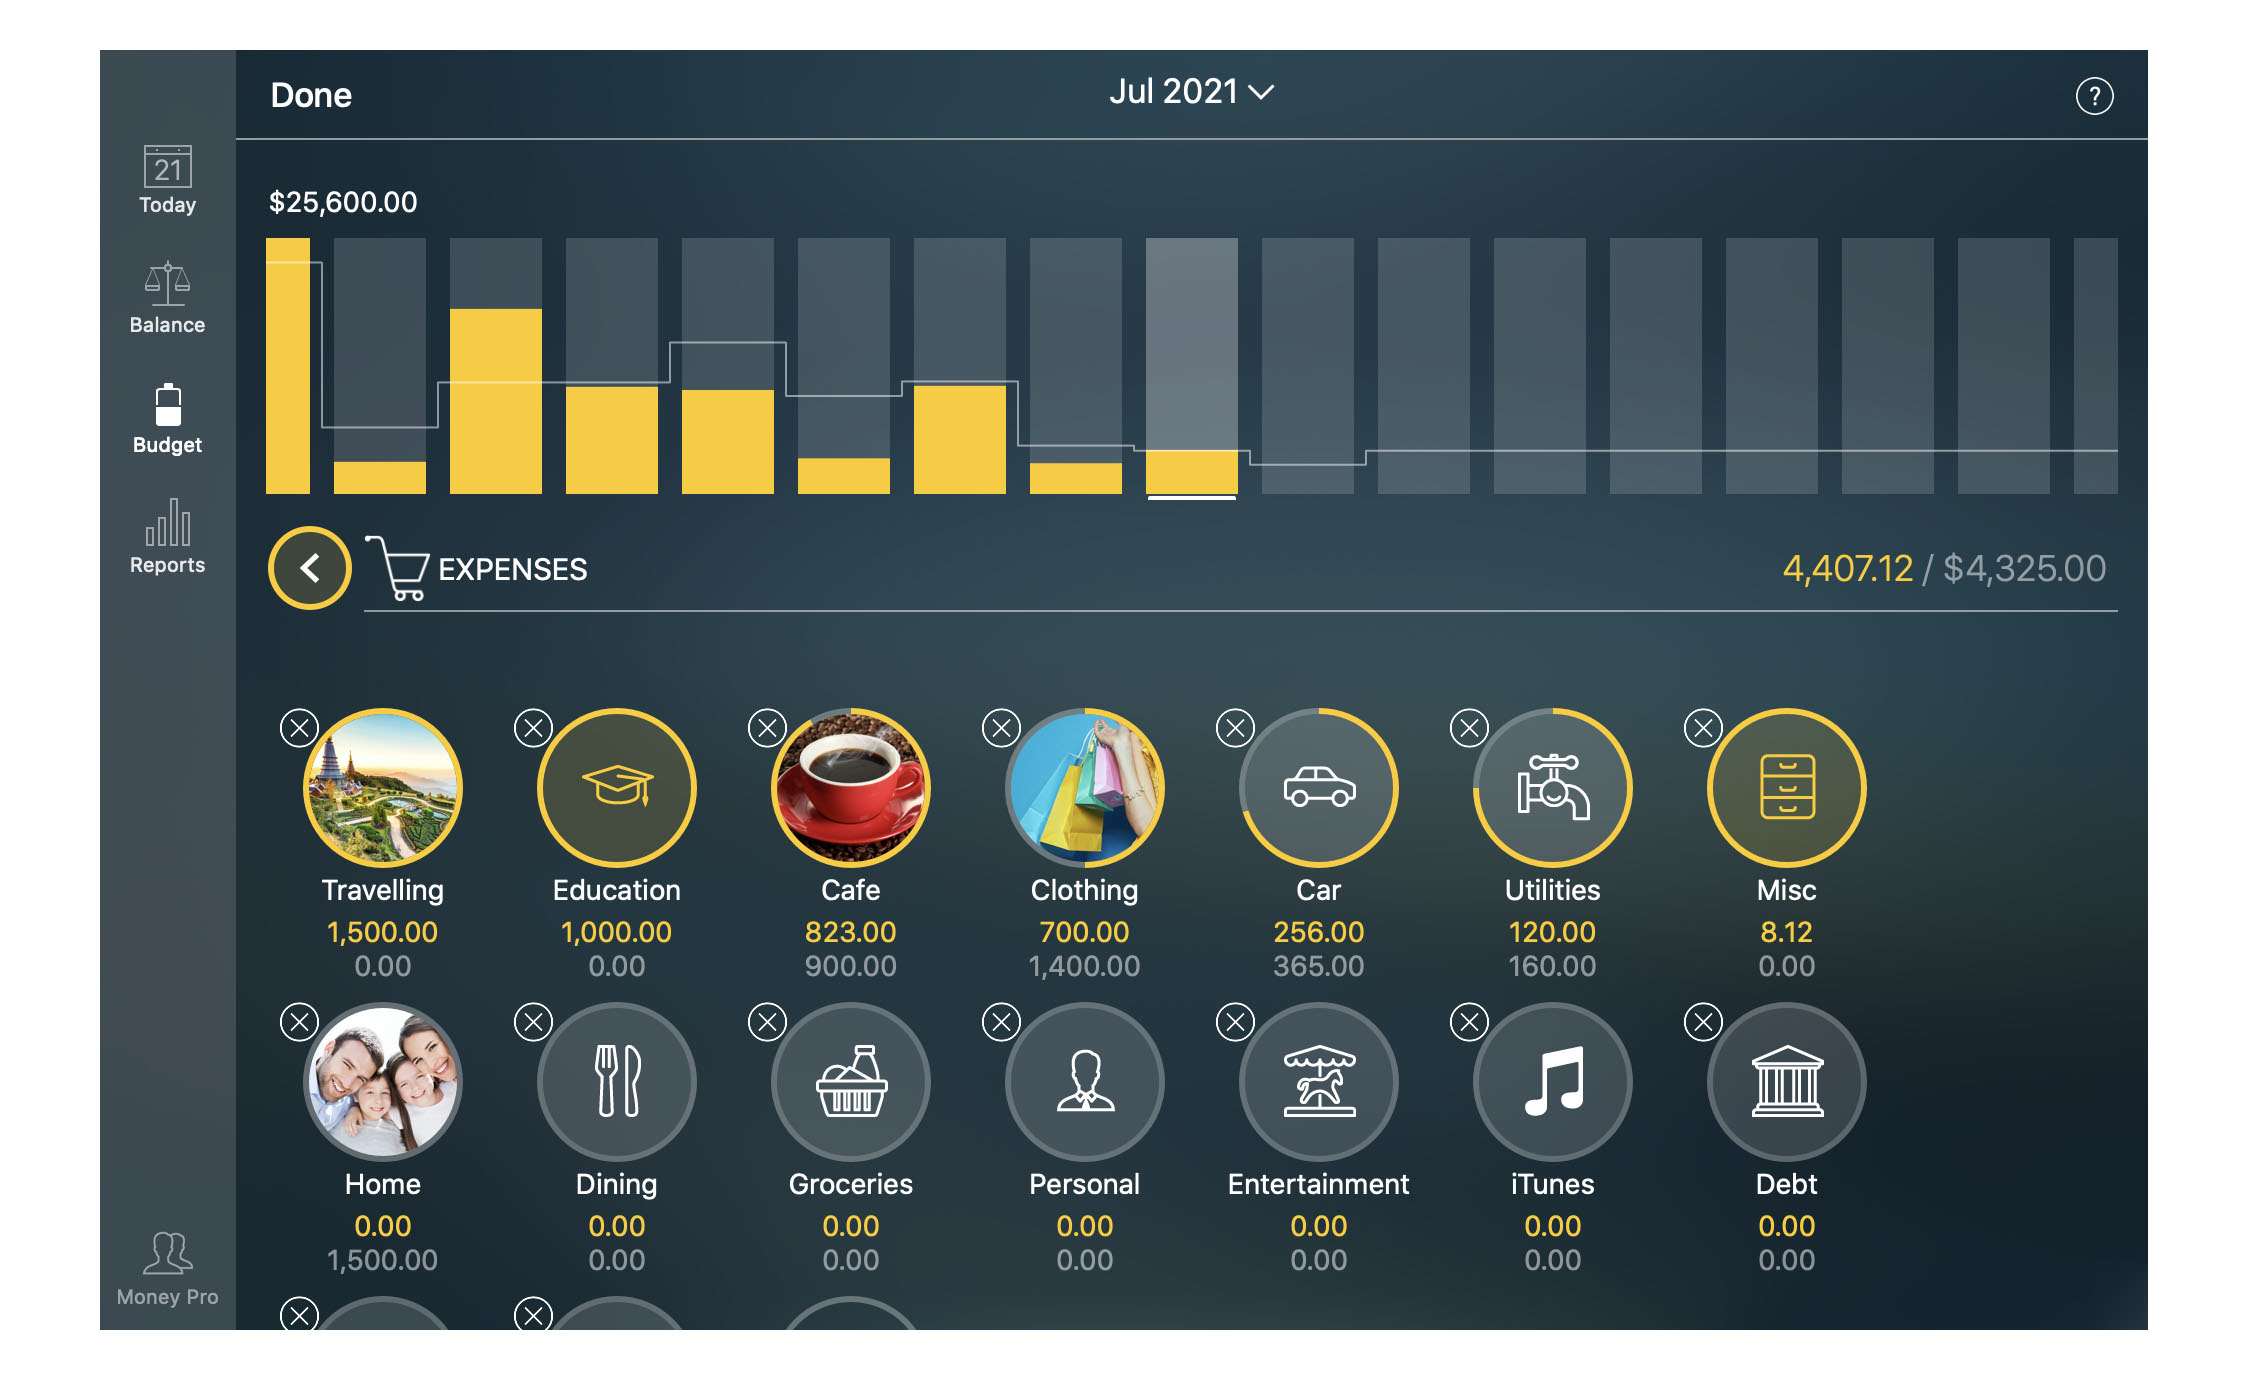
Tracking a budget (Budget widget)
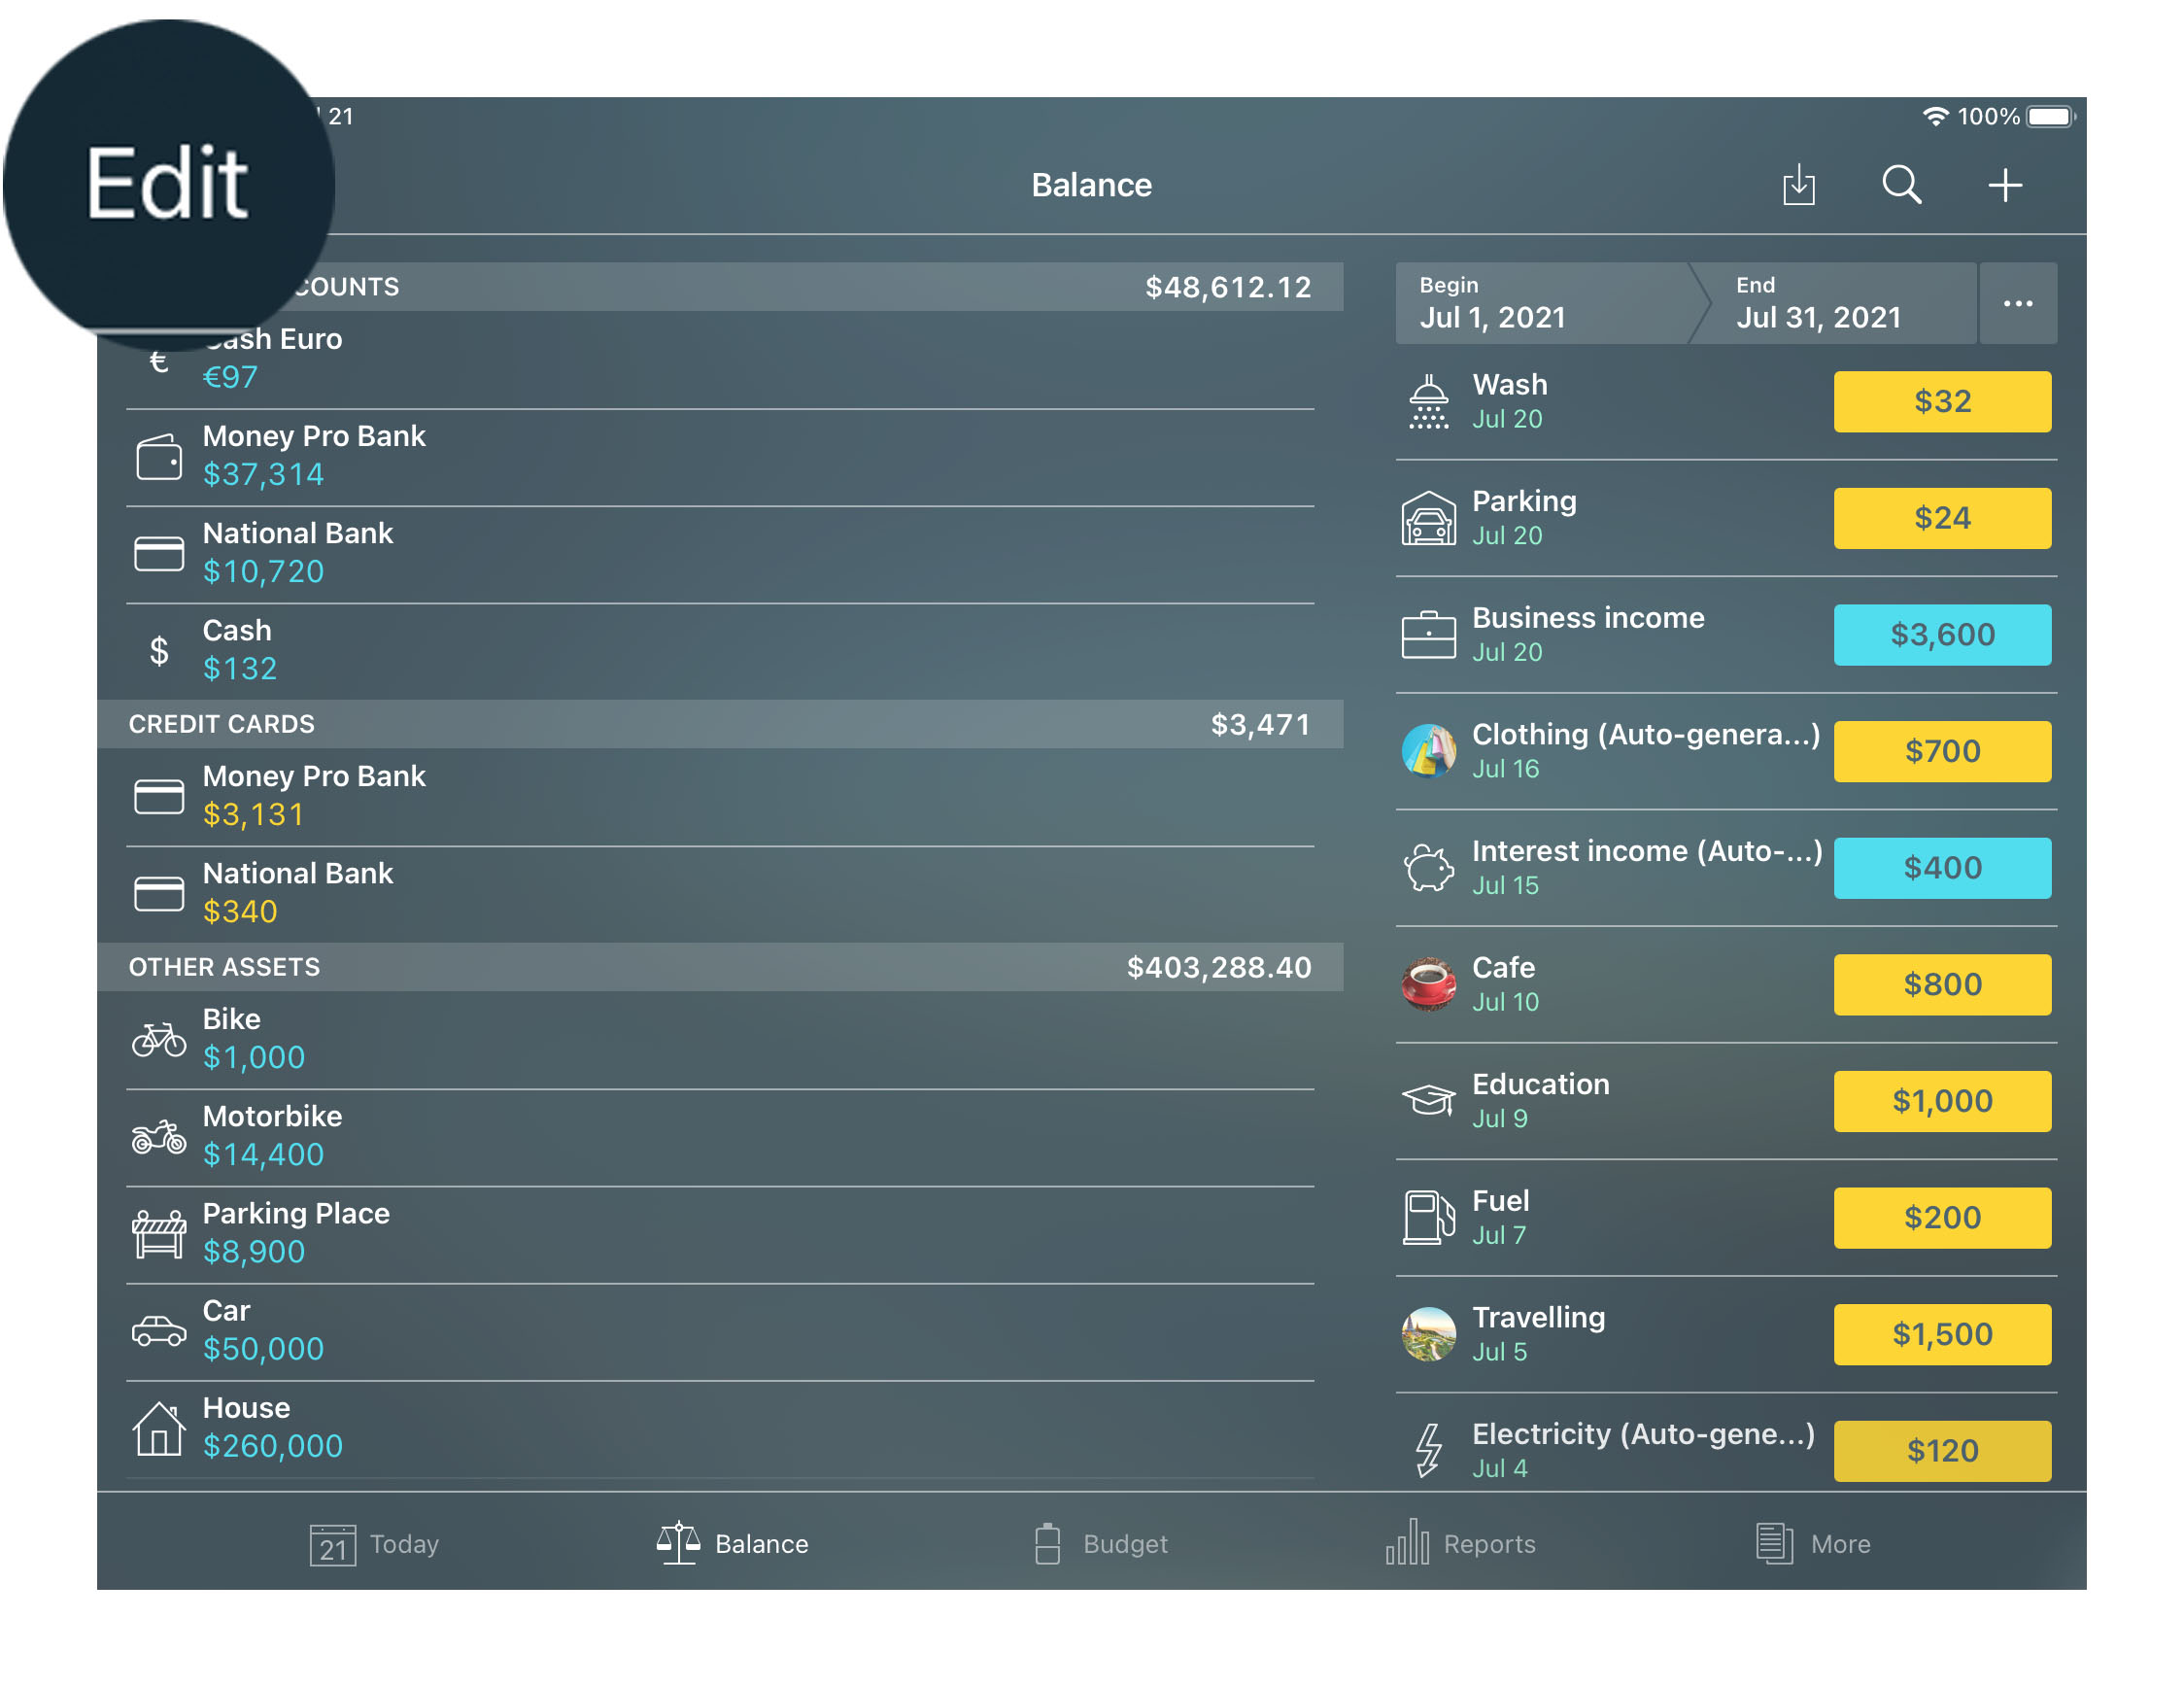
The widget at the top of the screen shows the budget progress over time.
Right above the bars, you can see a time filter that displays the period that is selected. Use the filter to change the periodicity (day, week, month, etc). To navigate between the periods, tap/click the bars.
The bars can be either blue or yellow. For a better understanding of the chart, imagine that the blue and the yellow bars are separated by the horizontal axis. So, the blue bars are above the horizontal axis and have positive values, and the yellow bars are below the horizontal axis and have negative values.
Blue bars show that your income exceeds your expenses in a certain period (f.e. in that month). In other words, blue bars indicate your gain. Yellow bars, on the contrary, testify that you spent more money than you made. Yellow bars indicate your loss.
The semitransparent white line shows what gain (income minus expenses) you planned to receive for each period. It helps better understand your spending behavior. It shows whether you acted according to your budget plan or strayed away from it.
The number in the upper left corner reflects the biggest bar. In other words, it is the biggest amount of money gained in one of the periods in the chosen periodicity.
Right below the widget, you can see your categories with individual budget progress indicators. The categories are displayed only if they have budget limits set or have actual transactions for the period selected.
For each category, you can see:
- Actual amount spent (yellow) or earned (blue).
- Amount you planned to spend or earn in the budget (semitransparent white).
Tap/click the category you want to analyze and examine a budget trend chart generated for that category. If the category has subcategories, you will see them listed below.
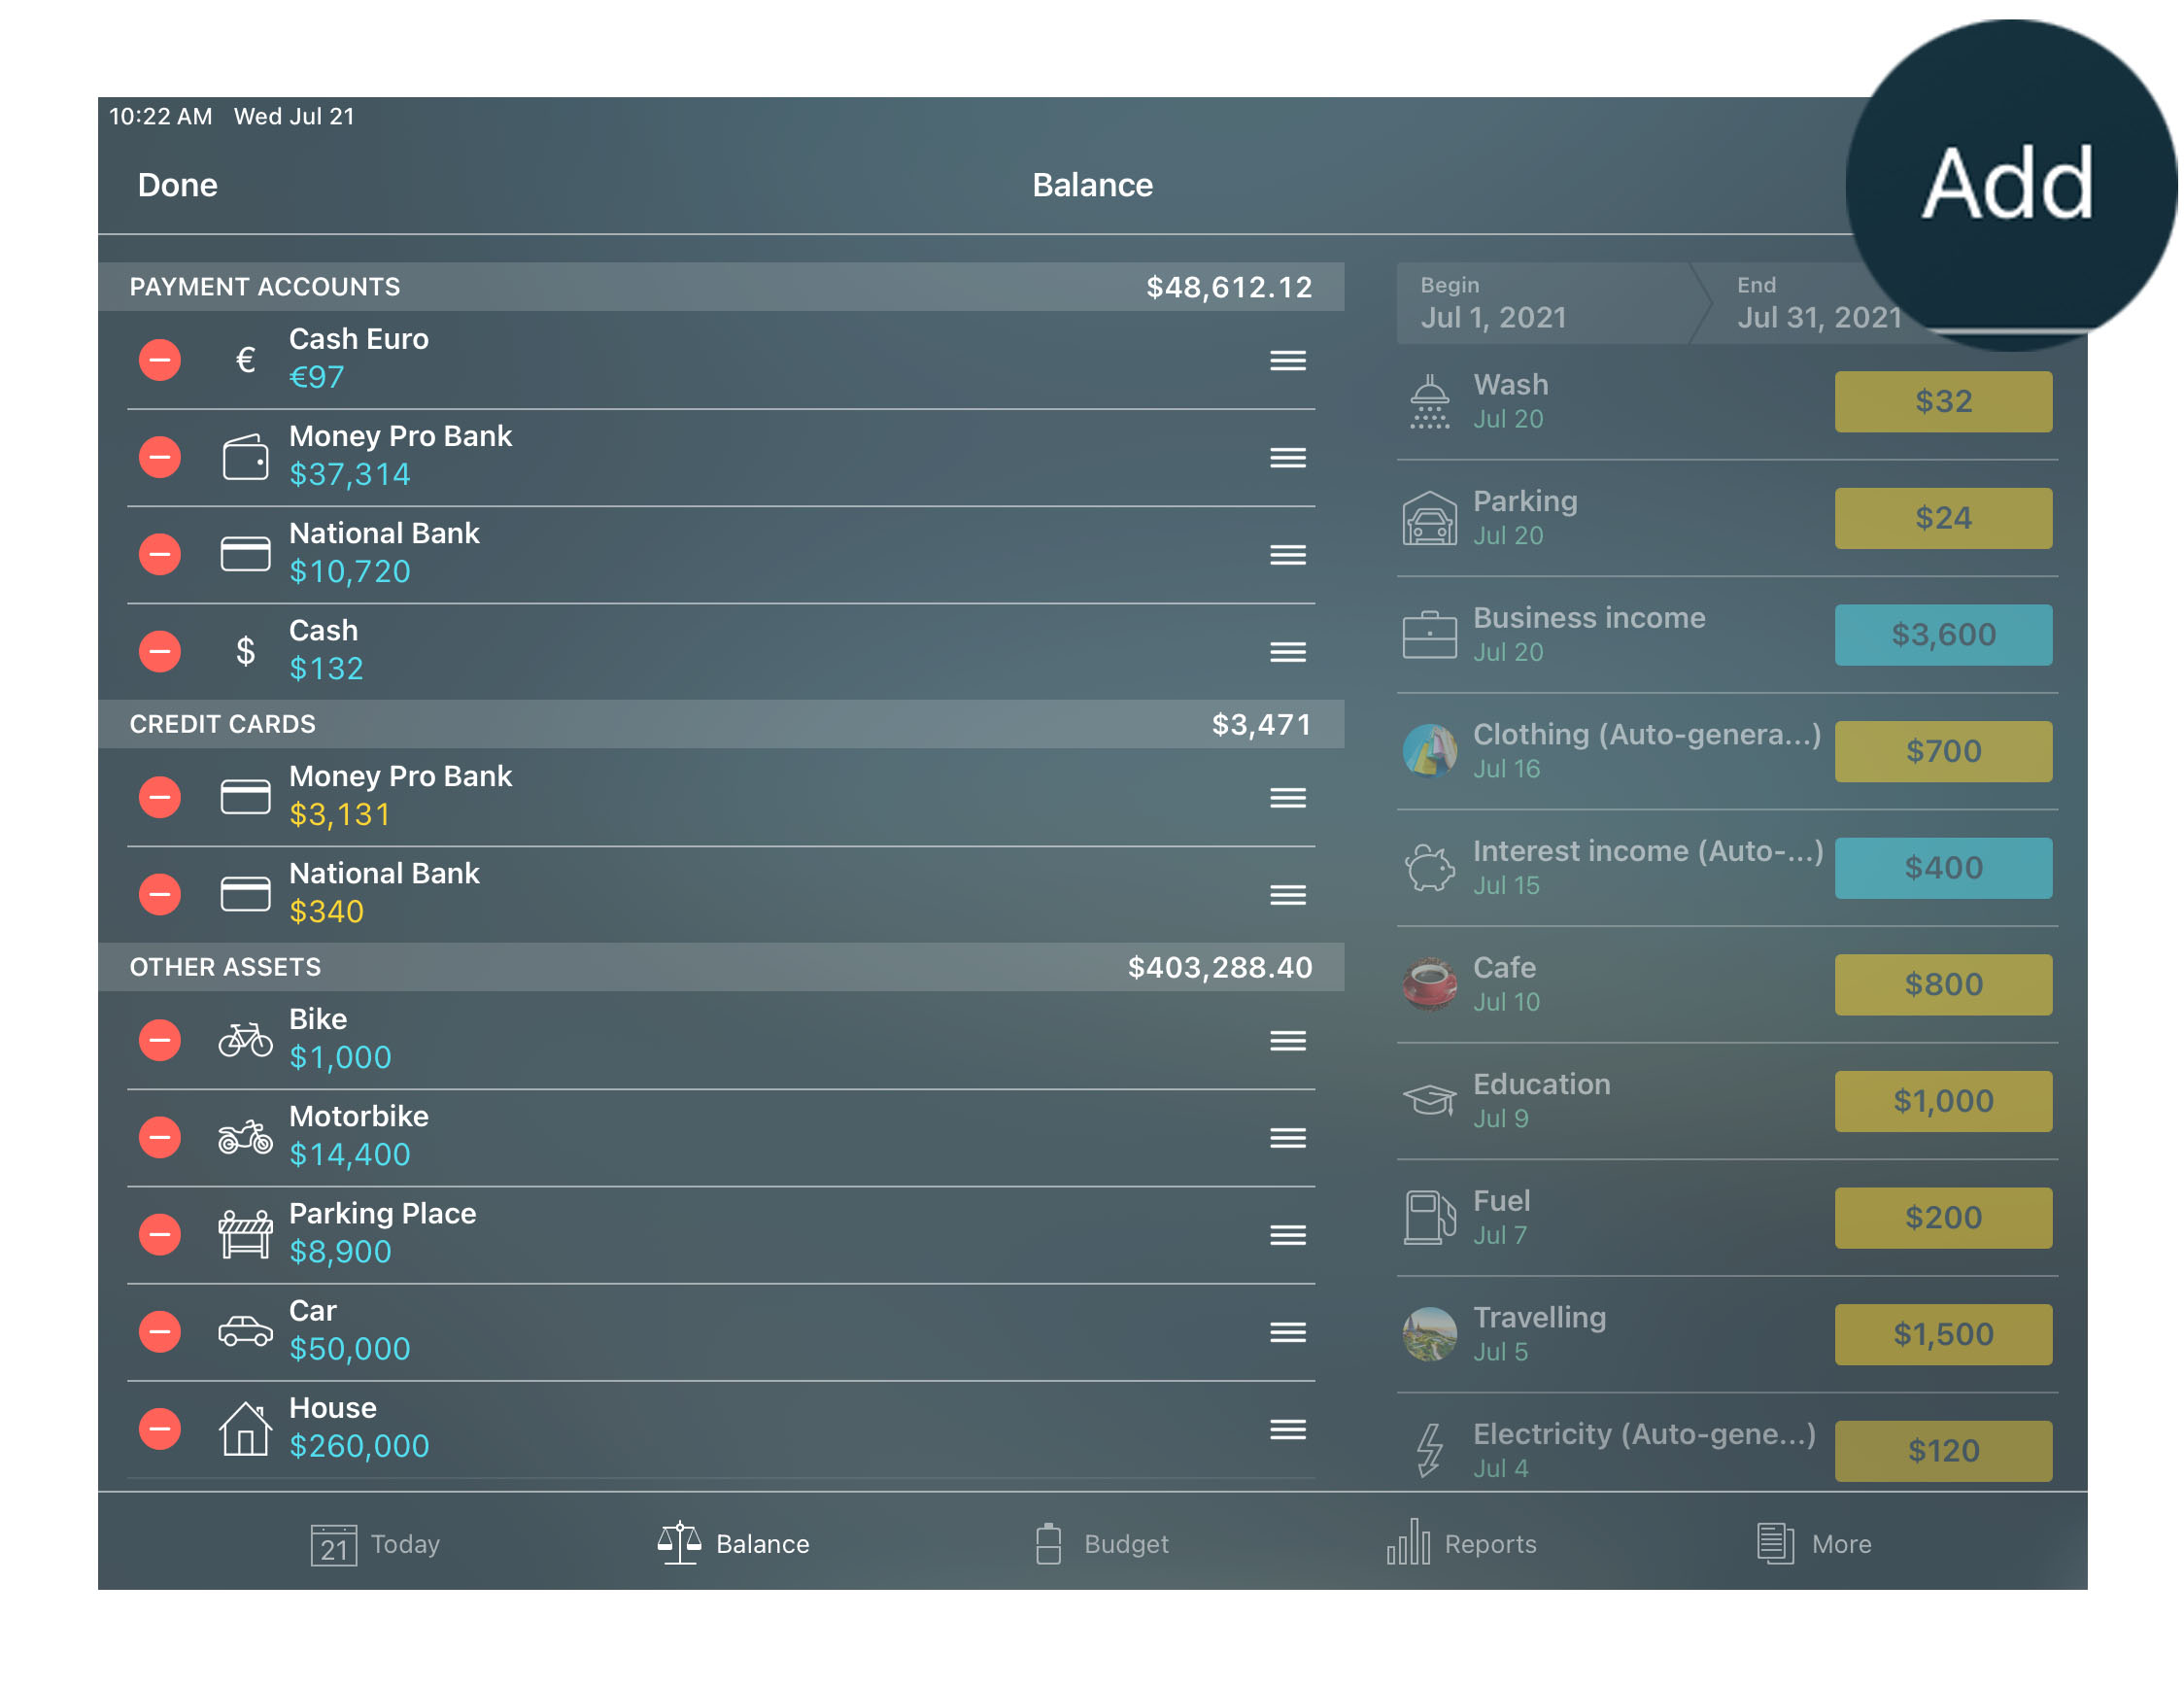
Deleting a budget
To delete a budget entry, go to Budget, select the budget category you need, and select a budget period from the list. In the opened form choose “Delete” > “Delete all future budgets”. Even if you delete the budget, it may still be displayed on the screen due to transactions for the given period.
Alternatively, you can delete the category itself. Go to Budget, select “Edit” and tap/click the cross button in the upper corner of the category.
Bills
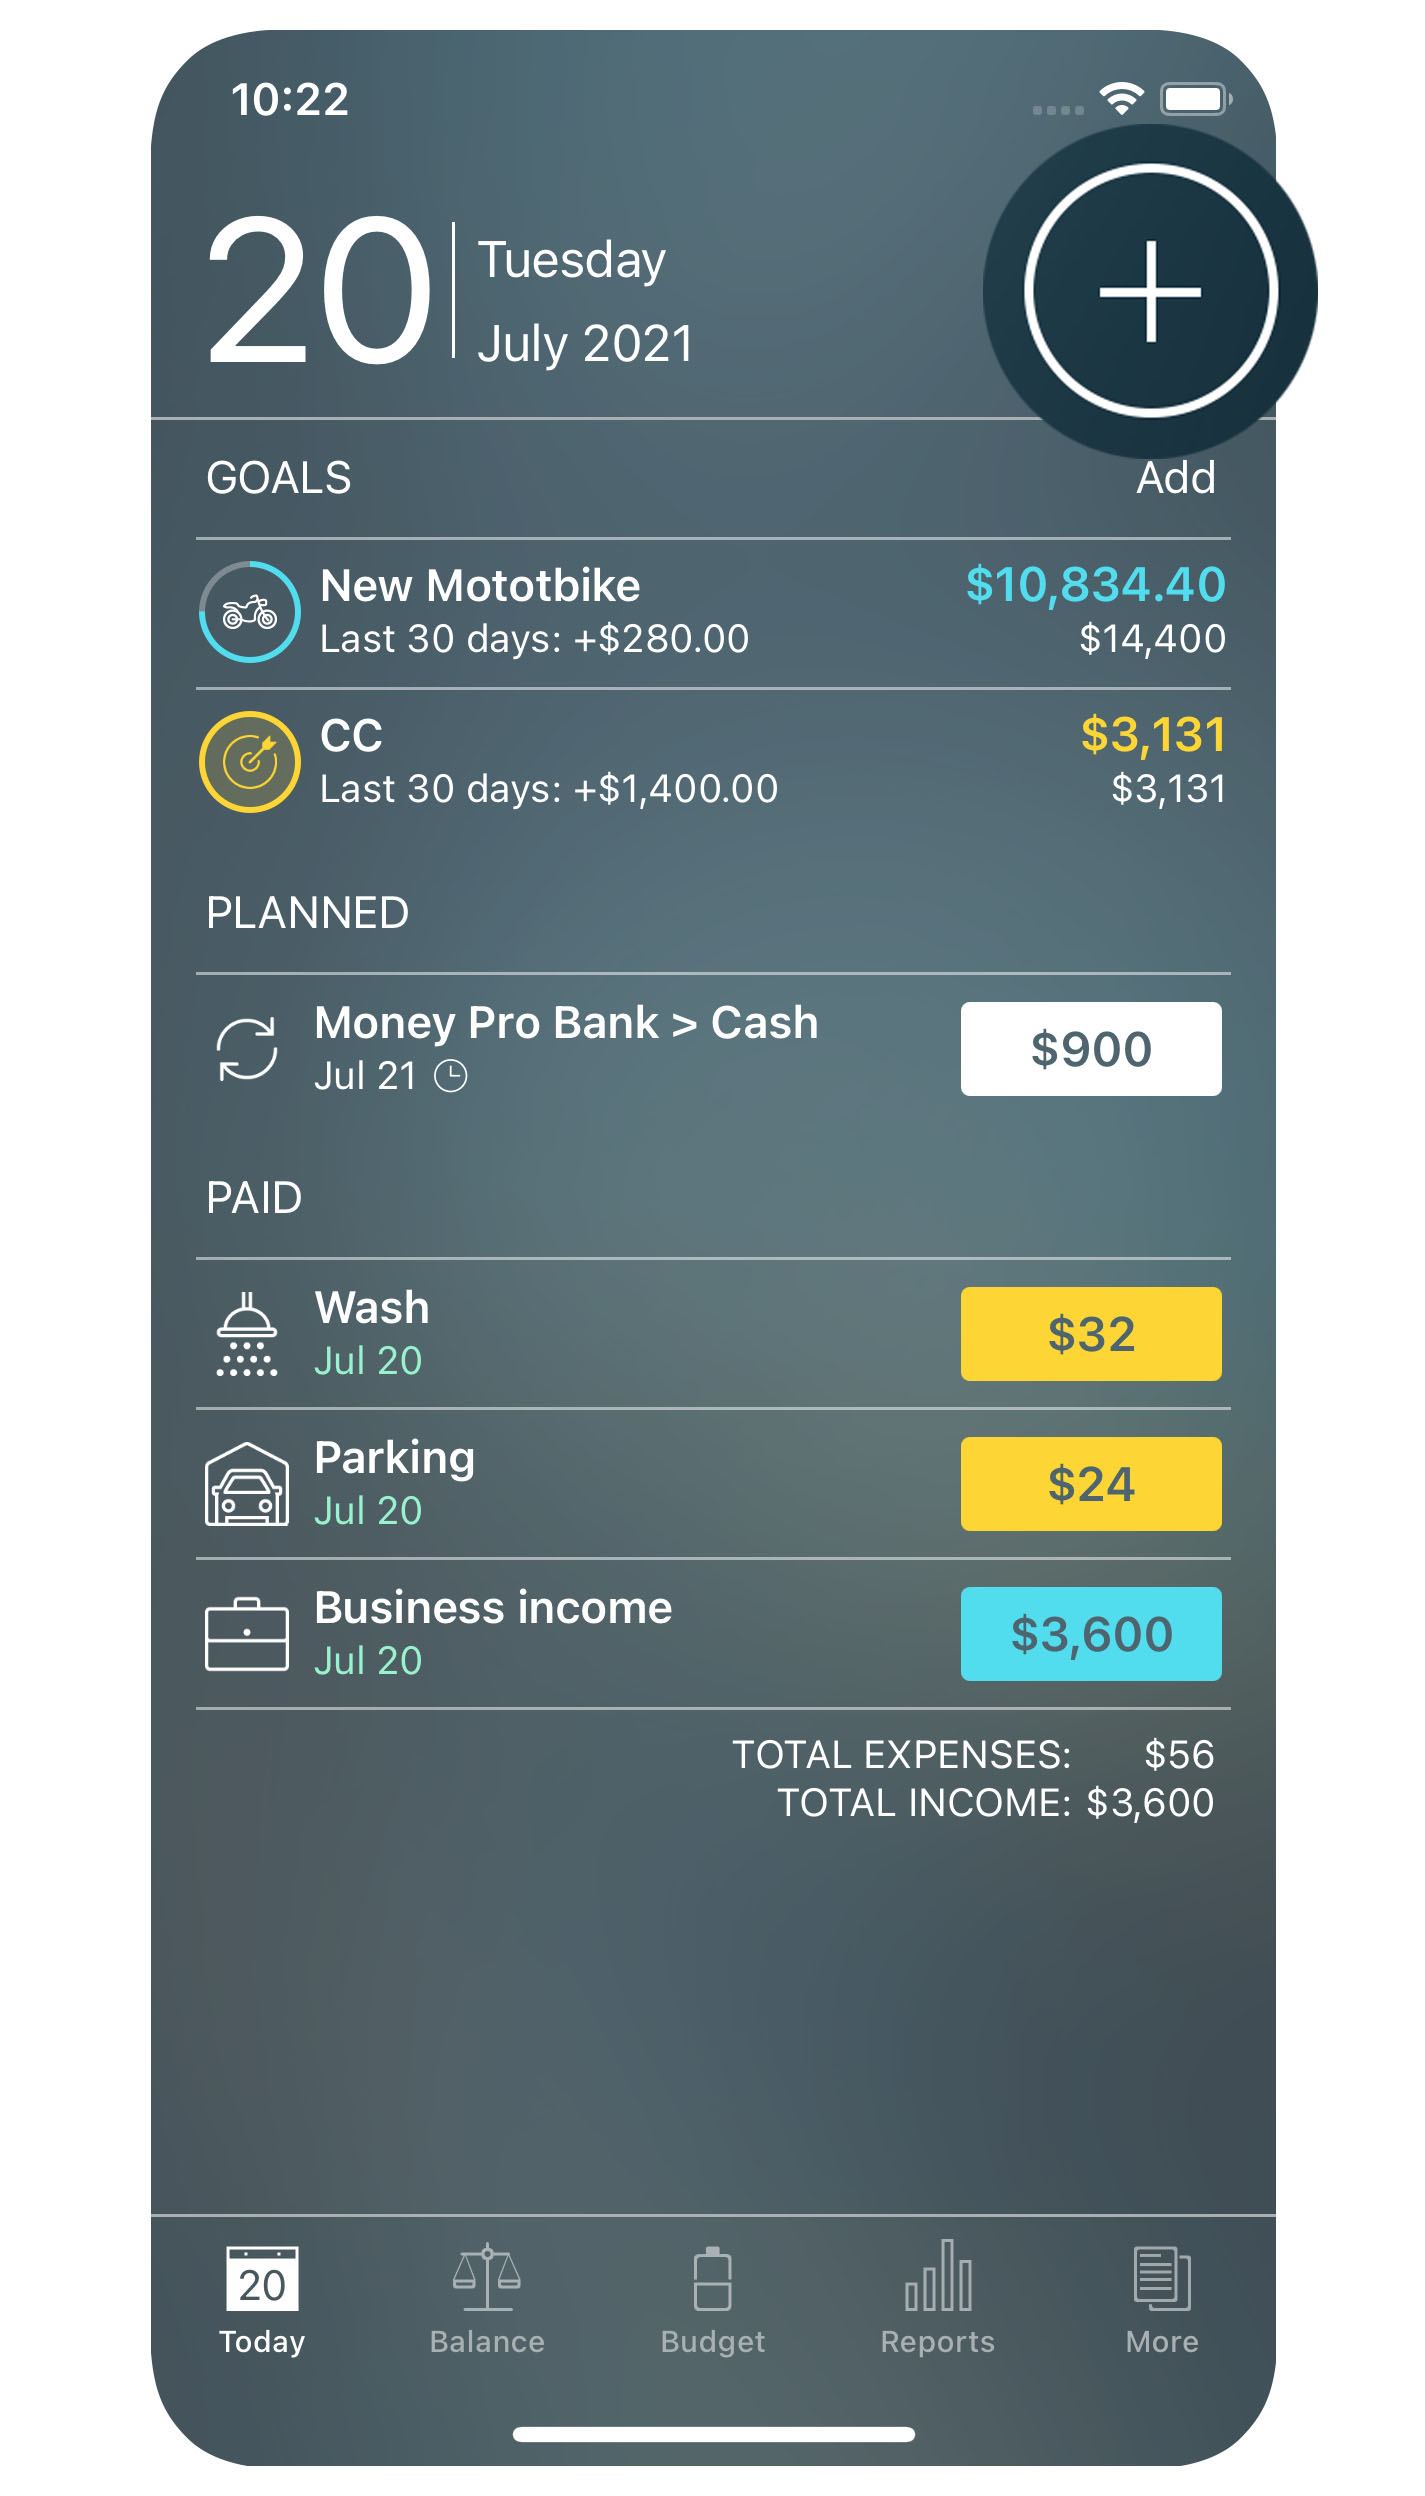
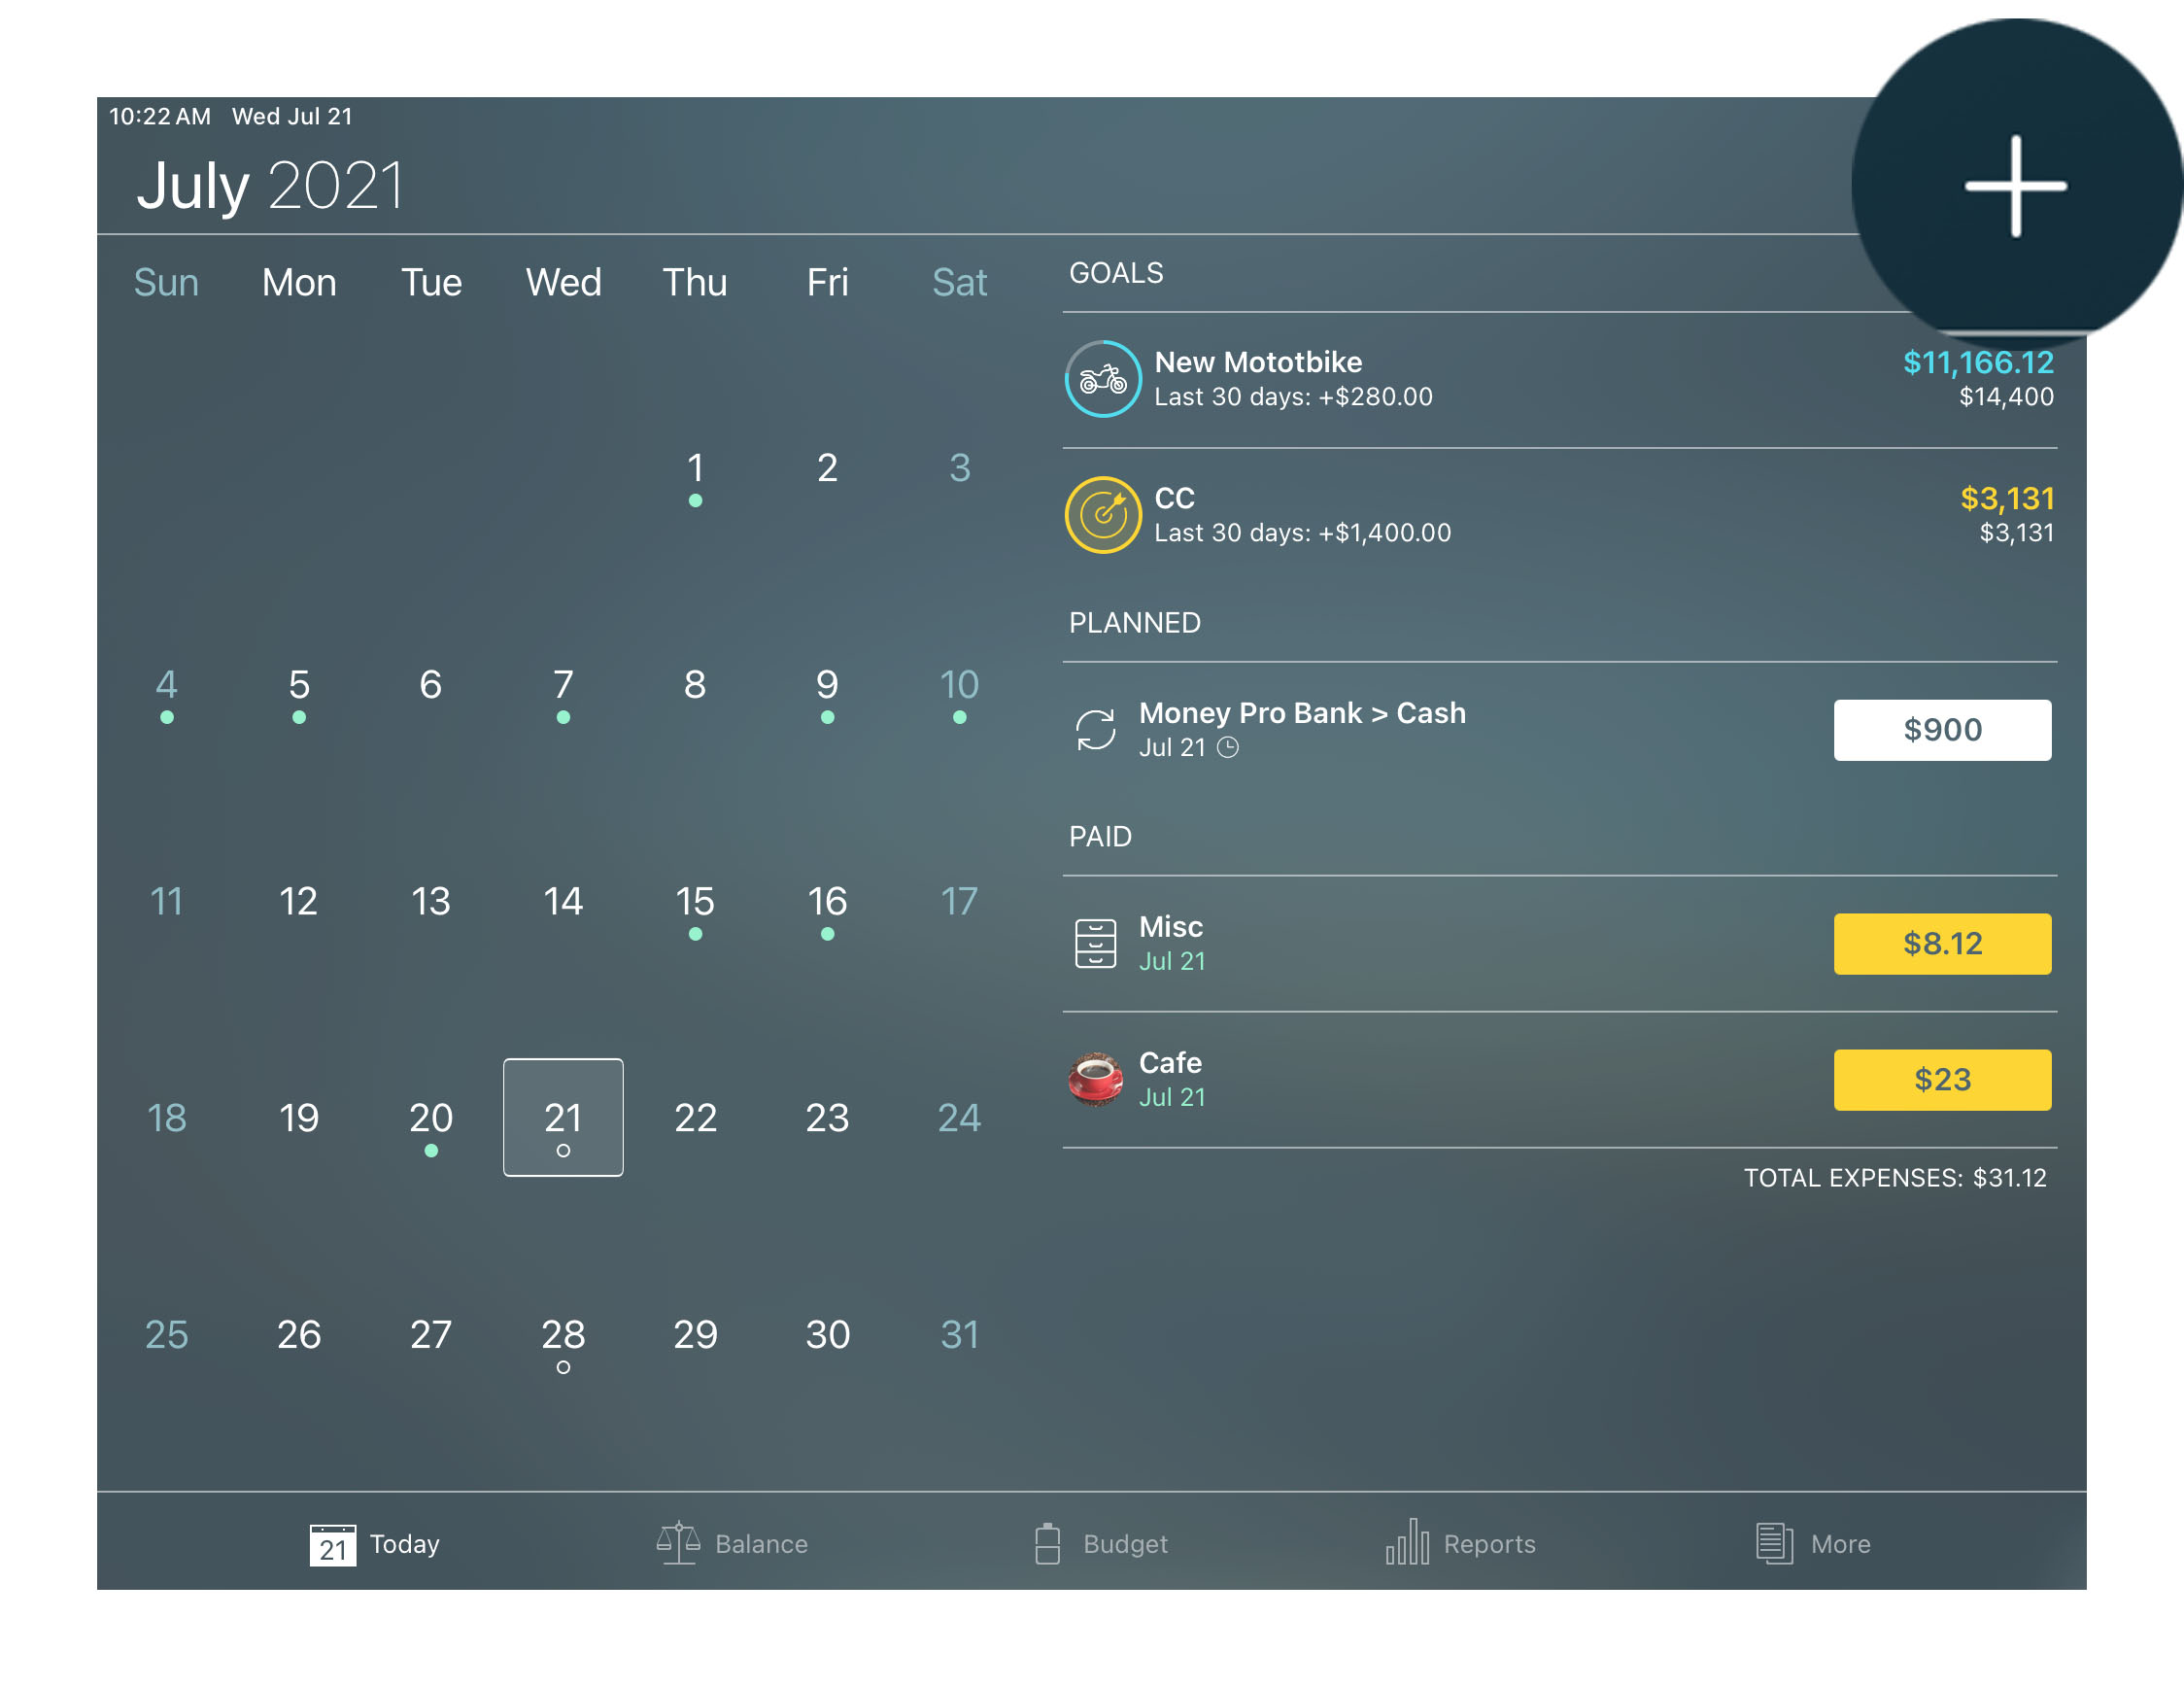
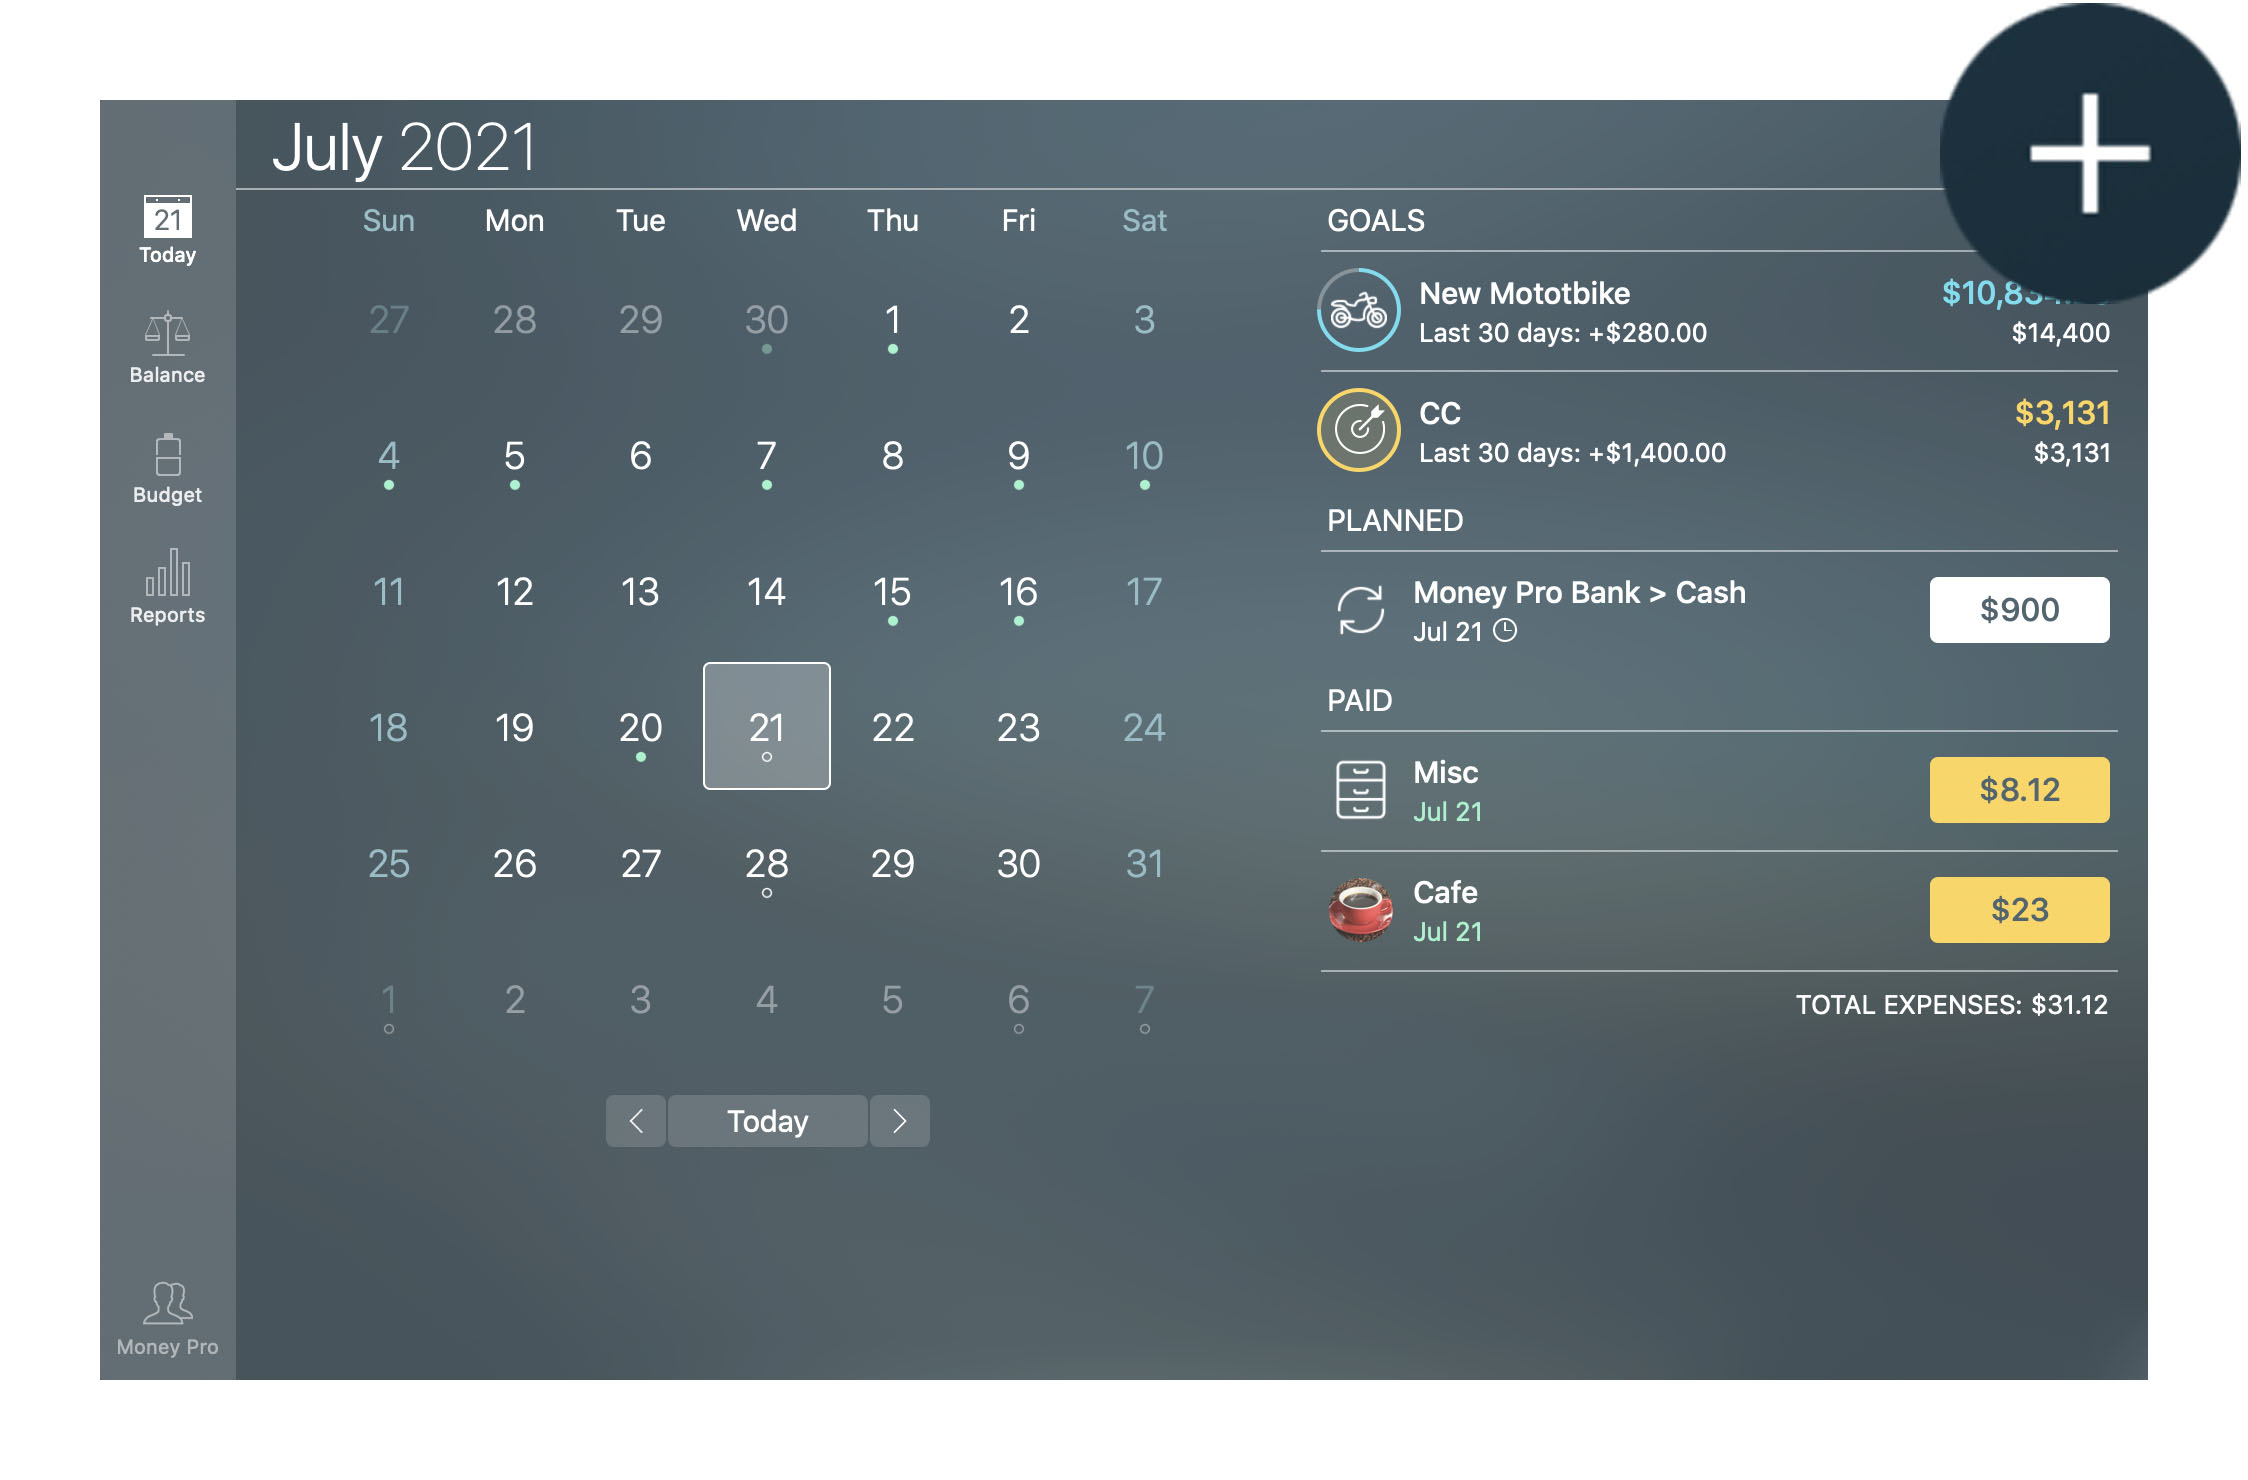
By simply taking a look at the Today section you will instantly know how many due & overdue transactions you have. Different colors contain information:
- Orange color is used for overdue transactions.
- White color is used for planned (scheduled) transactions.
- Green color is used for actual (paid) transactions.
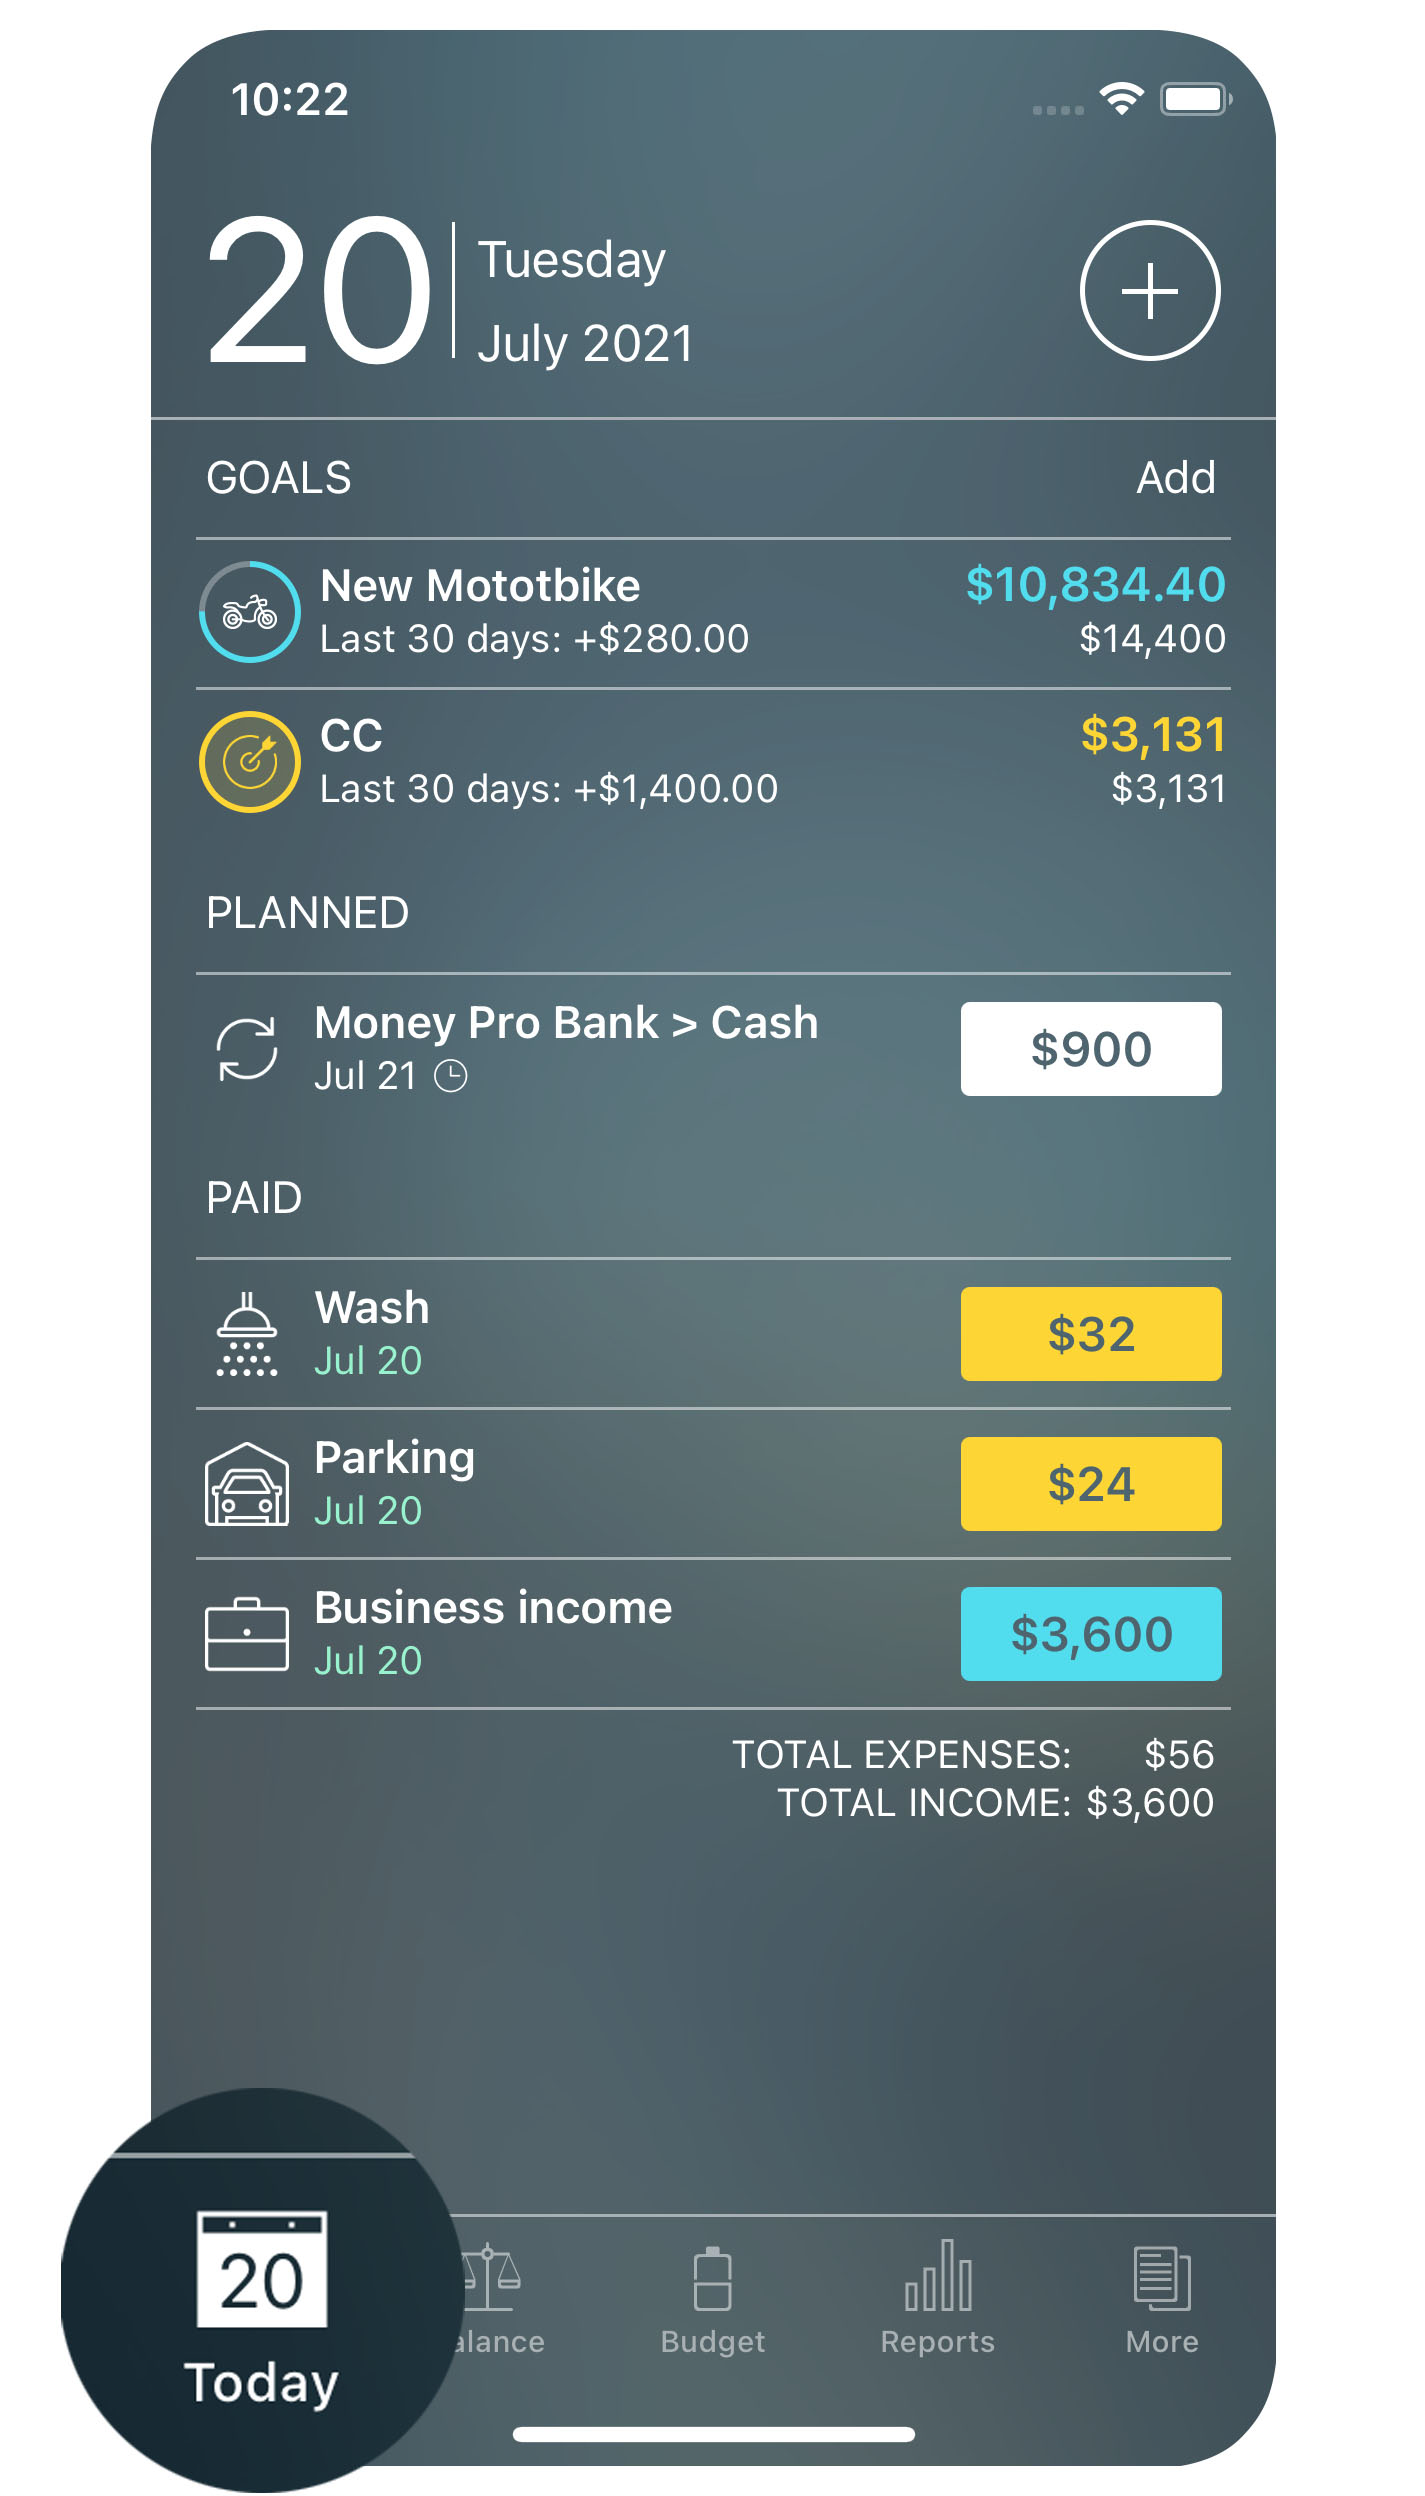
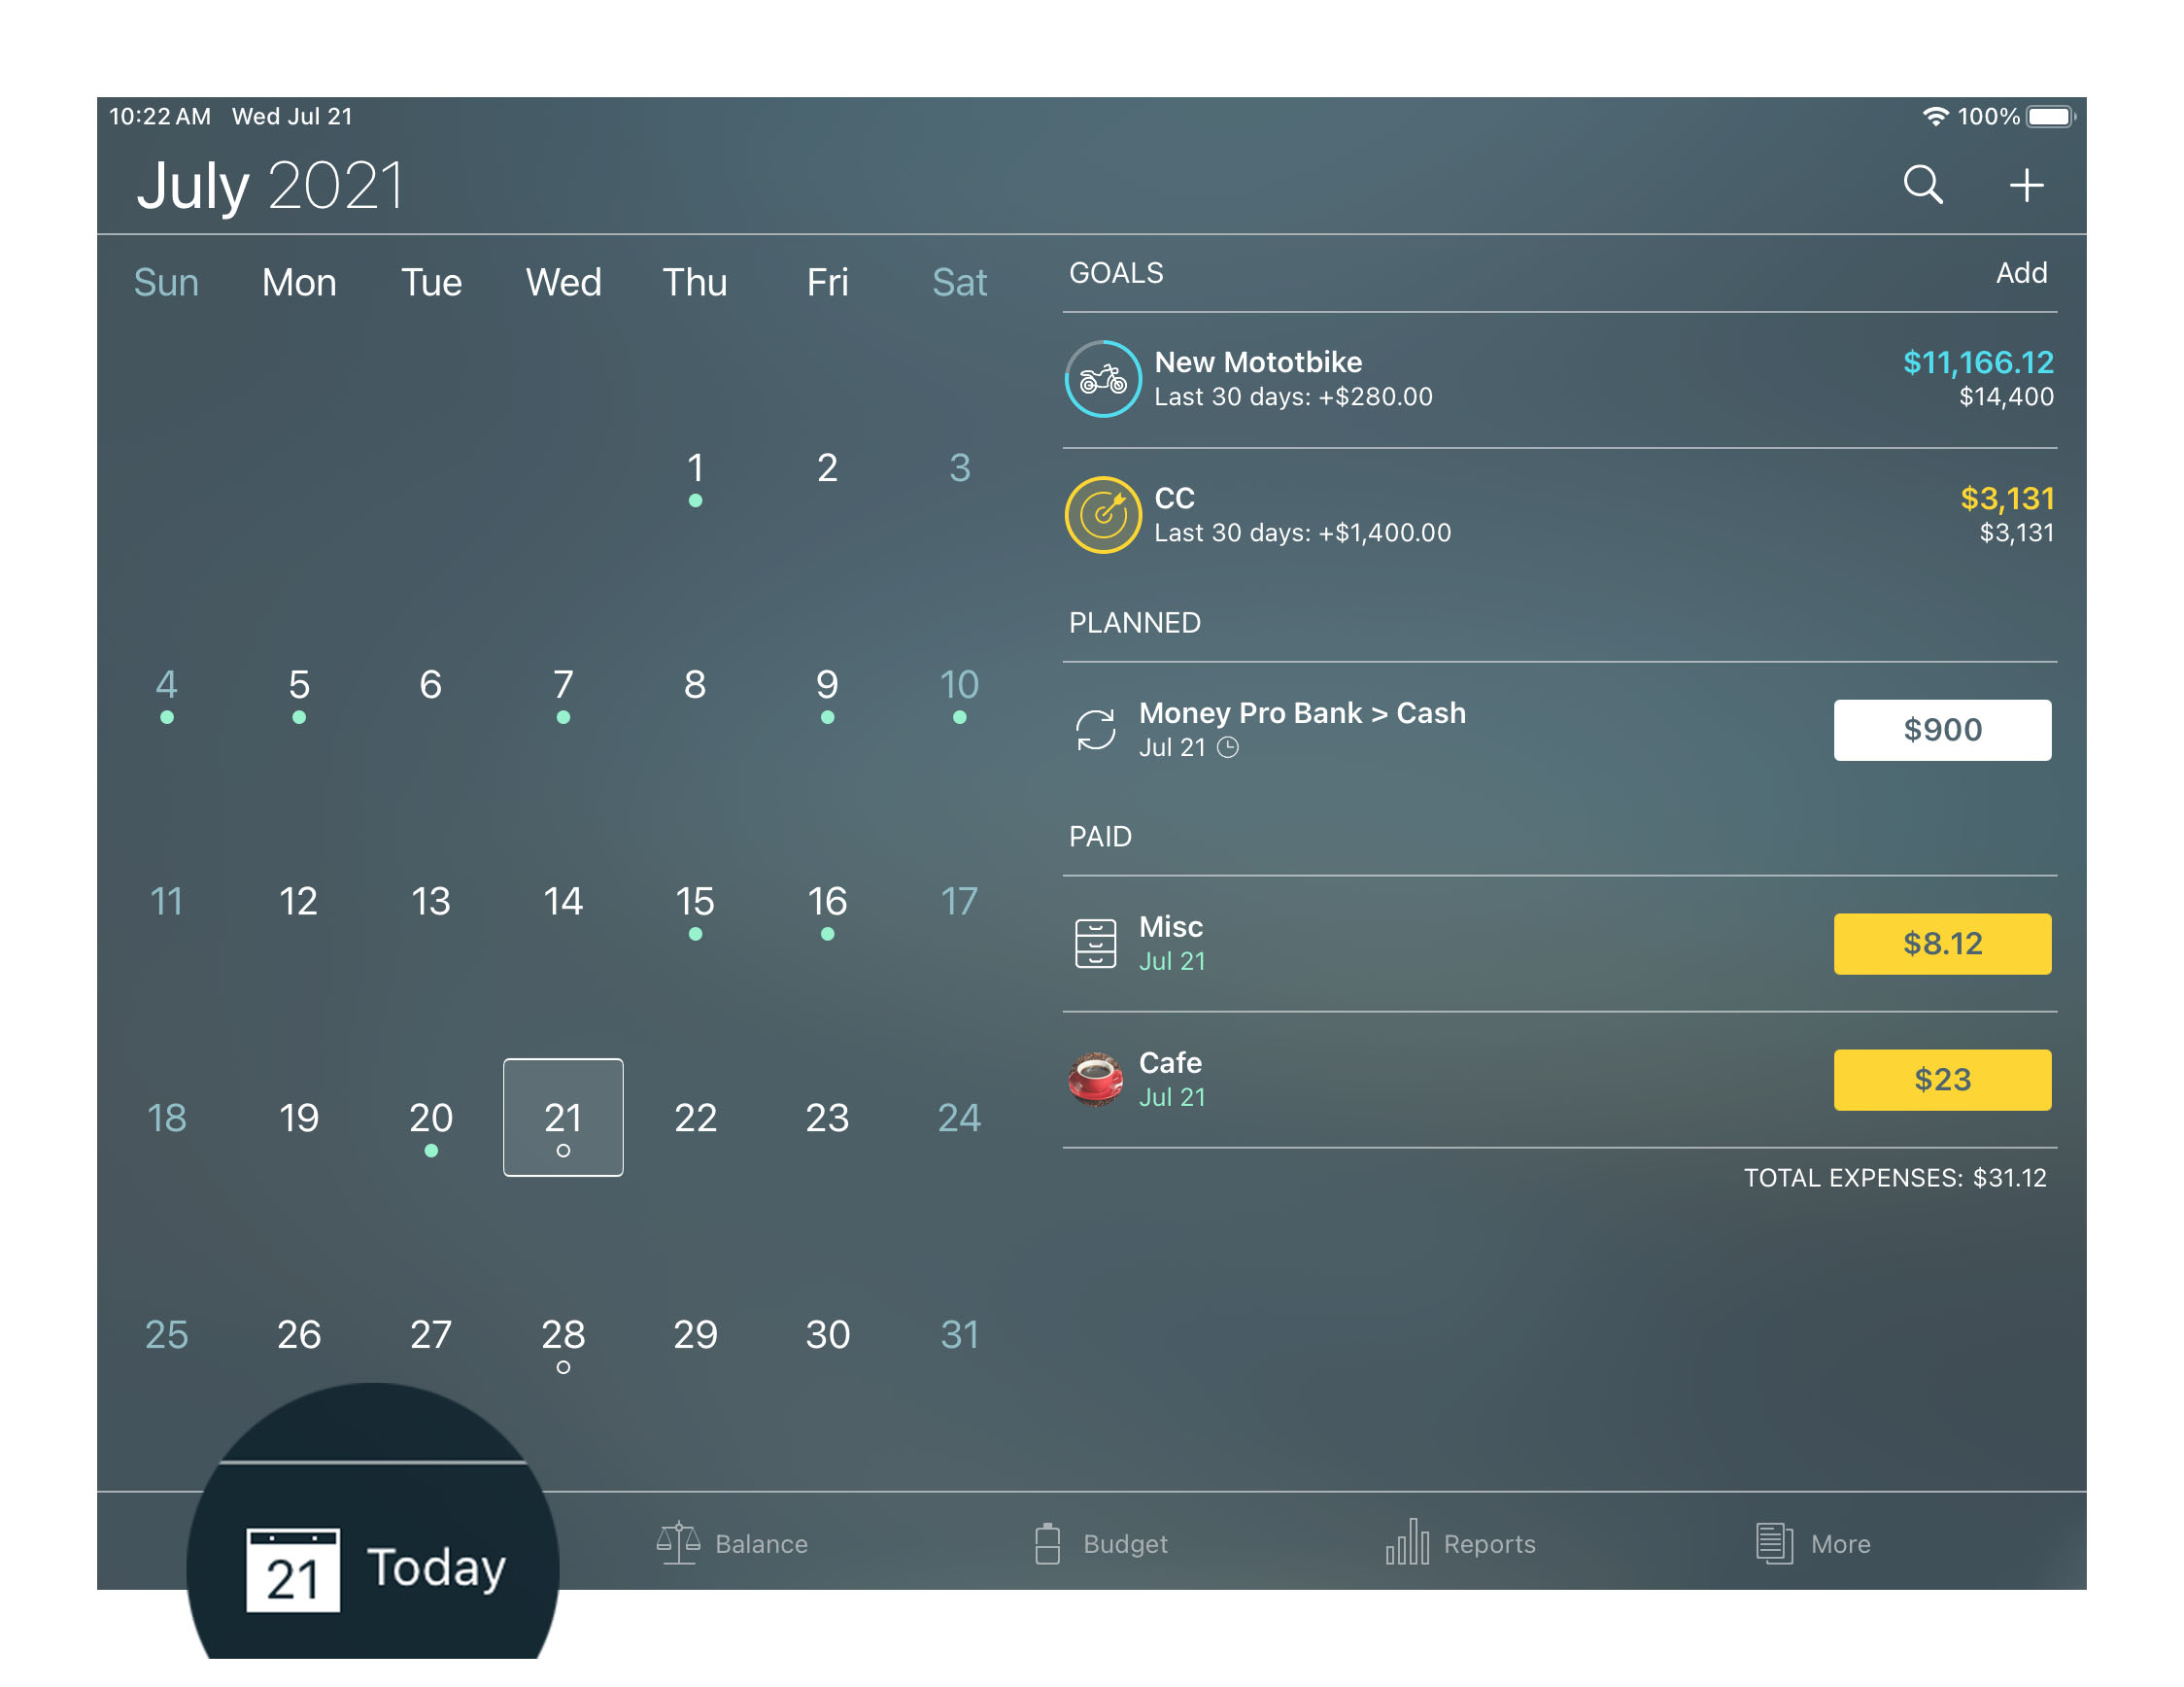
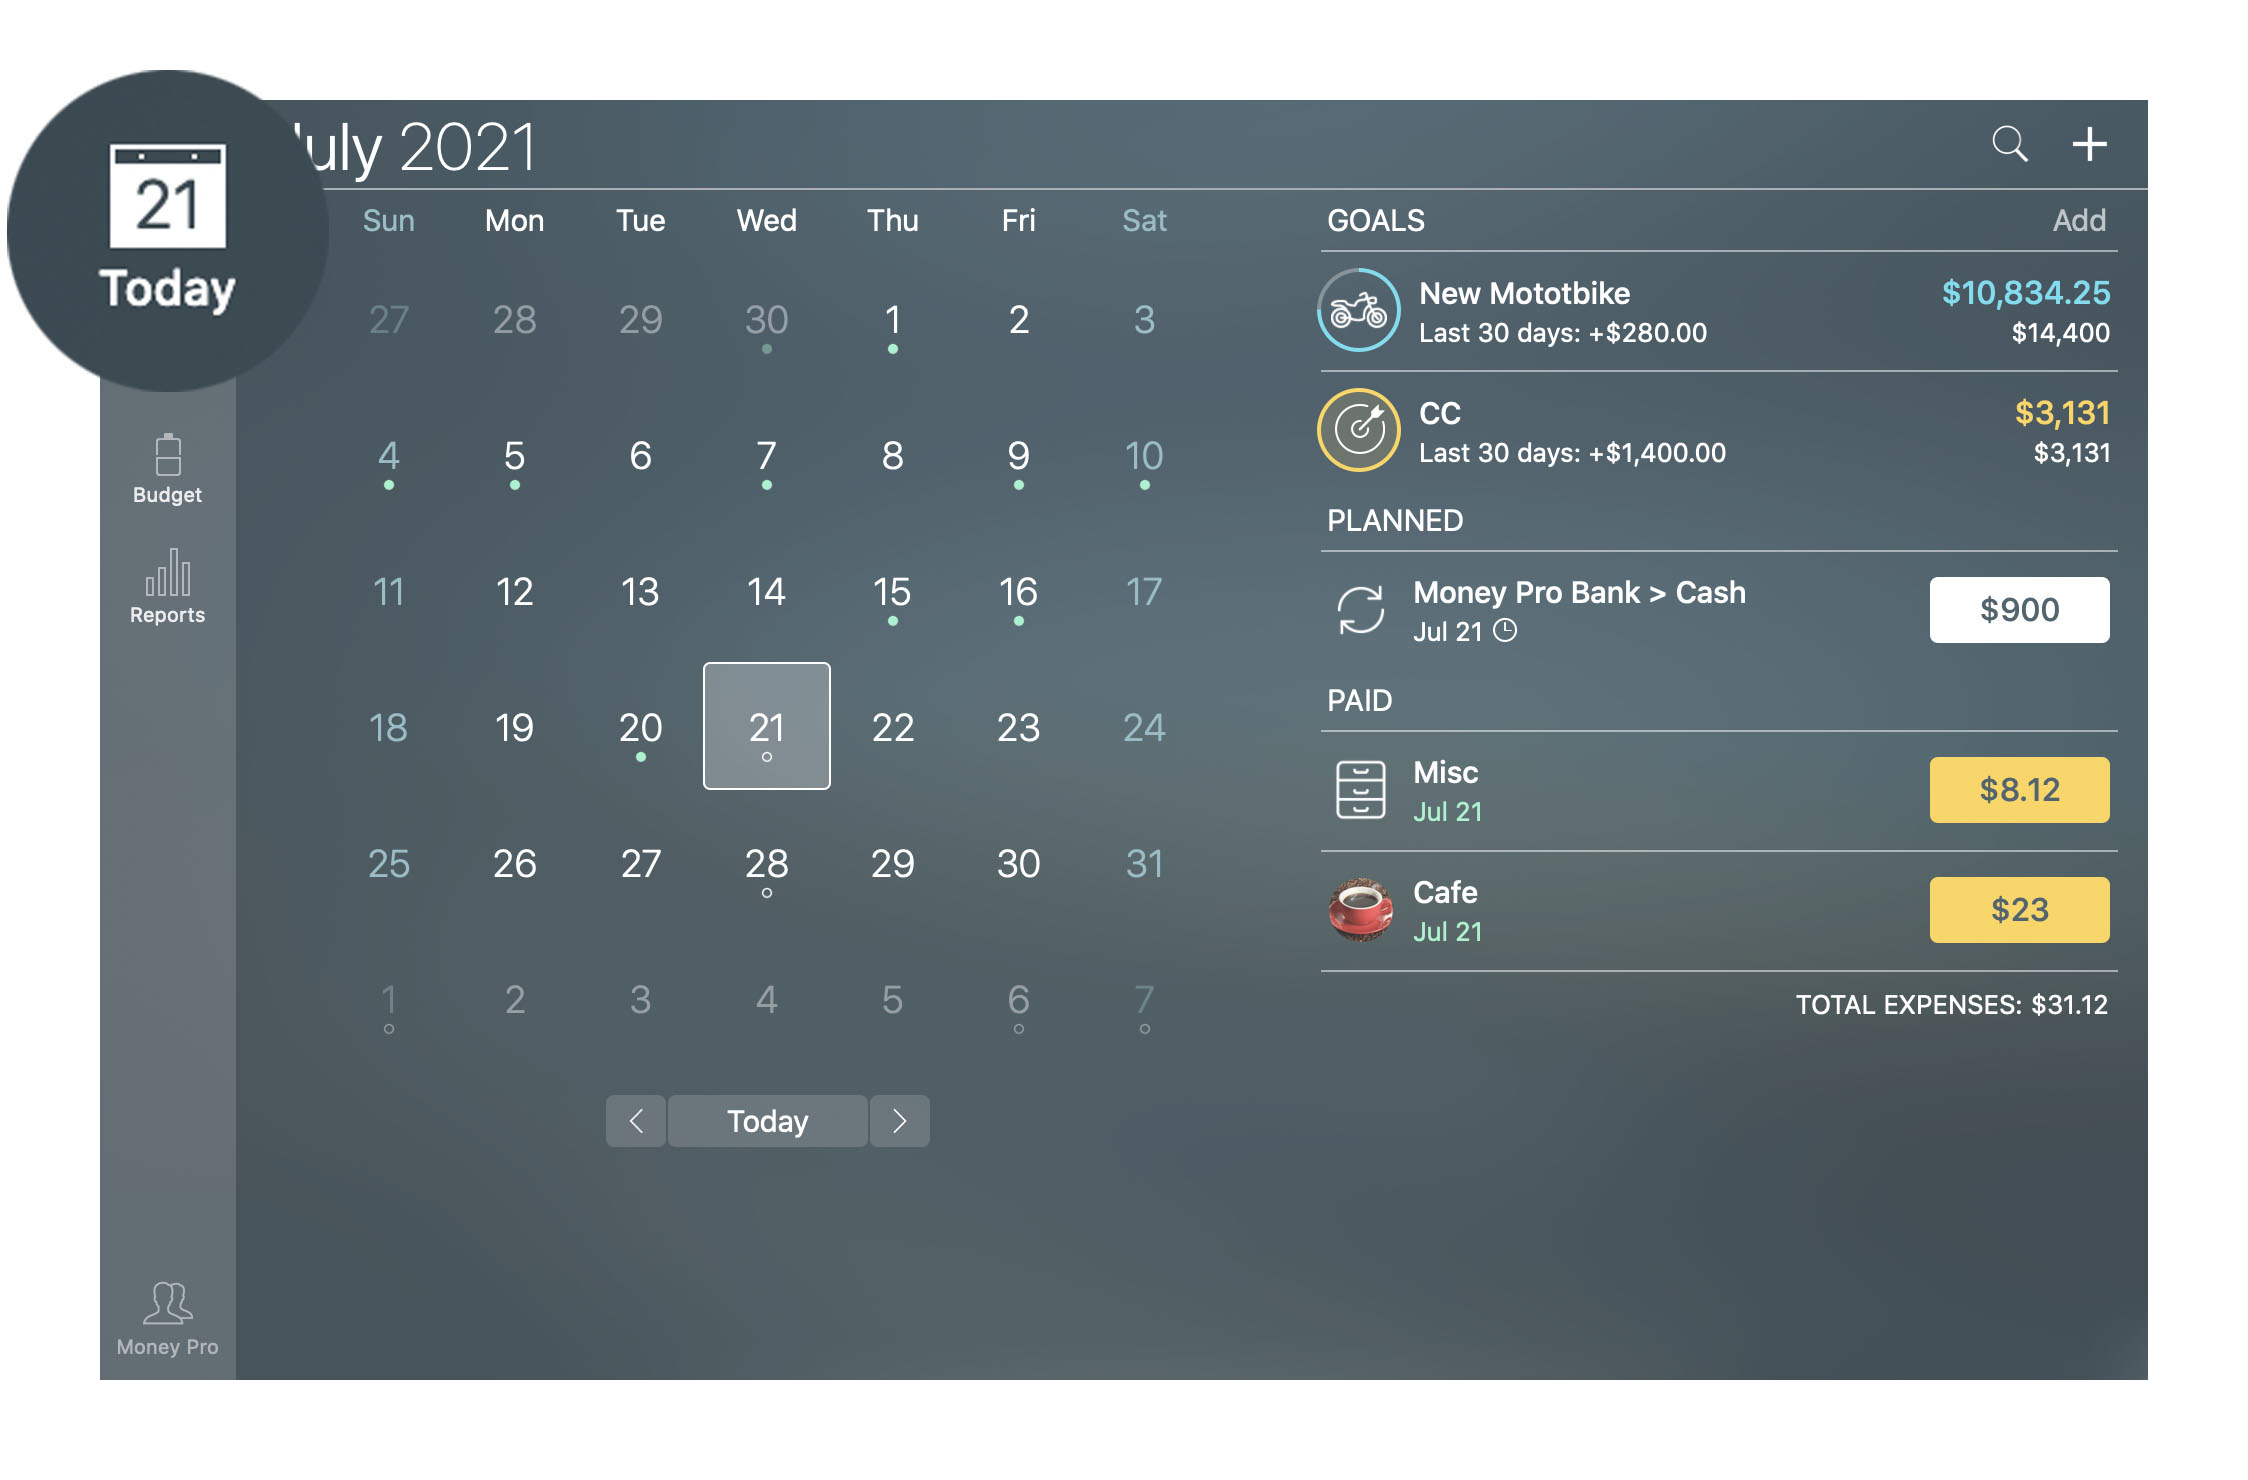
Money Pro can predict the transactions you might repeat on a certain day. These transactions are listed under Repeat transactions on the Today tab. Use them for quick entry and as a friendly reminder of something you might have forgotten to schedule manually.
If you tap the date in the upper left corner of the iPhone screen, a calendar view will appear. Use the swipe gesture to change months on iOS devices. Below the calendar, you will see the list of the transactions for the chosen period (or the whole month).
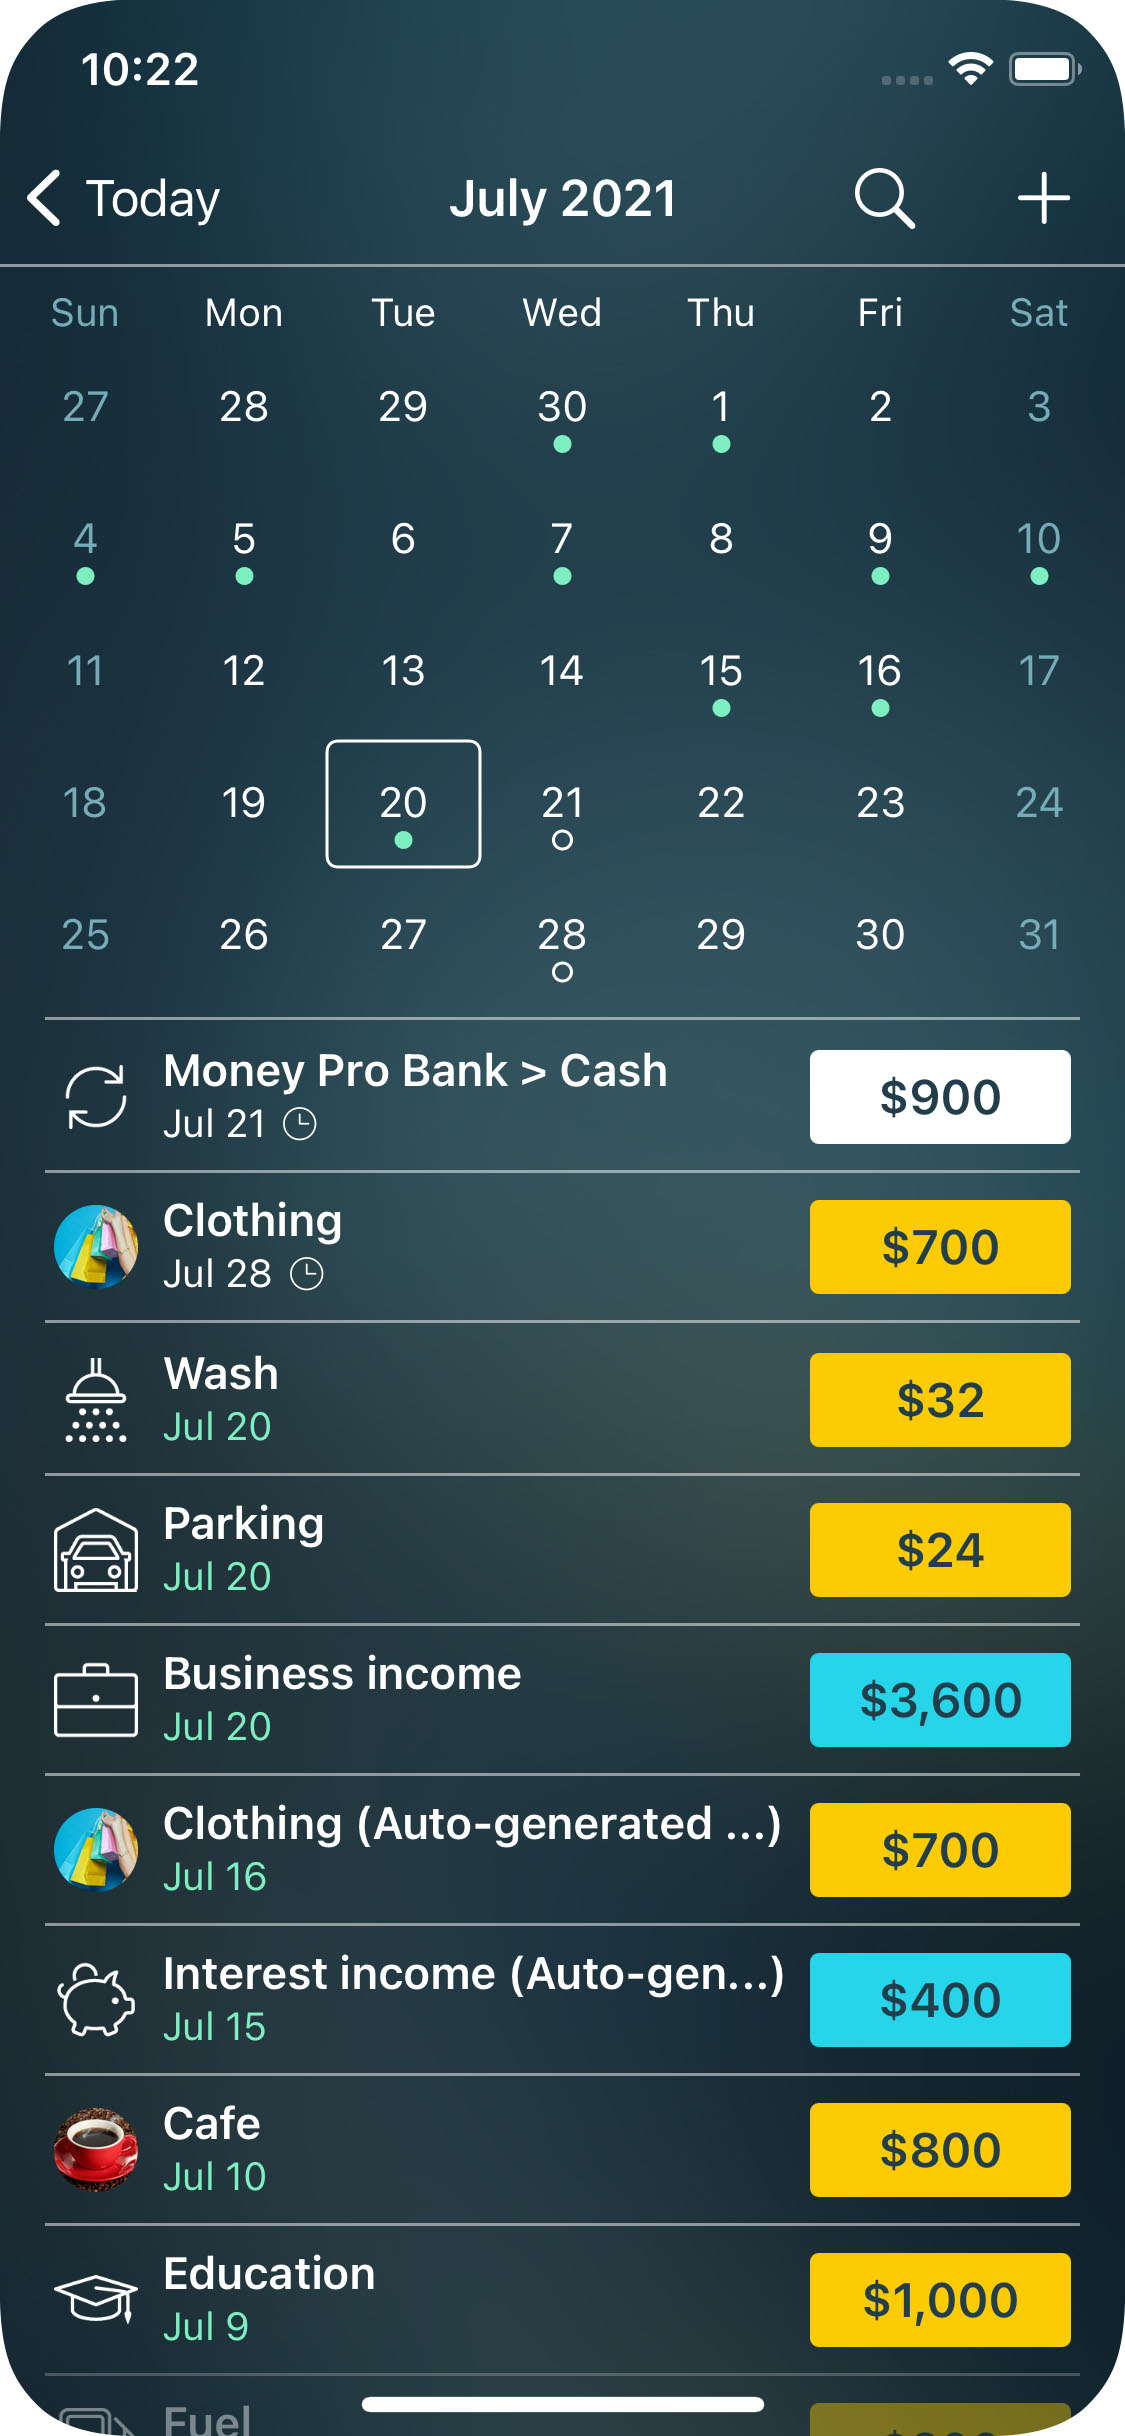
A large calendar view has all your payments marked as dots. Scroll up and down (or left and right for iPhone) to change months. The list shows your transactions for the whole month or the selected day if you select a specific date. If you choose the current day, you will see all your overdue and upcoming bills. It works similarly to the Today view on iPhone.
There will also be a search icon for searching a particular transaction. To search a transaction, use any parameter: amount, check #, agent, description notes, etc.
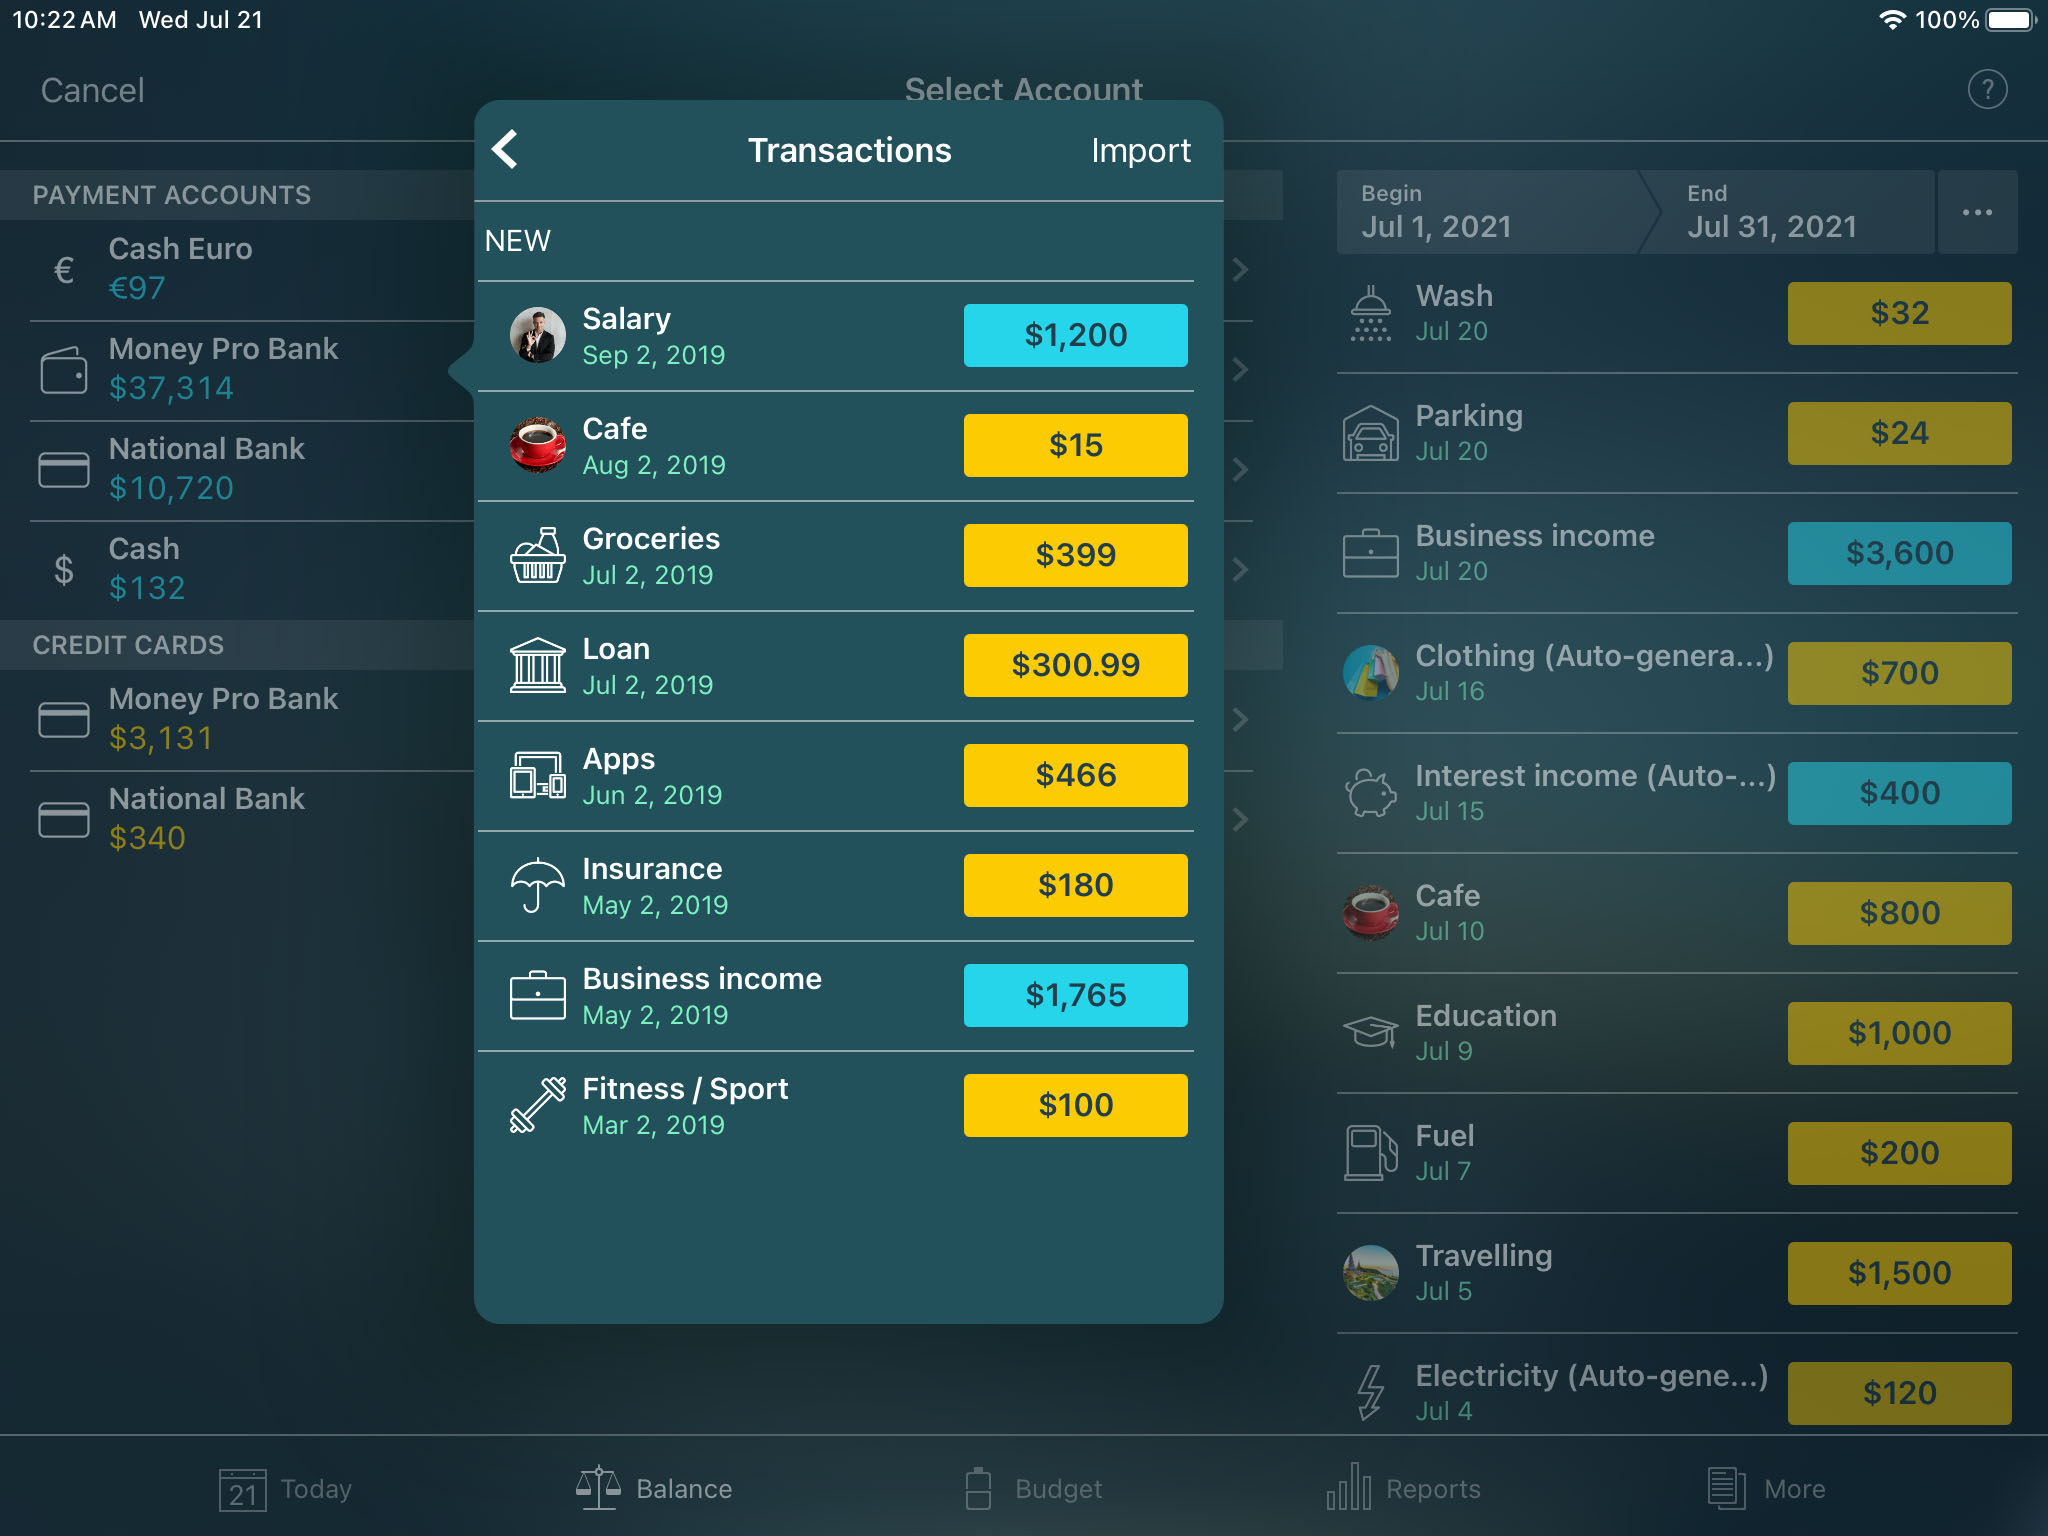
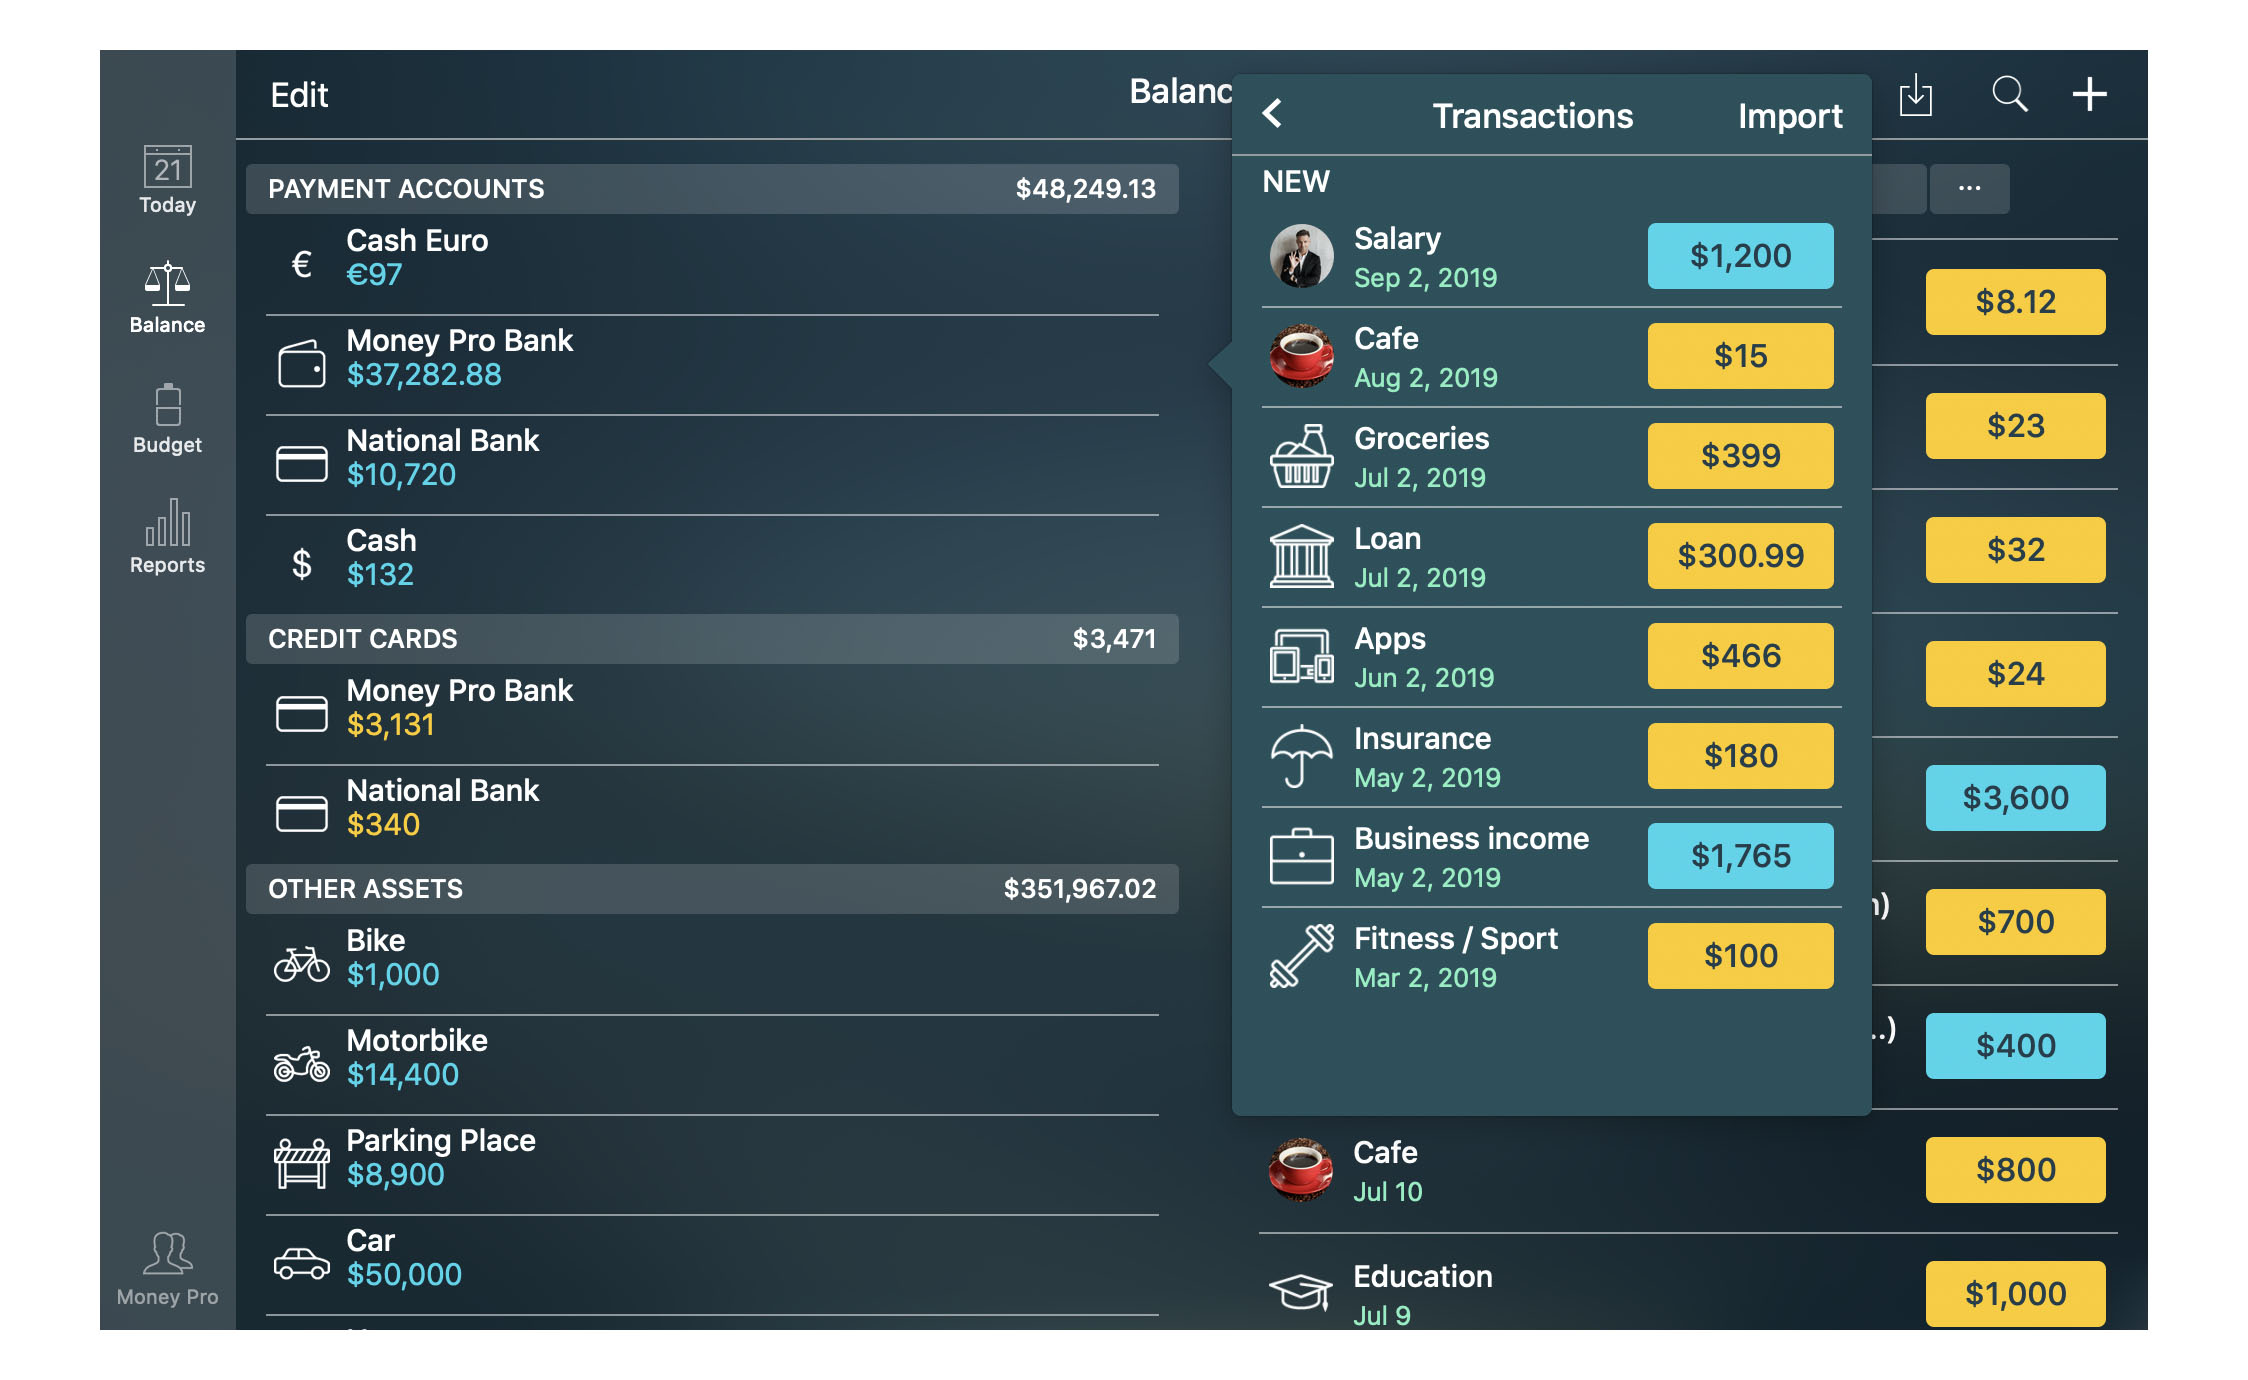
If you want to view transactions for a certain account, choose this account while in the Balance section.
To see all the expenses/incomes for a particular budget, go to the Budget section, select a certain period and choose the needed budget. In the opened form tap/click “Show transaction list” in the bottom.
Transaction types: income, expense, money transfer and others
Transactions are your actual or scheduled (planned) financial operations. There are three basic types of transactions:
- Income transaction. When you receive money from someone else as a paycheck, profit share, dividends, gifts, etc.
- Expense transaction. When you pay someone else in exchange for a purchase or service.
- Money transfer transaction. When your money goes from one of your app’s accounts to another. F.e. you take a certain amount from your checking account to use as cash.
However, in the More section, you will find a few additional types of transactions as well:
- Asset purchase. When you buy a new asset and add it to your list of Other assets in the Balance section.
- Asset sale. When you sell an asset and delete it from your list of Other assets in the Balance section.
- Liability acquisition. When you take a loan and add it to the list of your Liabilities in the Balance section.
- Discharge of liability. When you pay off your loan or close your credit card.
Creating a transaction
Go to the Today section, and tap/click “+” in the upper right corner.
The default transaction type is “expense”. Change the transaction type if needed. The chosen type will influence the other fields on the form. Fill in the required fields for each particular case.
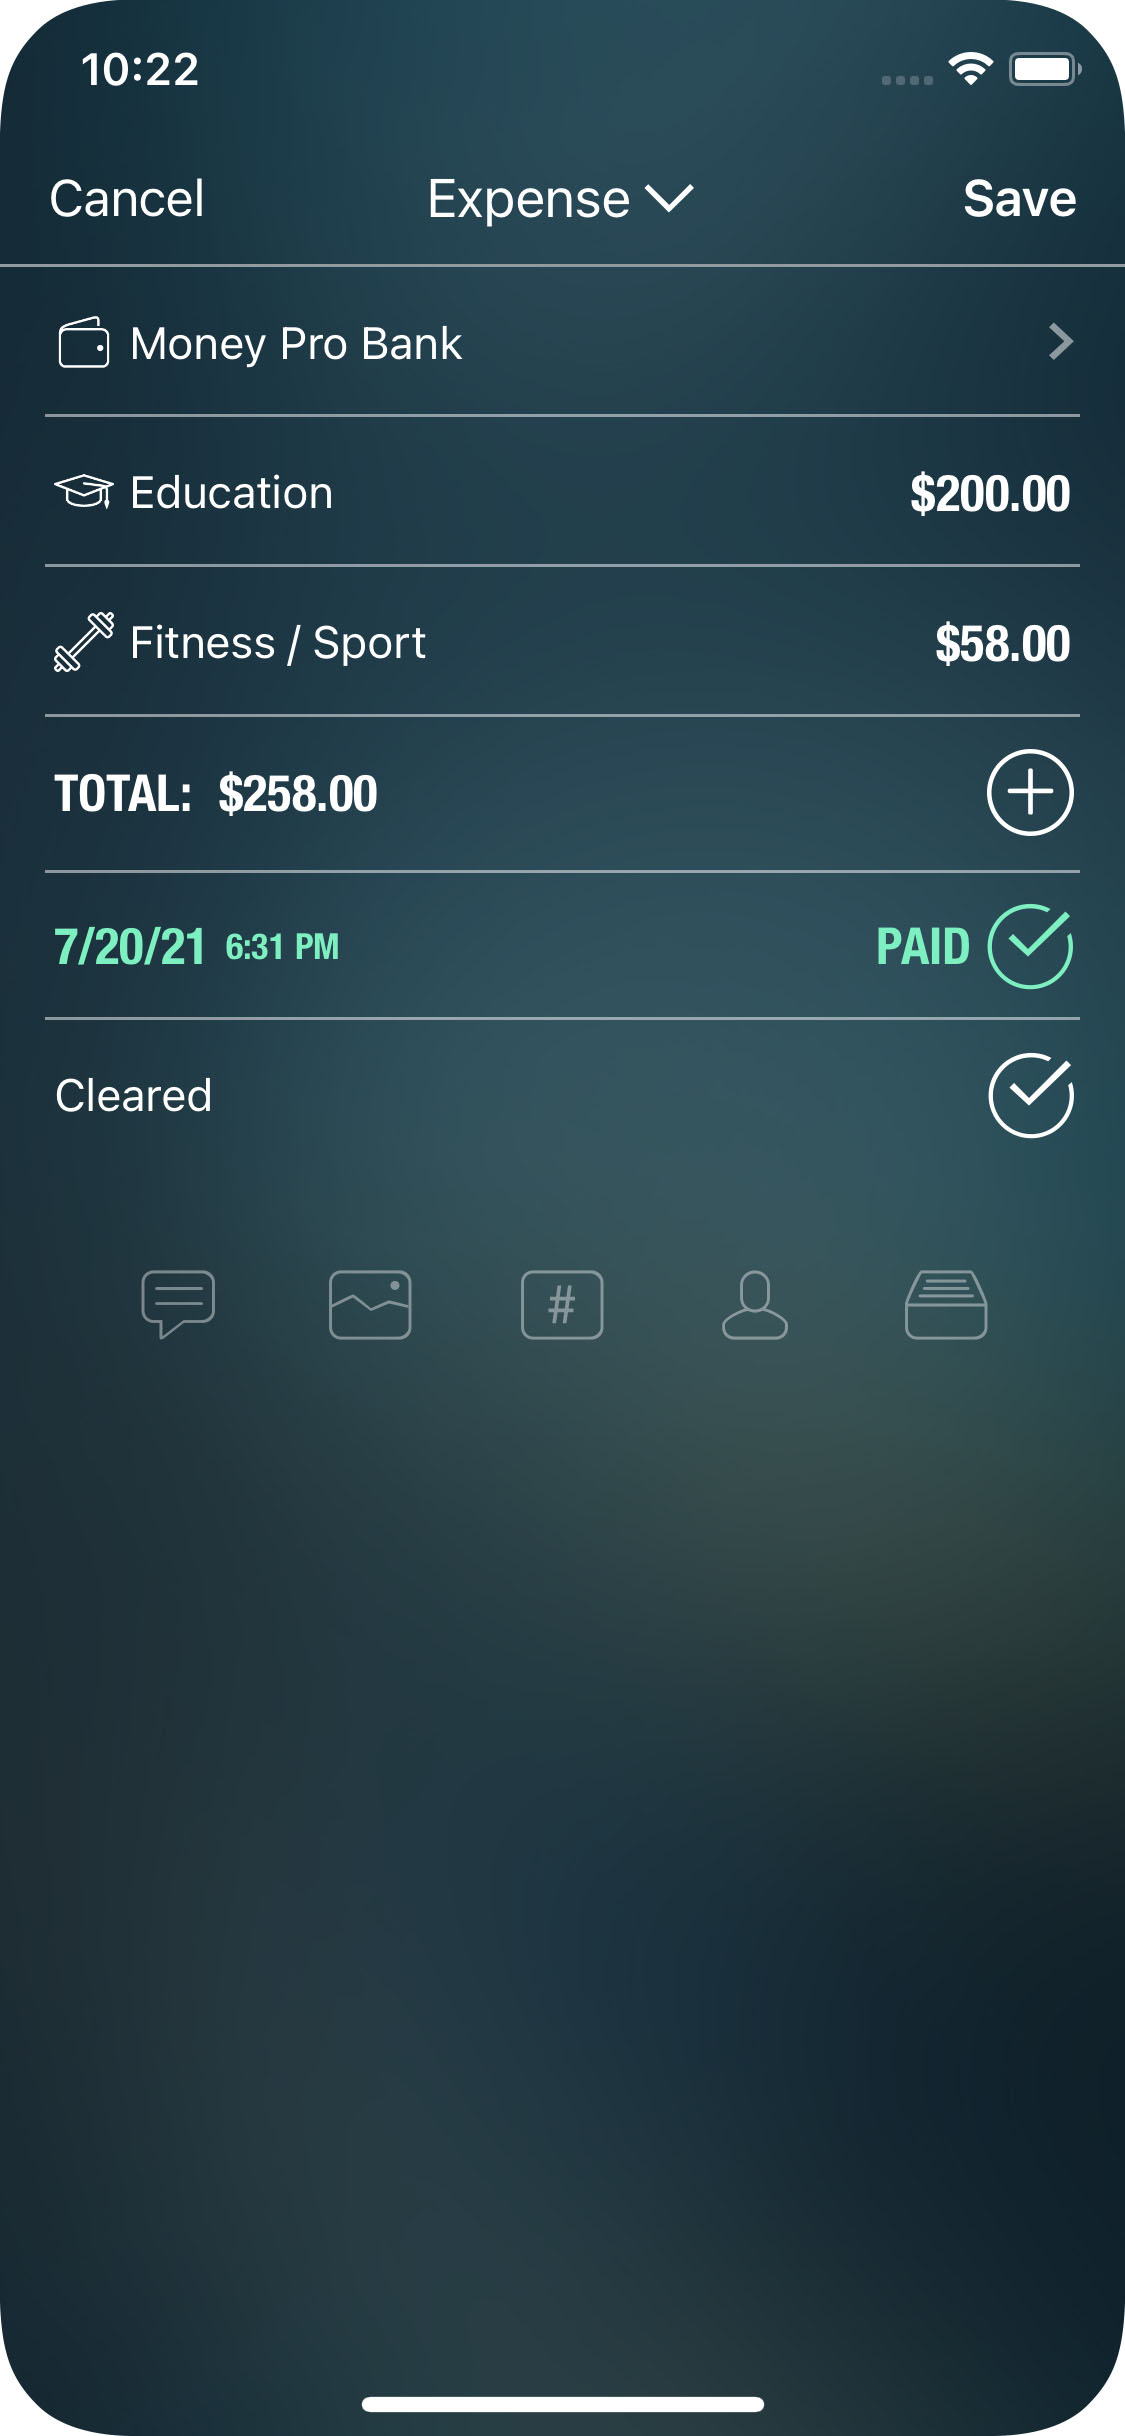
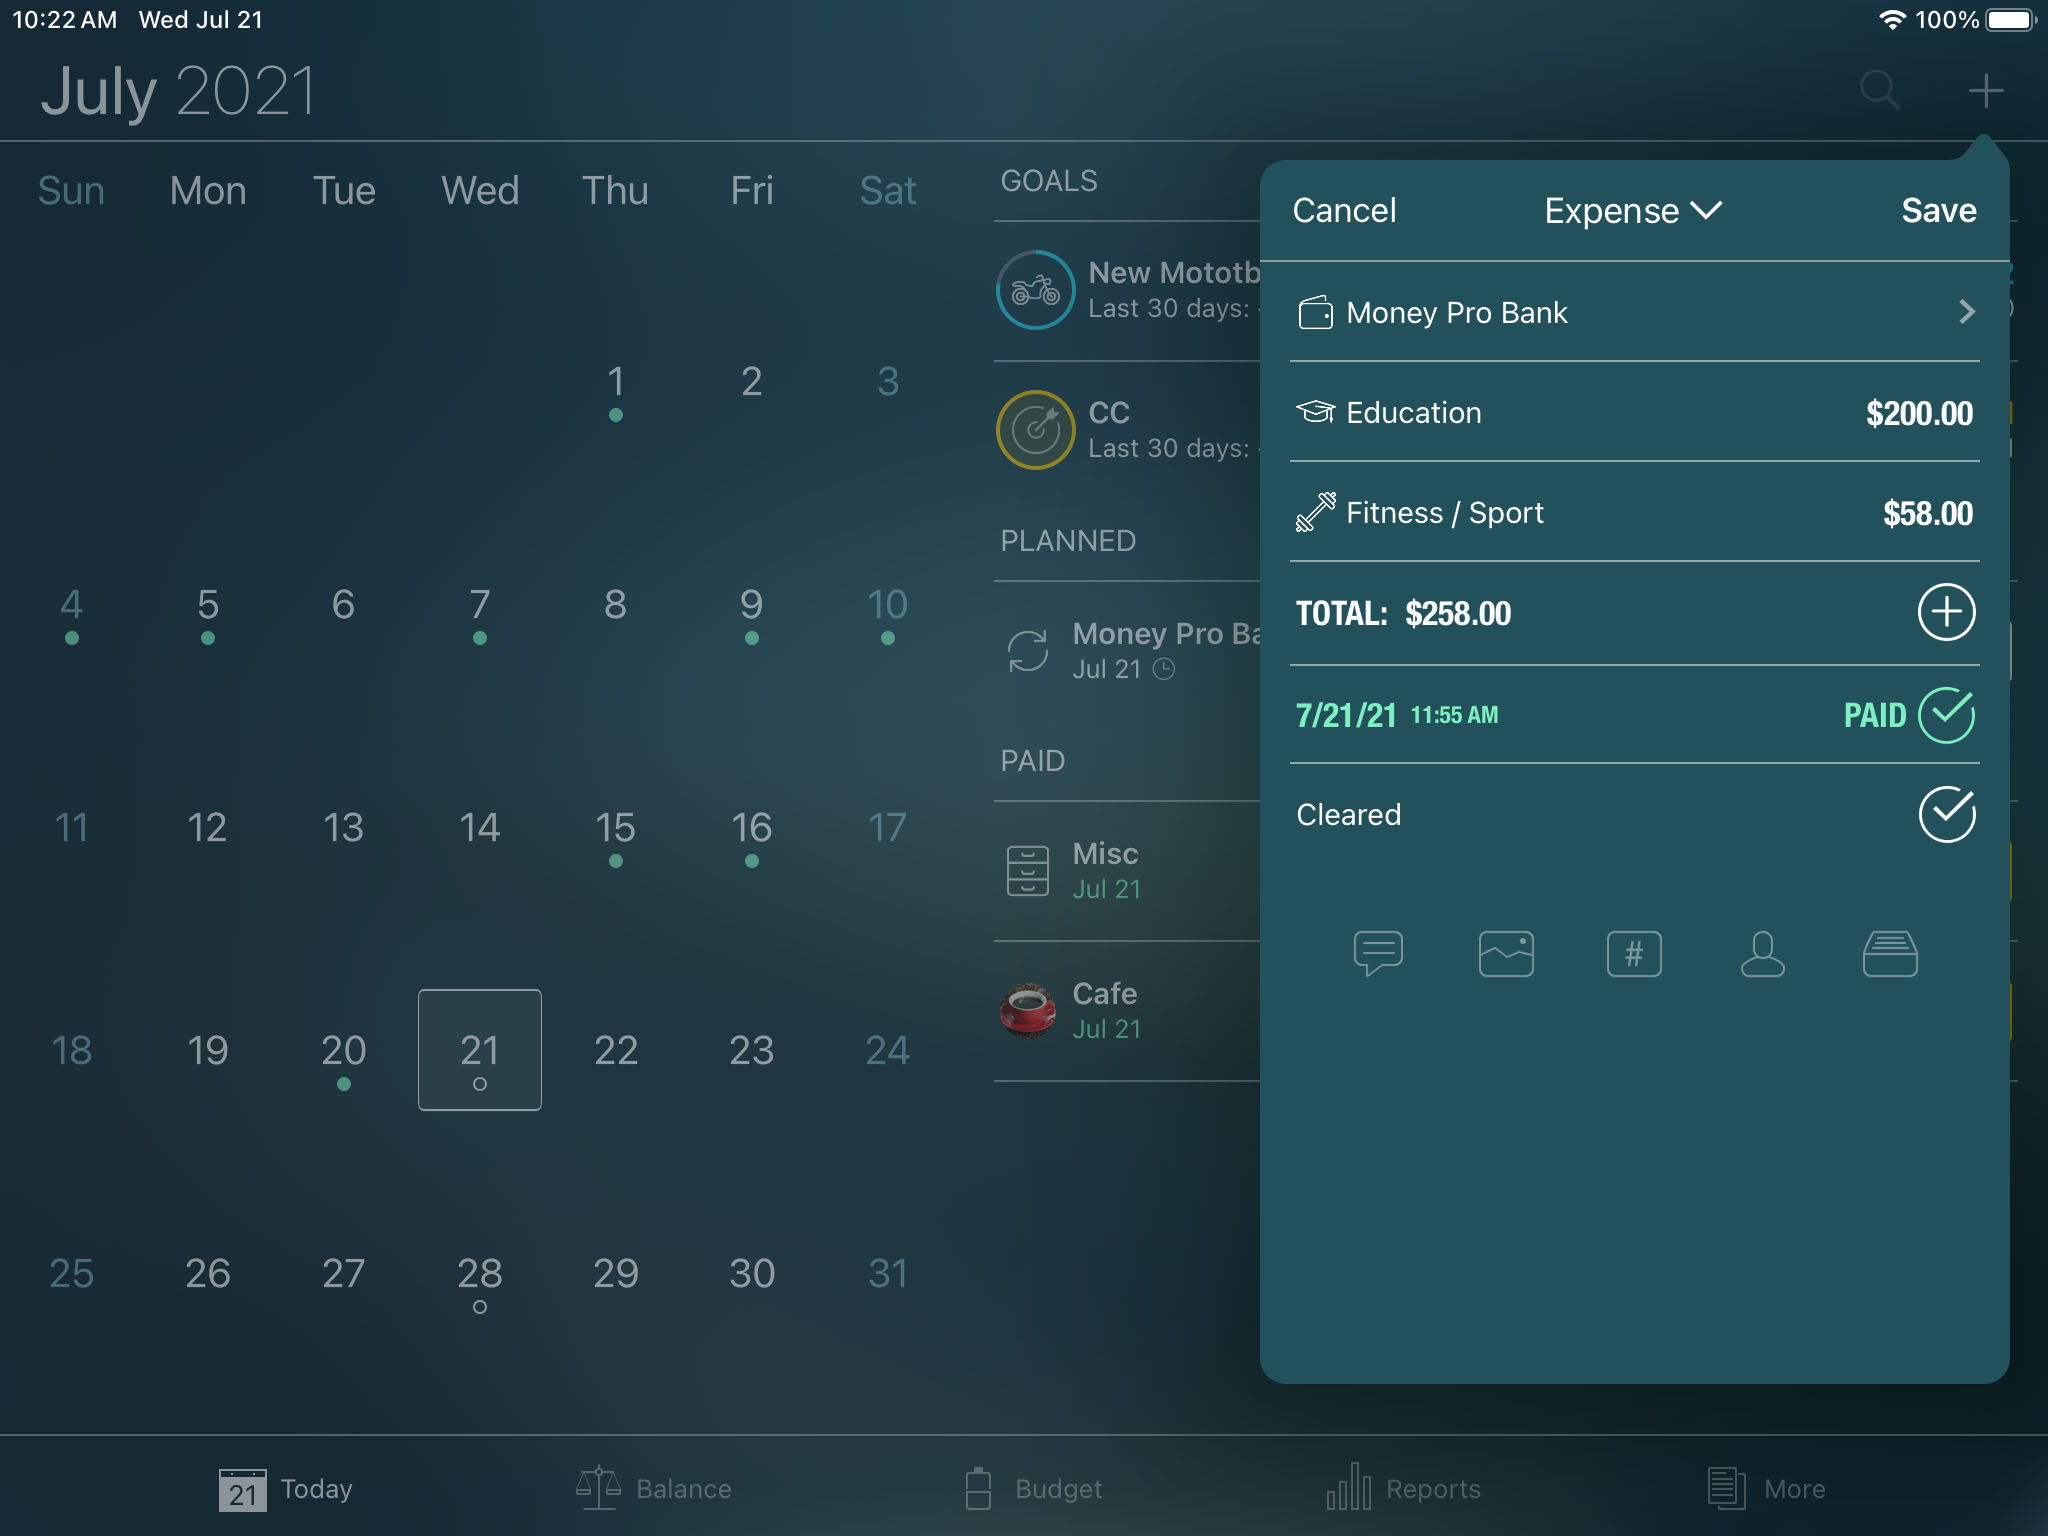
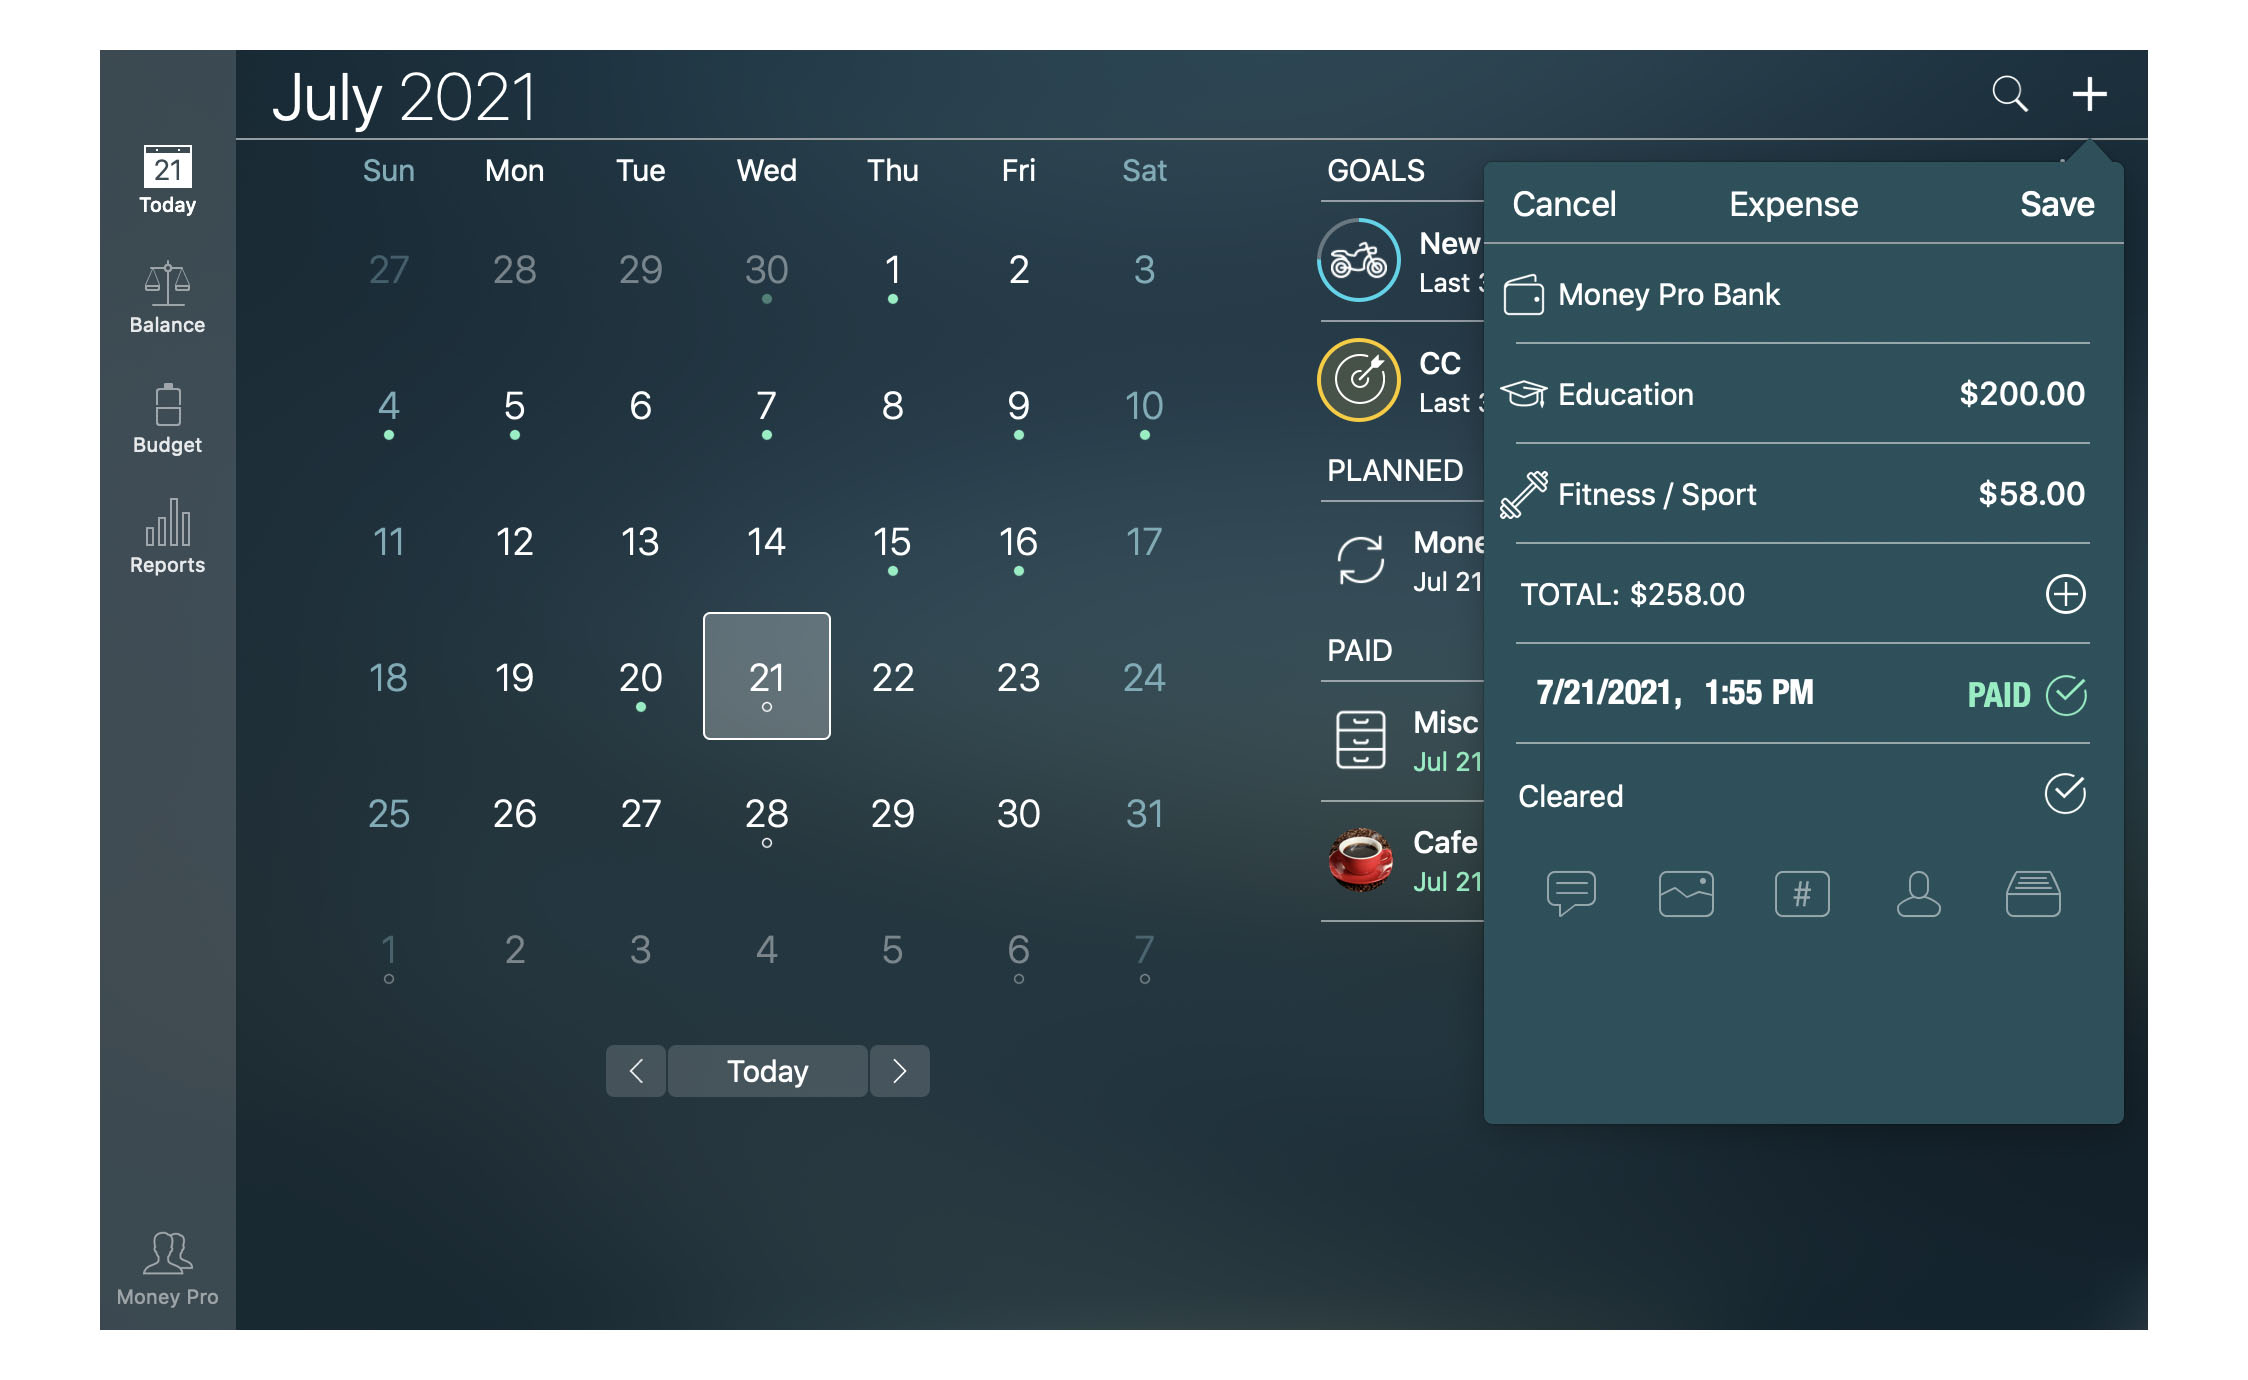
Expense transaction:
- Category: assigning a category for the expense should be easy if your budget structure is well thought out.
- Account: the account you paid for this purchase from.
- Amount: a specific amount in the currency of the account.
- Date: along with the date, you can enter the exact time of the purchase. If you set a future date when creating a new transaction, the transaction will become “Planned” automatically (learn more below).
- Cleared: you can reconcile this transaction. (This option is available for paid transactions if account reconciliation is turned on for the selected account)
- Additional information (optional): description, photo attachments, check #, agent (payee), class of the transaction (business, personal, or any other custom class).
Income transaction:
- Category: an appropriate category for the income.
- Account: the account which will receive the income money.
- Amount: a specific amount in the selected account’s currency.
- Date: along with the date, you can enter the exact time of the transaction.
- Cleared: you can reconcile this transaction.
- Additional information (optional): description, photo attachments, check #, agent (payee), class of the transaction (business, personal, or any other custom class).
Money transfer transaction:
- Account: the account you are transferring money from.
- Account (to): the account you are transferring money to.
- Amount: the amount you transfer from the first account. It should be entered in the currency of the first account.
- Amount received: the amount received by the account you are transferring money to. It will be filled out automatically even if the two accounts have different currencies (see “Currency converter”). But if the received amount differs from the one you transfer, correct it manually.
- Date: along with the date, you can enter the exact time of the transfer.
- Additional information (optional): description, photo attachments, check #, agent (payee), class of the transaction (business, personal, or any other custom class).
Asset purchase is essentially an expense paid for some asset you would like to list in your balance sheet. All the fields are similar to what you have for an expense transaction. Two additional fields are:
- Asset: you need to add a new asset to the existing list of assets. To do that, tap/click “Edit” in the upper right corner, then tap/click “Add”. Fill in the asset parameters. Save the changes and tap/click “Done”. After that select the newly added asset from the appeared list.
- Increase balance: if you turn it on, then the asset’s balance will be increased on the amount of the transaction. This option may be helpful when you want to pay for your purchase in several installments. This way the value of your asset will increase after each of your transactions.
Asset sale is similar to an income transaction. Two additional fields are:
- Asset: the asset you sell. Select it from the list of assets and it will be erased.
- Partial sale: you may sell the asset at once or decrease its value on the transaction amount.
Liability acquisition is also similar to an income transaction since you receive money. Two additional fields are:
- Liability: you need to add a new liability to the existing list. To do that, tap/click “Edit”, then “Add”. Fill in the liability parameters. Save the changes and tap/click “Done”. After that select the newly added liability from the appeared list.
- Increase Liability Balance: the balance of the liability will be increased on the amount of the transaction.
Discharge of liability is almost like an expense. The only difference is that it decreases the balance of a liability. Additional fields are:
- Liability: select the liability from the list of your liabilities.
- Interest: how much interest will be deducted from your account without discharging the liability.
- Principal: it will be deducted from both your account and your liability.
- Extra payment: the amount you pay for discharging your liability in advance. It will also be deducted from both your account and your liability.
When you finish the with transaction details, tap/click “Save” and a new transaction will be created.
When your transaction includes Assets/Liabilities you may specify the category. In this case, the transaction will be taken into account when summing up your budget and making all the reports including the “Income/Expenses” report. Otherwise, it will not be counted in your budget and will not be reflected in the “Income/Expenses“ report. However, all the other reports (“Cash Flow“, “Projected balance“, “Transactions“, “Net Worth“, and “Assets/Liabilities“) will include the information about this transaction.
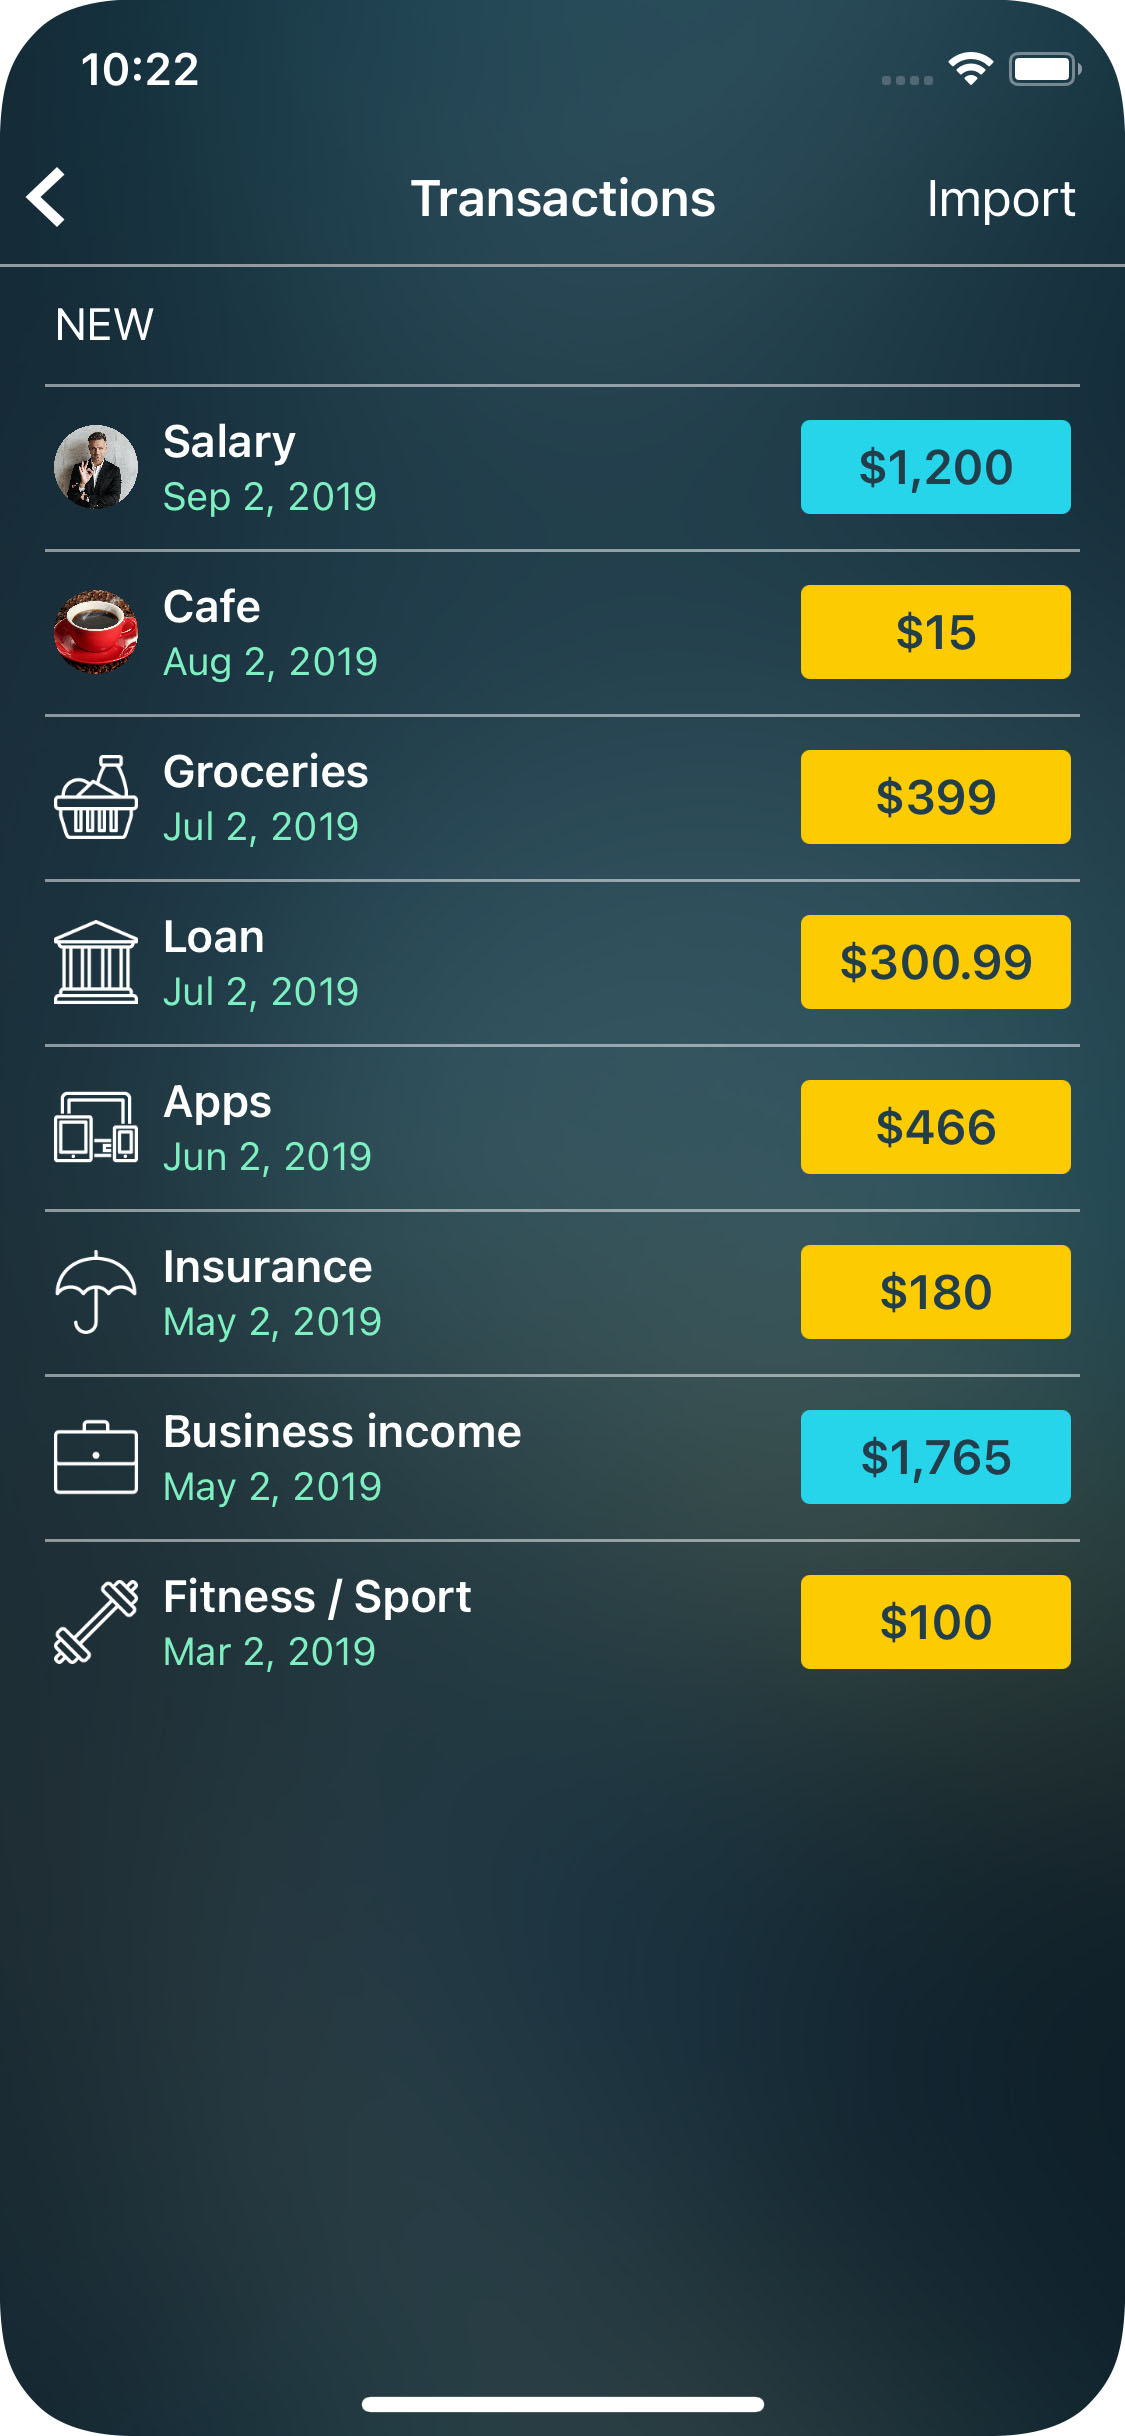
Deleting a transaction
You can delete any transaction by pressing “Delete” at the bottom of the editing form (the form with transaction details). You can open the editing form by choosing the transaction while working in any of the sections: Transactions, Balance, or Budget.
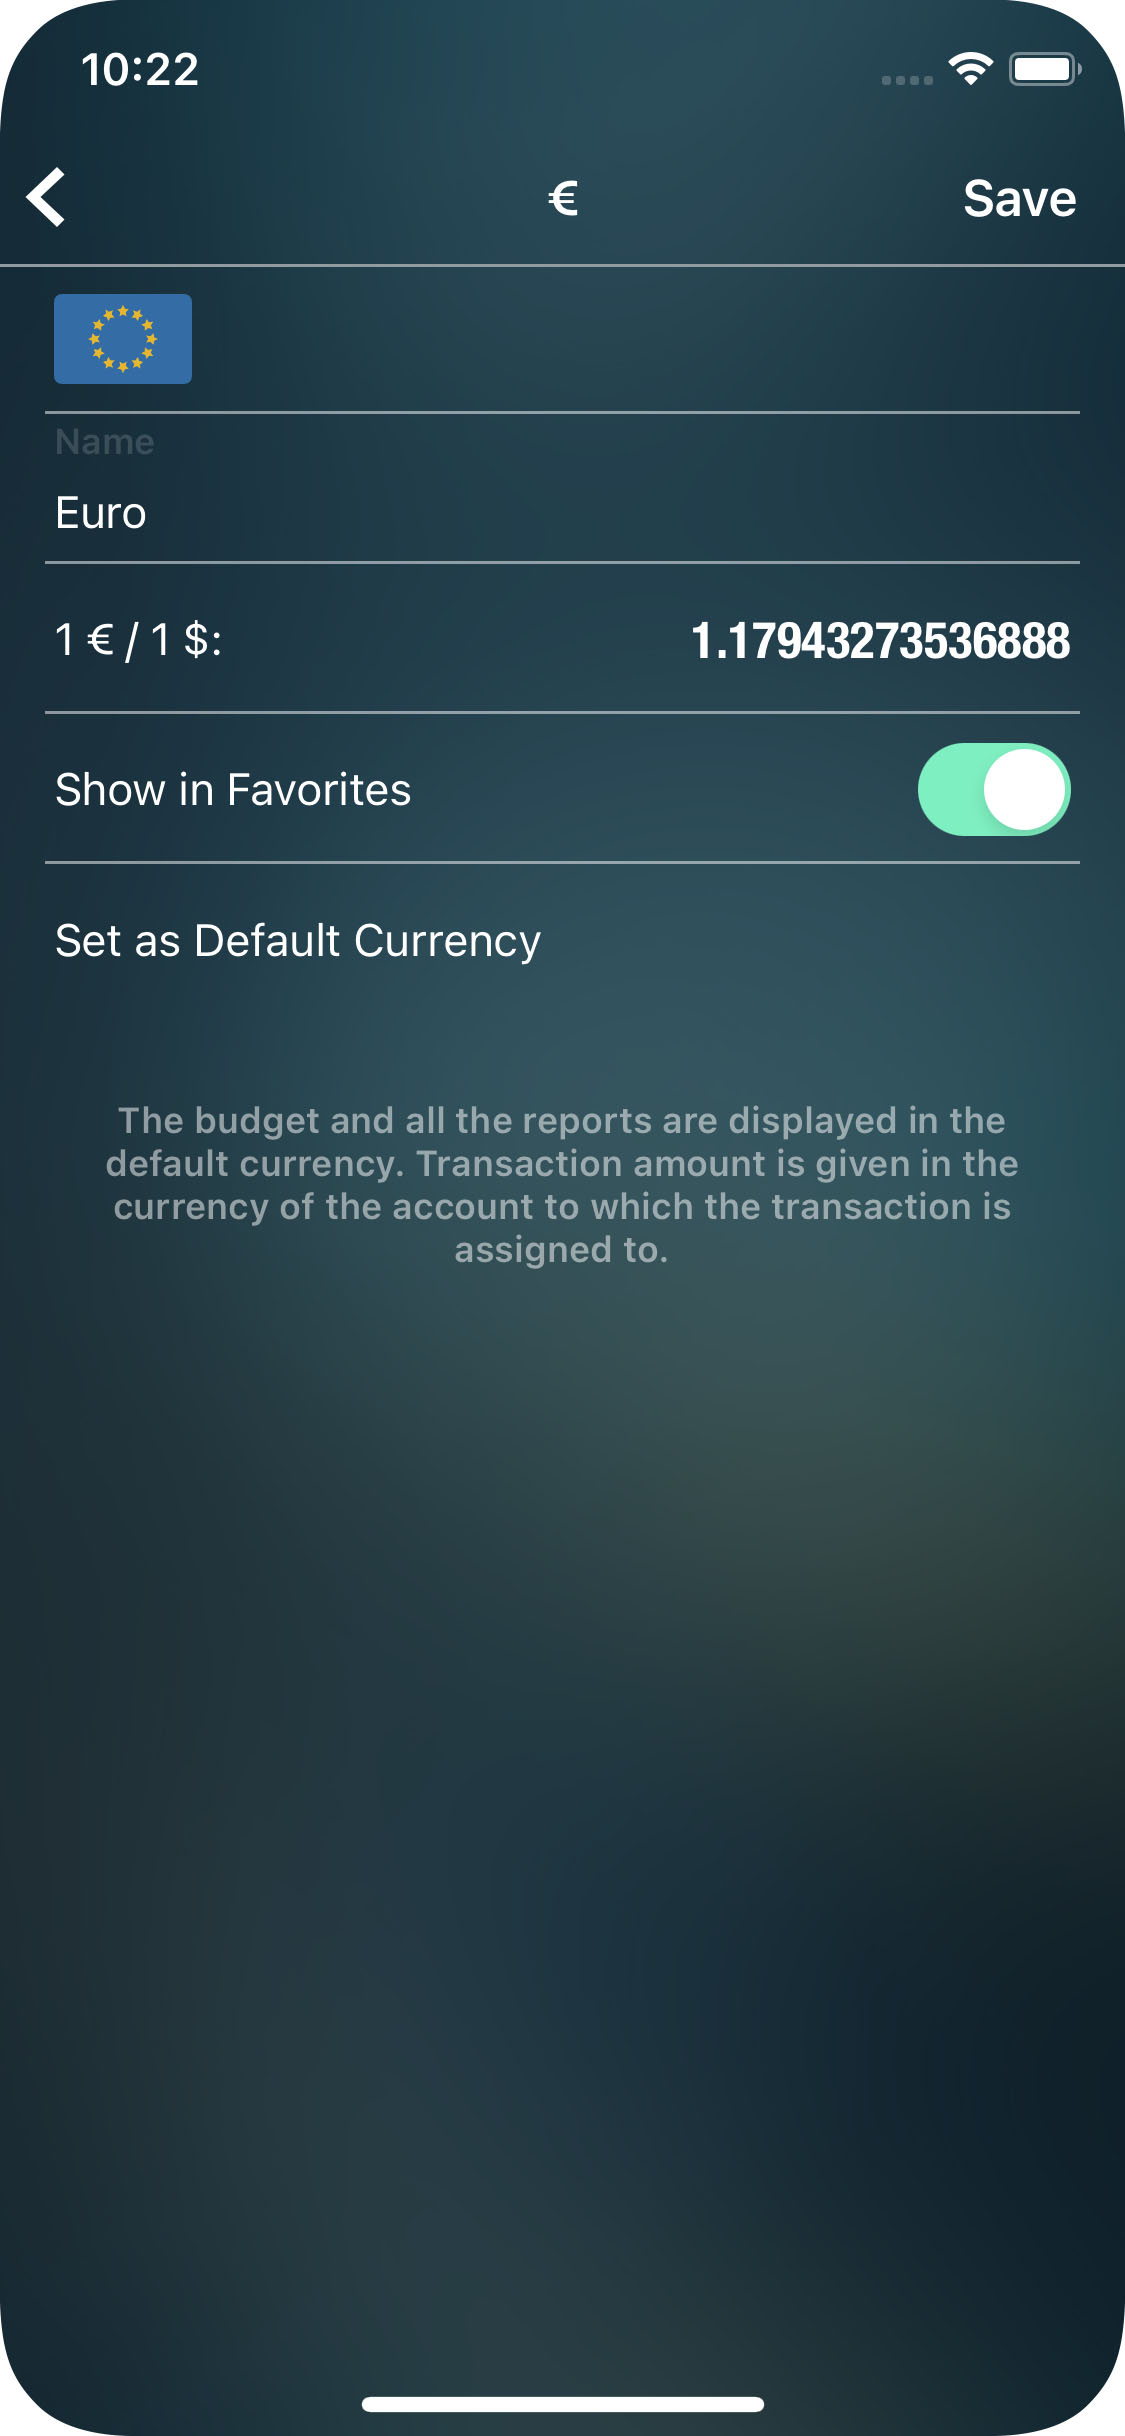
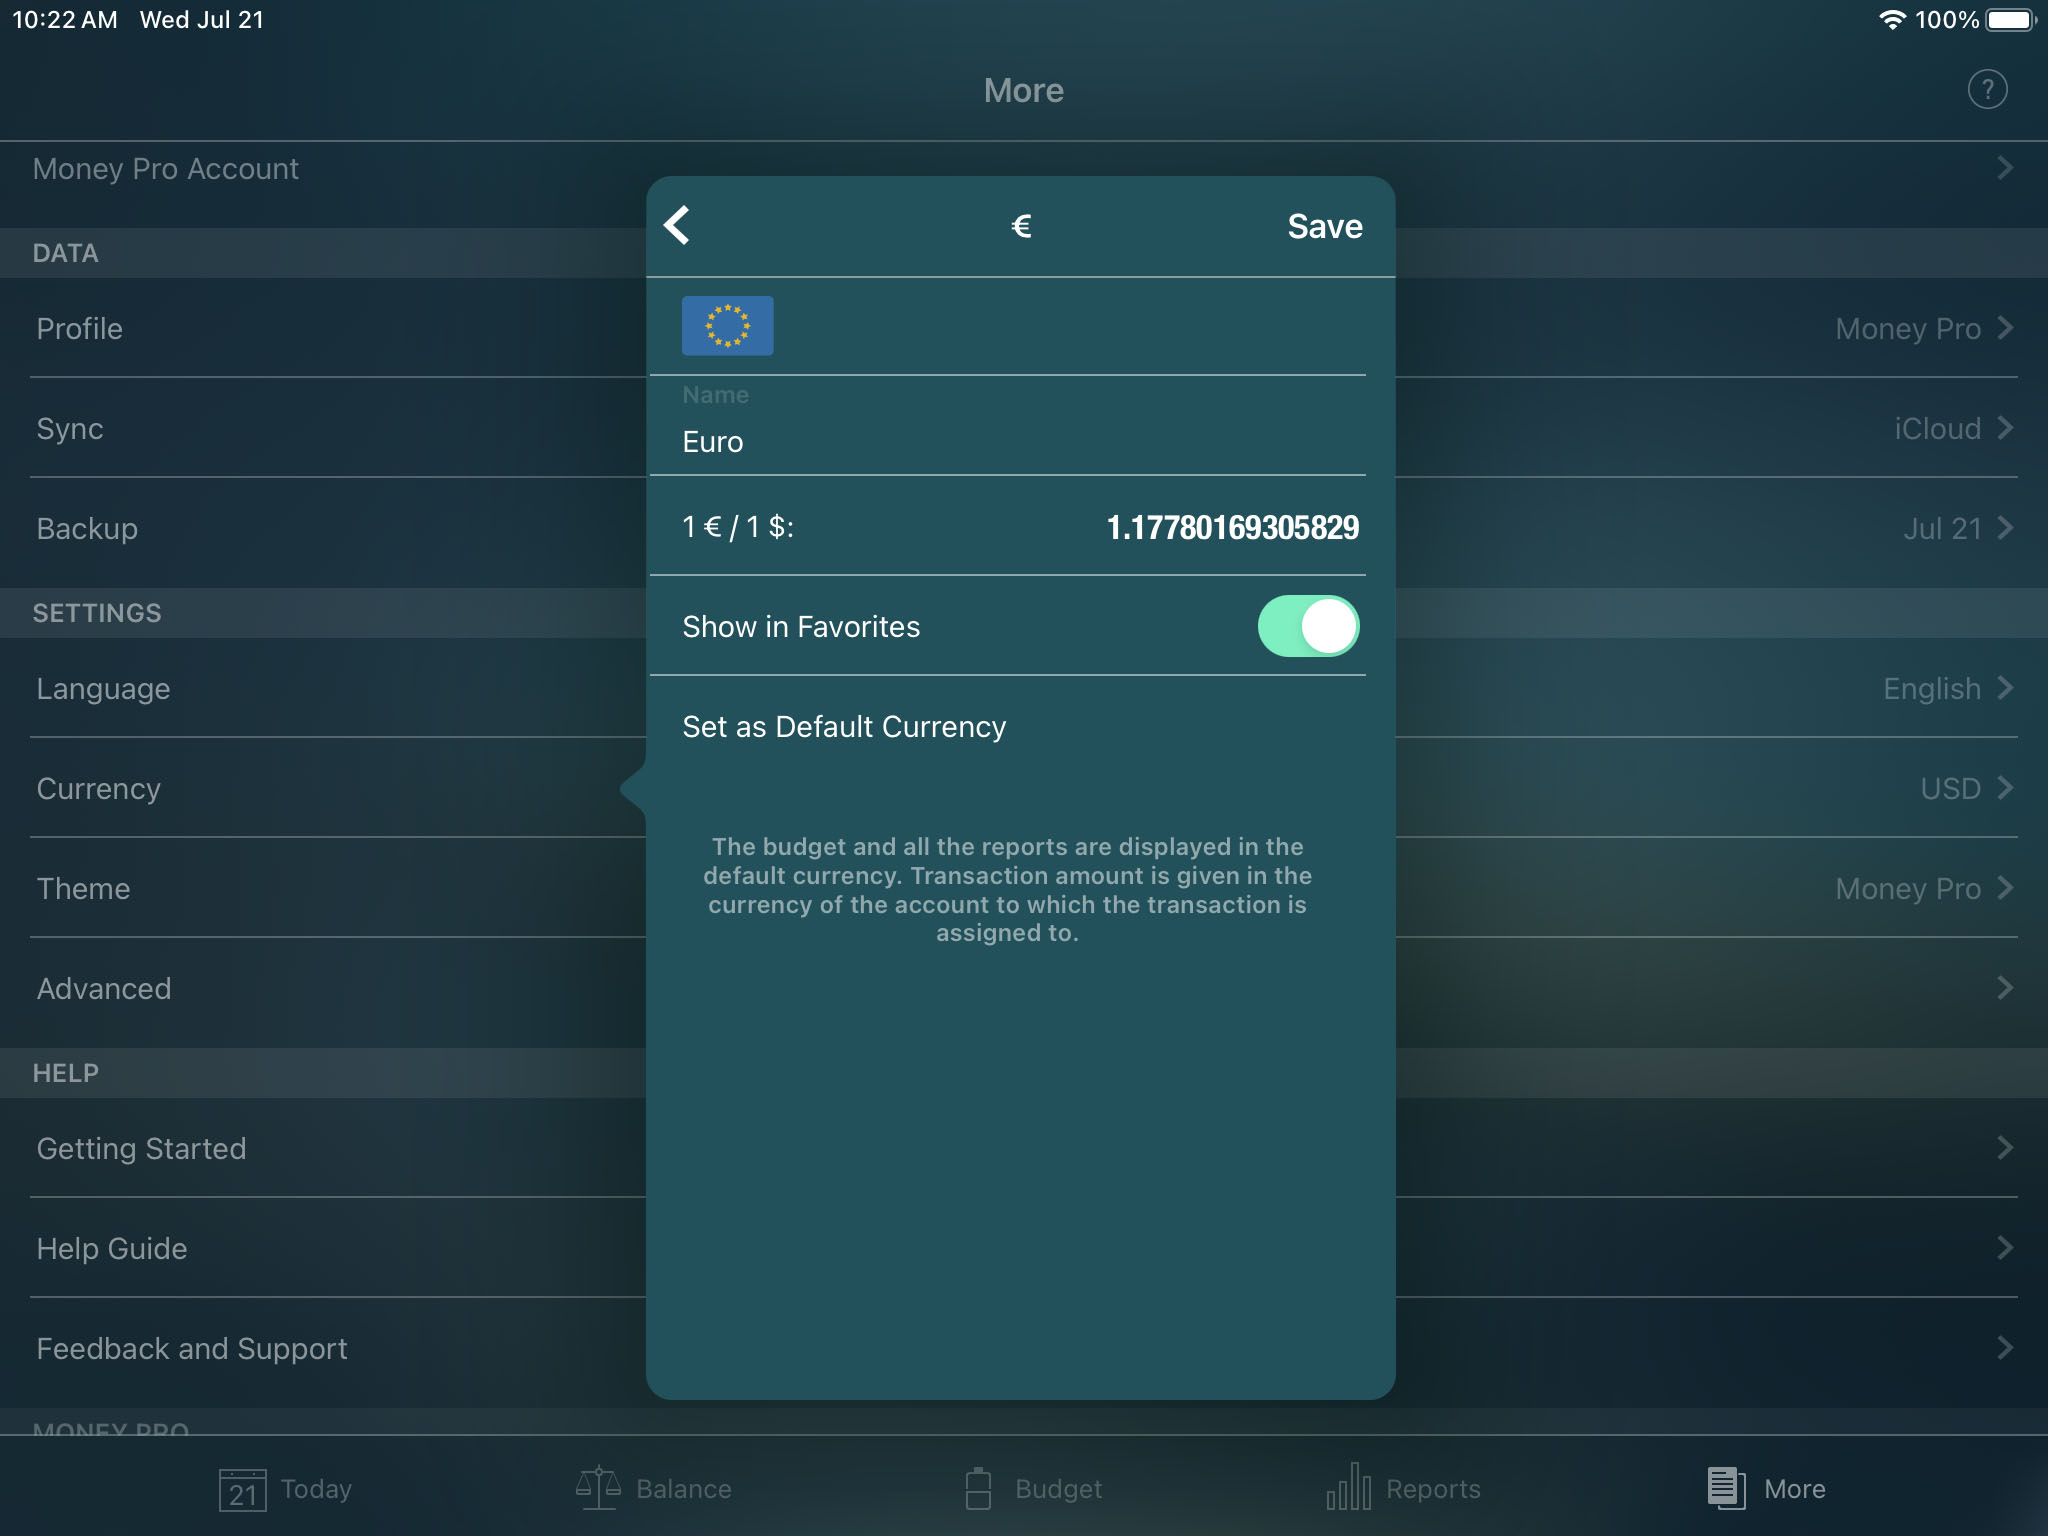
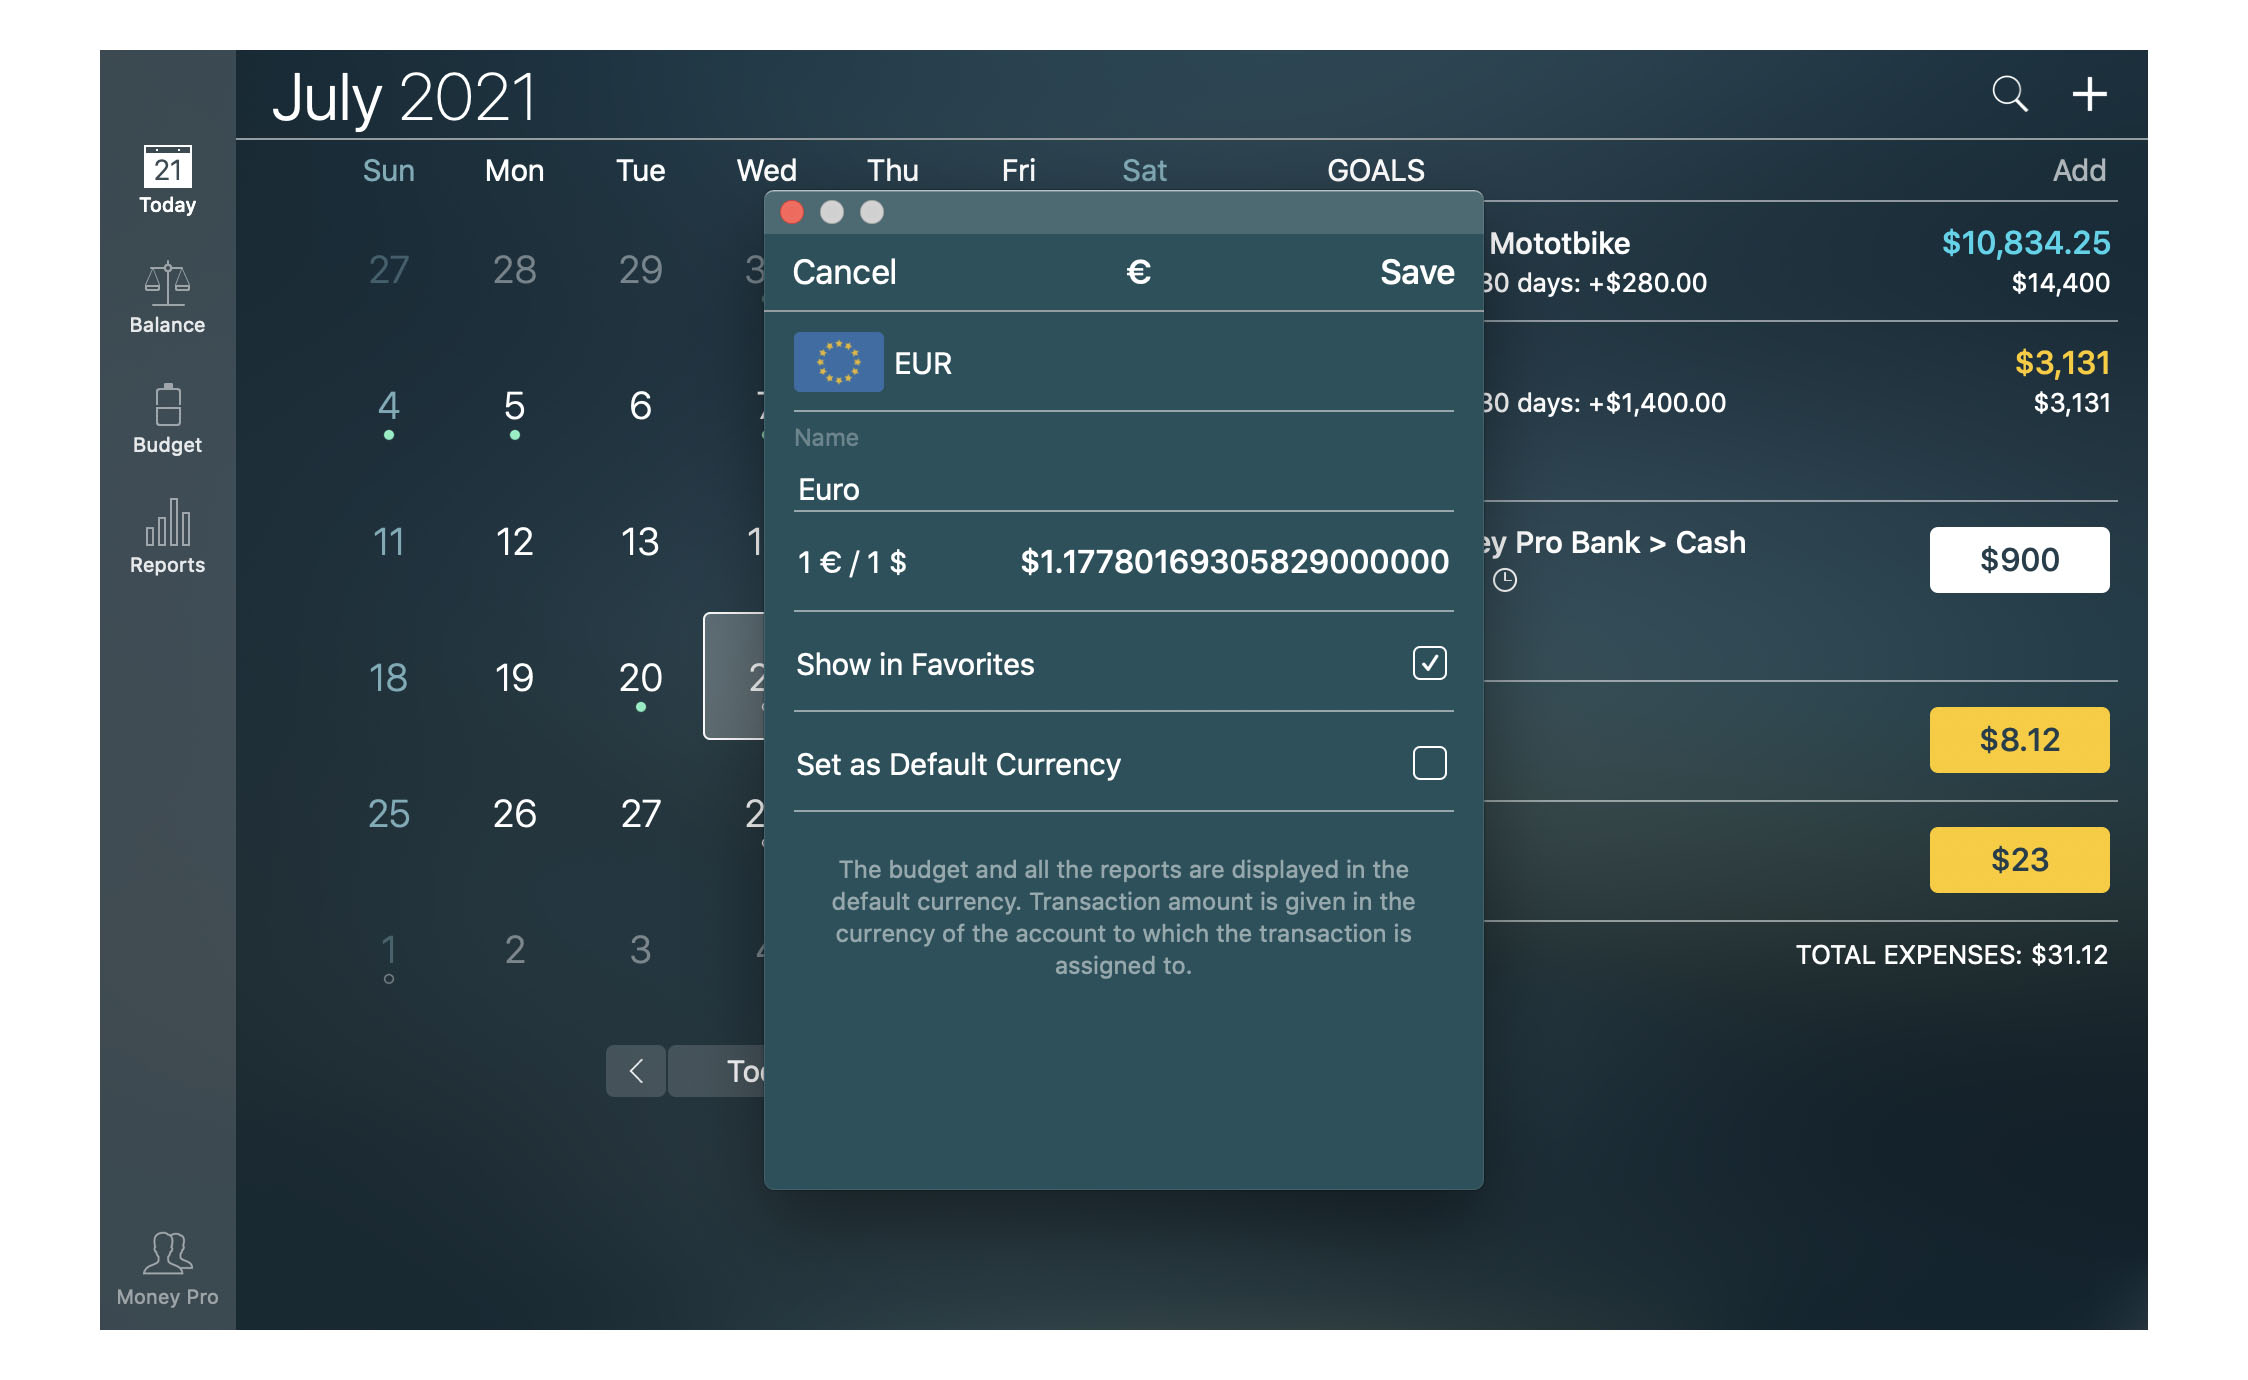
Currency converter
When you enter an amount while creating transactions or planning your budget, you can use the built-in currency converter. The converter helps to operate with different currencies. Tap the currency button and select the currency you would like to convert from. Then enter the amount in the selected currency. The amount will be converted automatically to the currency of the account selected for the transaction.
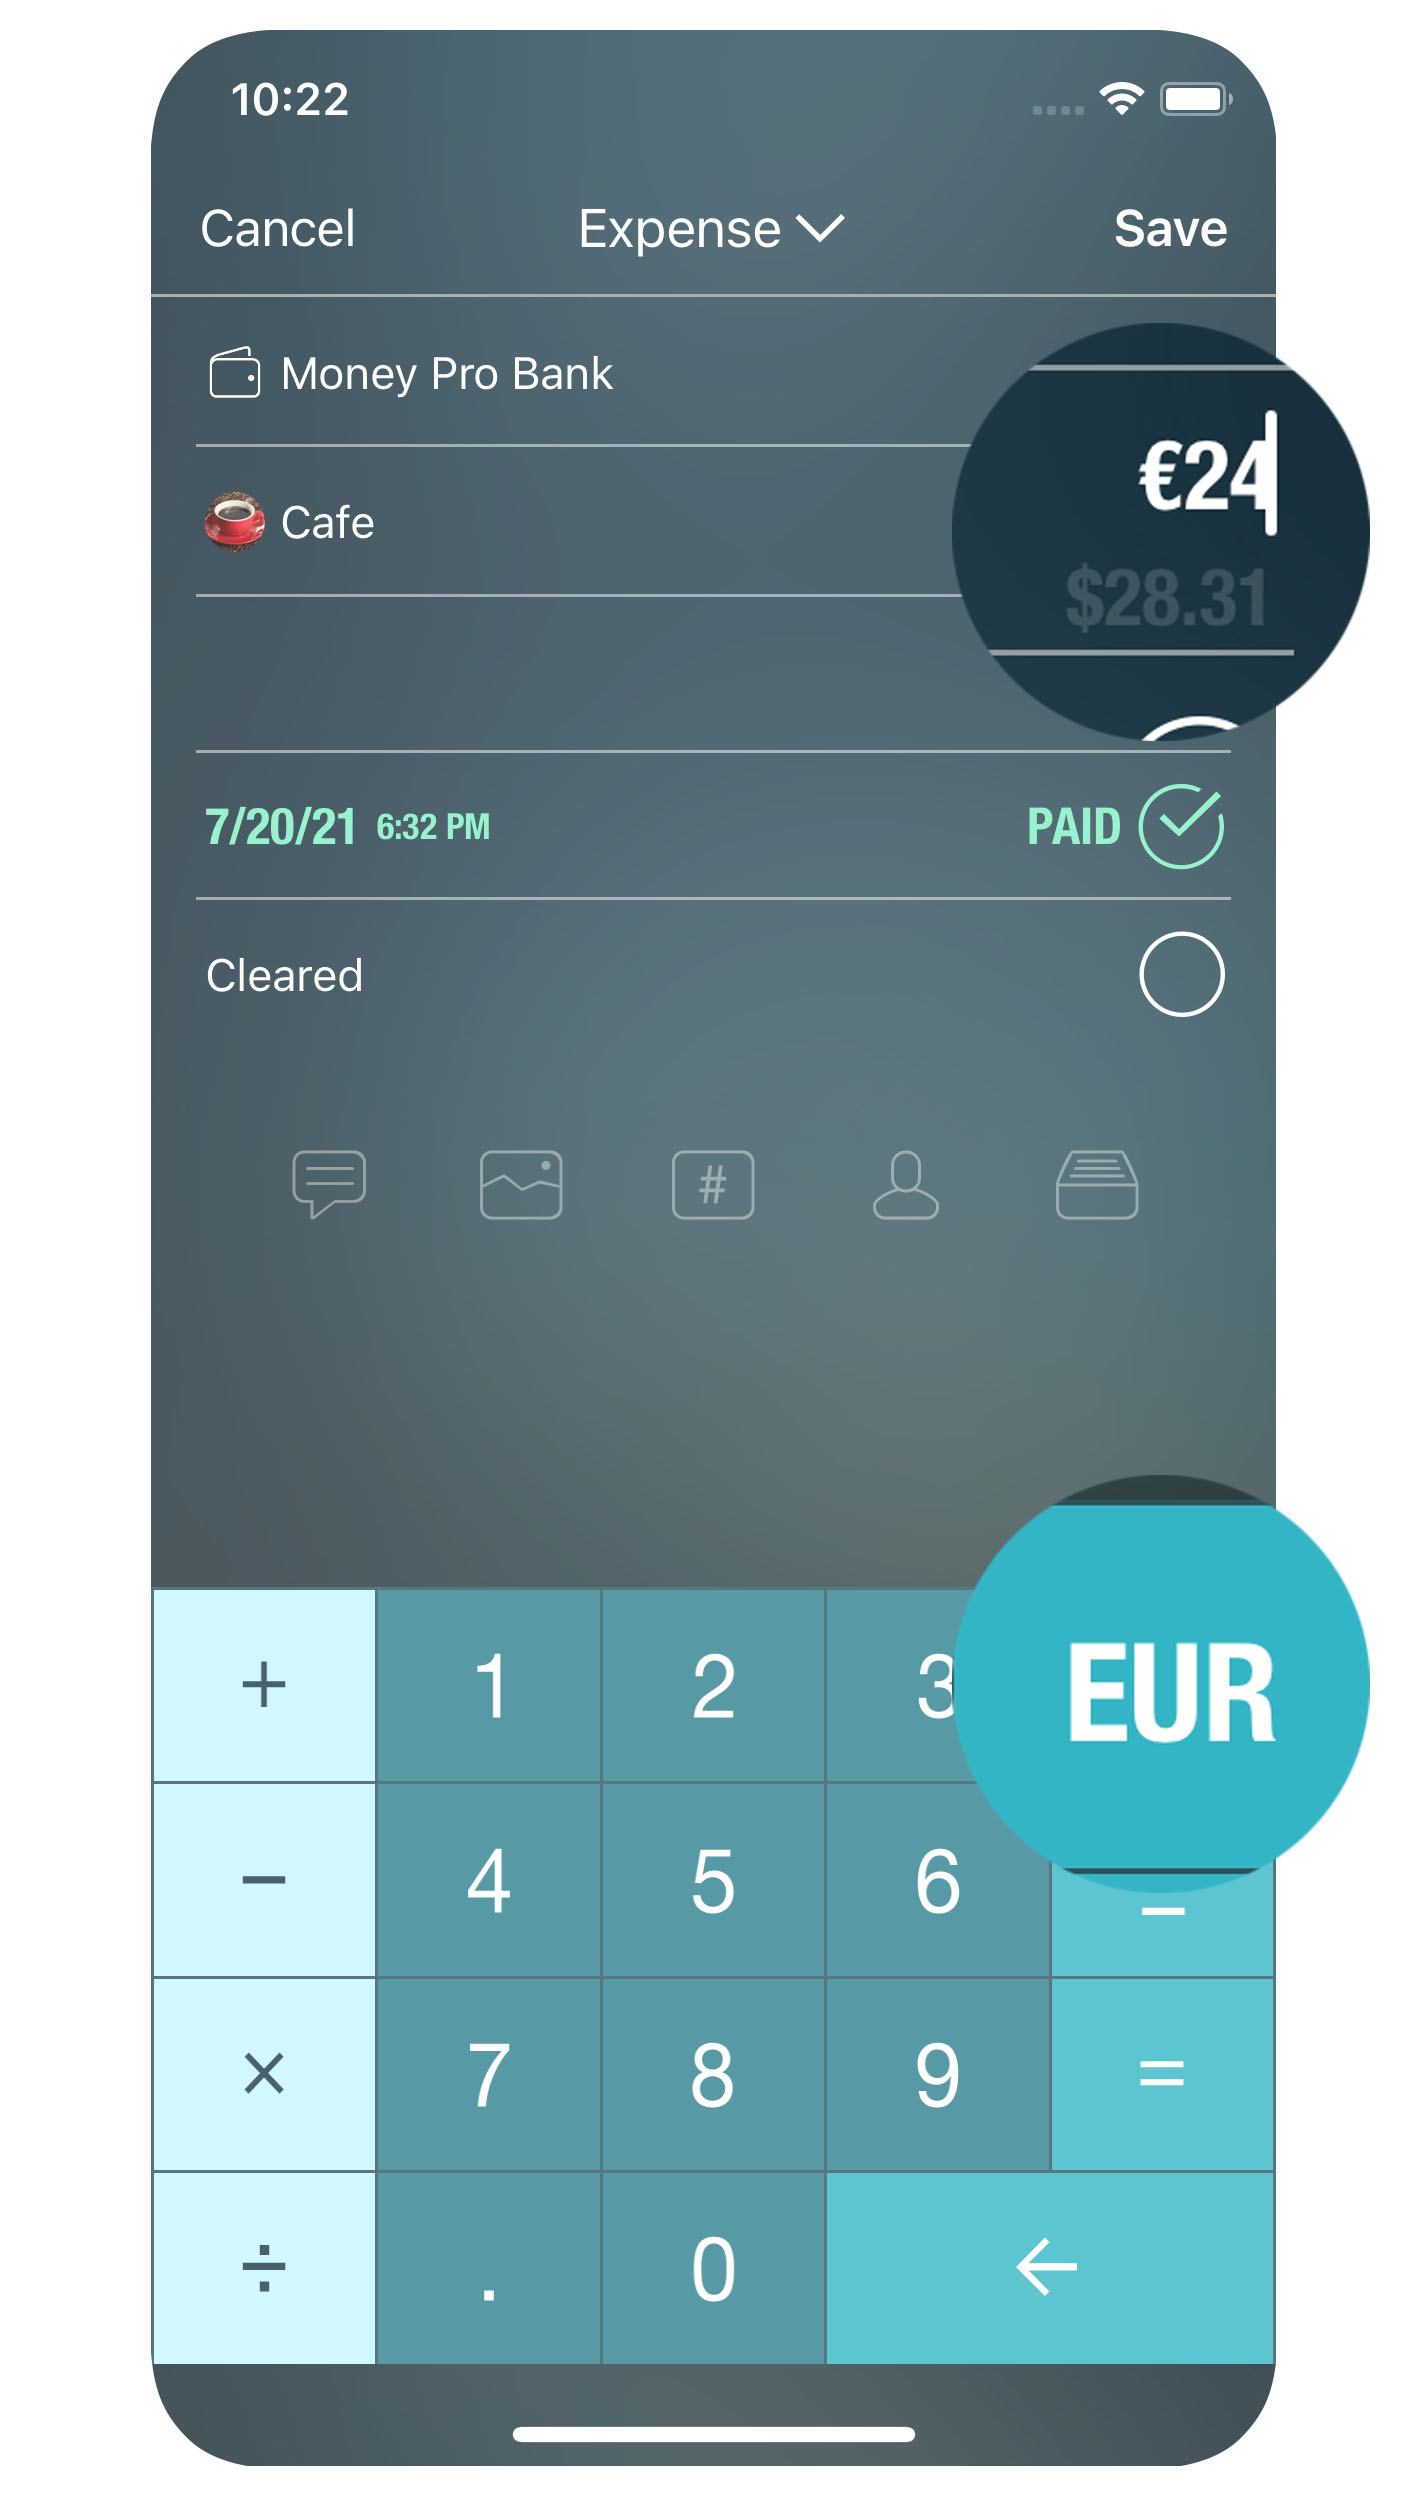
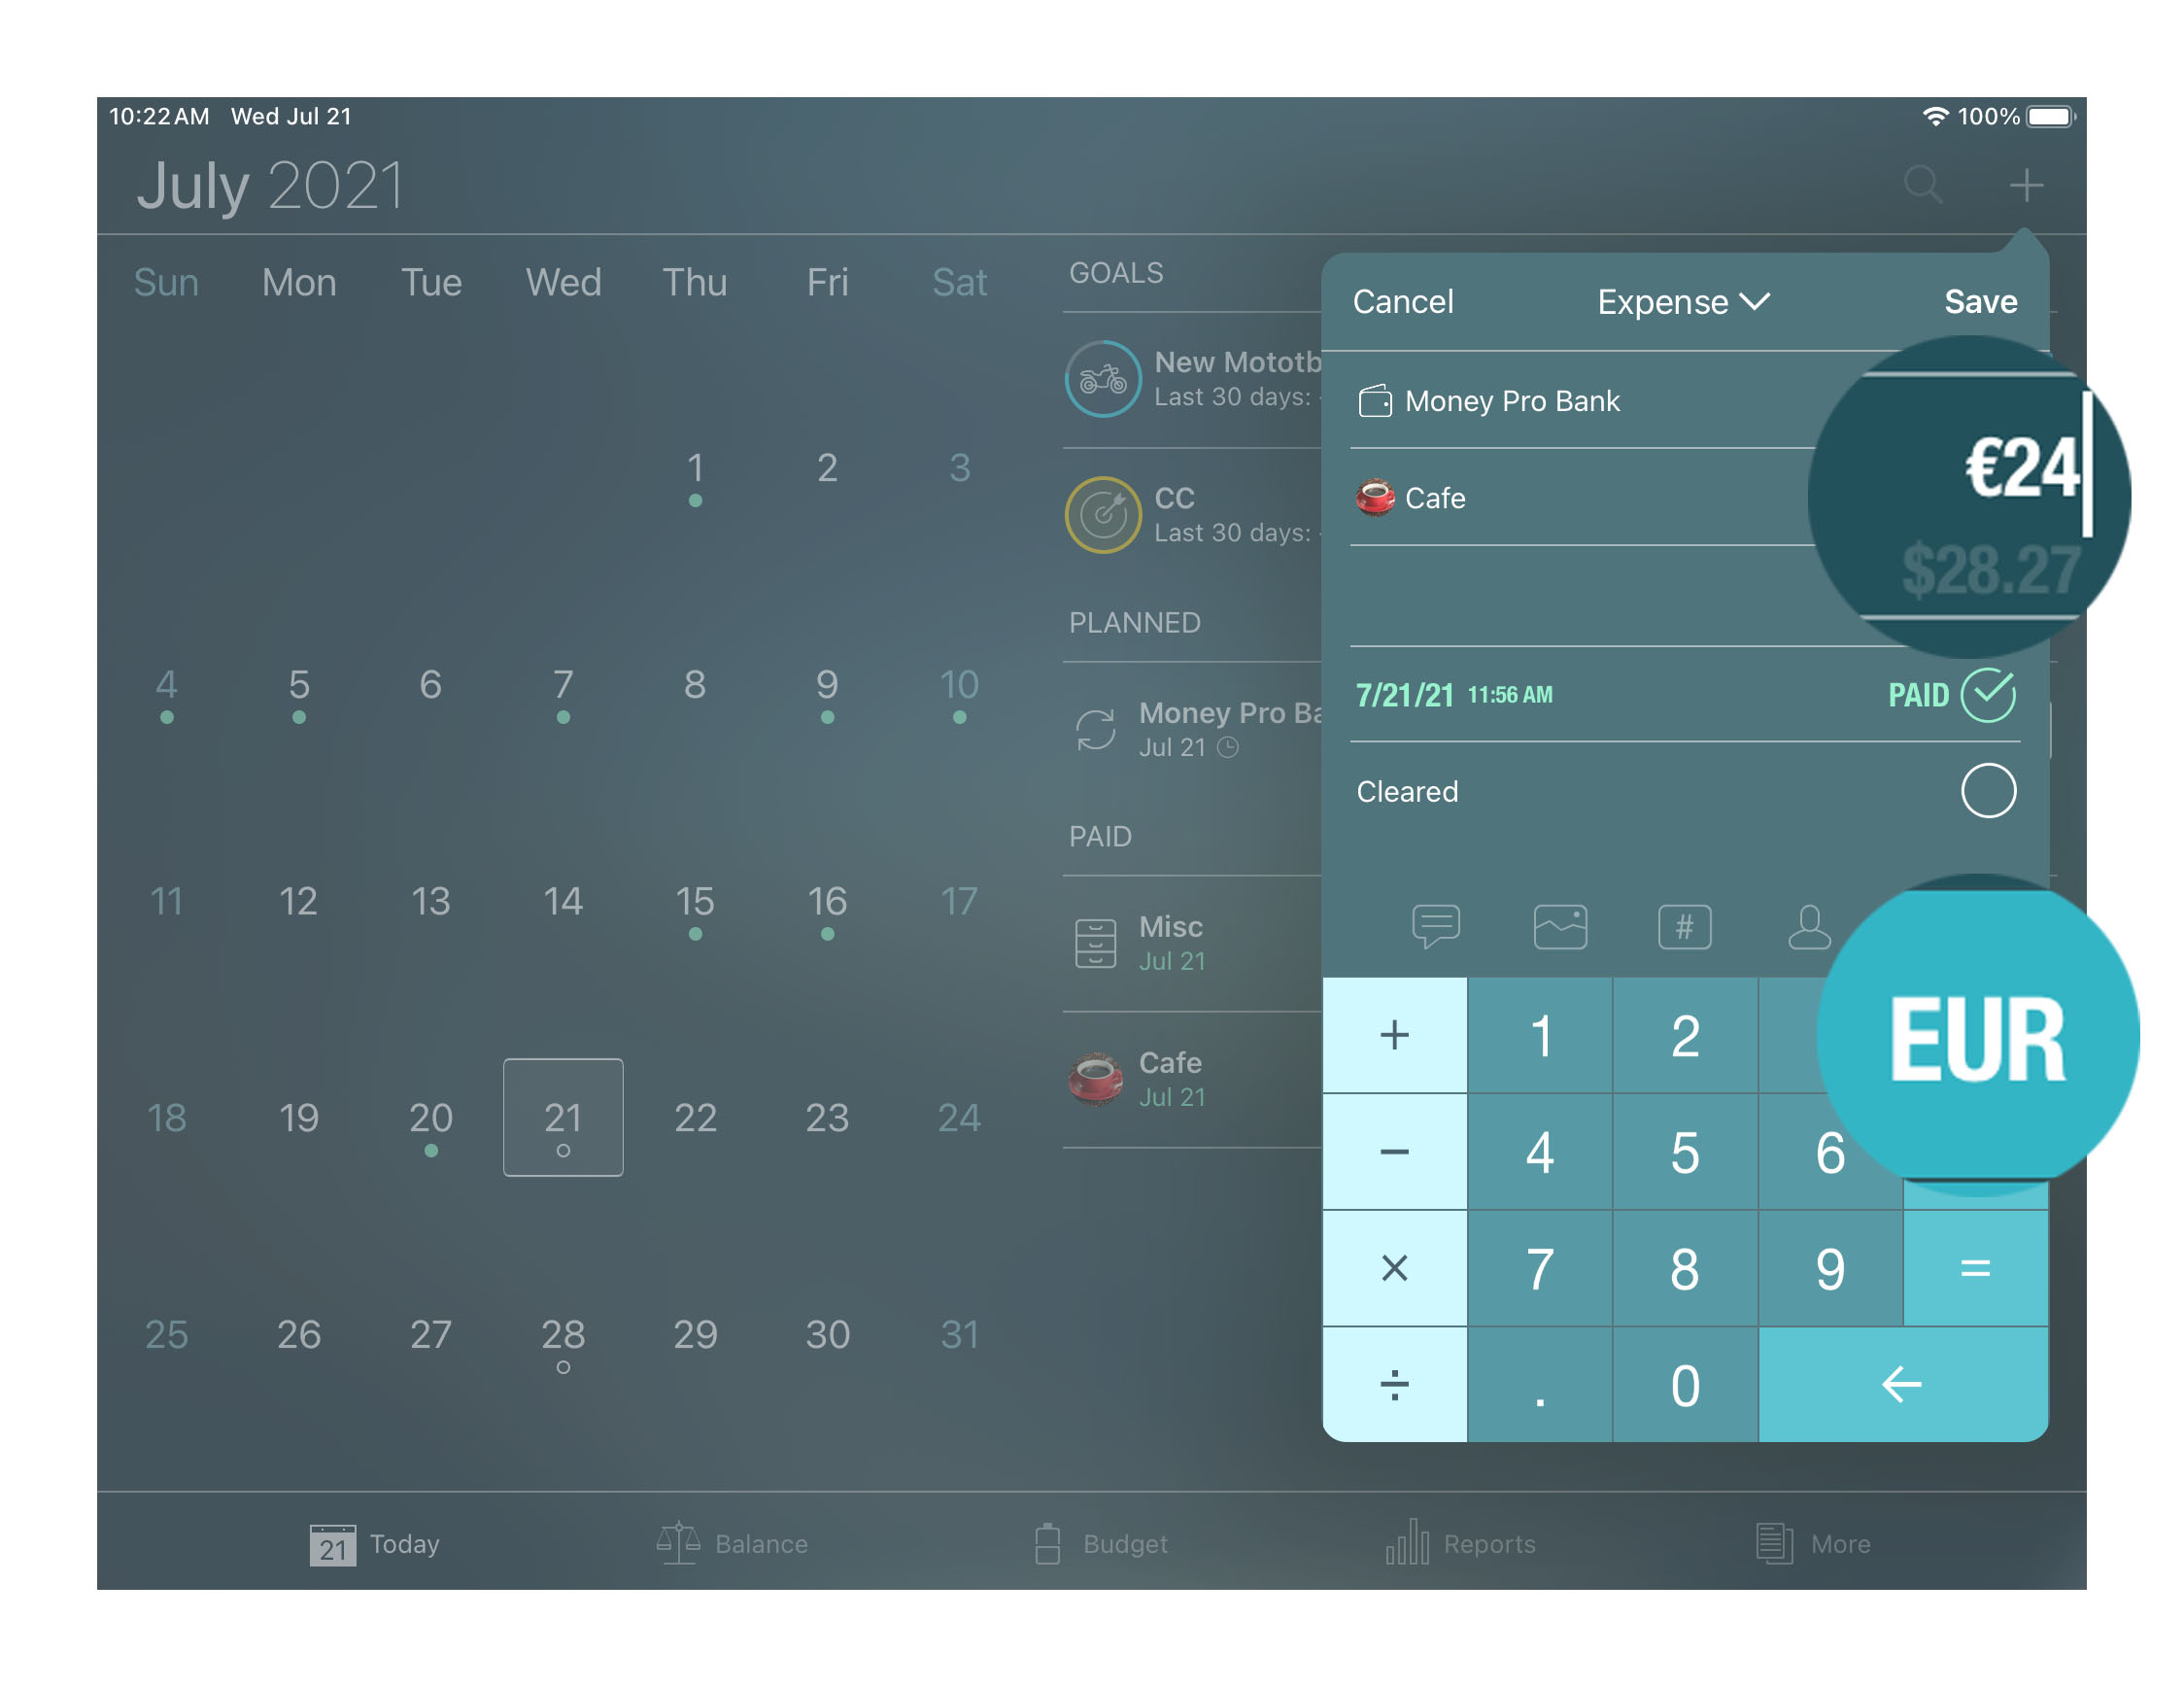
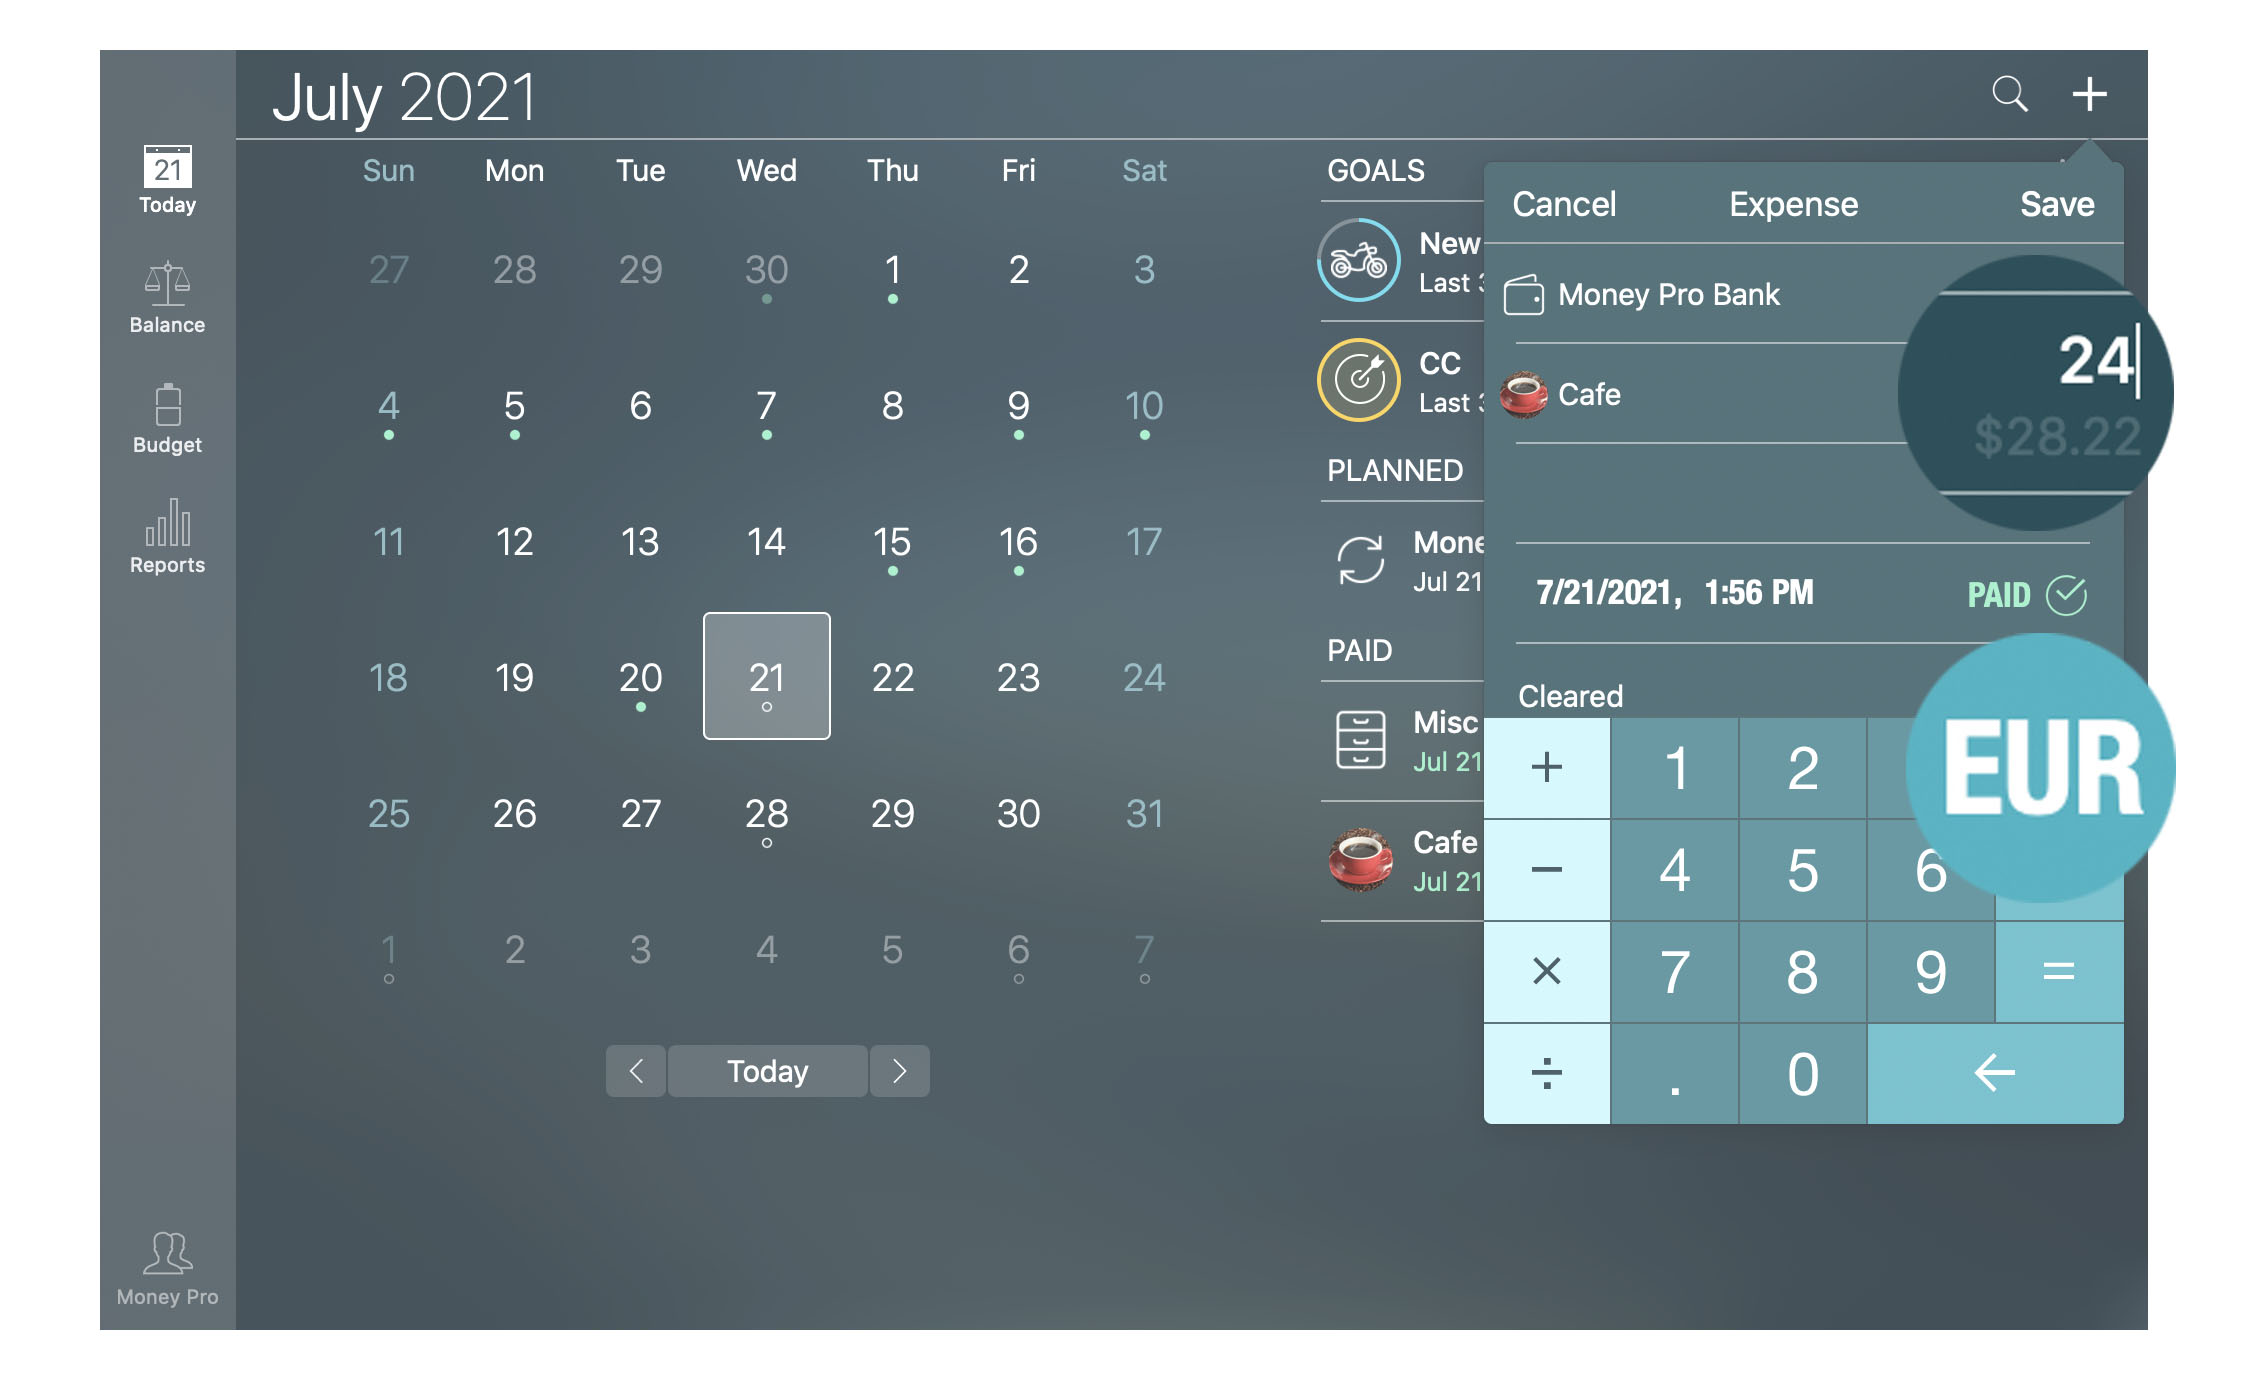
If you transfer money from an account with one currency to an account with another currency, just enter the transferred amount from the first account into the field “Amount”. The field “Amount received” (for the second account) will be calculated automatically in the corresponding currency.
The budget and all the reports are displayed in the default currency. To change the default currency on iOS devices go to the More tab > Currency and select the currency you need, for the Mac version open the Main Menu > Edit > Currency.
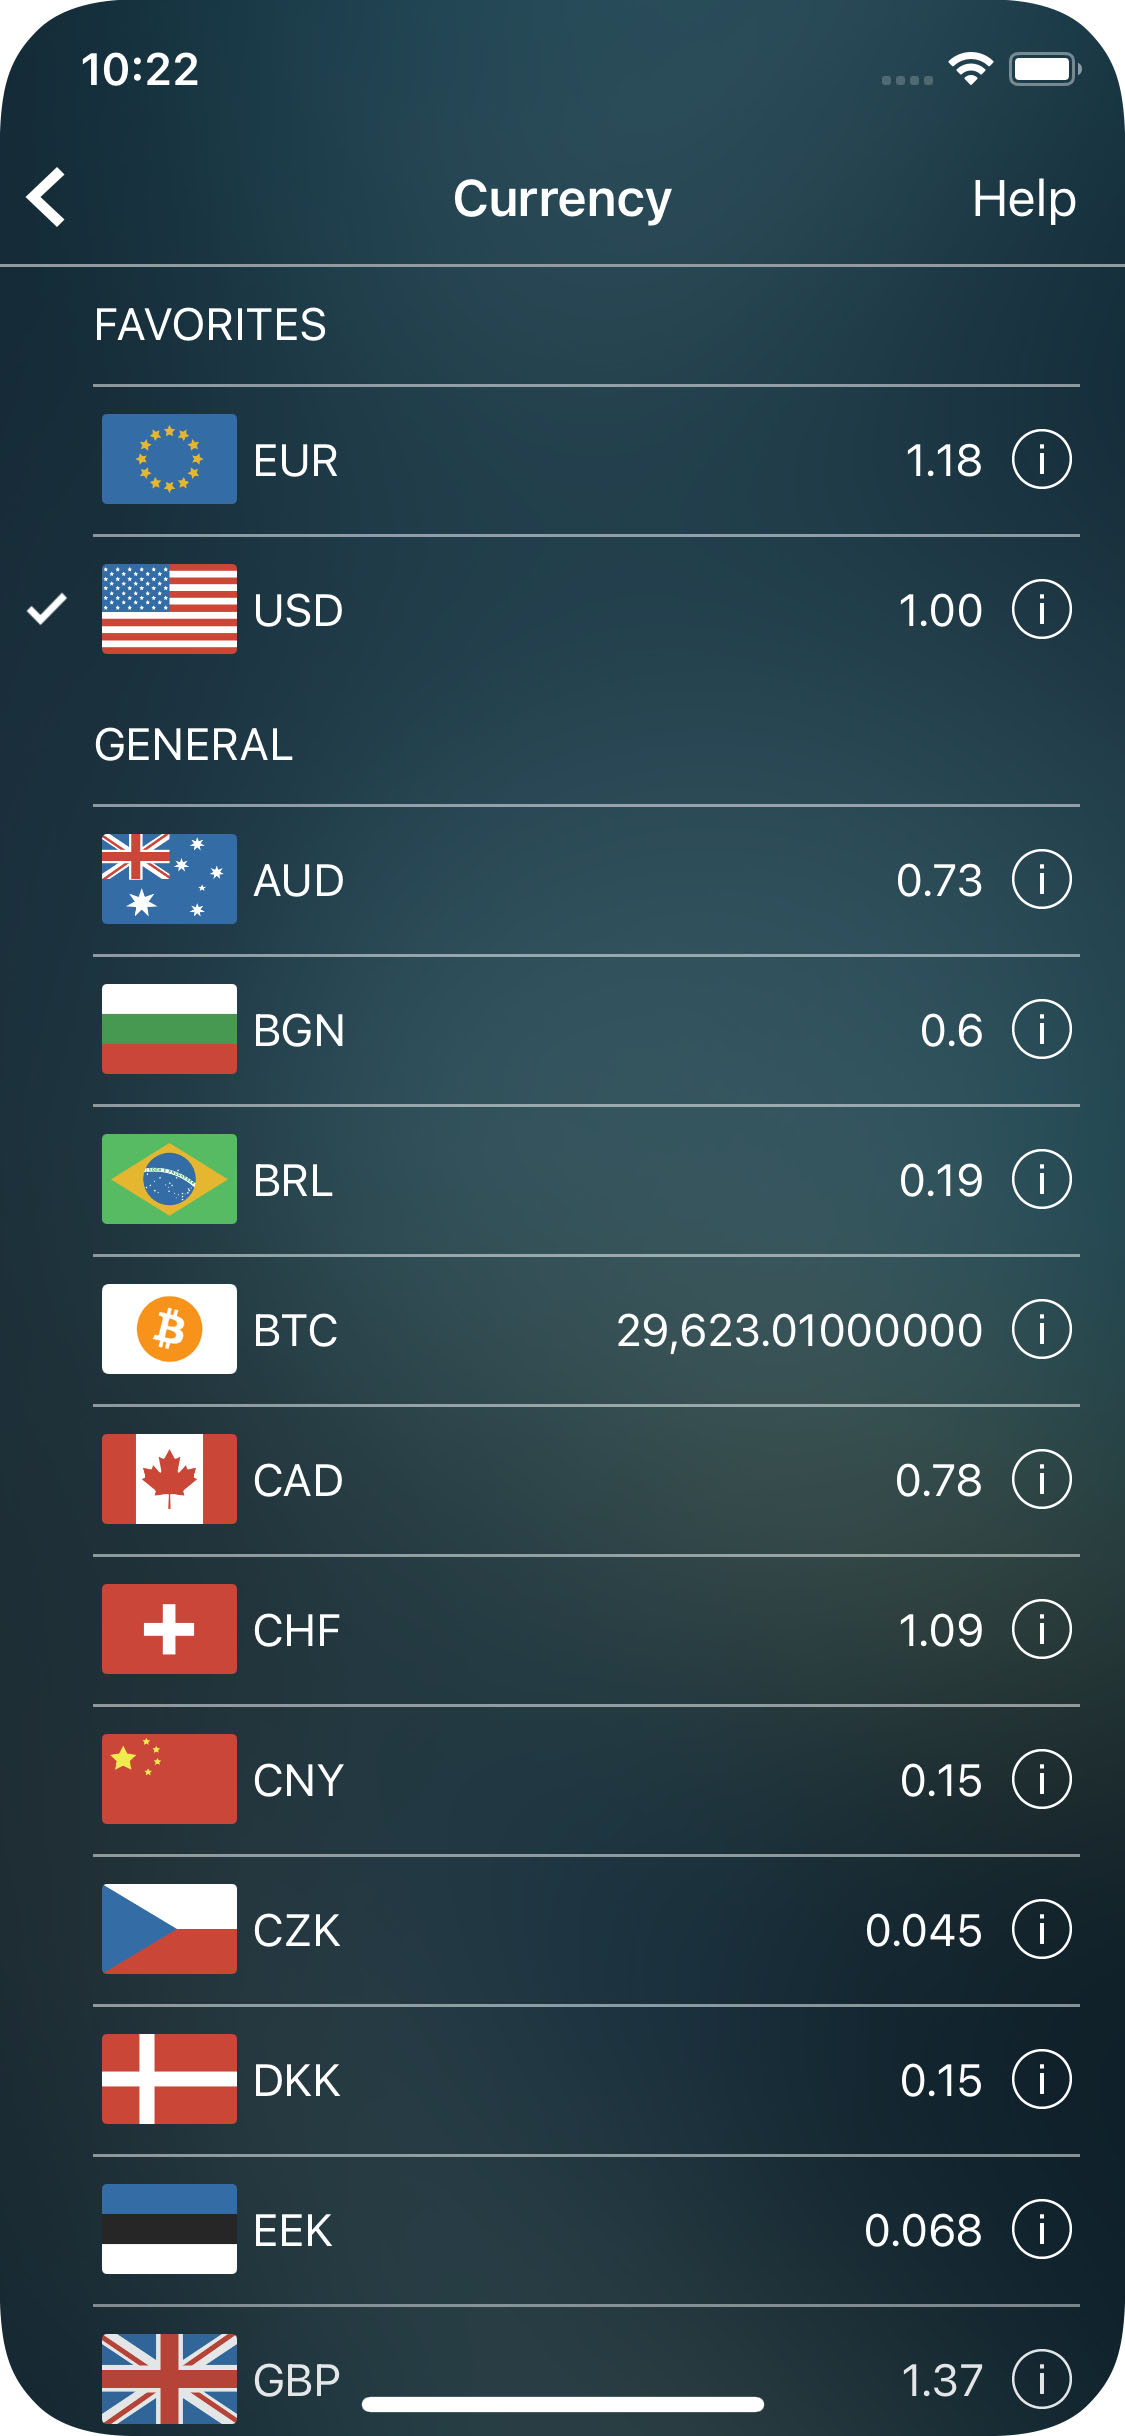
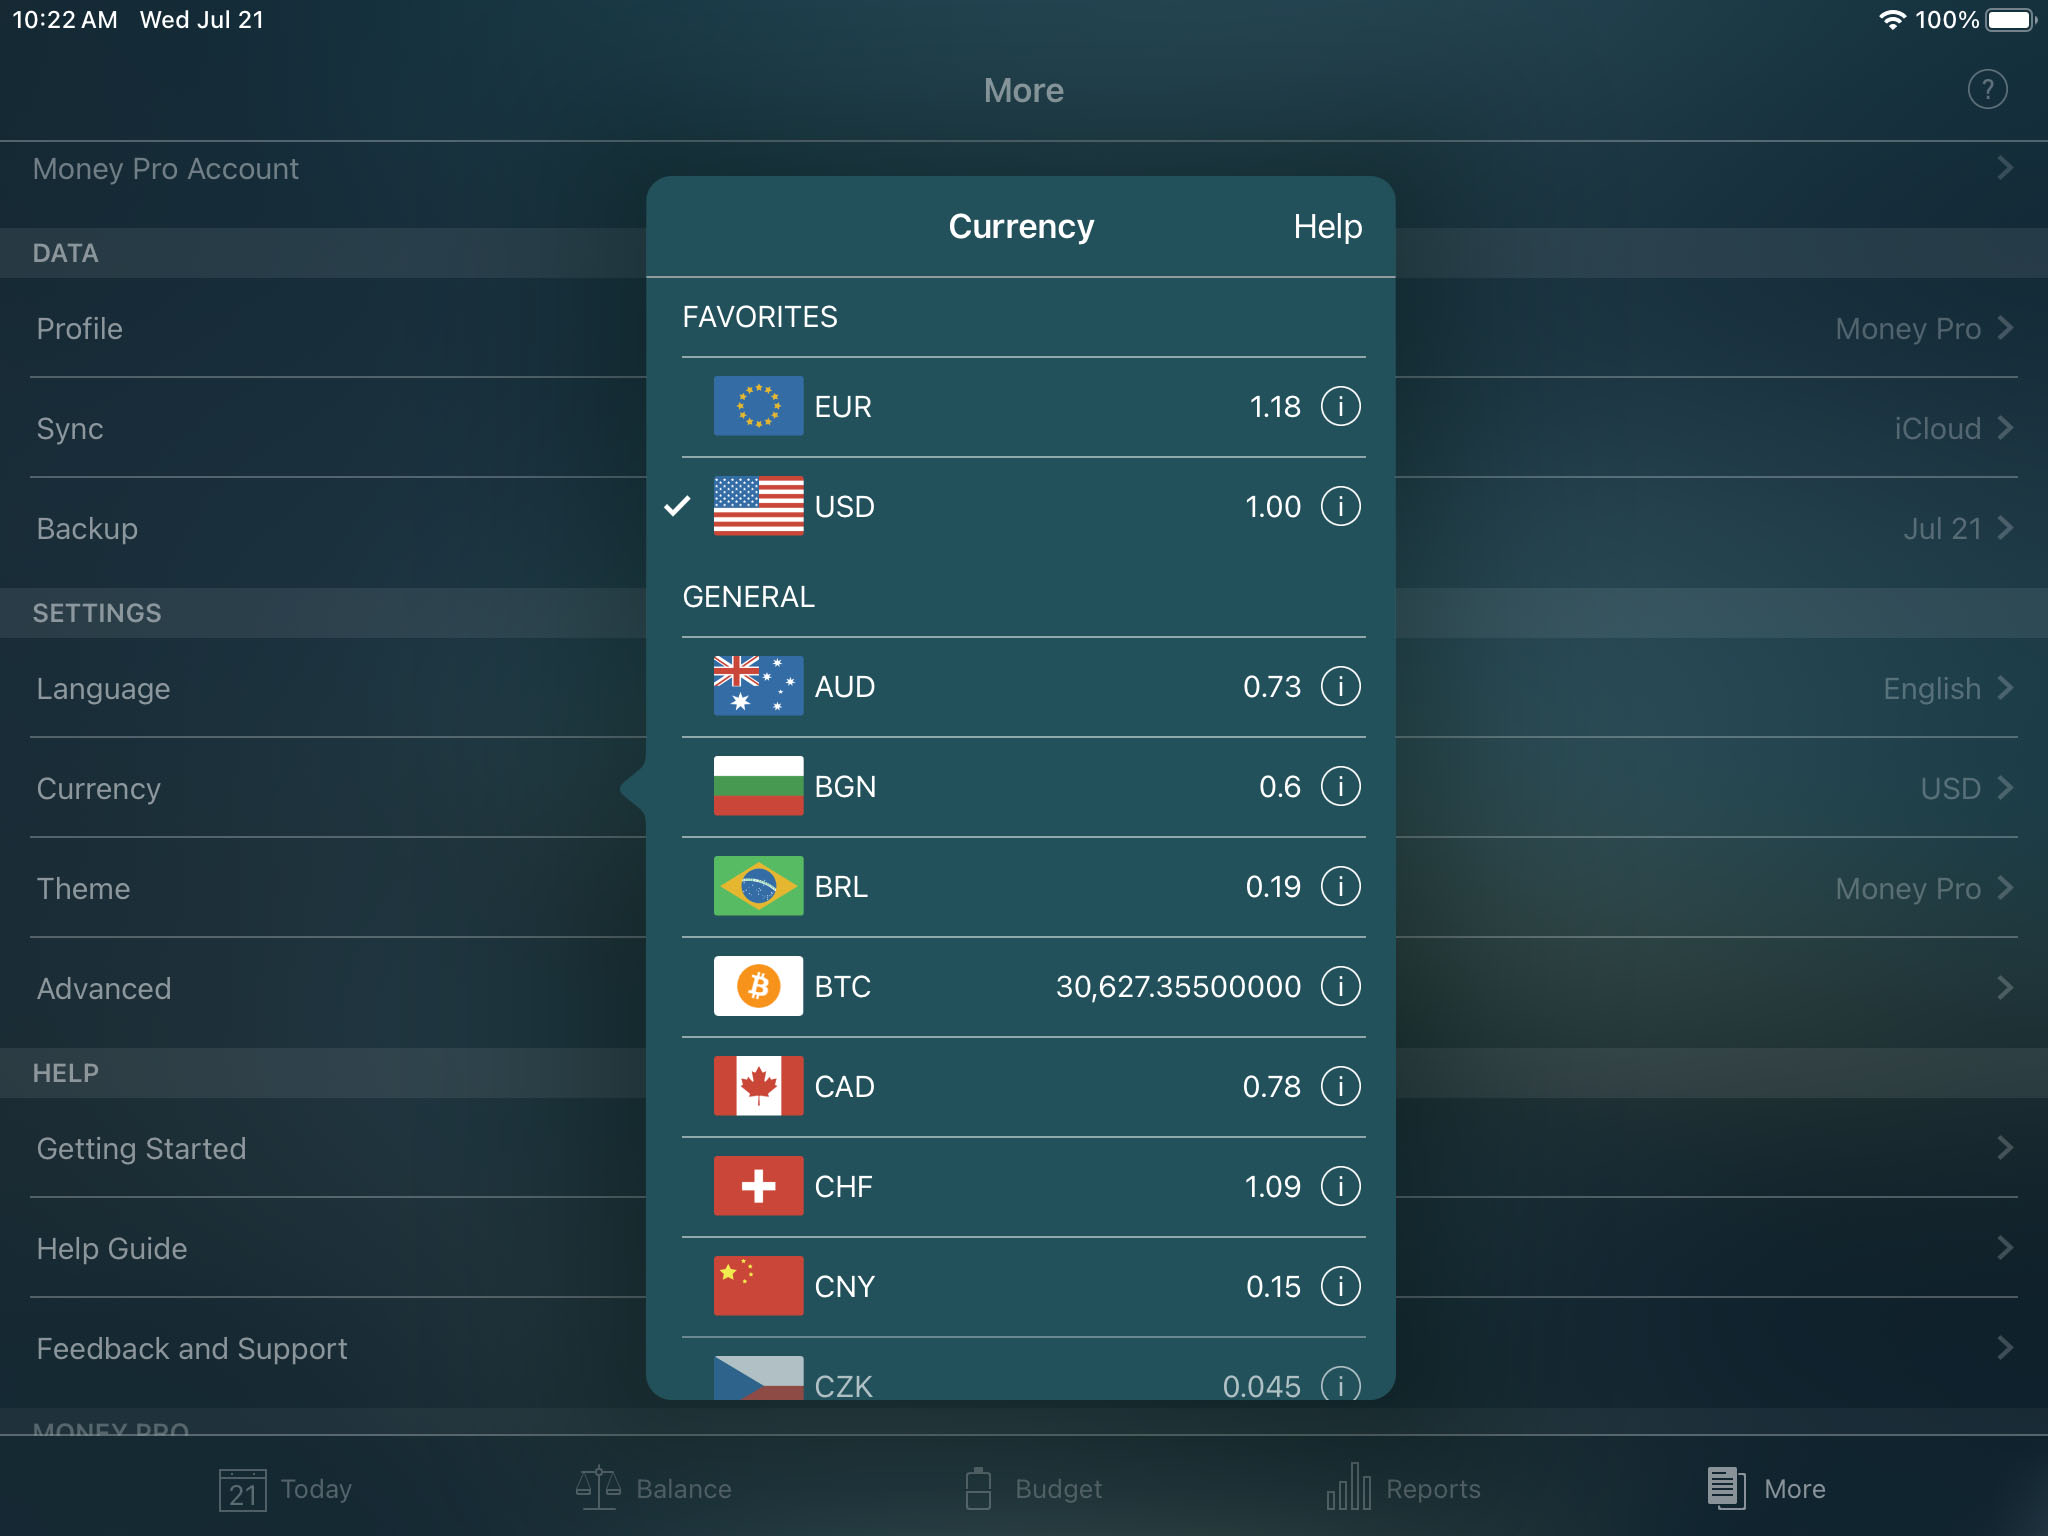
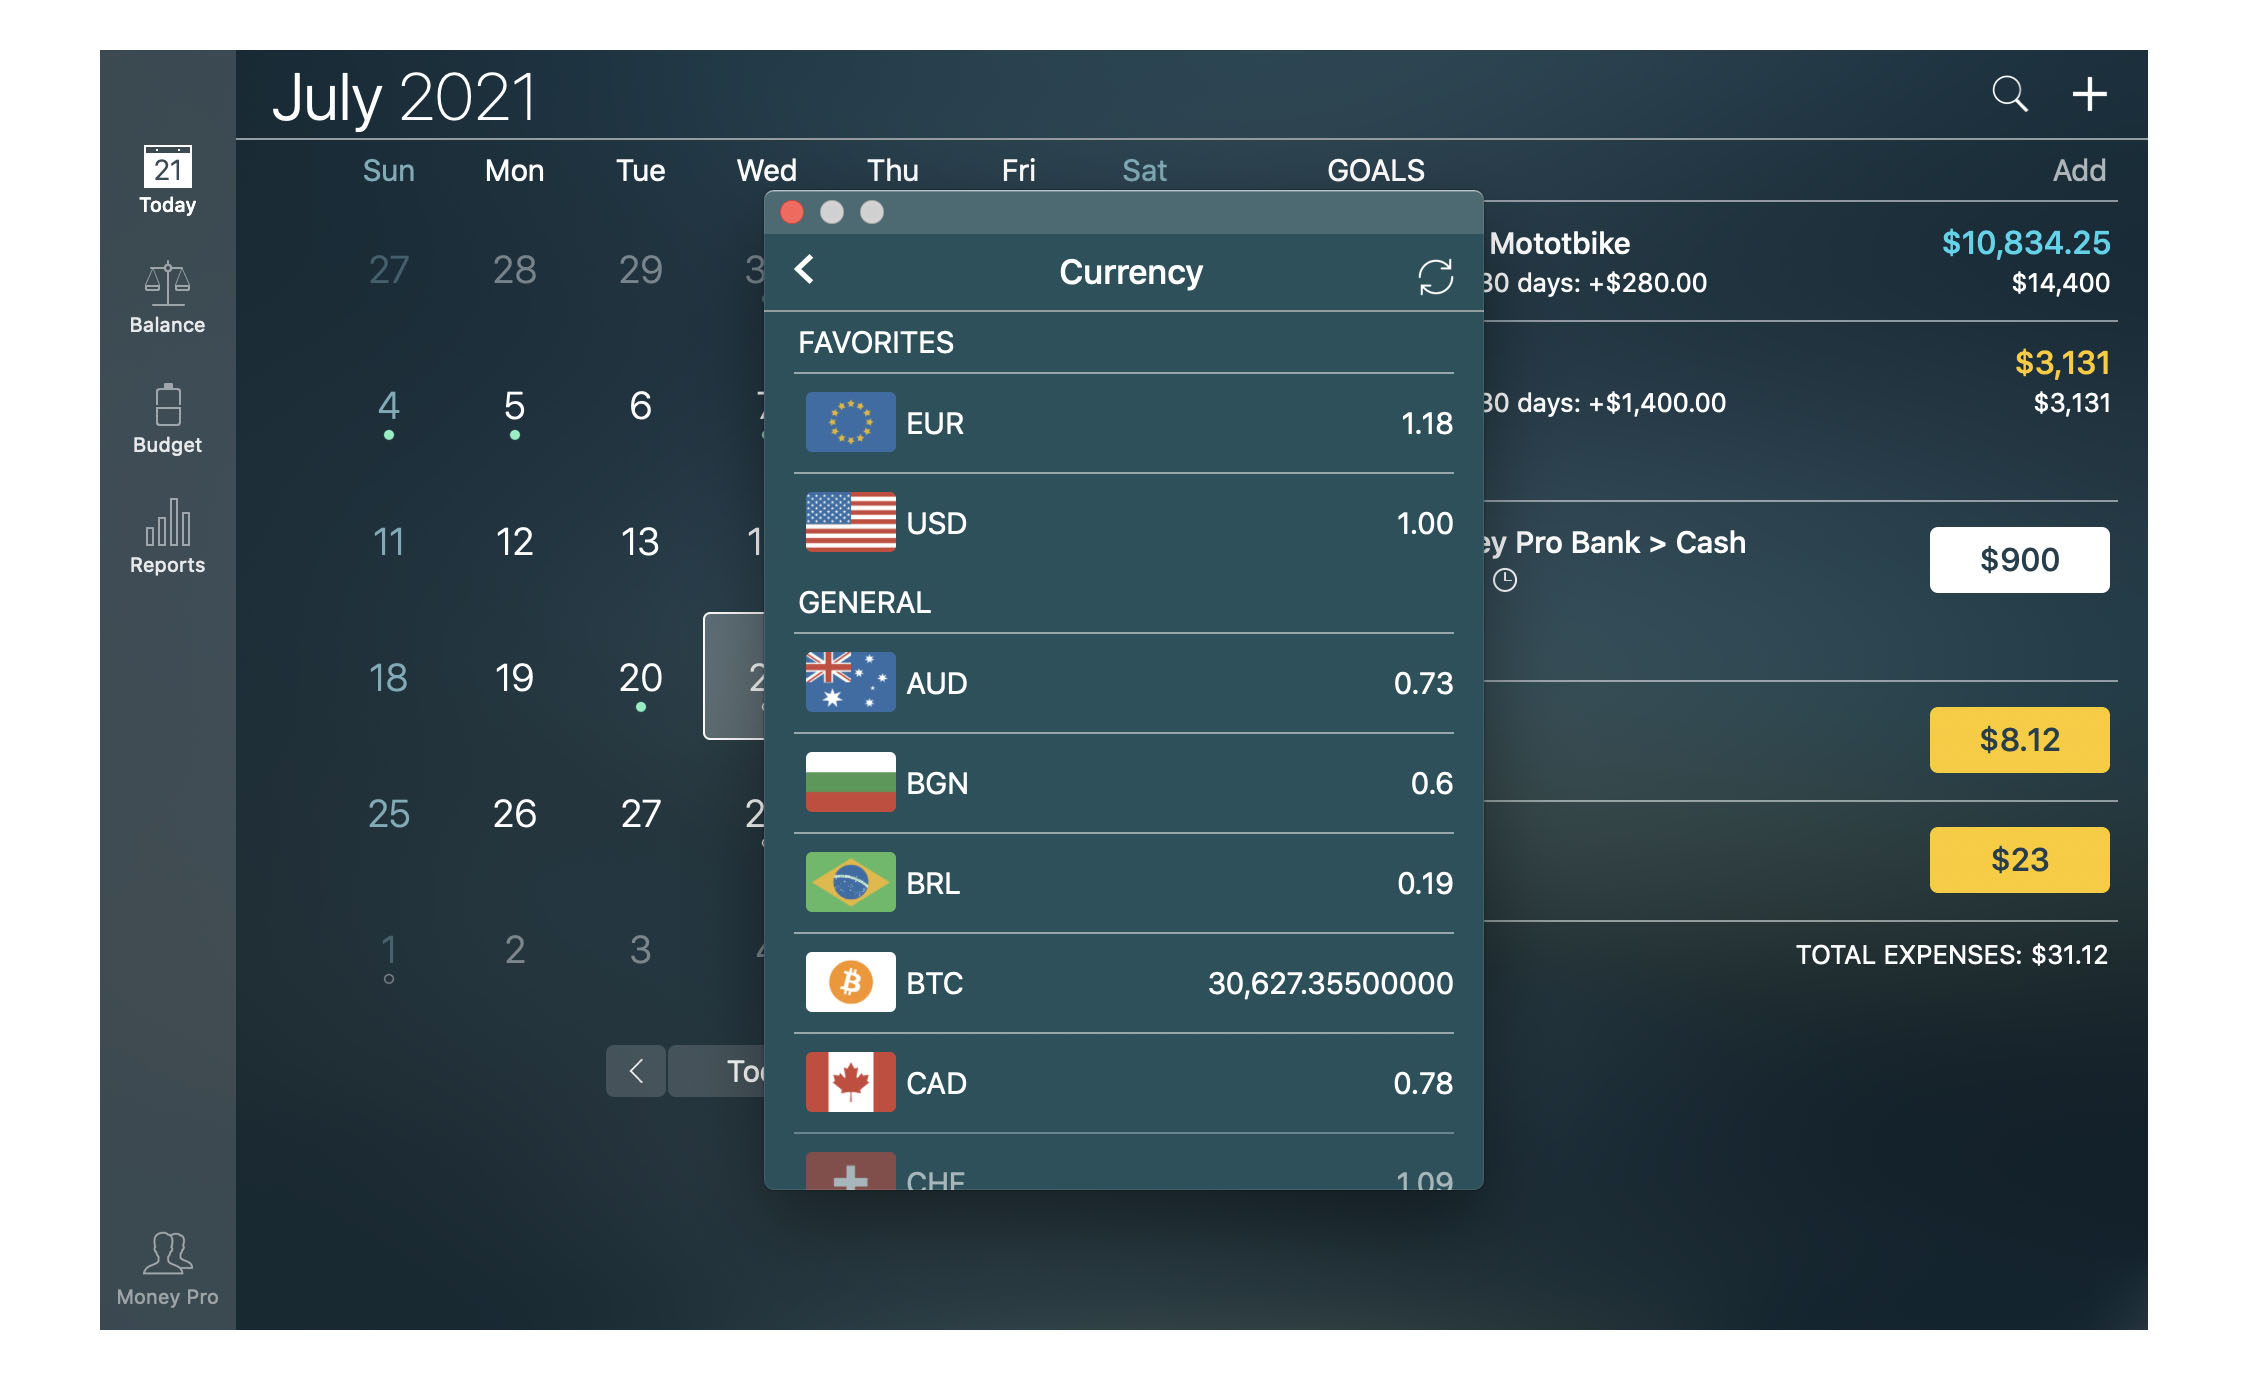
Additionally, you can tap/click the “i” button to correct the exchange rate and make it a favorite.
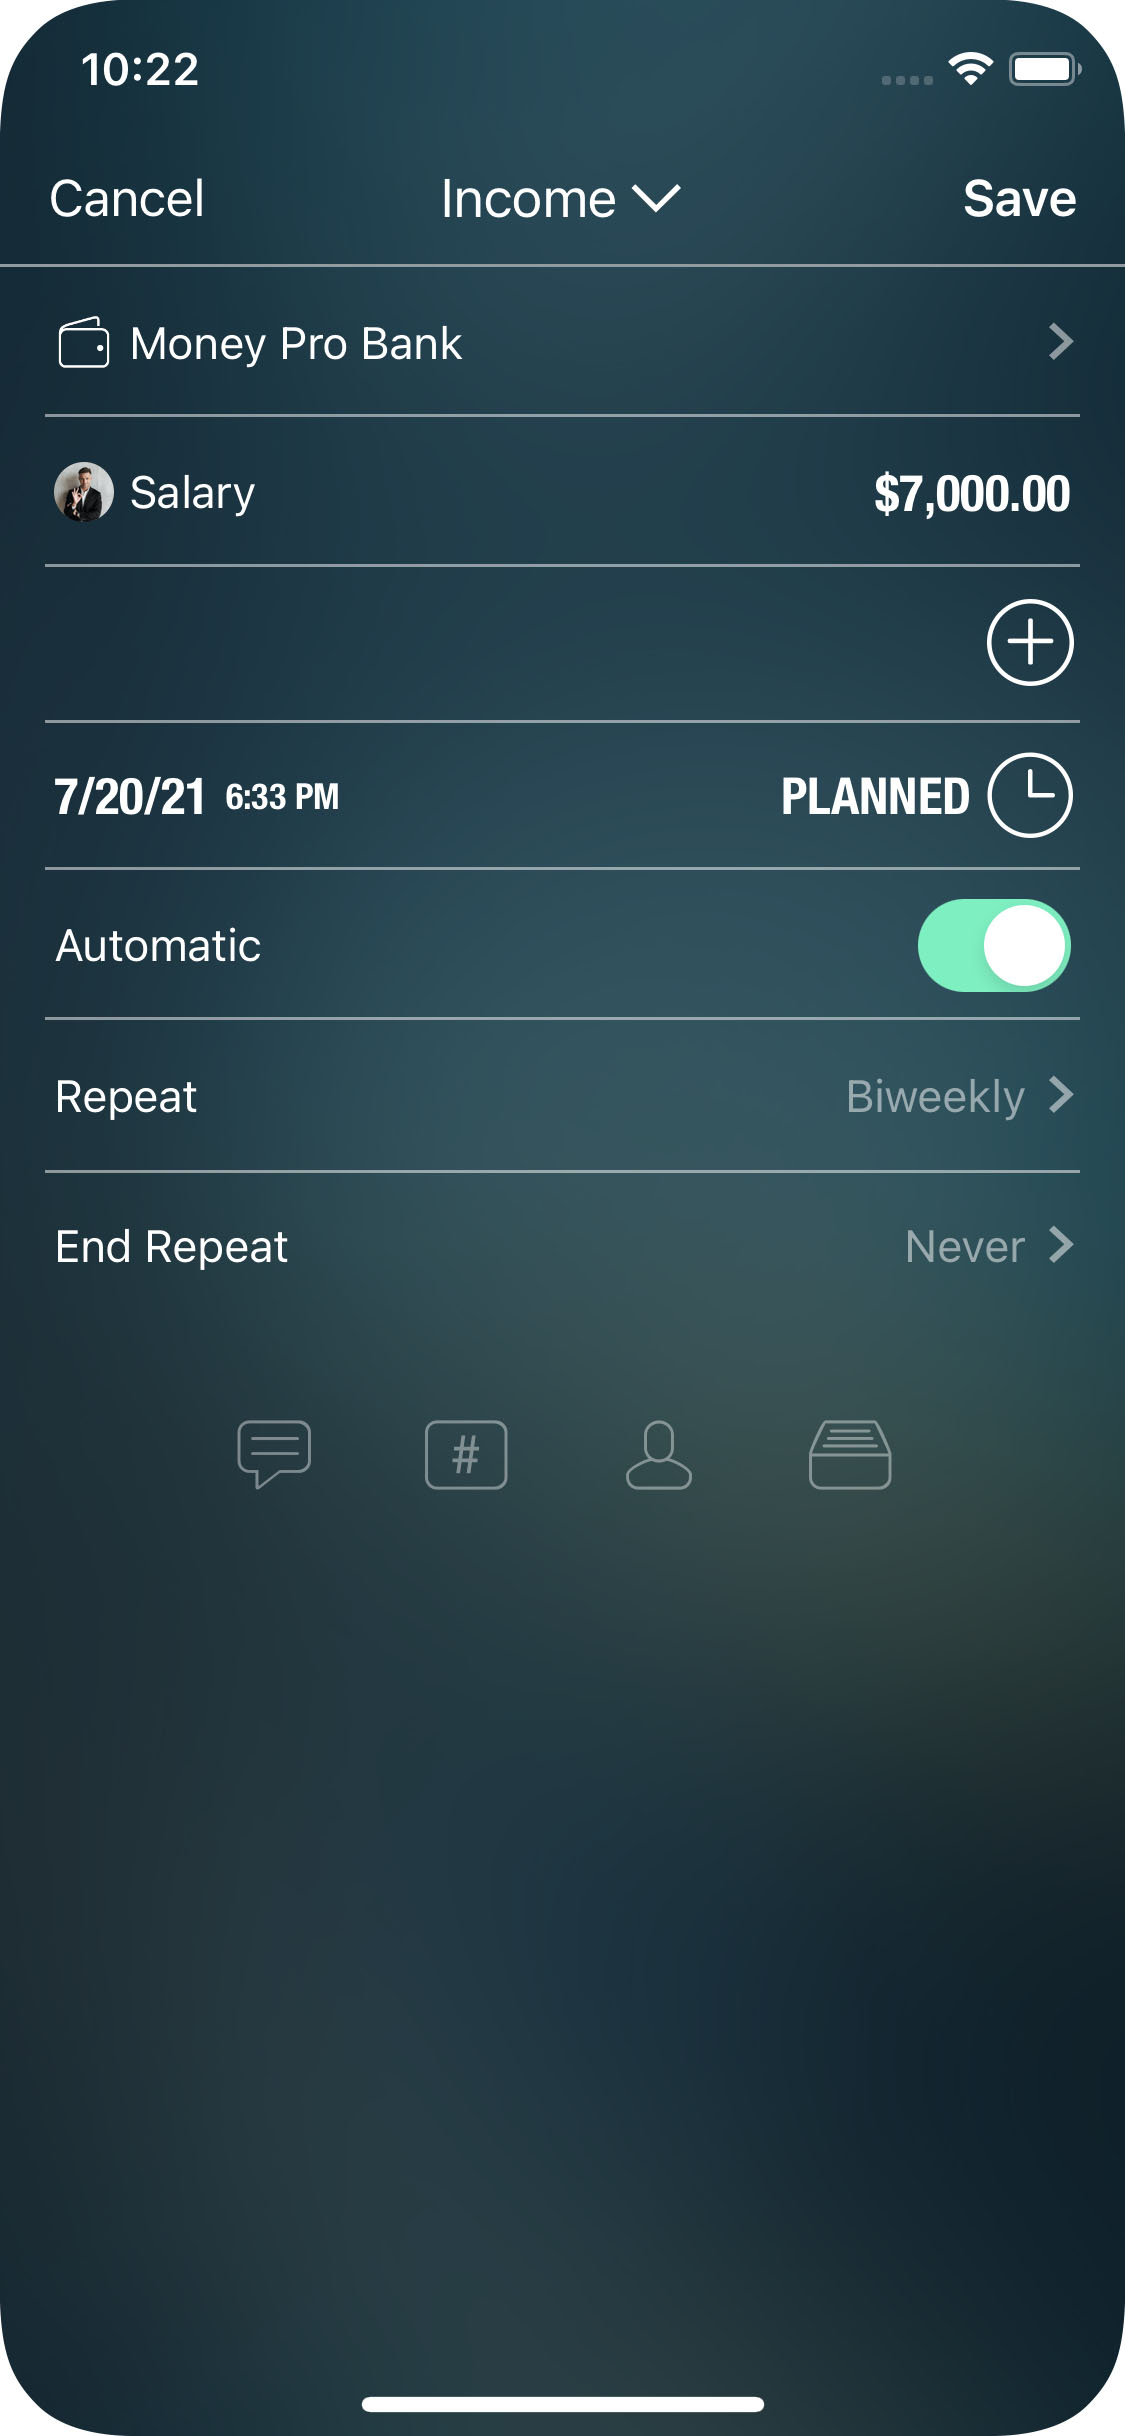
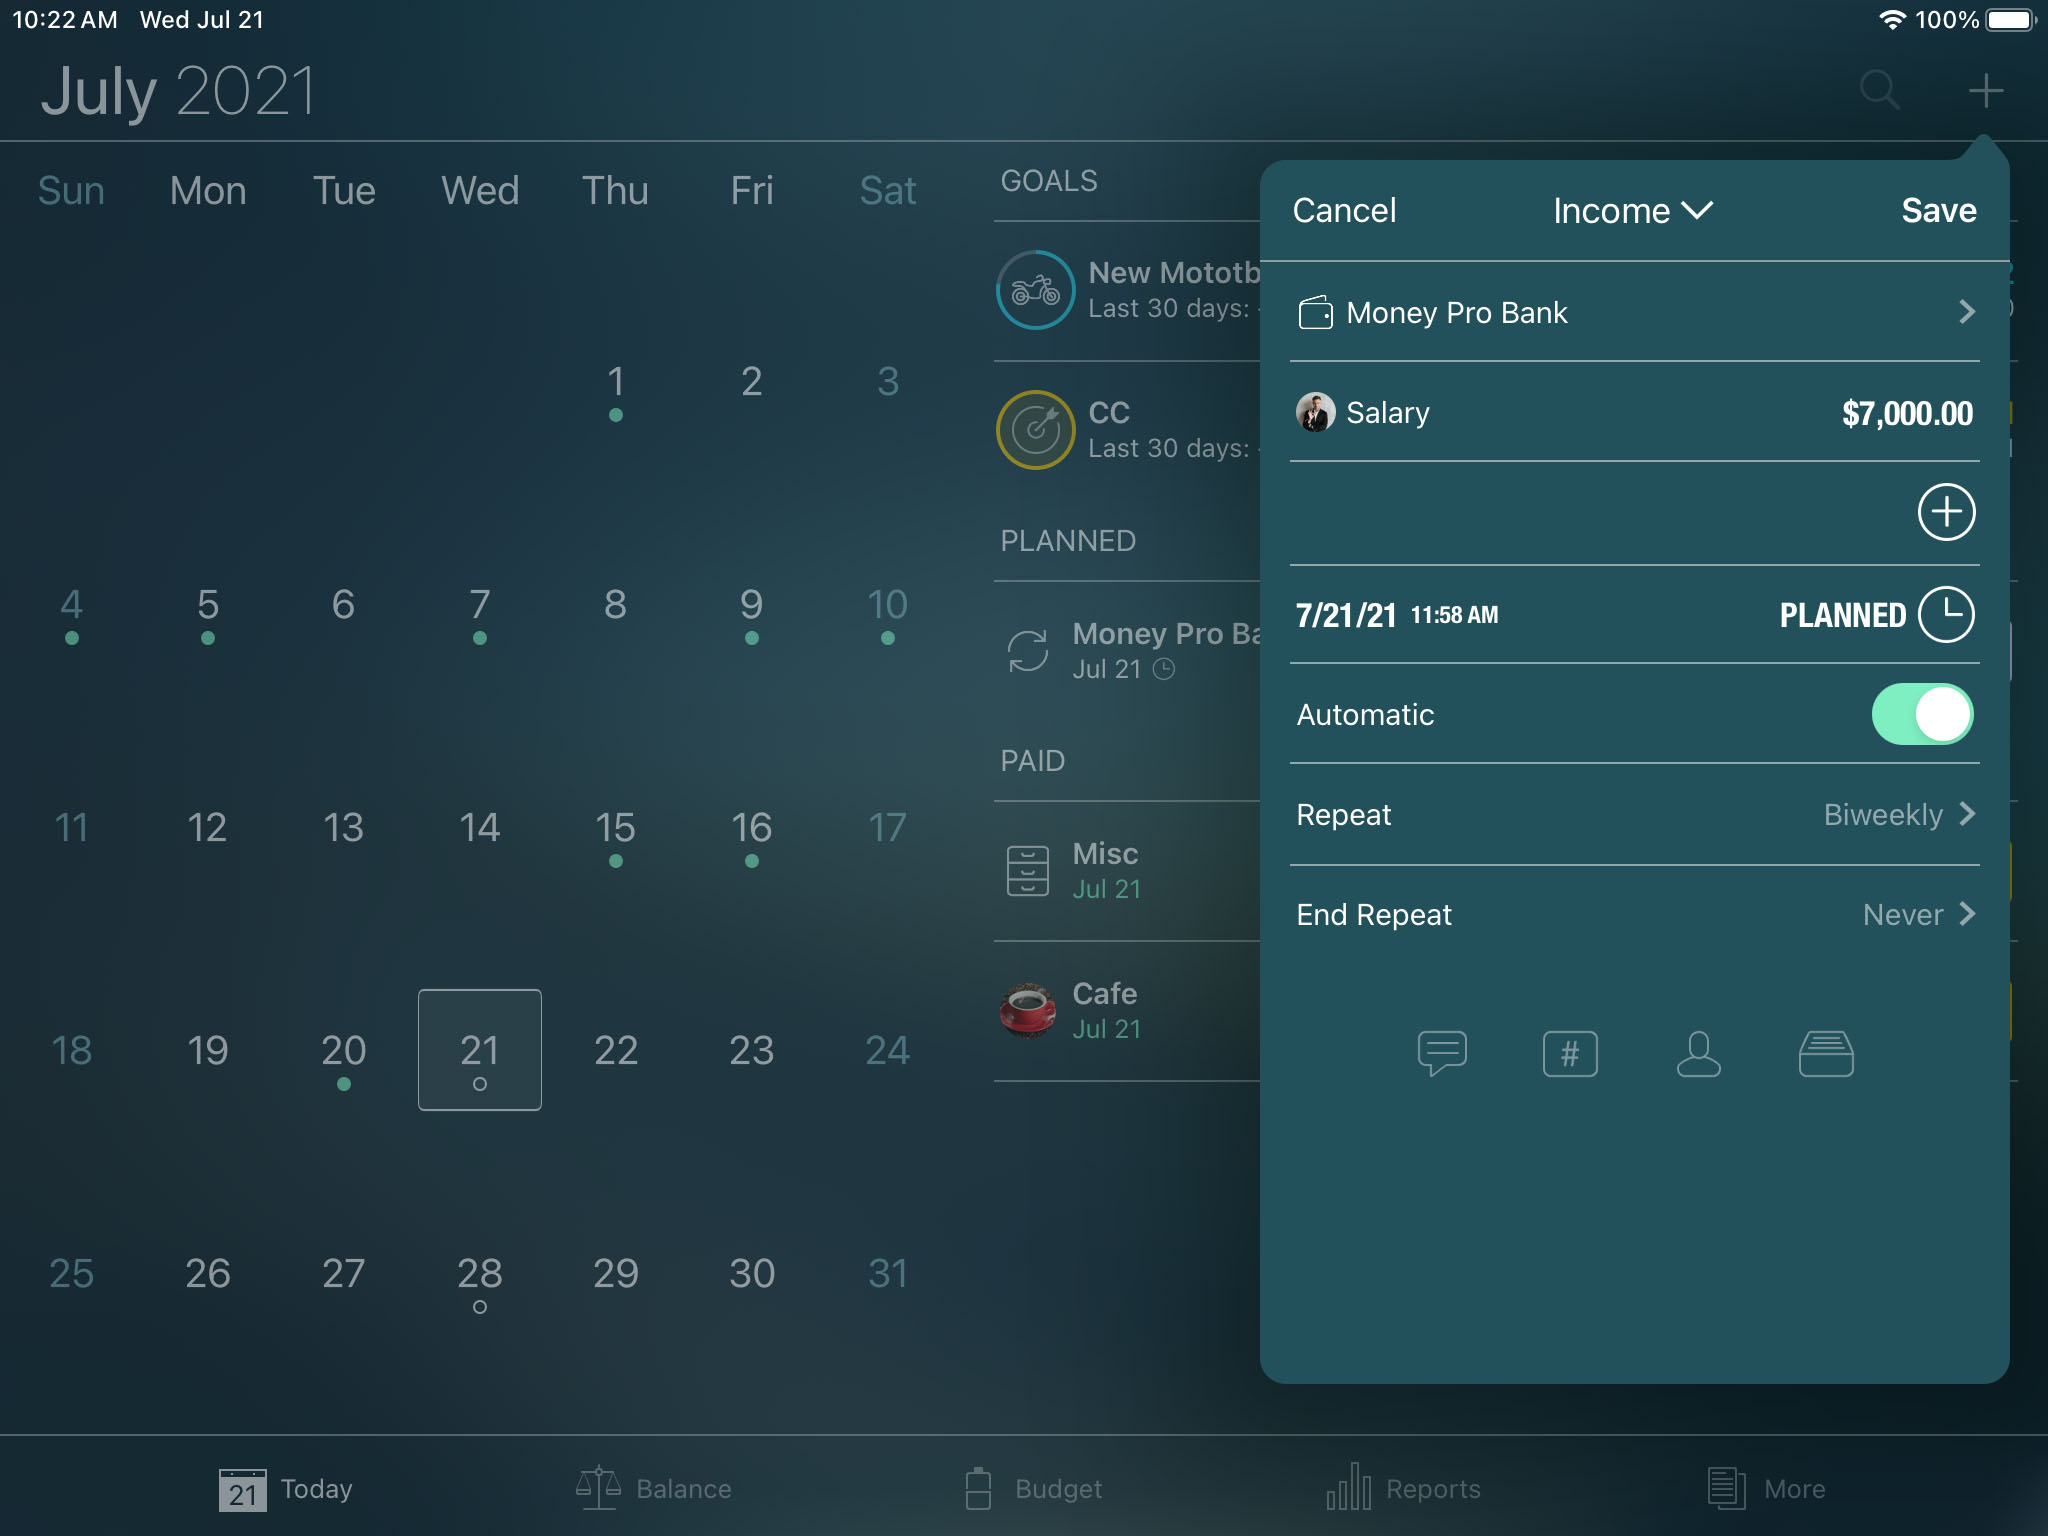
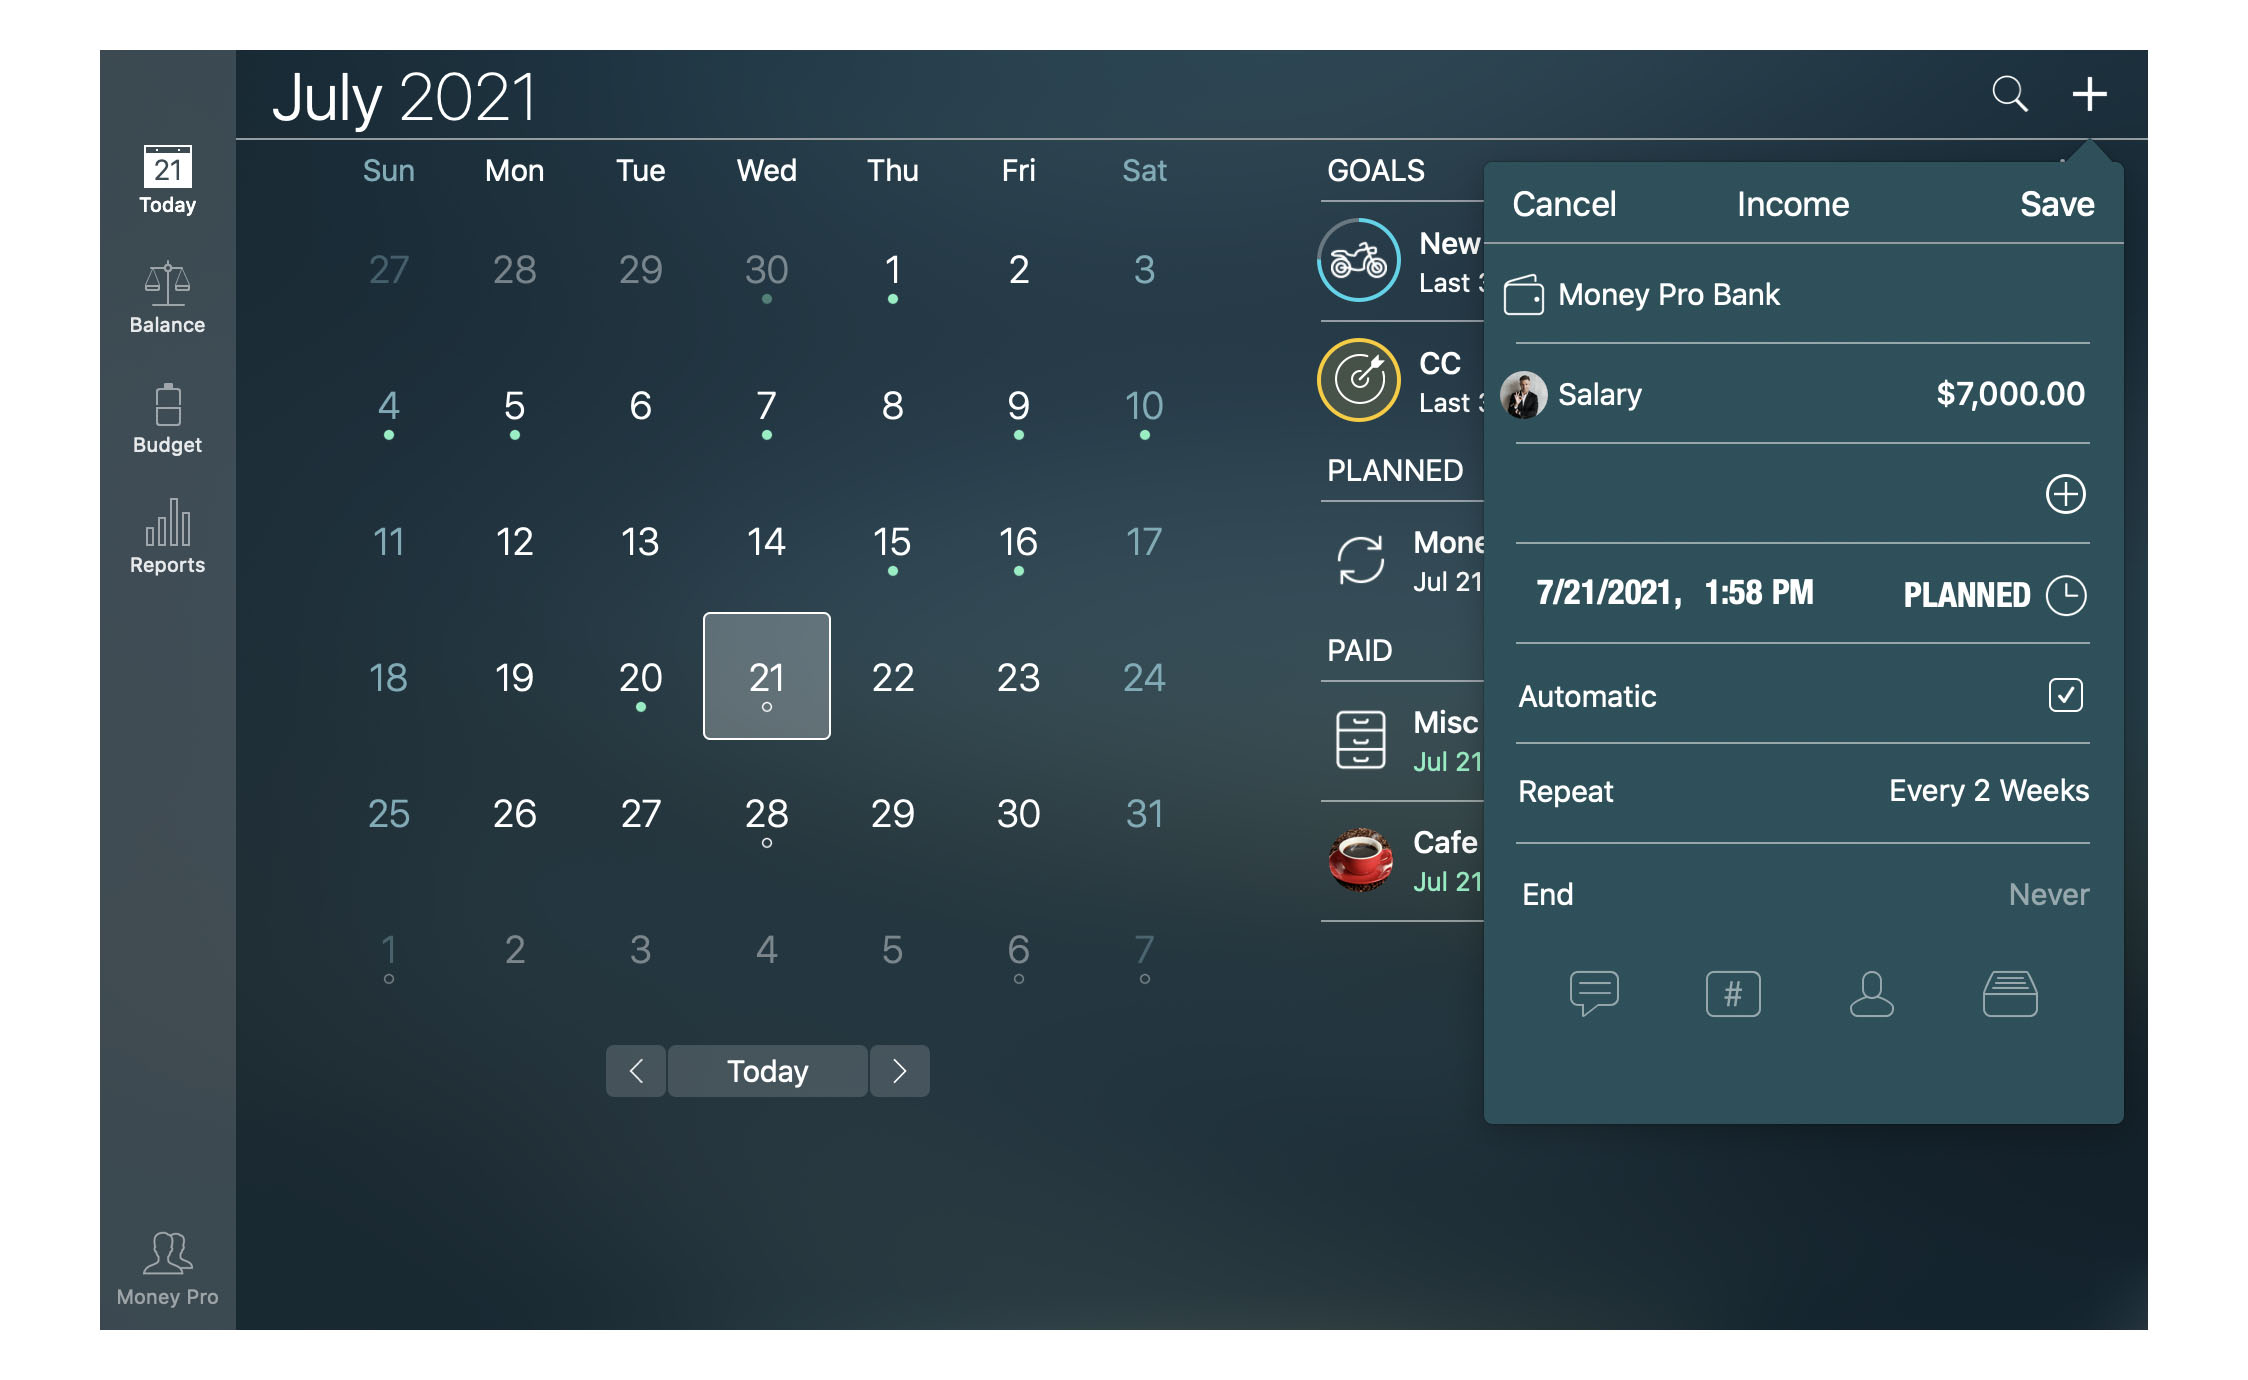
Planned and recurring bills
Recurring transactions are planned expenses and incomes that happen with a certain periodicity regularly.
Contrary to actual transactions, planned transactions do not influence the balance of your accounts and you can schedule a transaction for any day in advance.
Once you set it up, it will be generated automatically. It helps in case you have regular payments with the same amount of money (rent, mortgage, insurance, etc.).
To create a planned transaction, go to the Today section and tap/click “+” in the upper right corner. Change the transaction type to “Planned” (tap/click the icon near the date) and fill in the transaction details:
- Automatic: the transaction will become paid automatically on the specified date and time. If it is off, you will have to pay the transaction manually.
- Repeat: the period you enter will determine the frequency with which the transaction will be repeated. It can be “Every Day”, “Every Week”, “Every 2 Weeks”, “Every Month”, “Every Year”, etc. You can also set up the “End Date”, after which the transactions will stop being generated. If you need a one-time transaction, set Repeat to “Never”.
The rest of the fields fill out like for regular transactions described above.
To make a transaction paid on iOS devices, swipe it to the left and tap/click a green checkmark icon, for Mac select “Mark as Paid” in the context menu. The date of the transaction will change the color to green. To reschedule a planned transaction, use a white clock icon instead. You can copy or delete the transaction using the same swipe menu.
If you made a mistake, open the transaction details form and tap/click the green checkmark icon again to make the entry planned again.
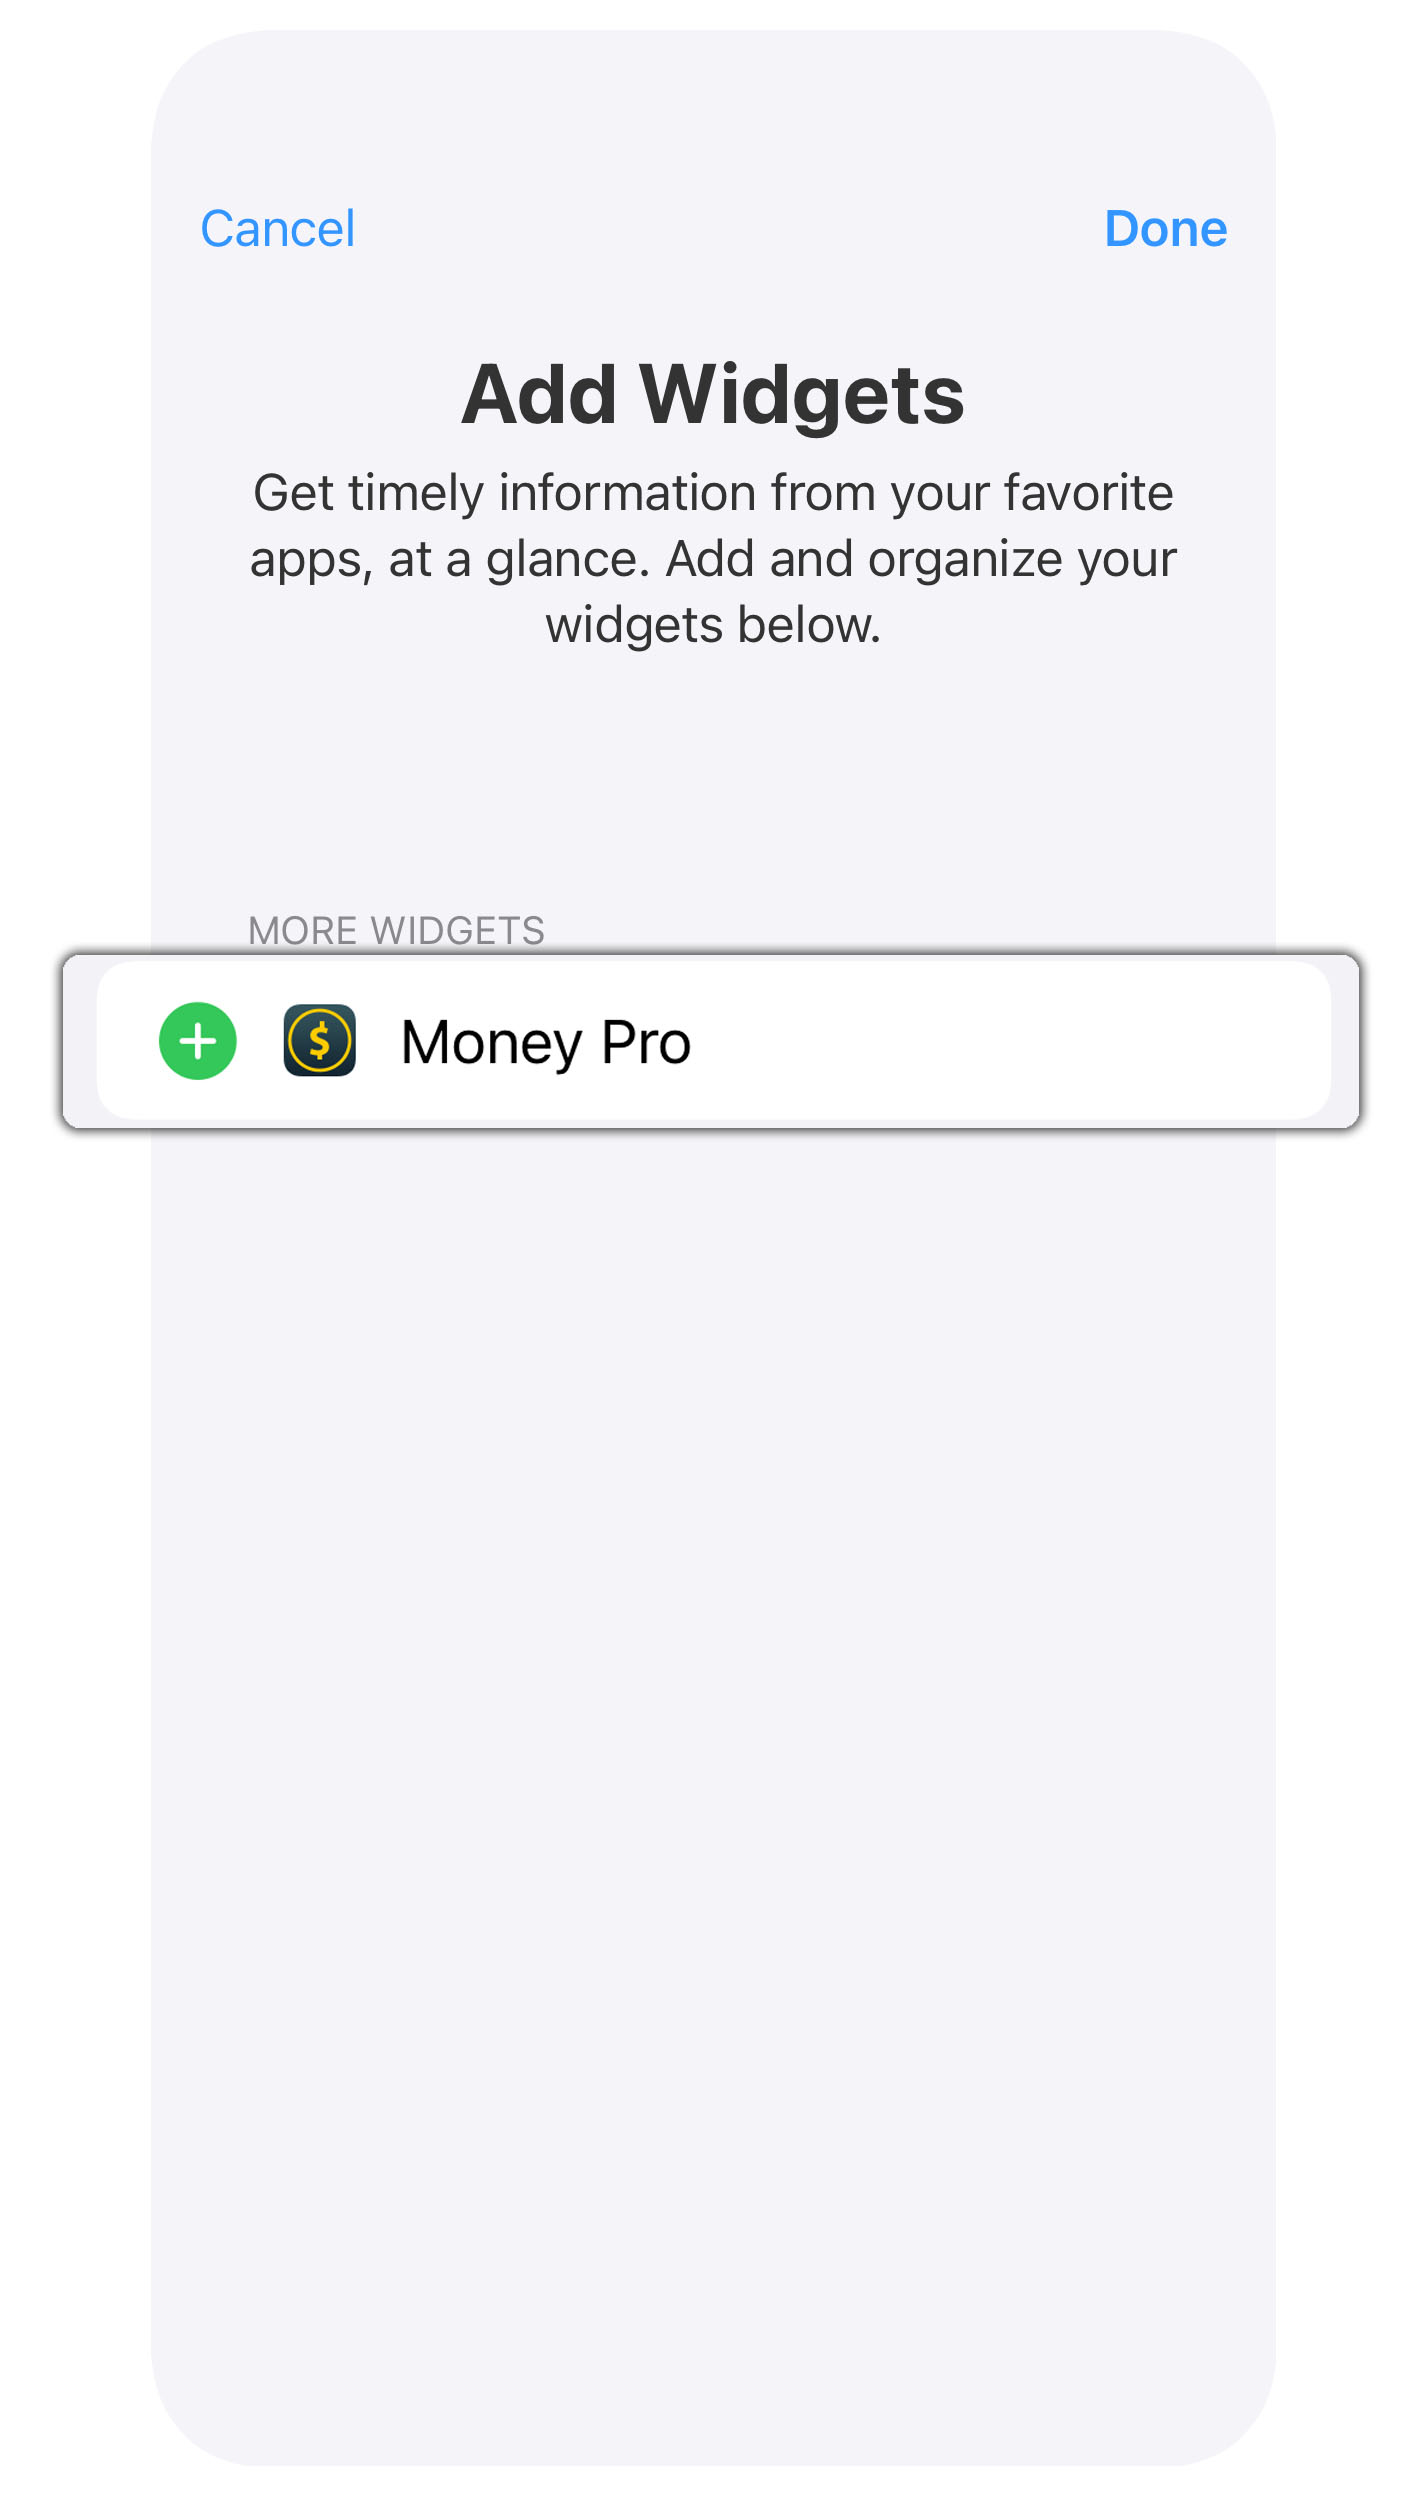
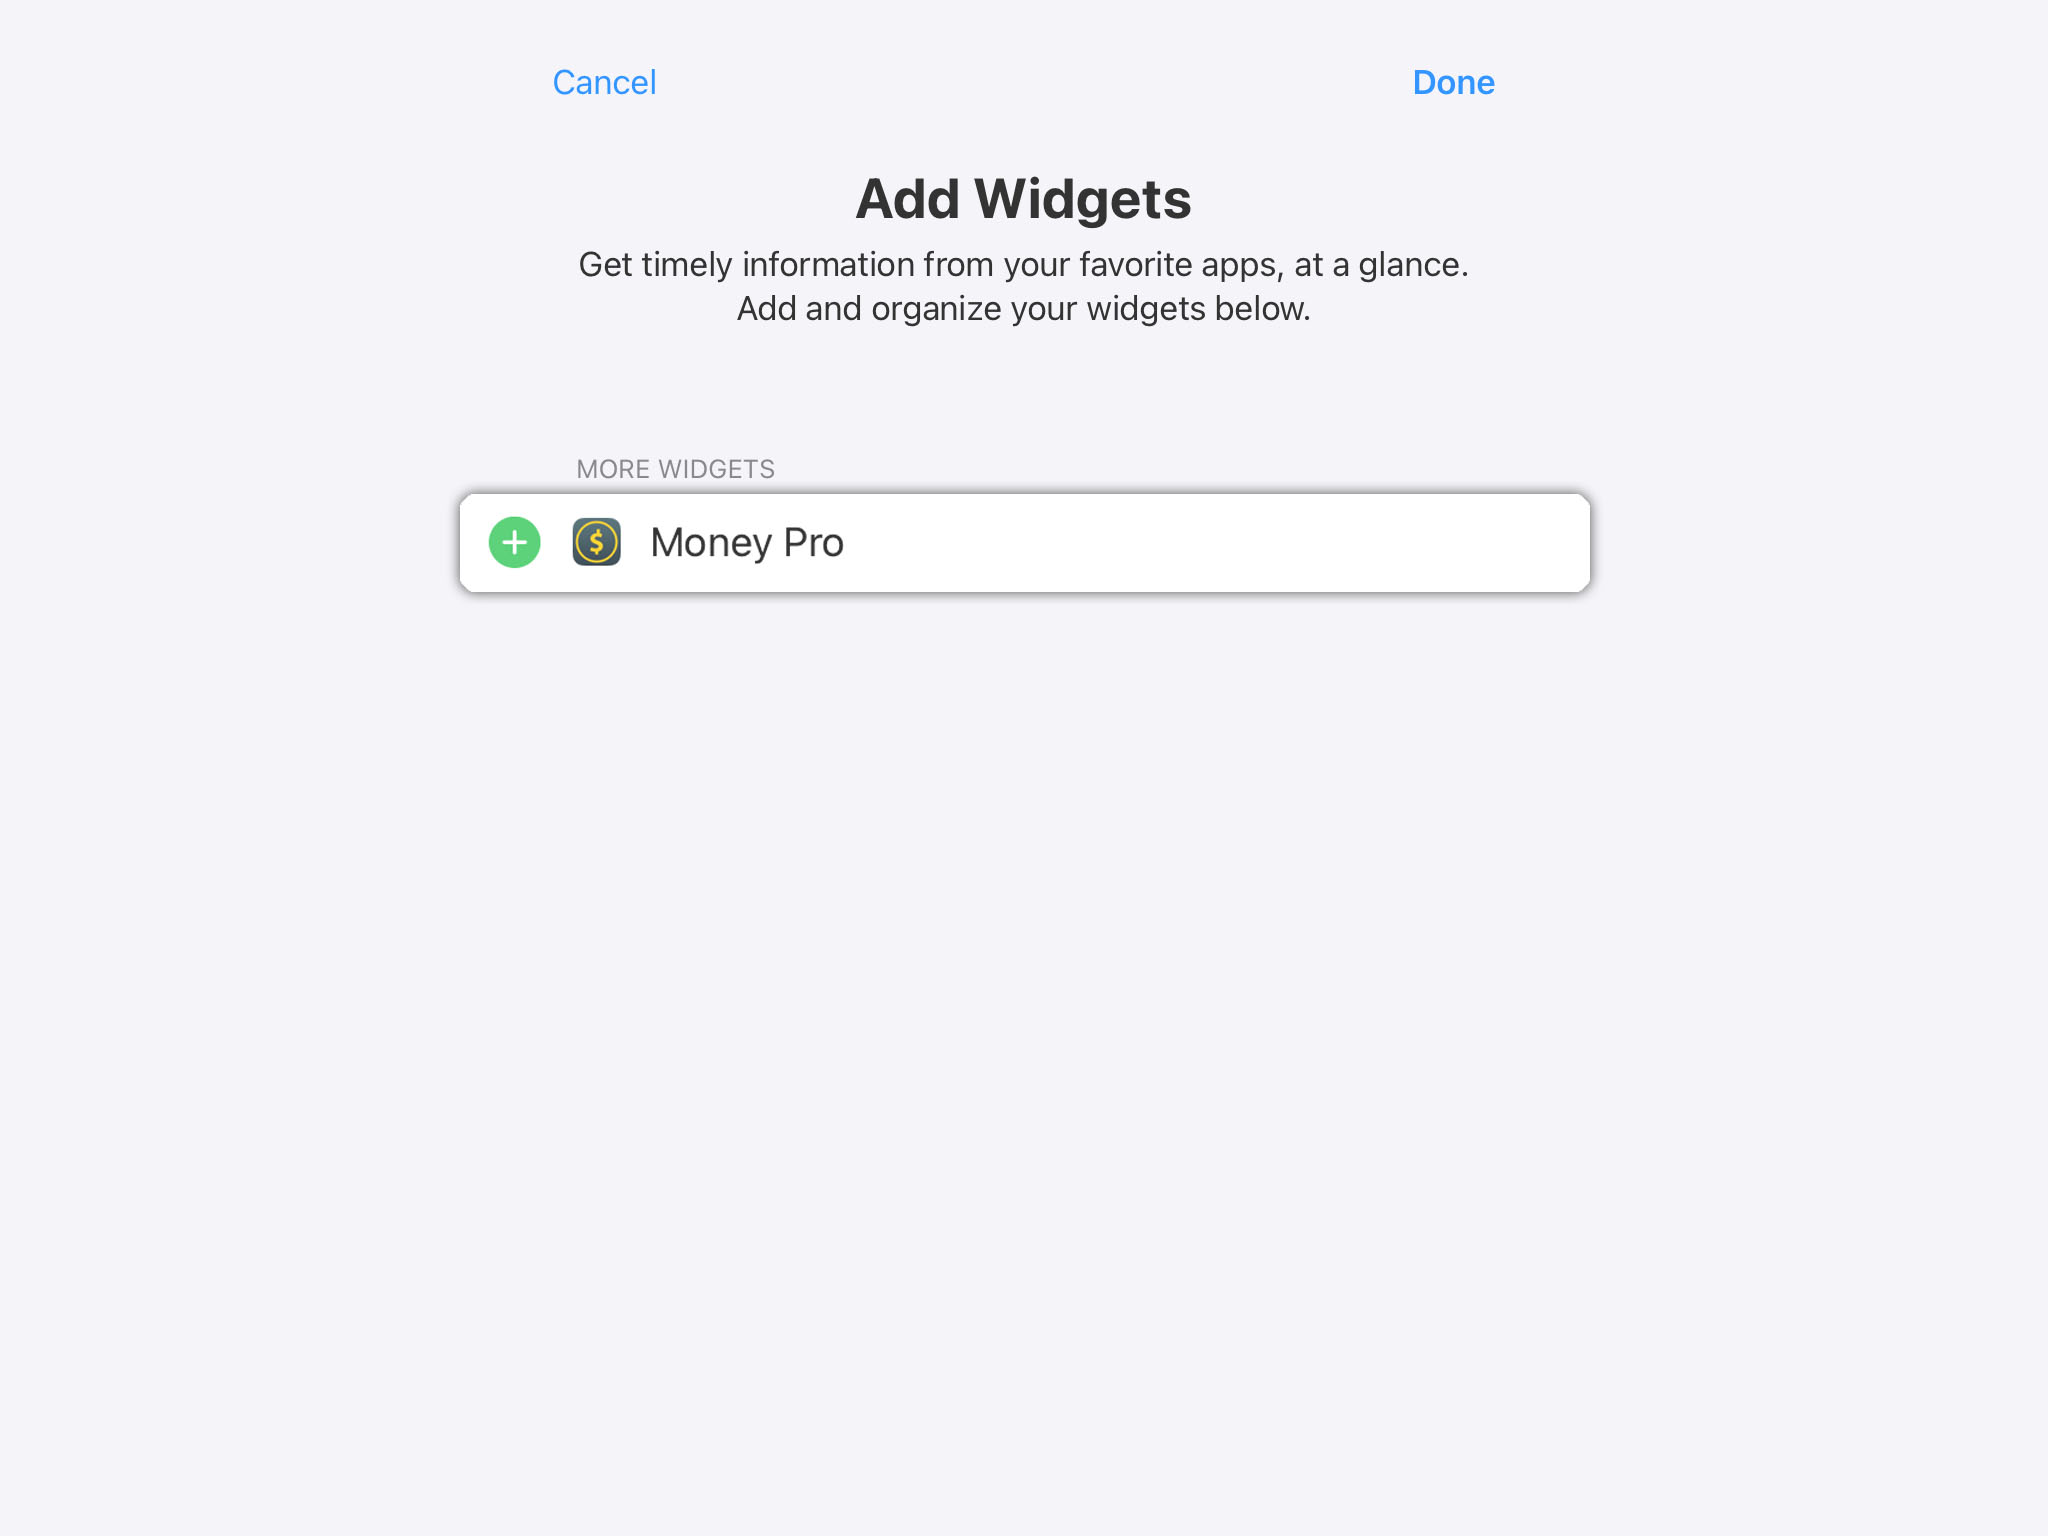
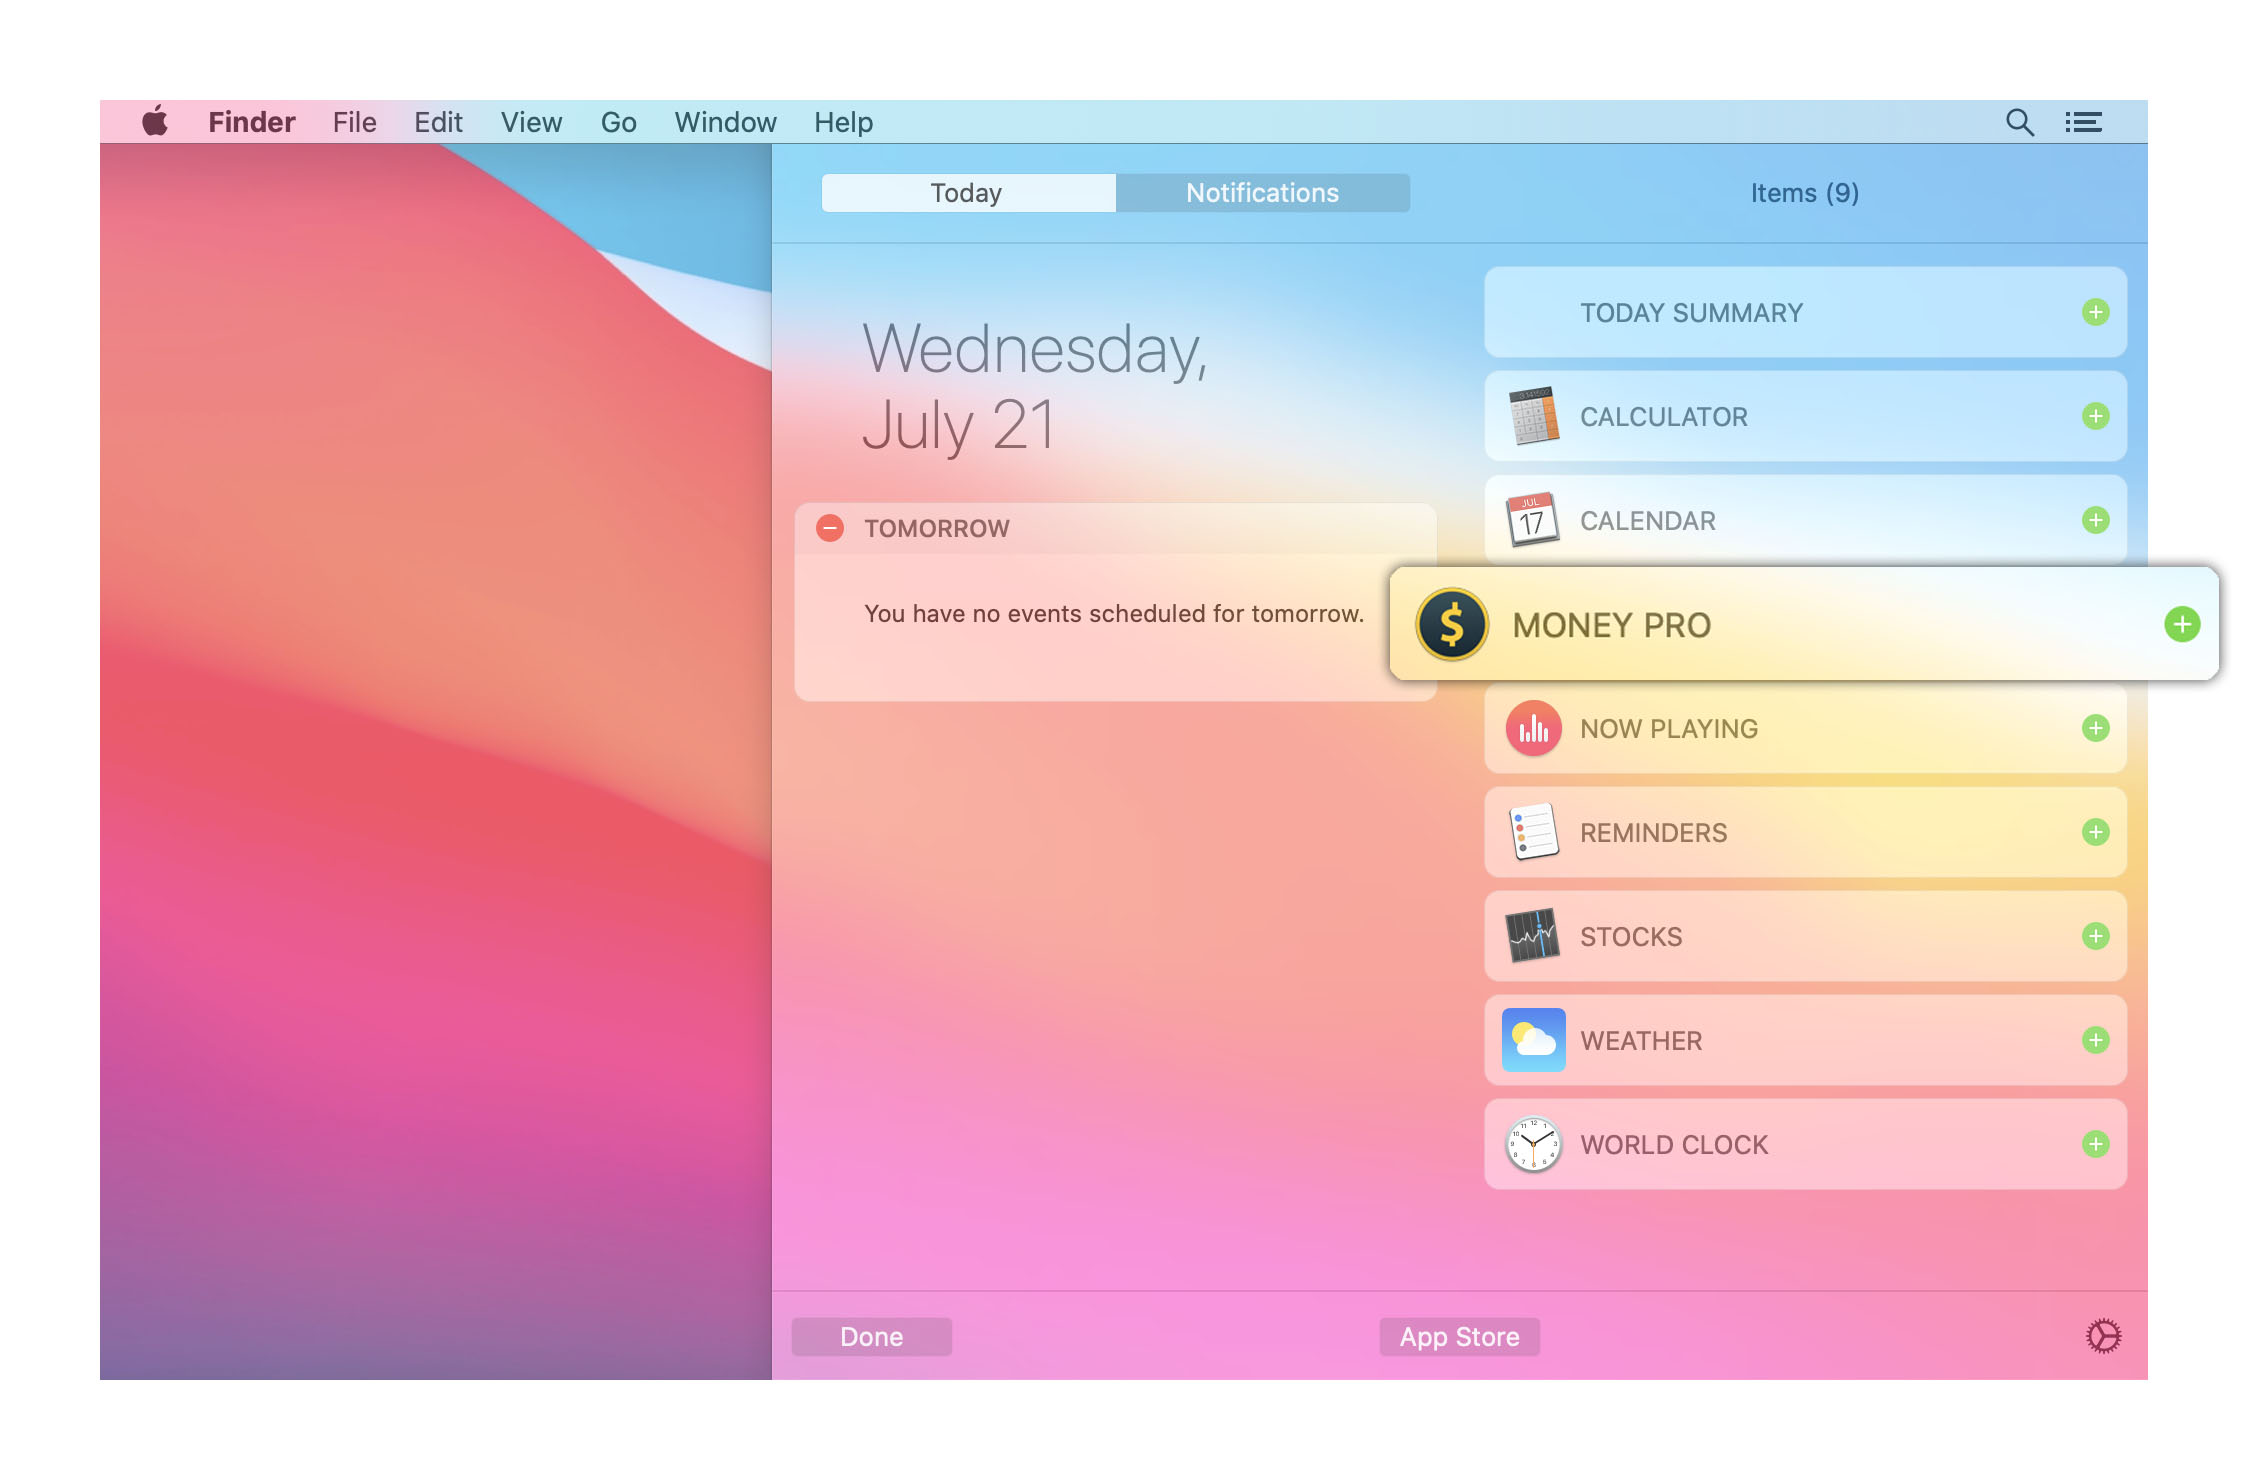
Today Widget
The Money Pro widget lets you mark scheduled transactions as paid or reschedule them in Notification Center (the pull-down menu) without having to launch the app. Besides, starting from iOS 10 (macOS Sierra) the widget allows adding a new transaction quickly. The categories shown in the widget are picked as the most often used categories. Select a particular category by tapping it, then choose an account and enter an amount.
*The widget is available for macOS Catalina and iOS 17 or earlier.
Notifications and alerts
To set up notification options for your planned transactions on iOS devices, go to iOS Settings > Money Pro, on Mac open the Main Menu > Money Pro > Settings. Make sure that Notifications are enabled and specify when you want to be notified (1 day before, on the due date, etc.).
You will receive the notification on the specified day (2 days before, on the due date, etc.).
Moreover, every time you turn on your device, on the app’s icon you’ll find the number of the planned transactions that are overdue. The number on the icon will not disappear until you mark the bills paid.
When you receive a notification about your planned transaction, please be aware that you can pay/delay/delete this transaction without launching the app. To do either of these operations, open the notification’s details list (using swipe or force touch) and press the button you need.
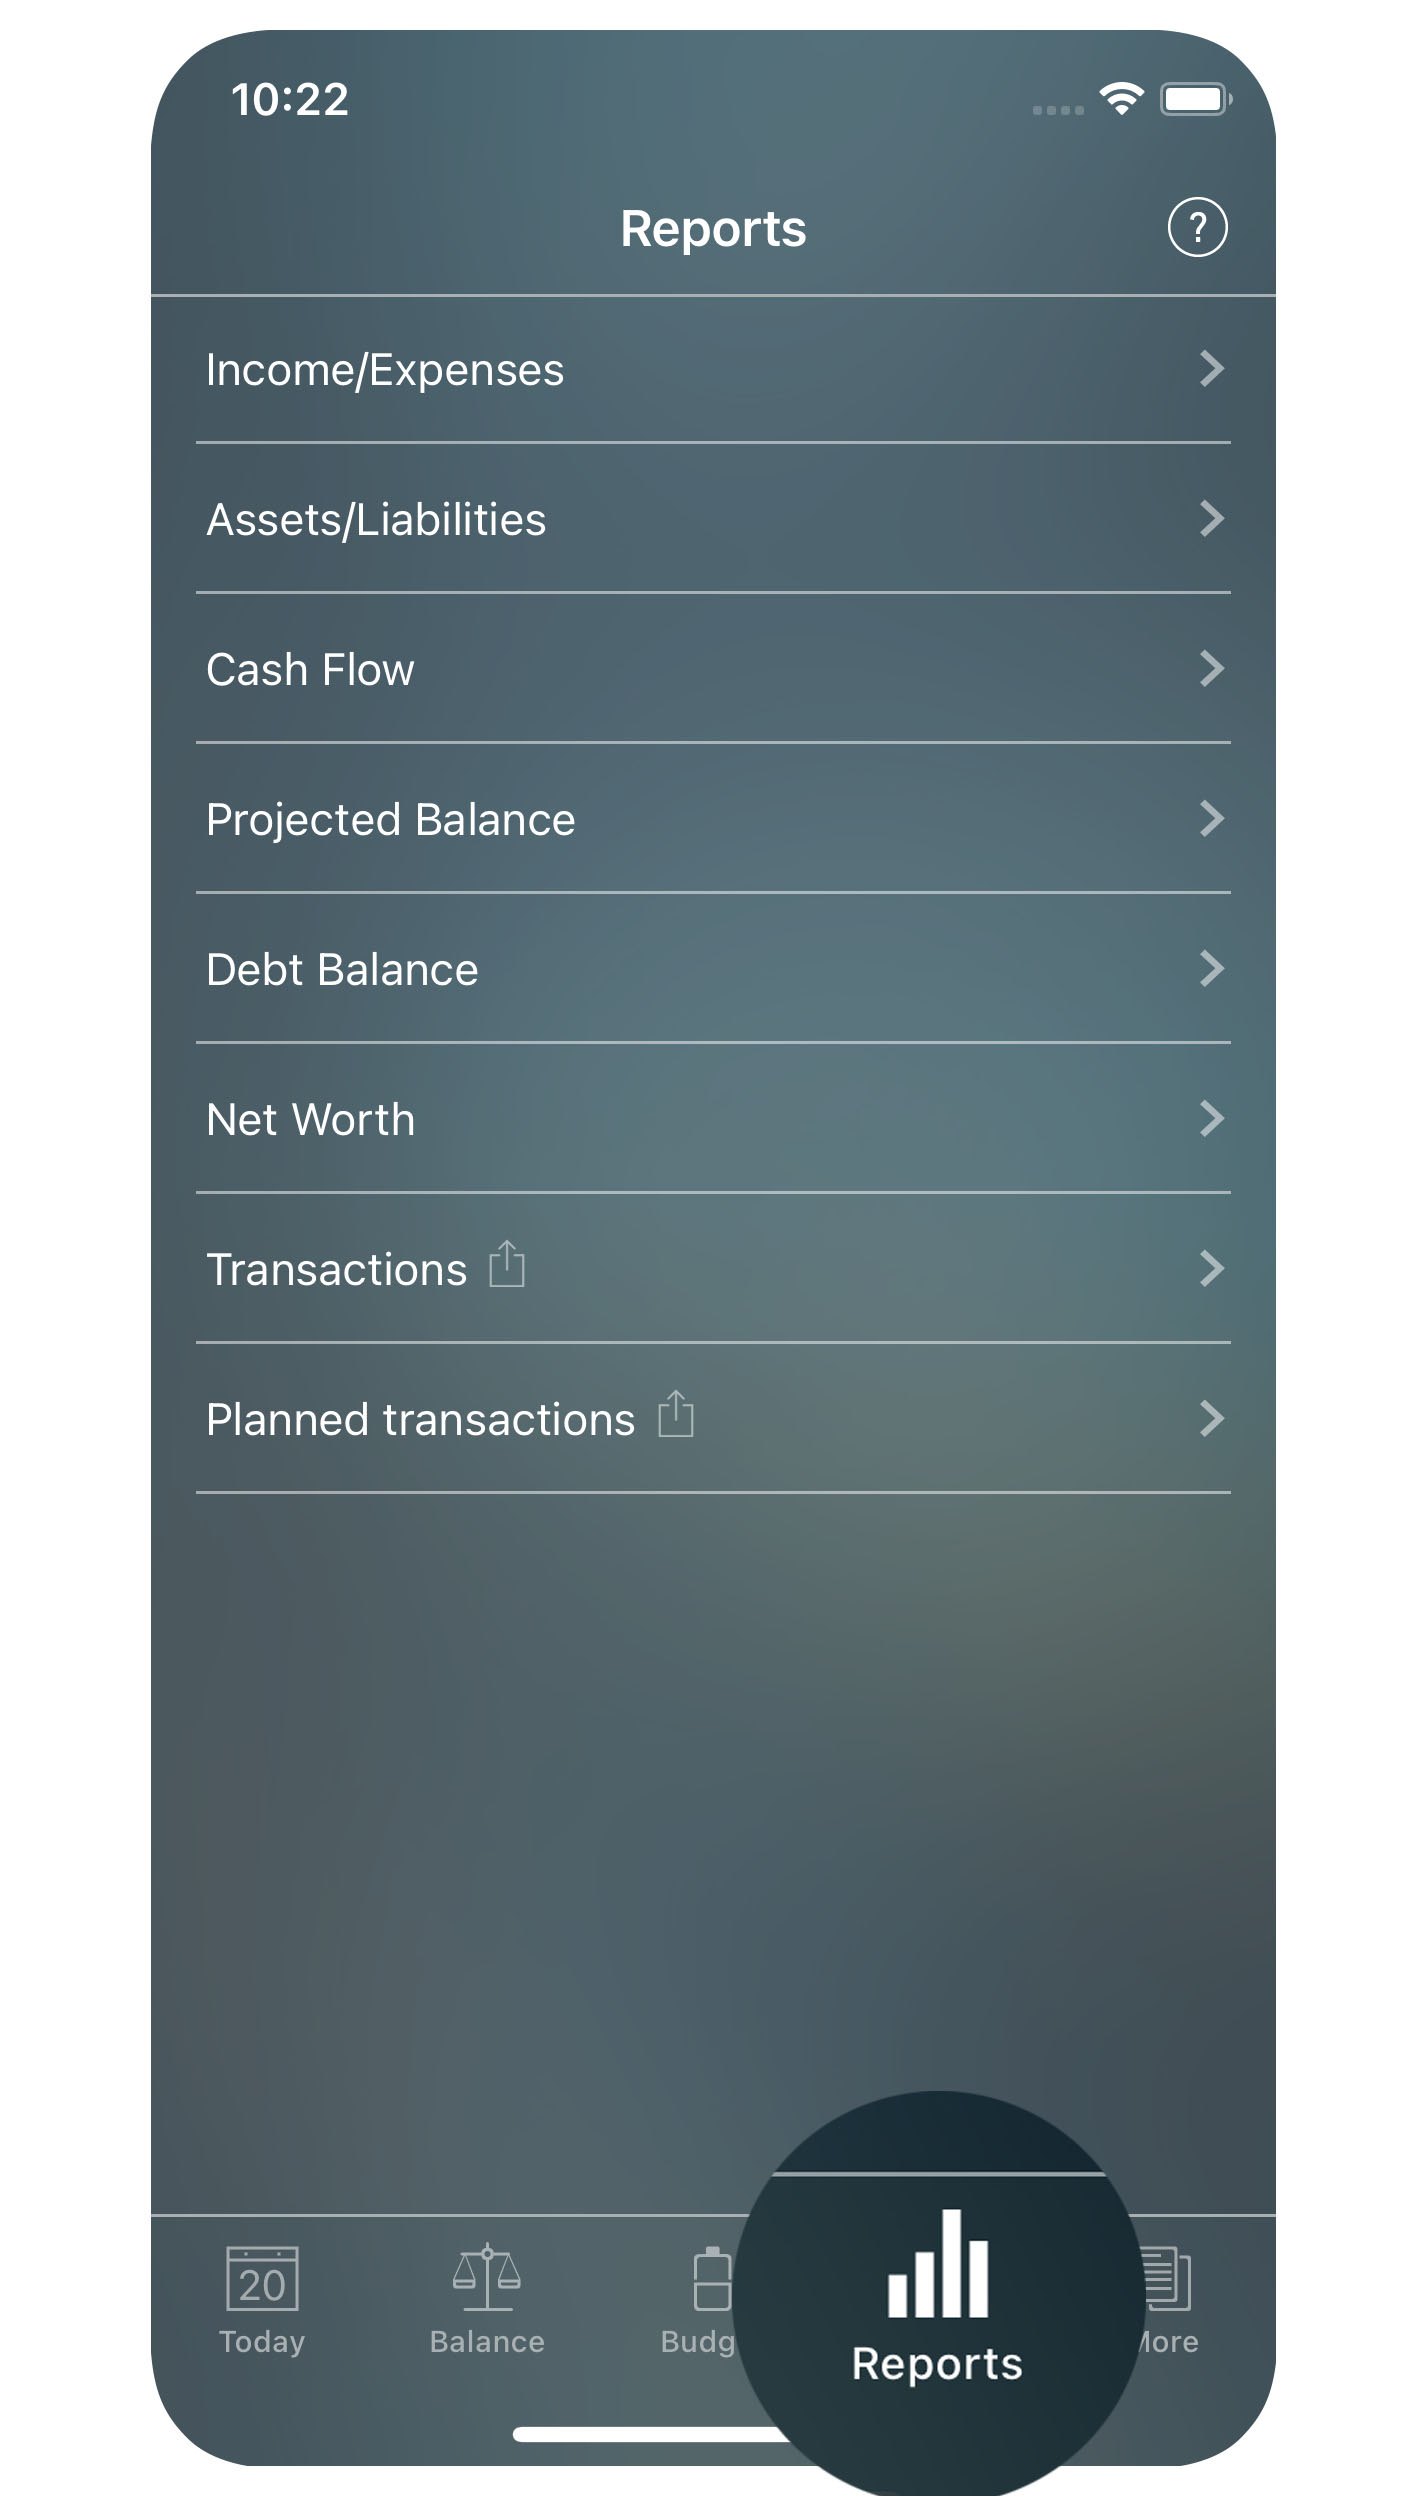
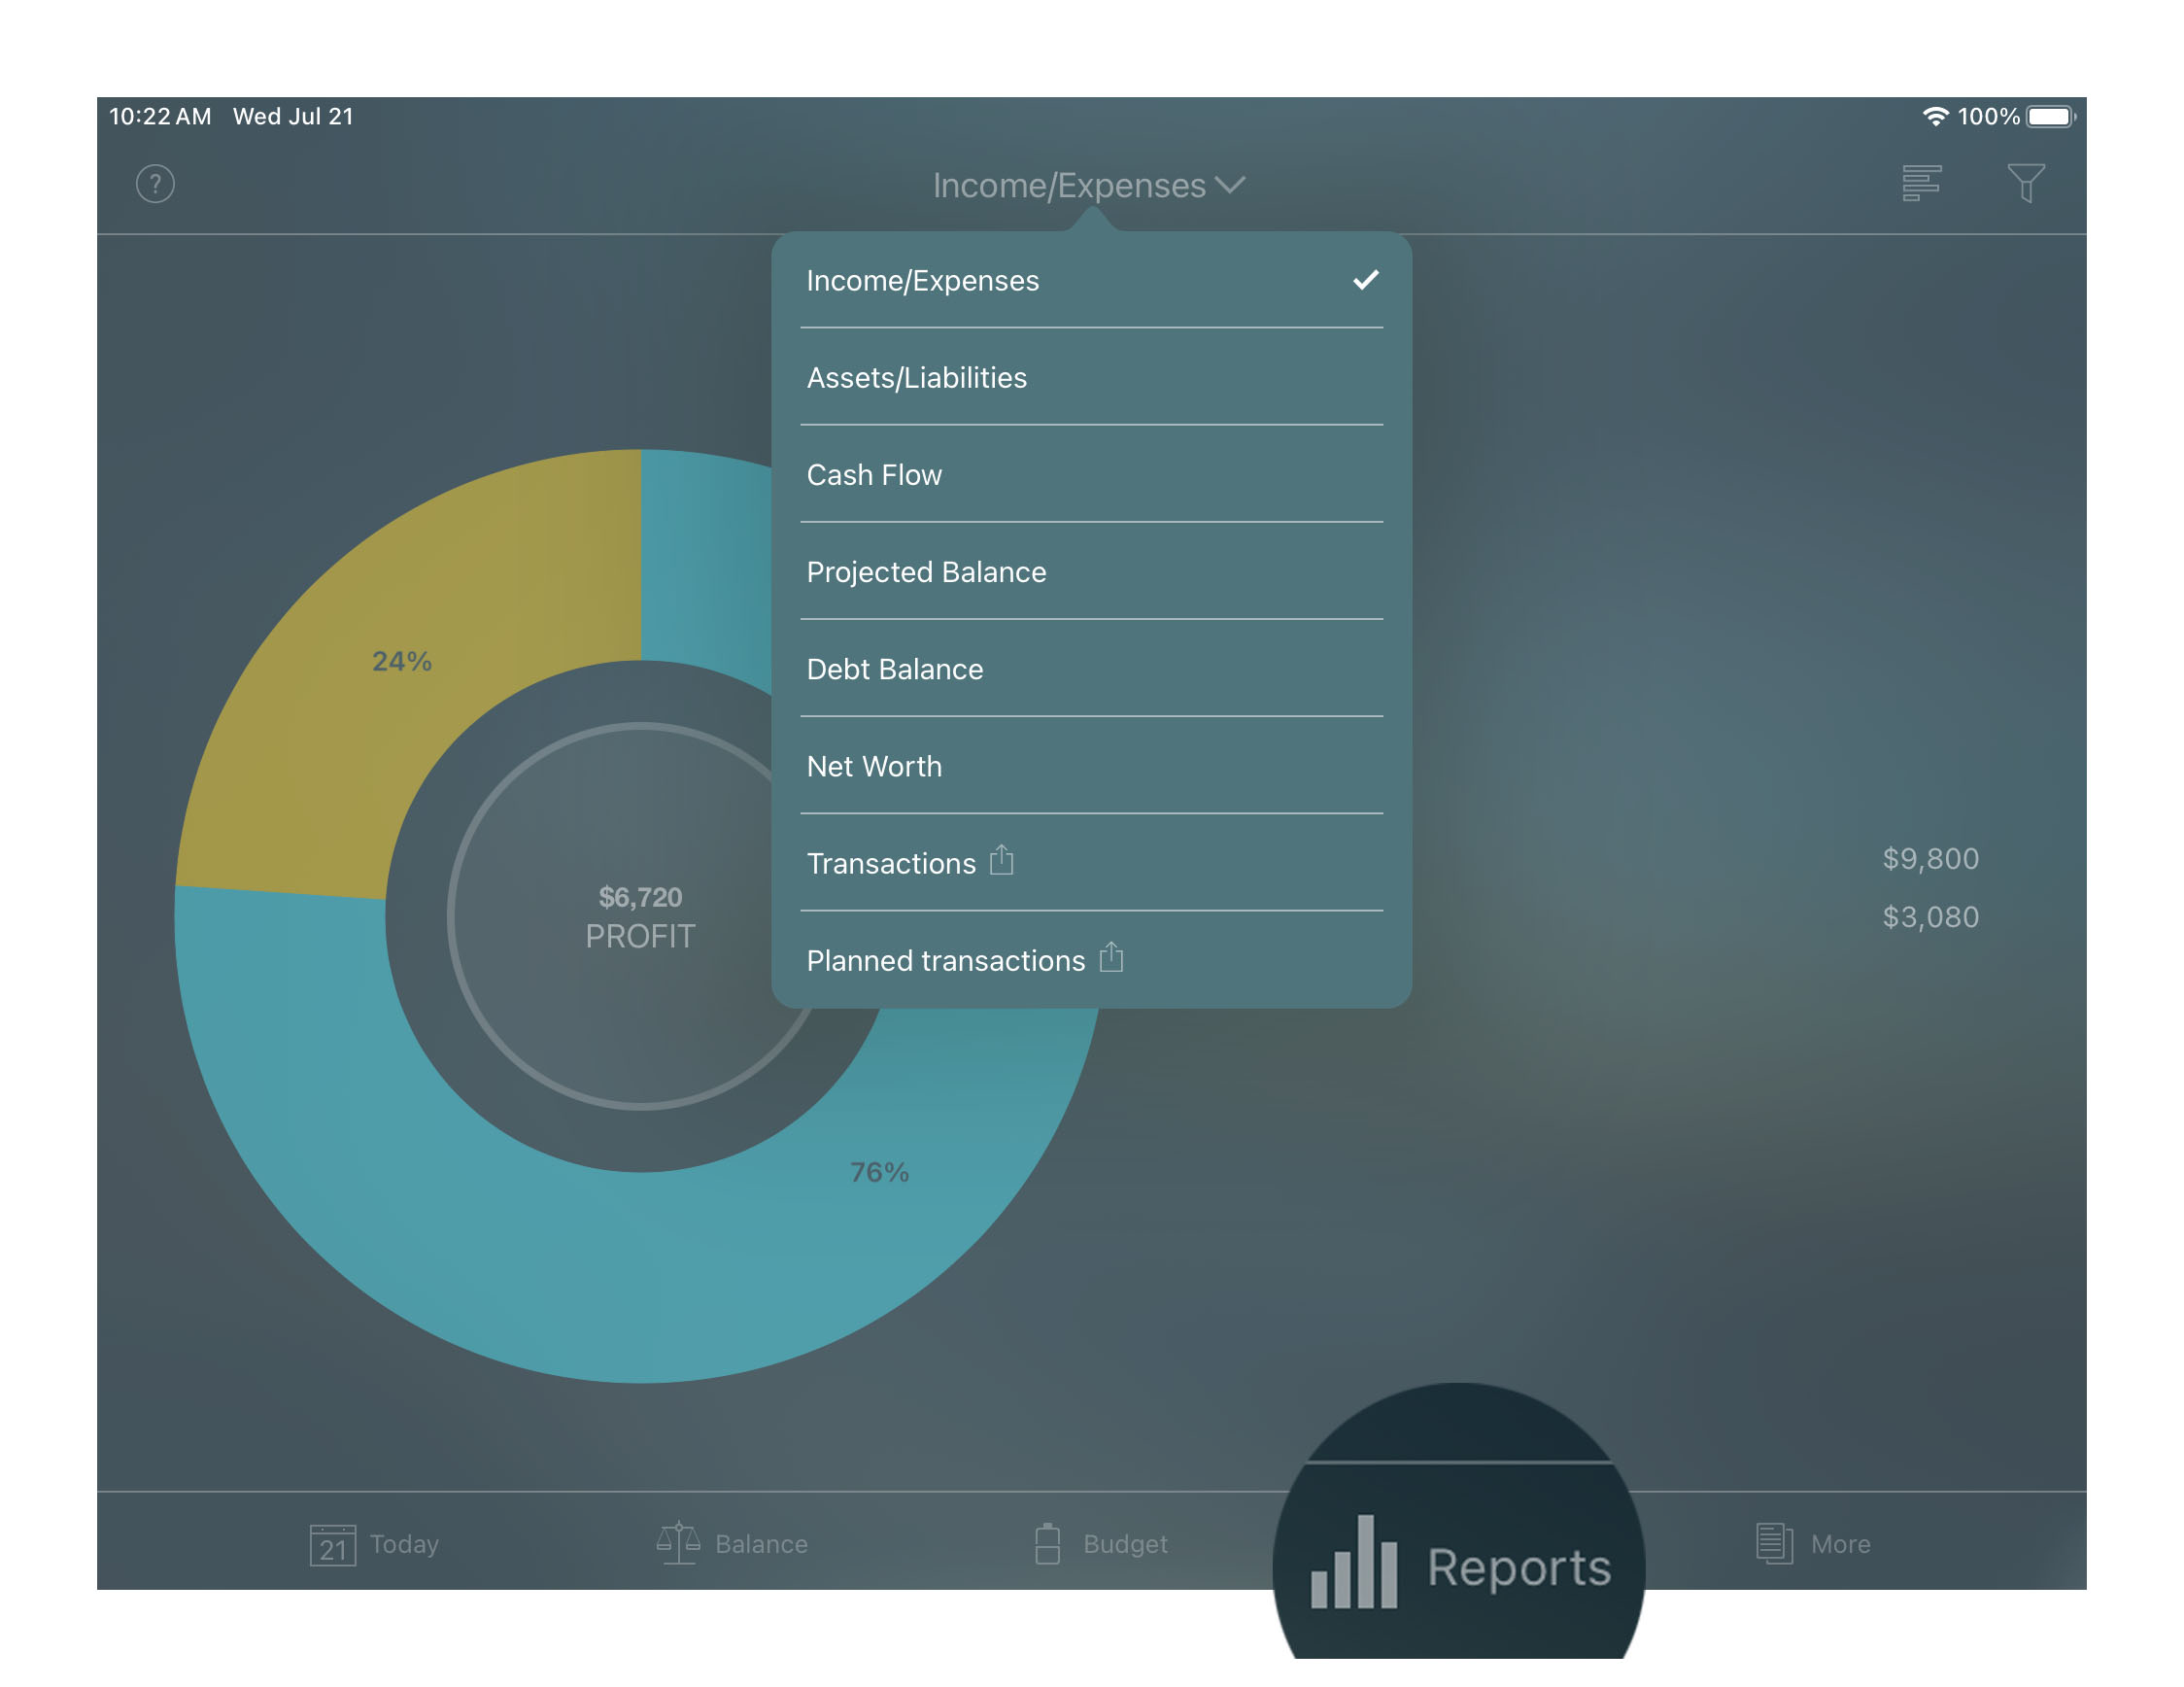
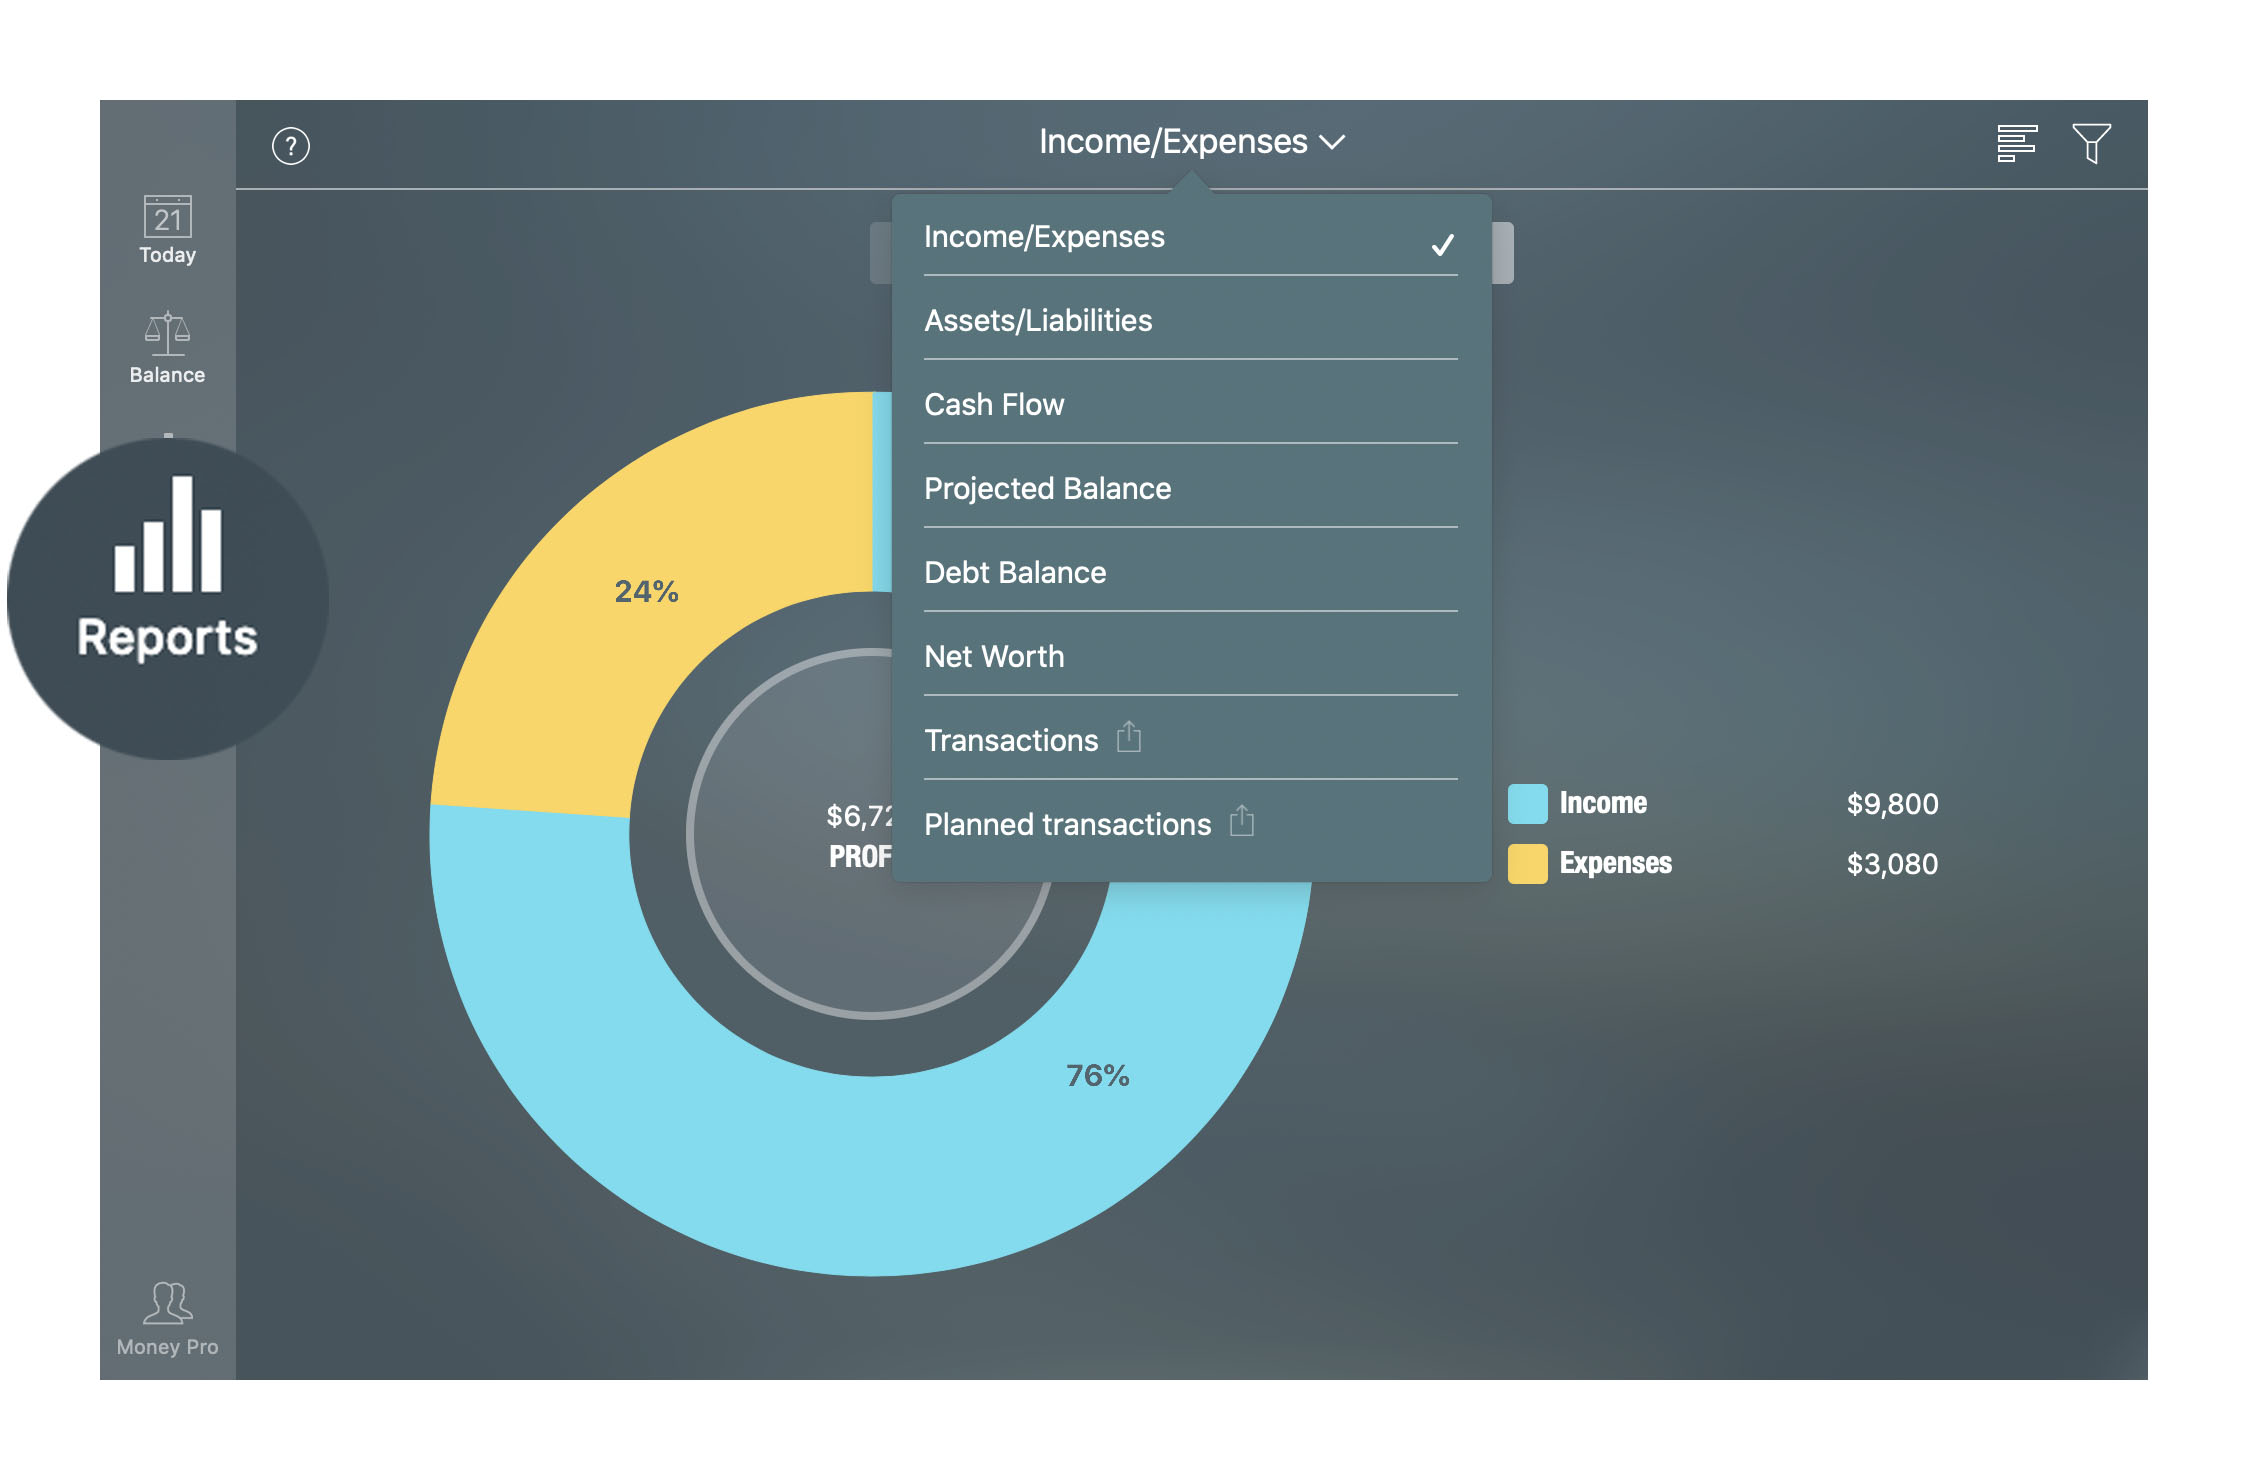
Reports
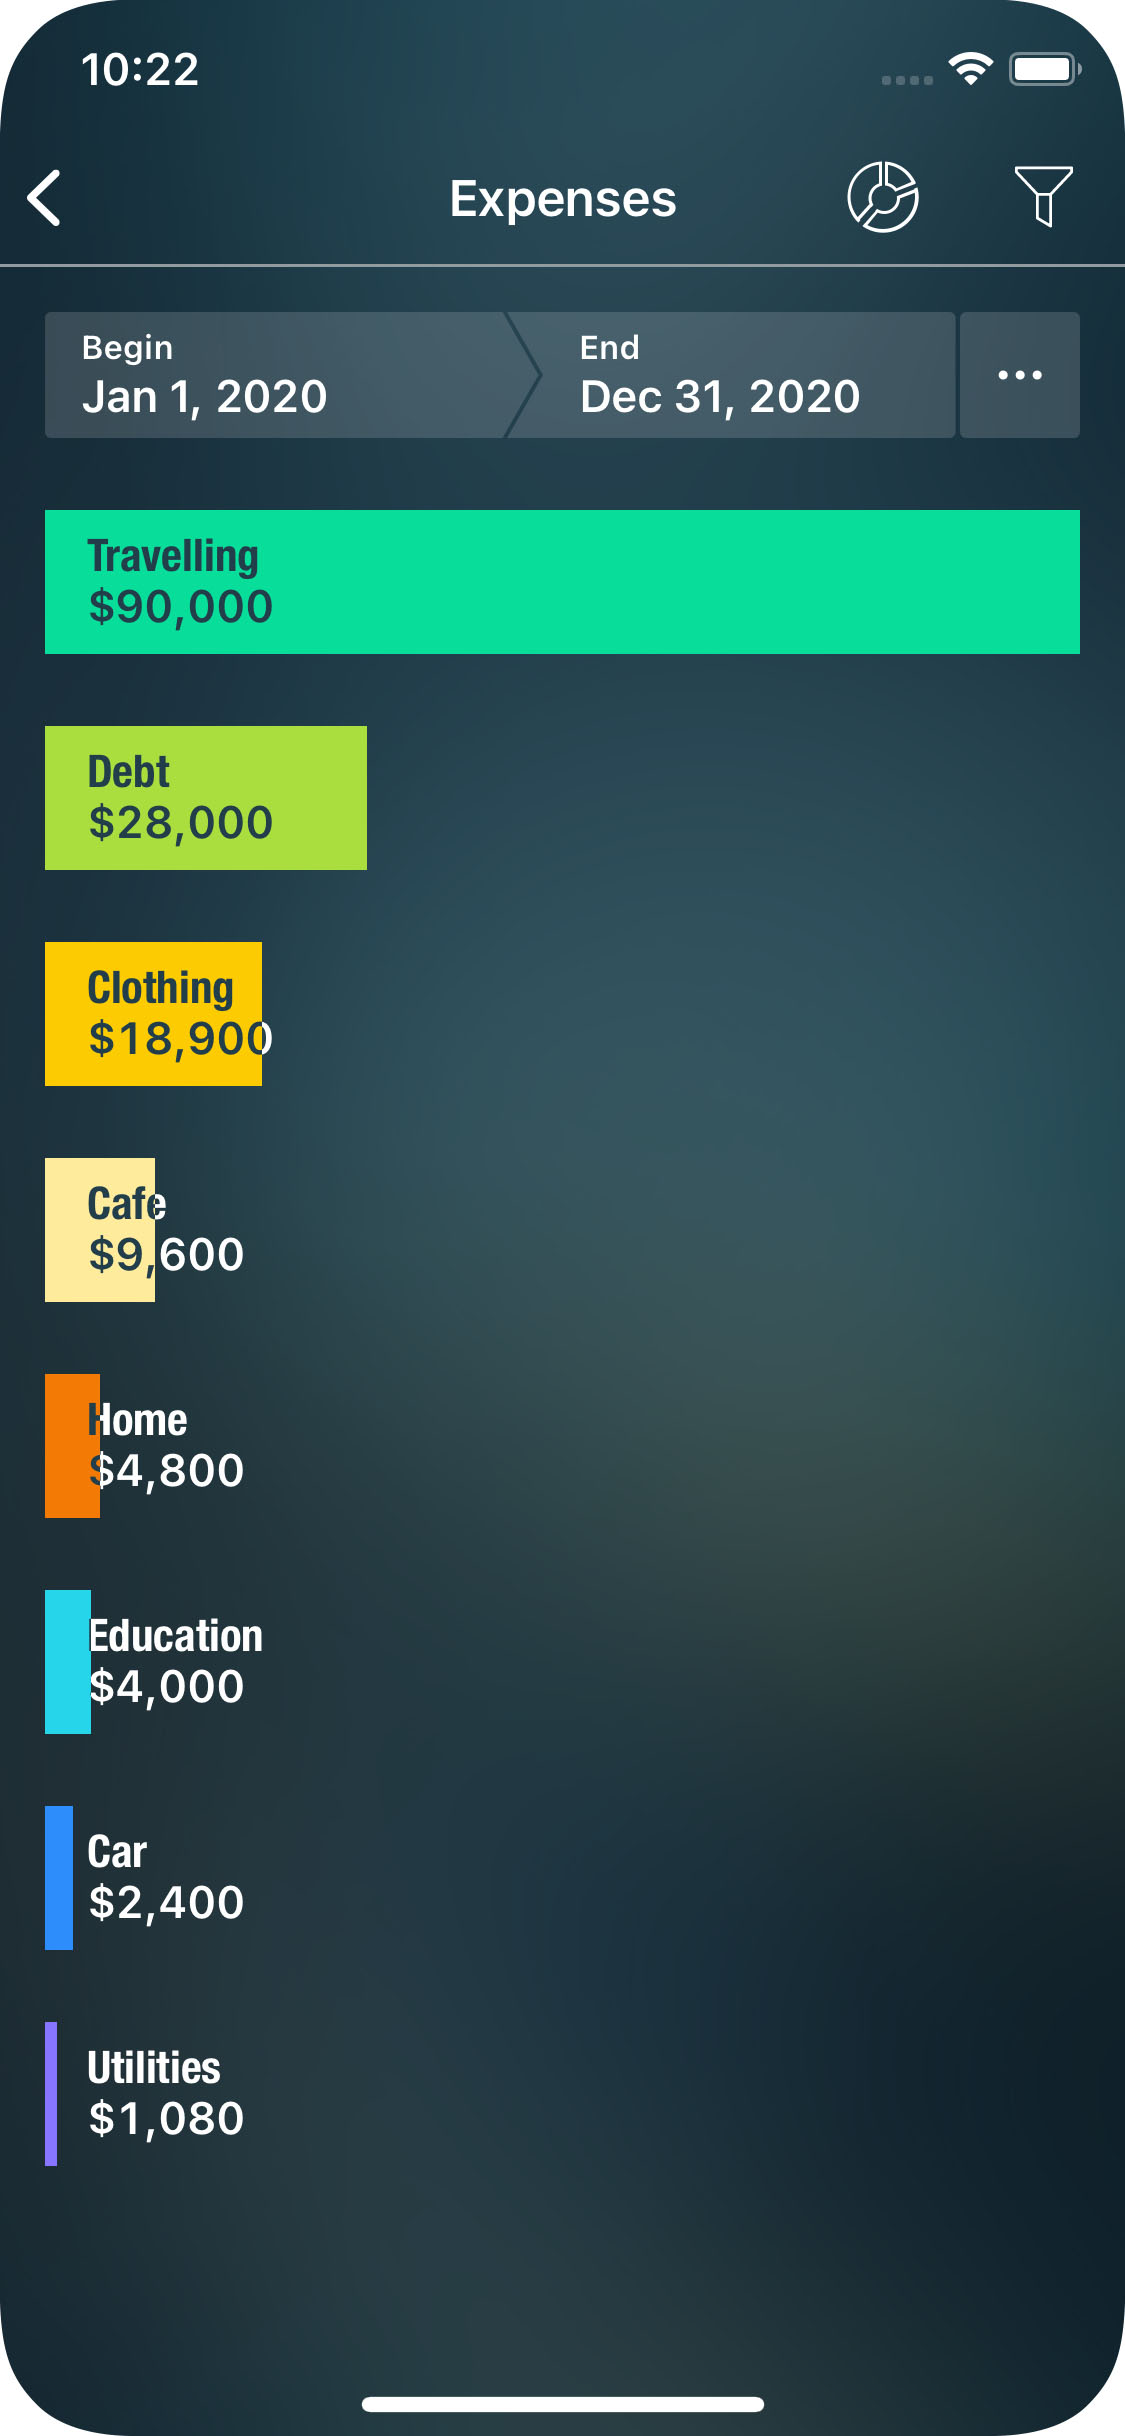
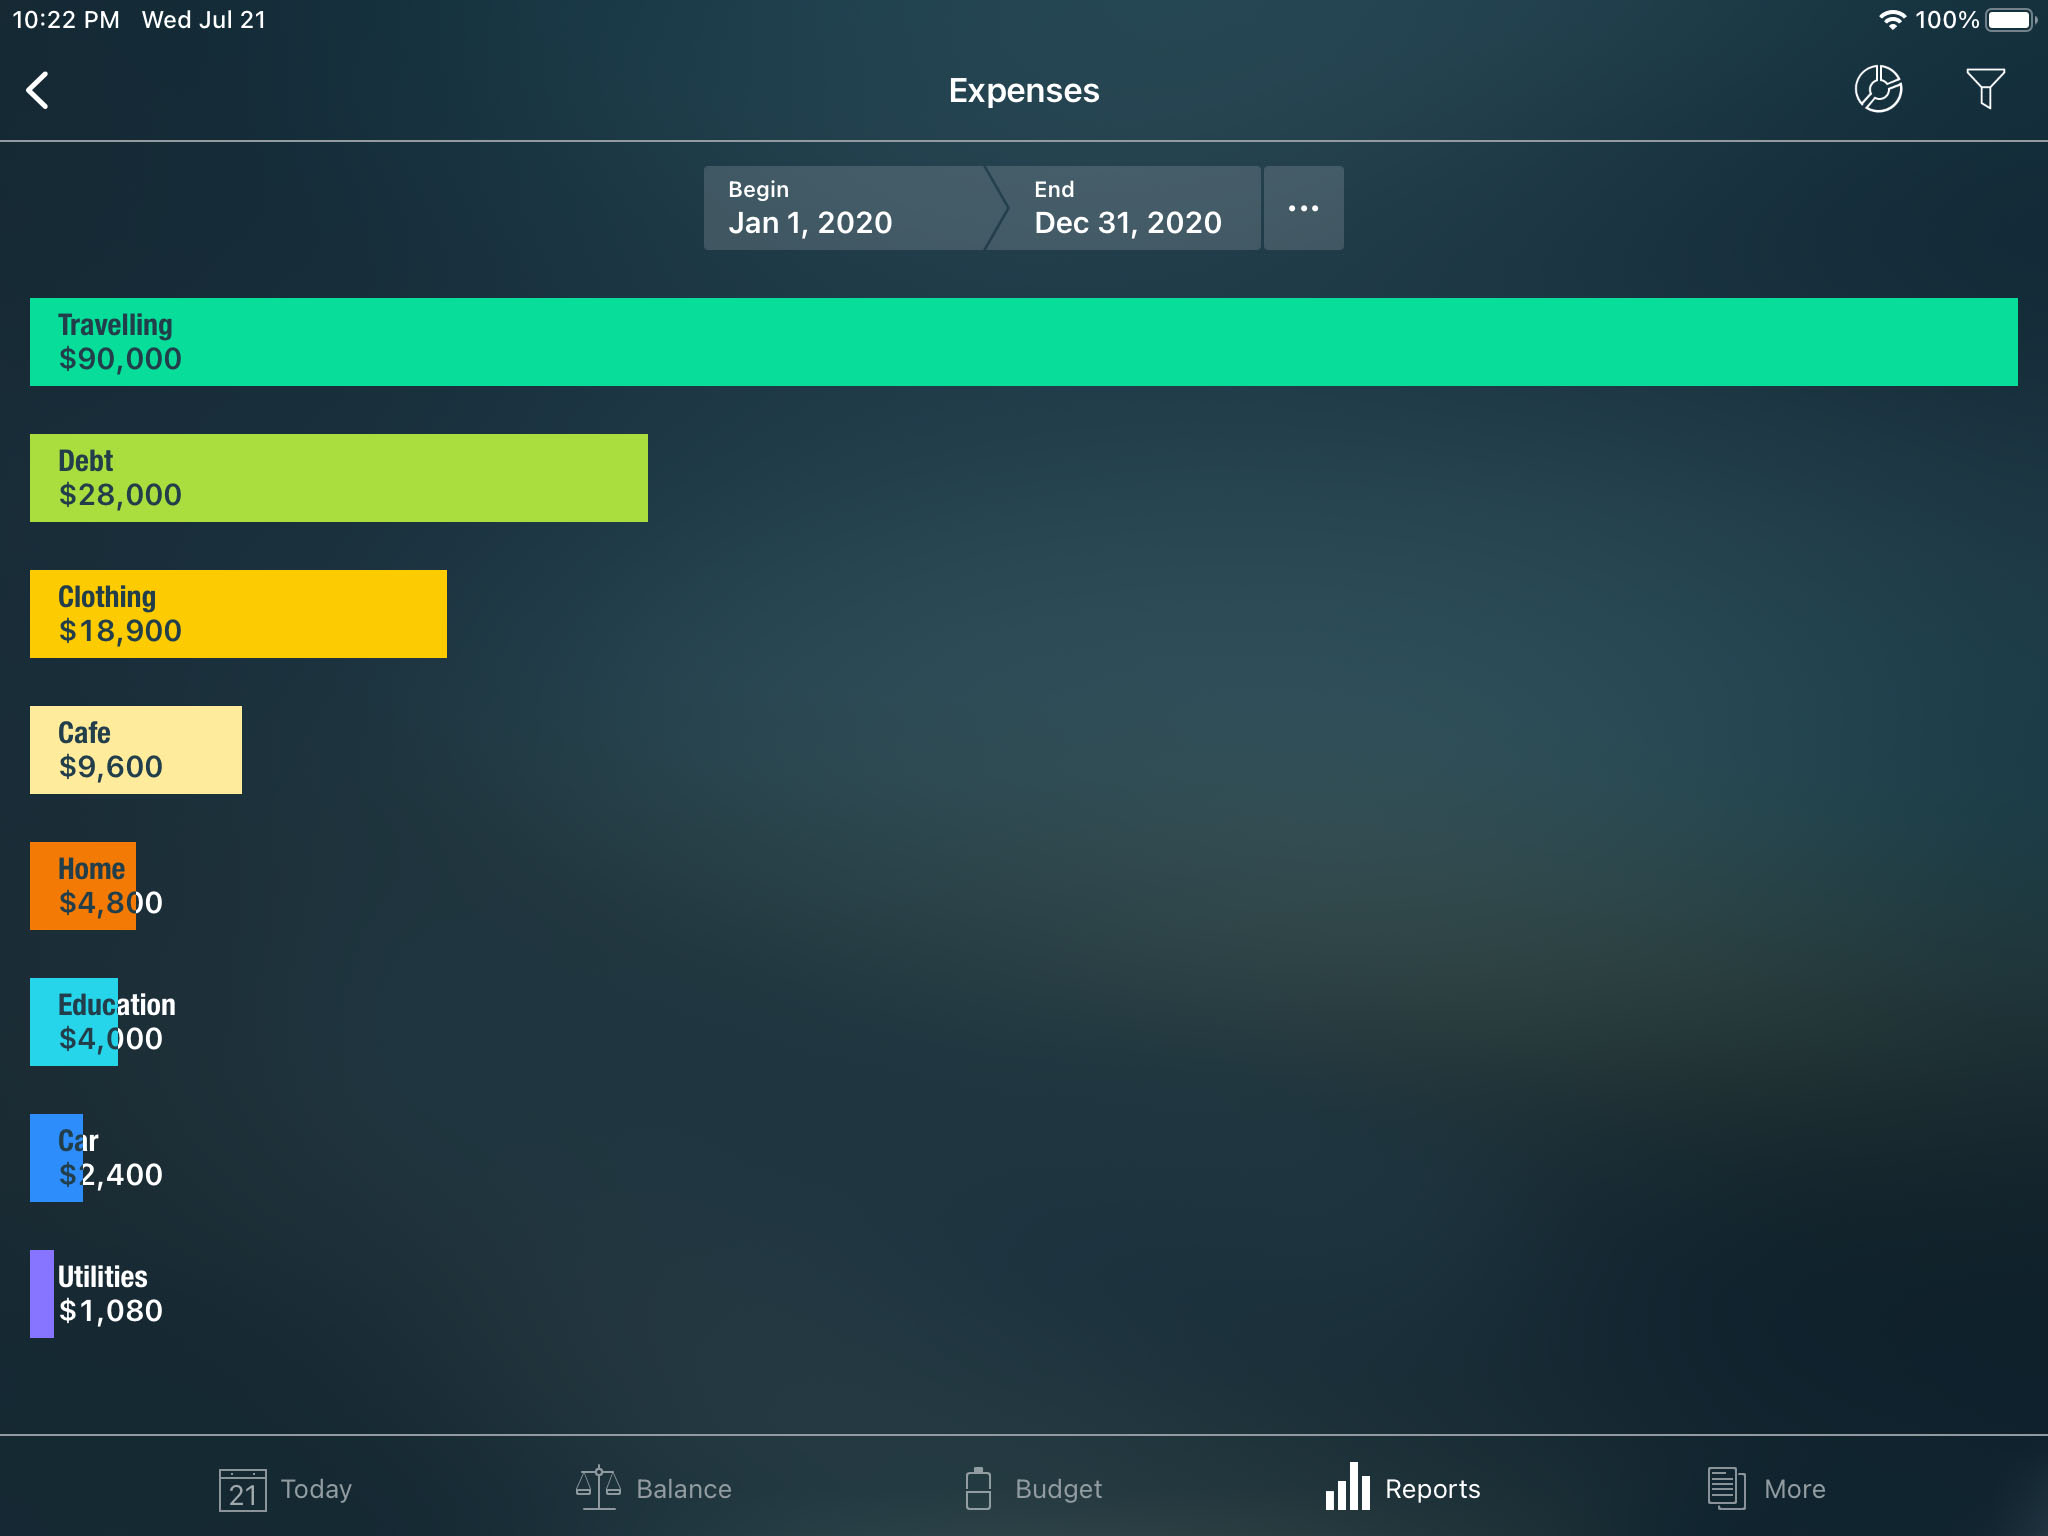
Money Pro provides you with all important insights on your financial state through a number of detailed reports described below. Go to Reports and select the report you need. The report will be generated for the current month by default. You can adjust Begin and End dates right on the report form.
Filters
Money Pro offers advanced filtering options for your reports. Tap/click the filter icon in the upper right corner of the report form and select the required parameters. For example, you can choose an account and certain expense categories. Combining several filters opens up great opportunities for the analysis of your personal finances.
You may filter transactions by period as described above.
You may filter transactions by category and subcategory:
- One category/subcategory
- Several categories/subcategories
- All the categories/subcategories
You may filter transactions by account:
- One account
- Several accounts
- All the accounts
You may filter transactions by reconcile status:
- Cleared
- Not cleared
- All the transactions
You may filter transactions by transaction type:
- Expenses
- Income
- Money transfer
- Asset purchase
- Asset sale
- Liability acquisition
- Discharge of liability
- All the types
You may filter transactions by class:
- Personal
- Business
- All the classes
It might be convenient in case you need to track business travel expenses separately from your personal expenditures.
You may filter transactions by agent (payee):
- One agent
- Several agents
- All the agents
It is especially useful when you want to analyze where you make purchases more often.
Additionally, you may select an appropriate grouping option for your reports:
- Group by Category
- Group by Agent
- Group by Class
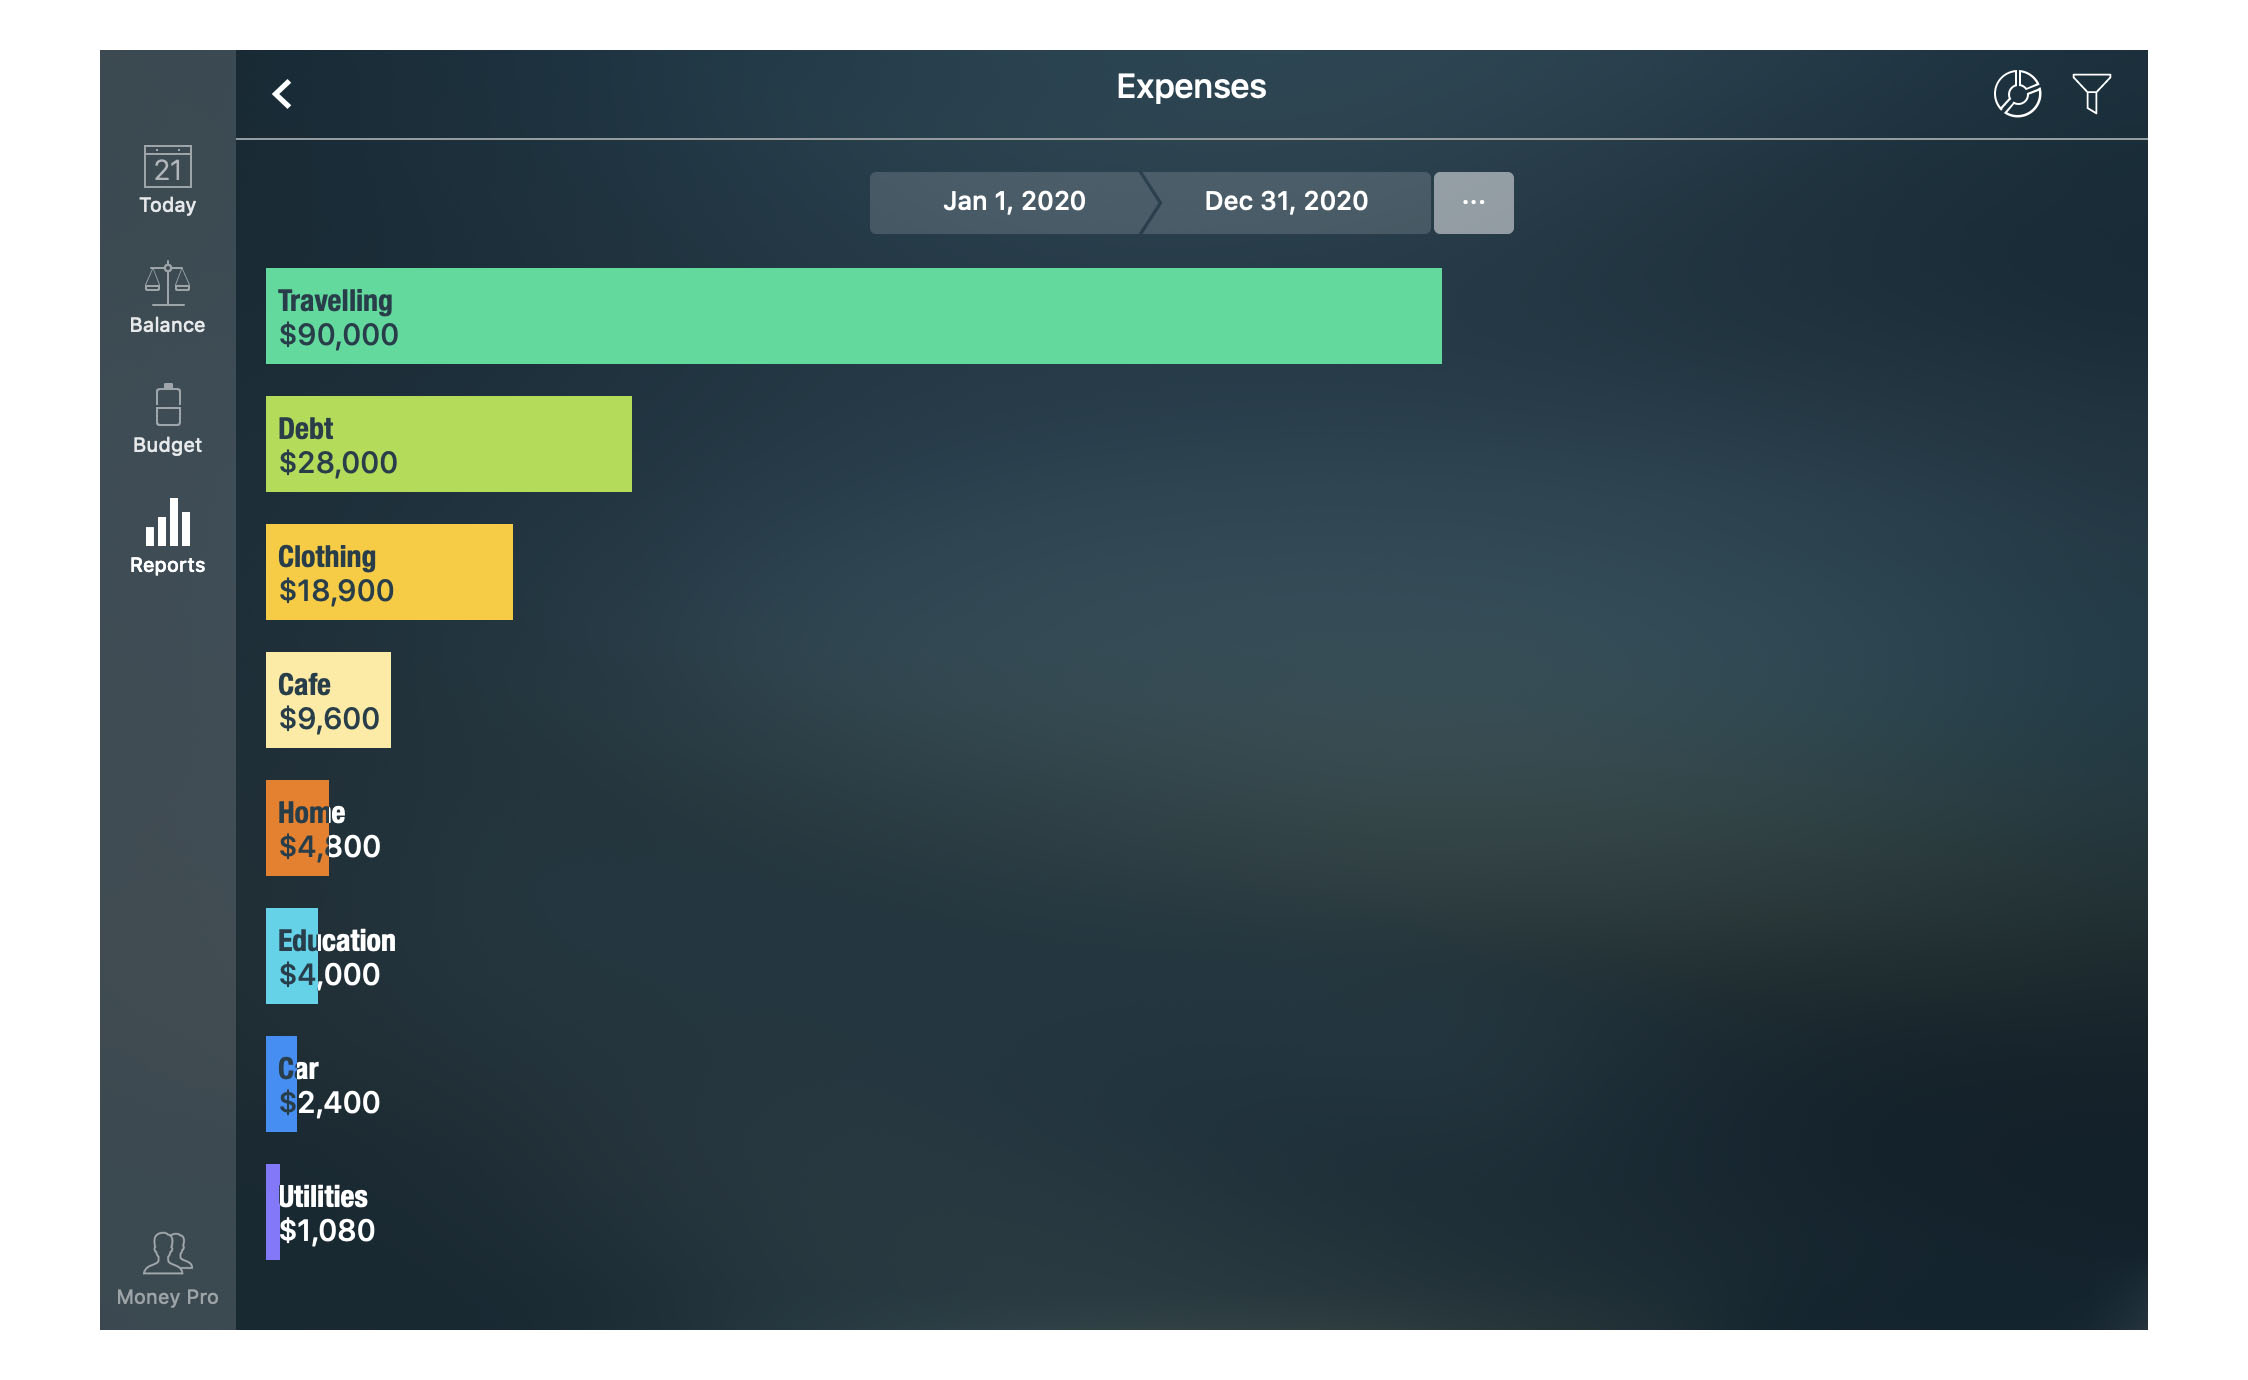
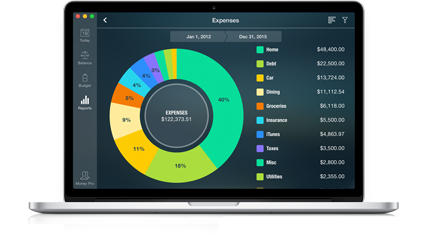
Income/Expenses report
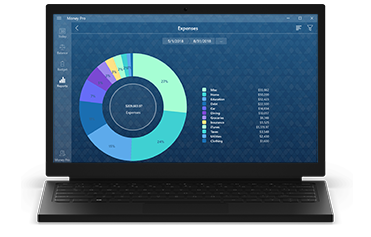
Here you can find detailed information on your income/expenses structure. You may choose a pie chart or a histogram representation of your data. Tap/click a bar or a sector to get more insights. By selecting a certain category you’ll get the report with the subcategories included.
On the top level, you will see aggregate income and aggregate expenditure. At the next level, you will be presented with a structure of your income or expenses (whichever you select). The next level will contain a structure of subcategories for a particular category (if any). At the lowest level, you will see the list of transactions for the selected category/subcategory.
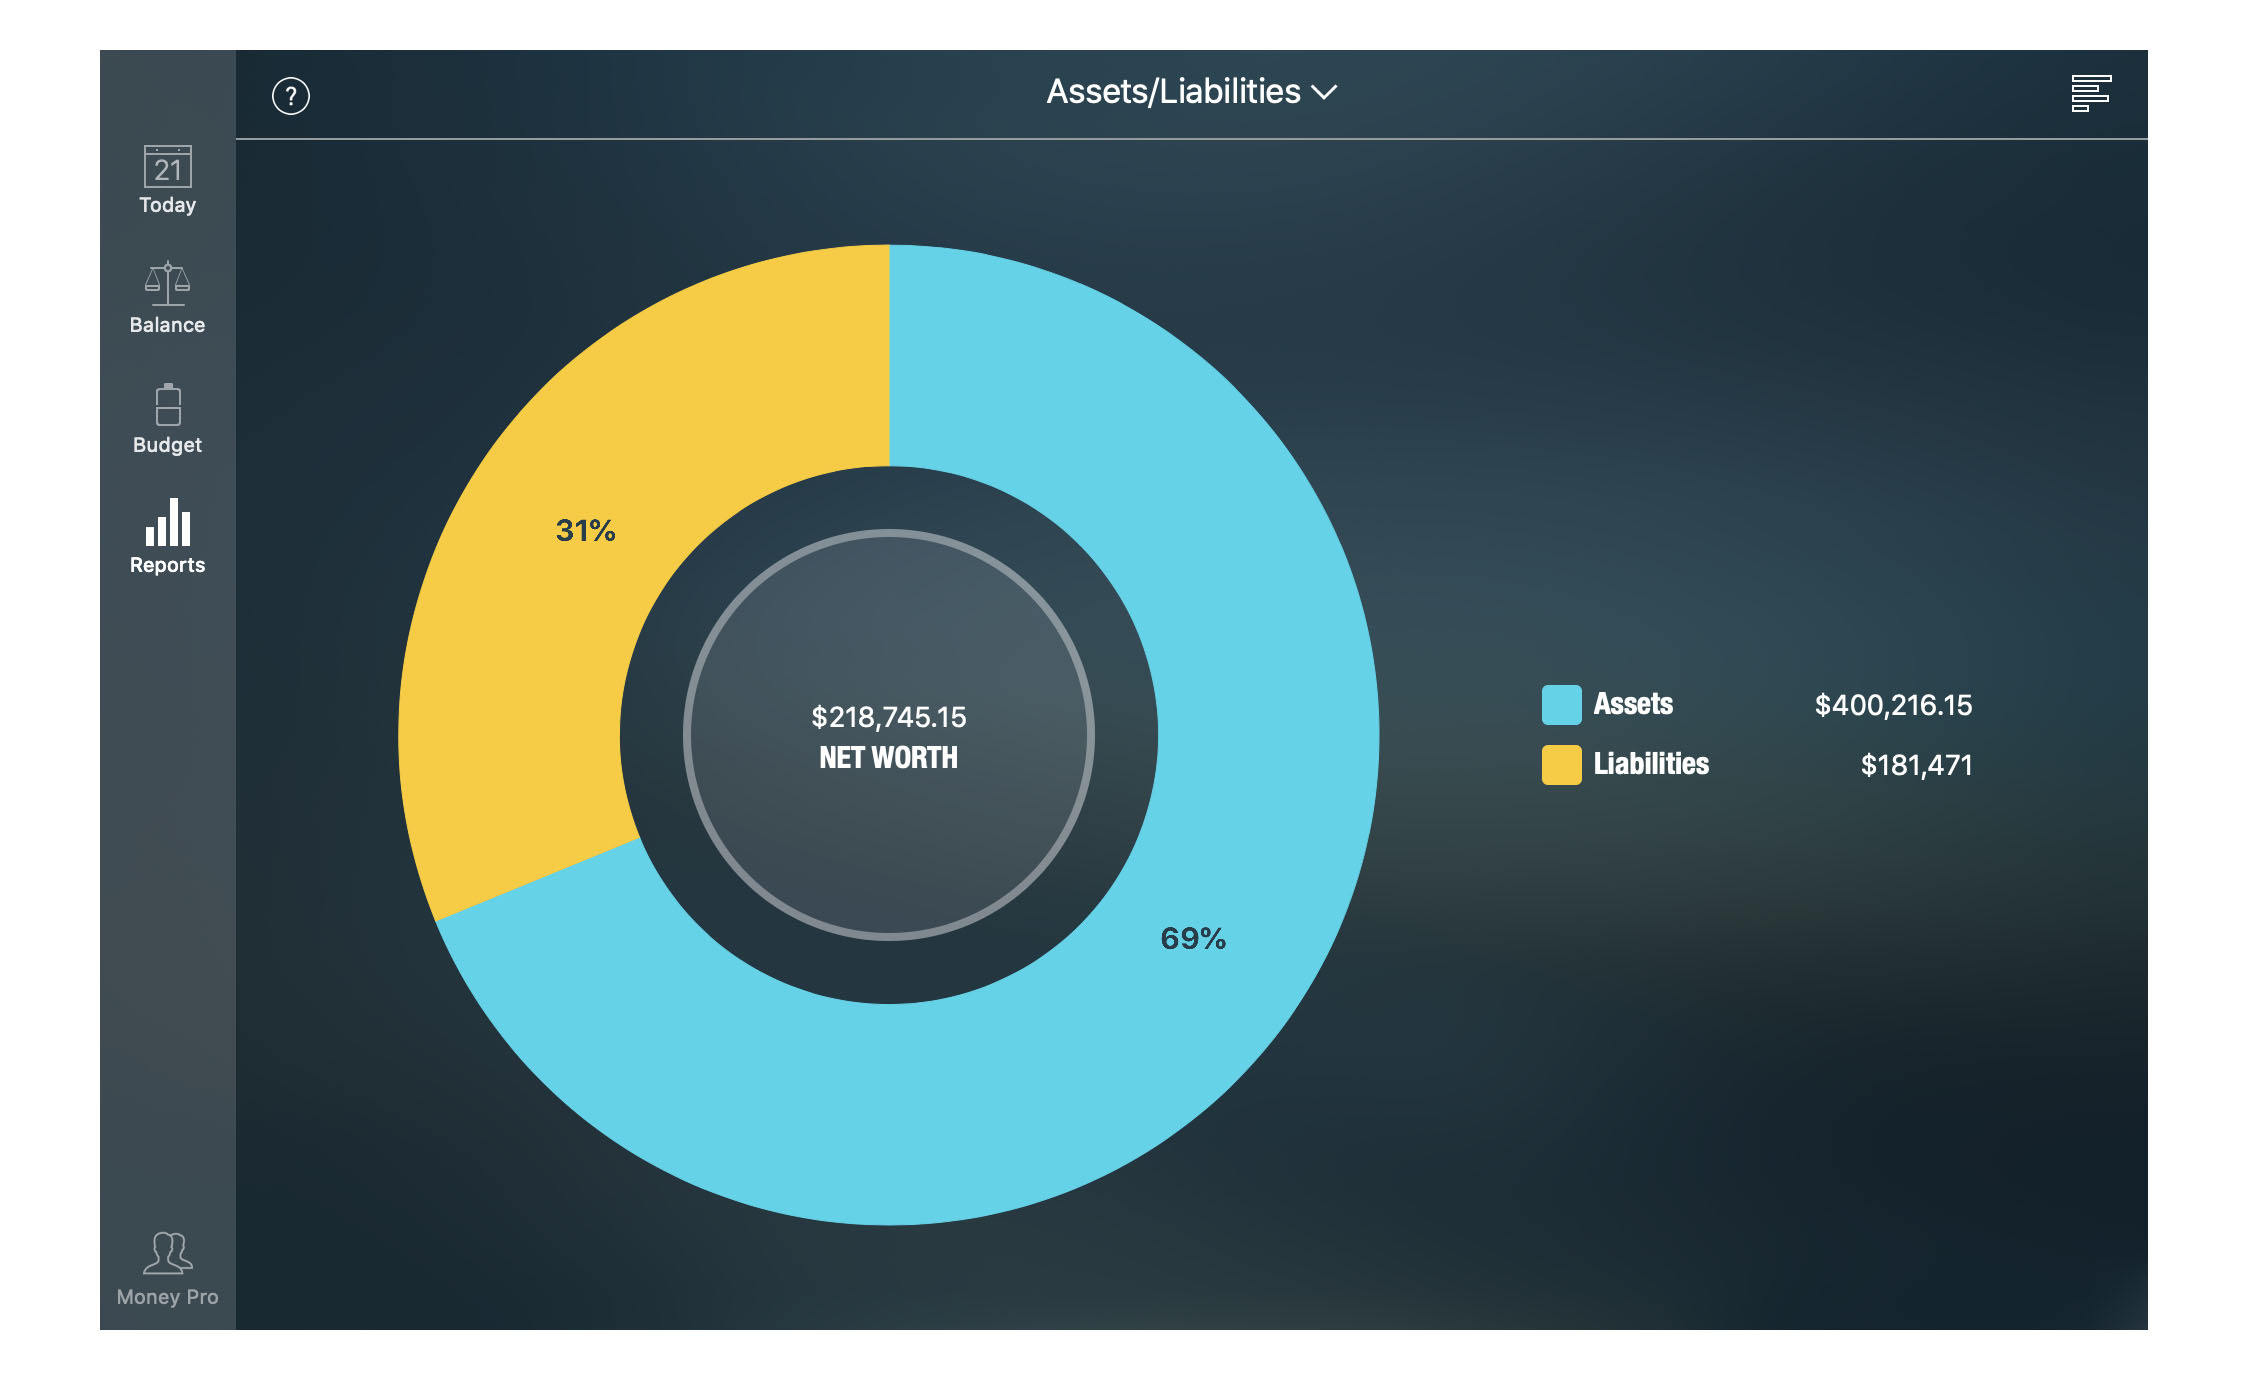
Assets/Liabilities report
This report shows the relation between your assets and liabilities. You can also view here the structure of your assets and liabilities. Choose “Assets” or “Liabilities”, then tap/click the pie chart button in the upper right corner.


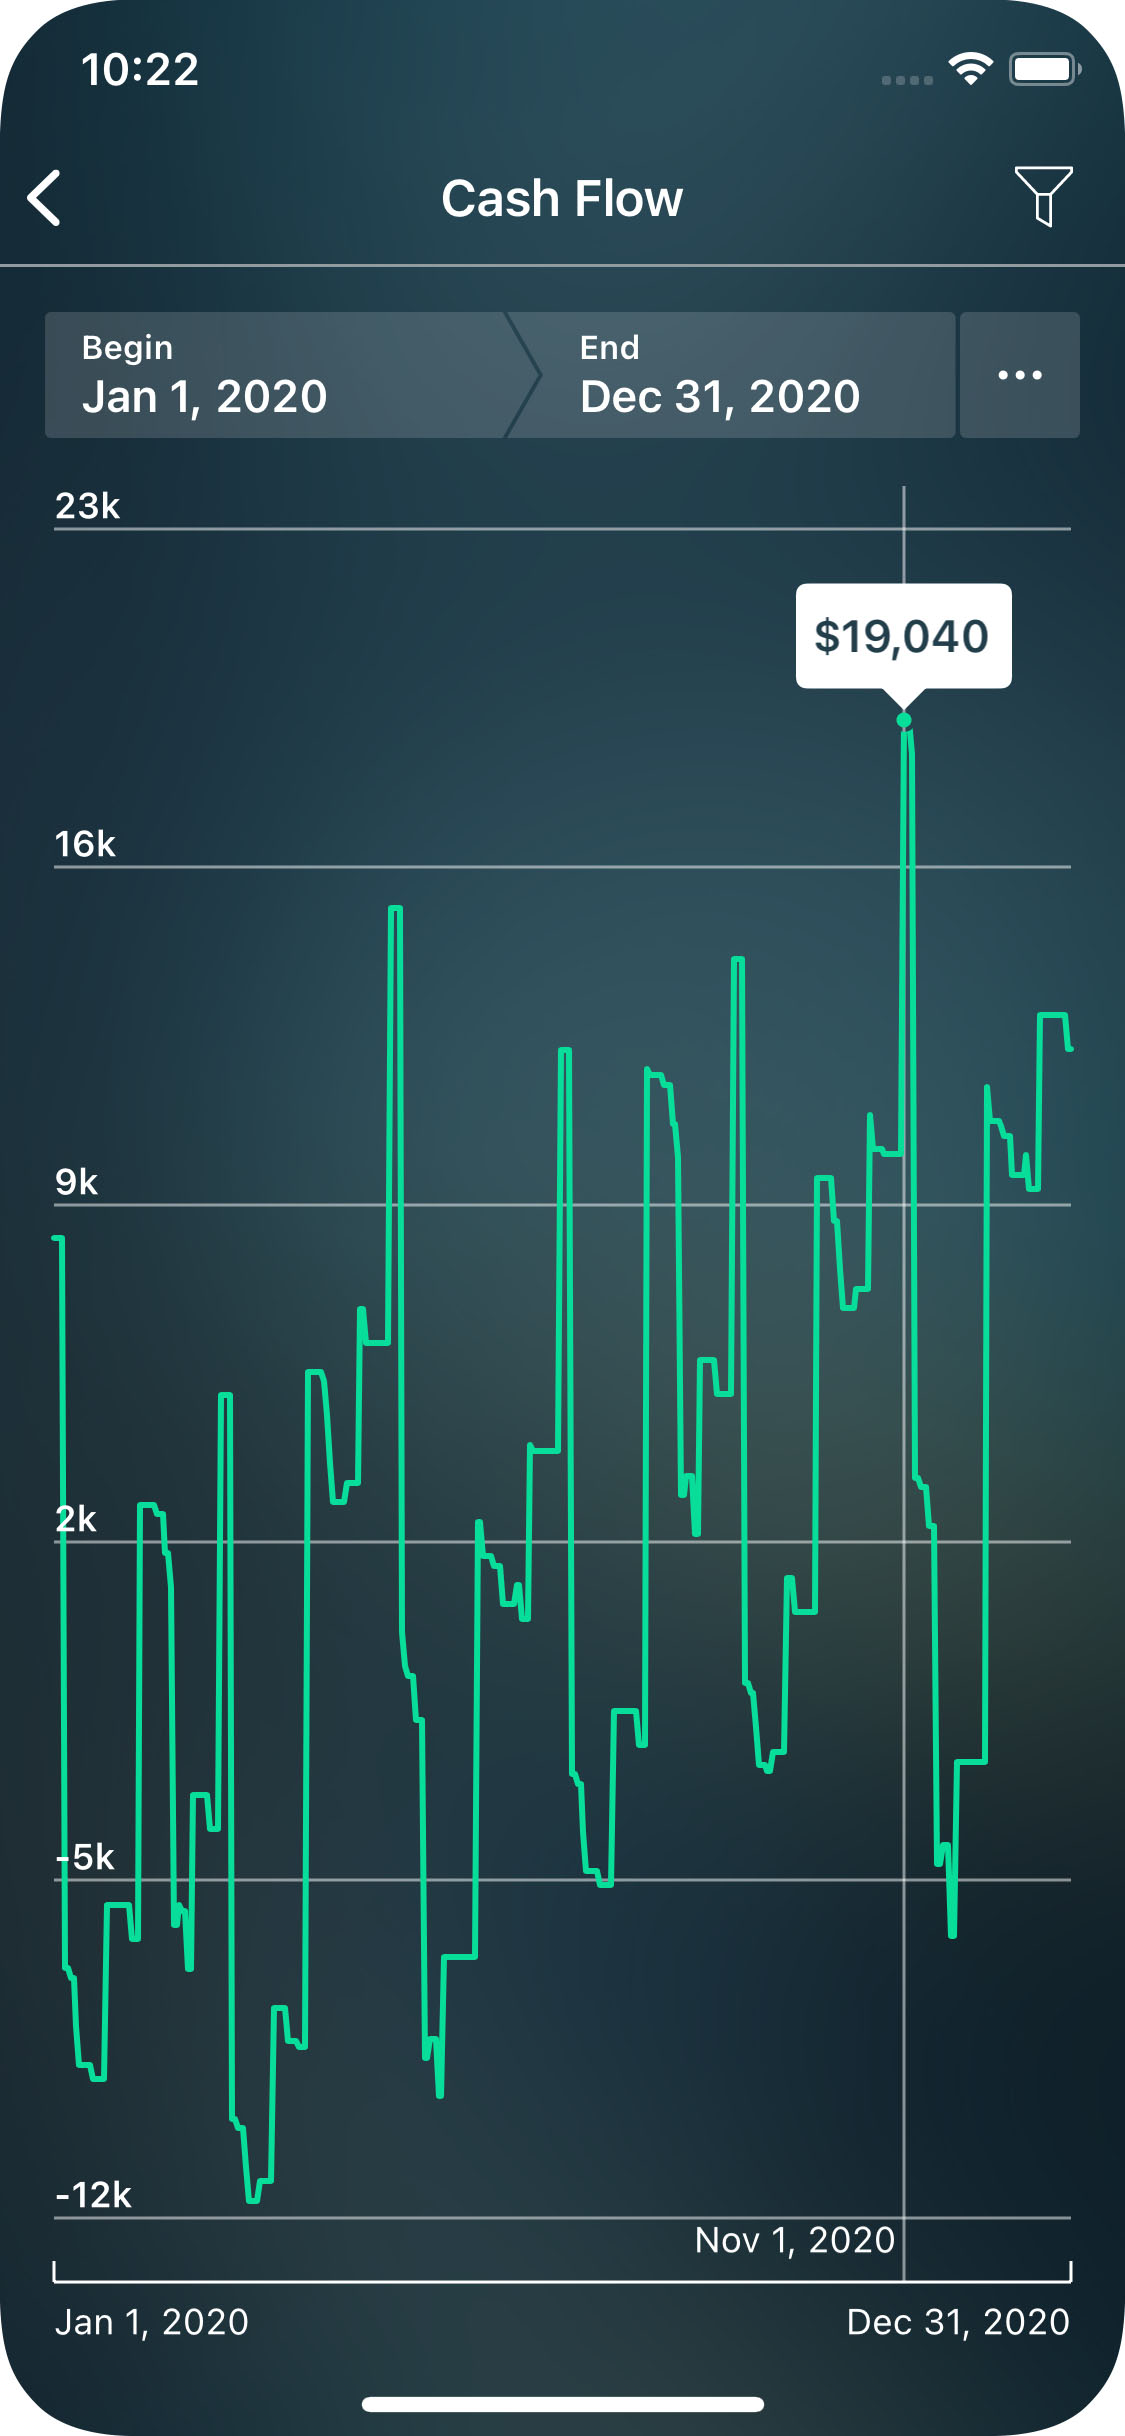
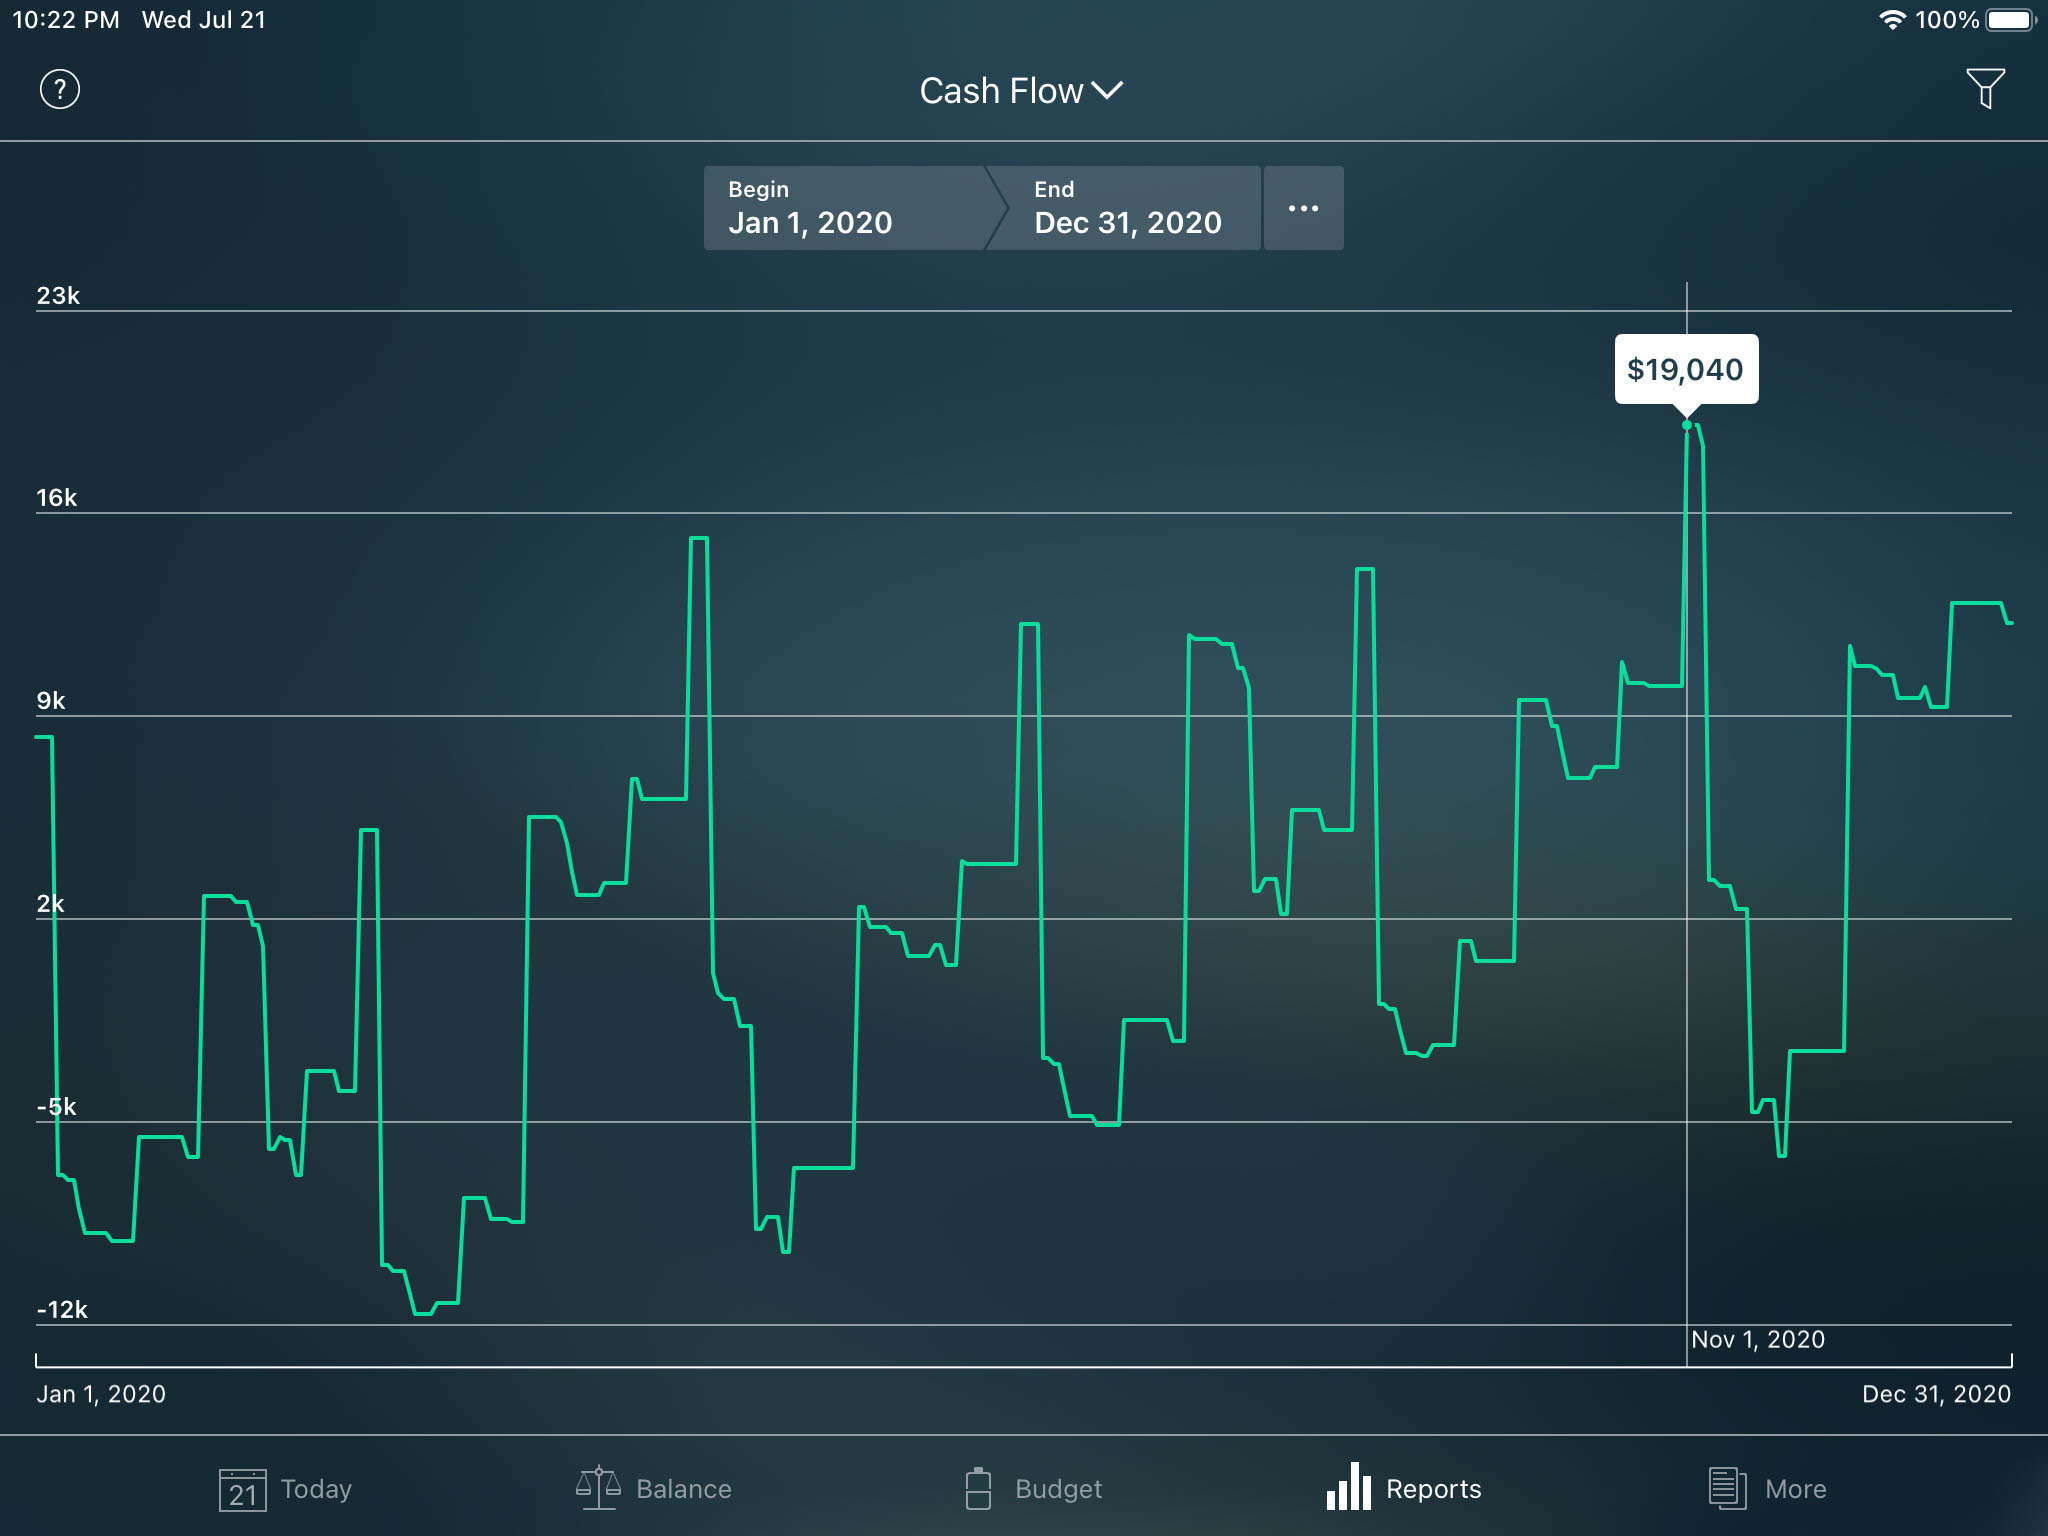
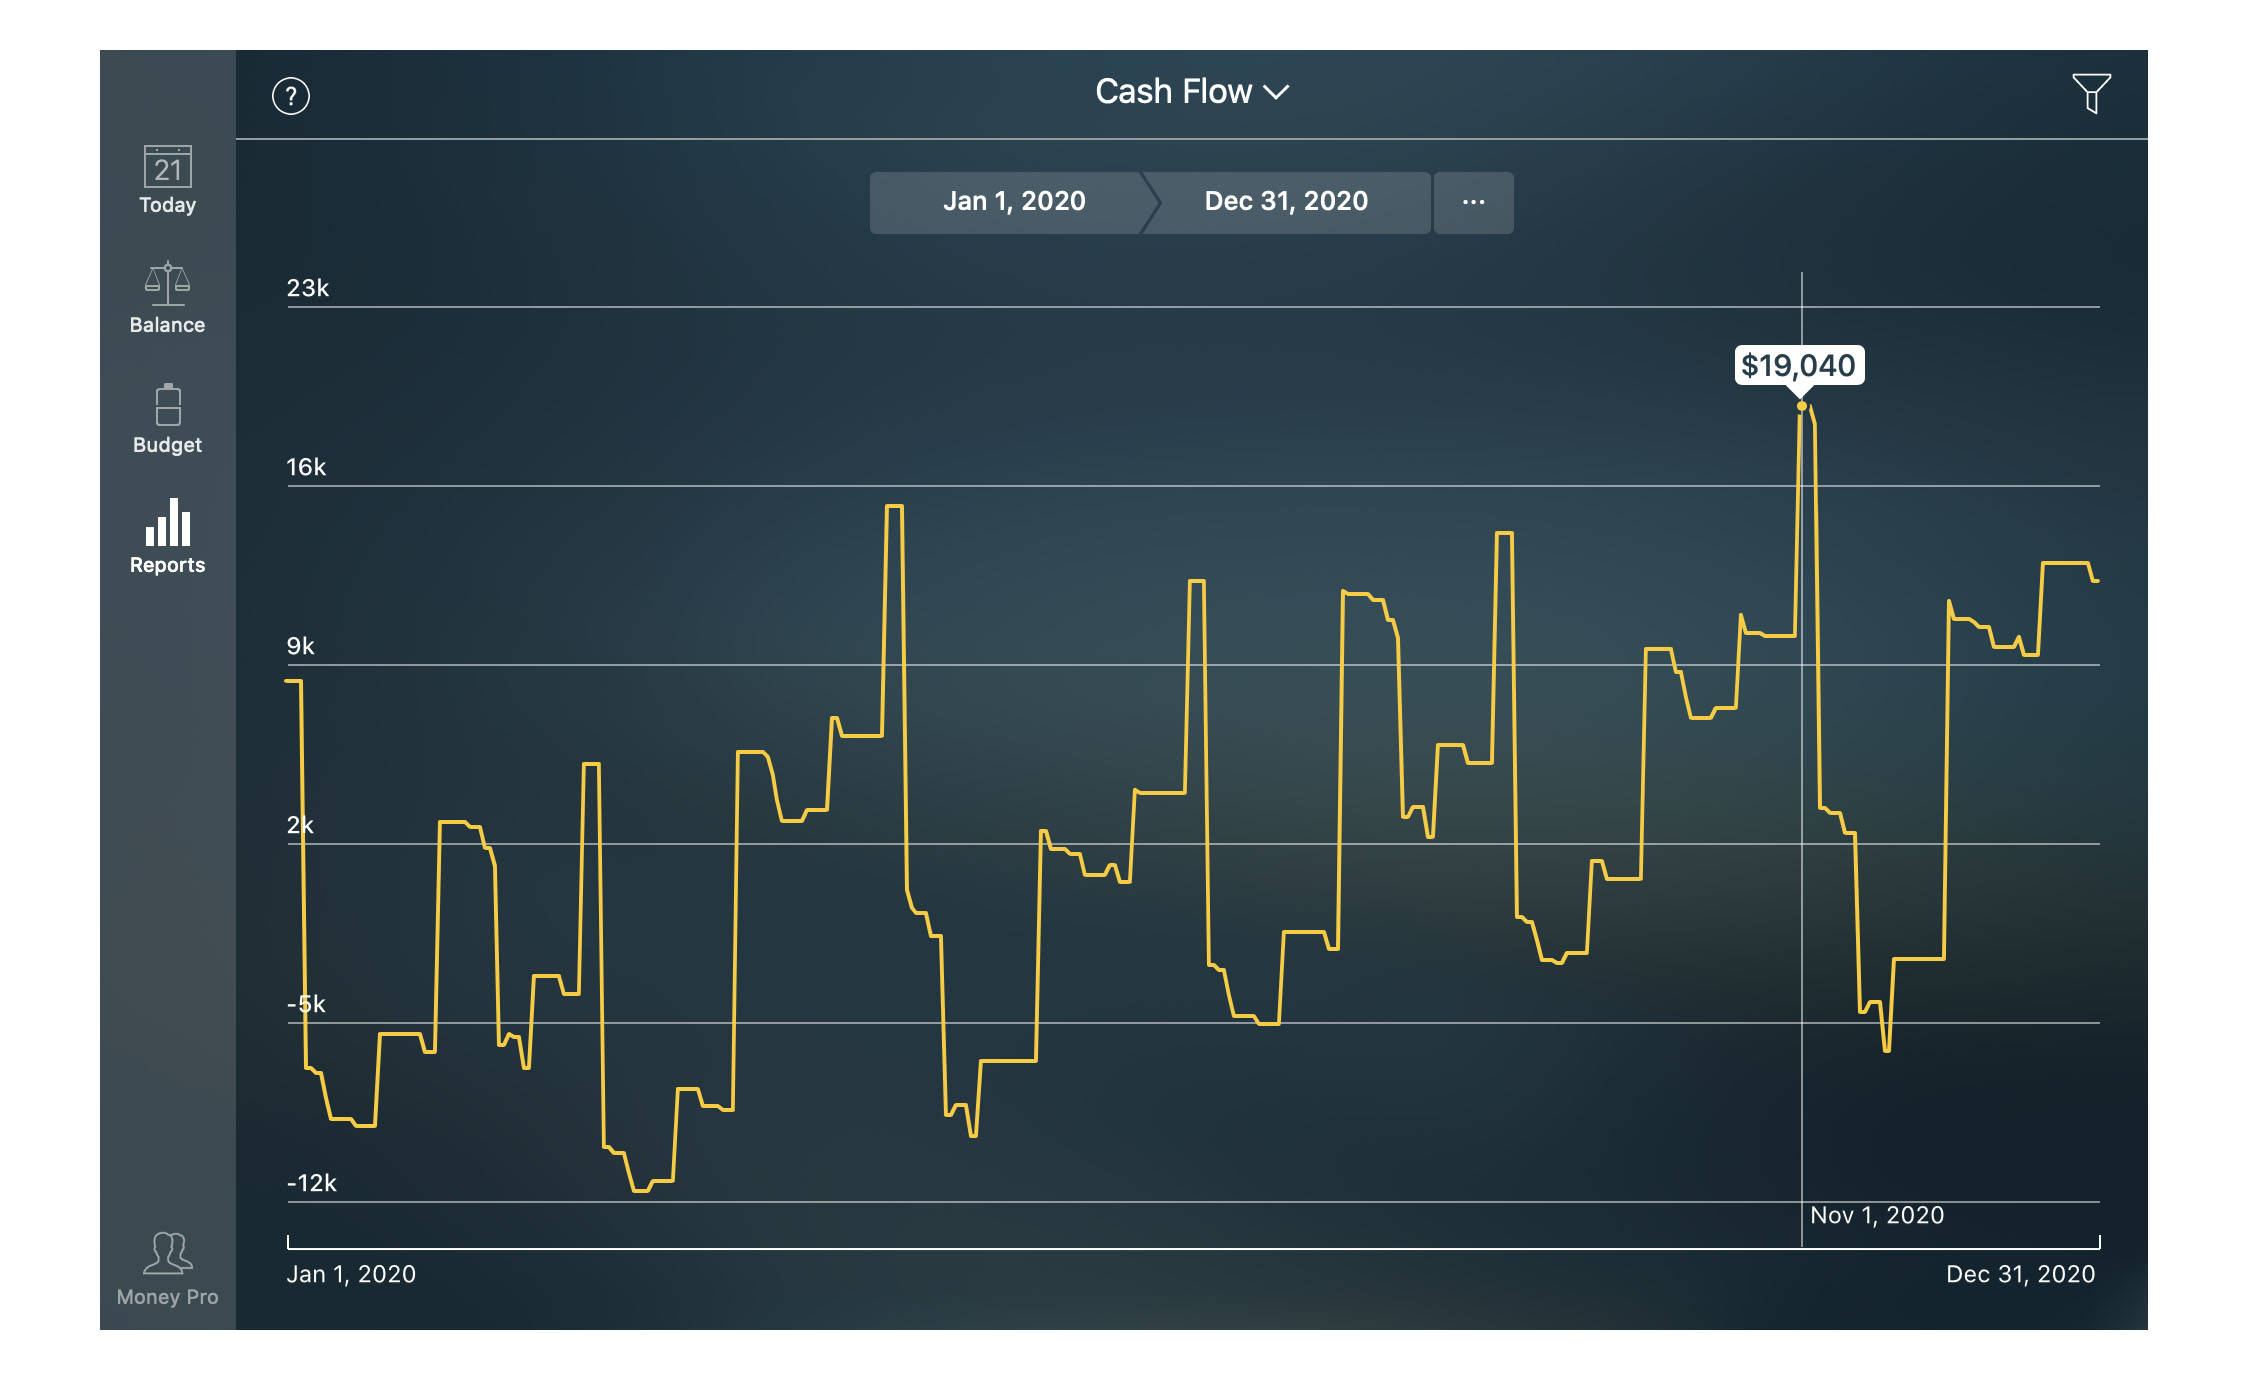
Cash flow report
The graph shows your cash flow for the selected period. It explains when and how much cash you accumulated (or spent) over time. If the graph goes up, you earn more than you spend. The rising graph means increasing your wealth. If it goes down during certain periods, it means your expenditure was higher than your earnings during those periods.
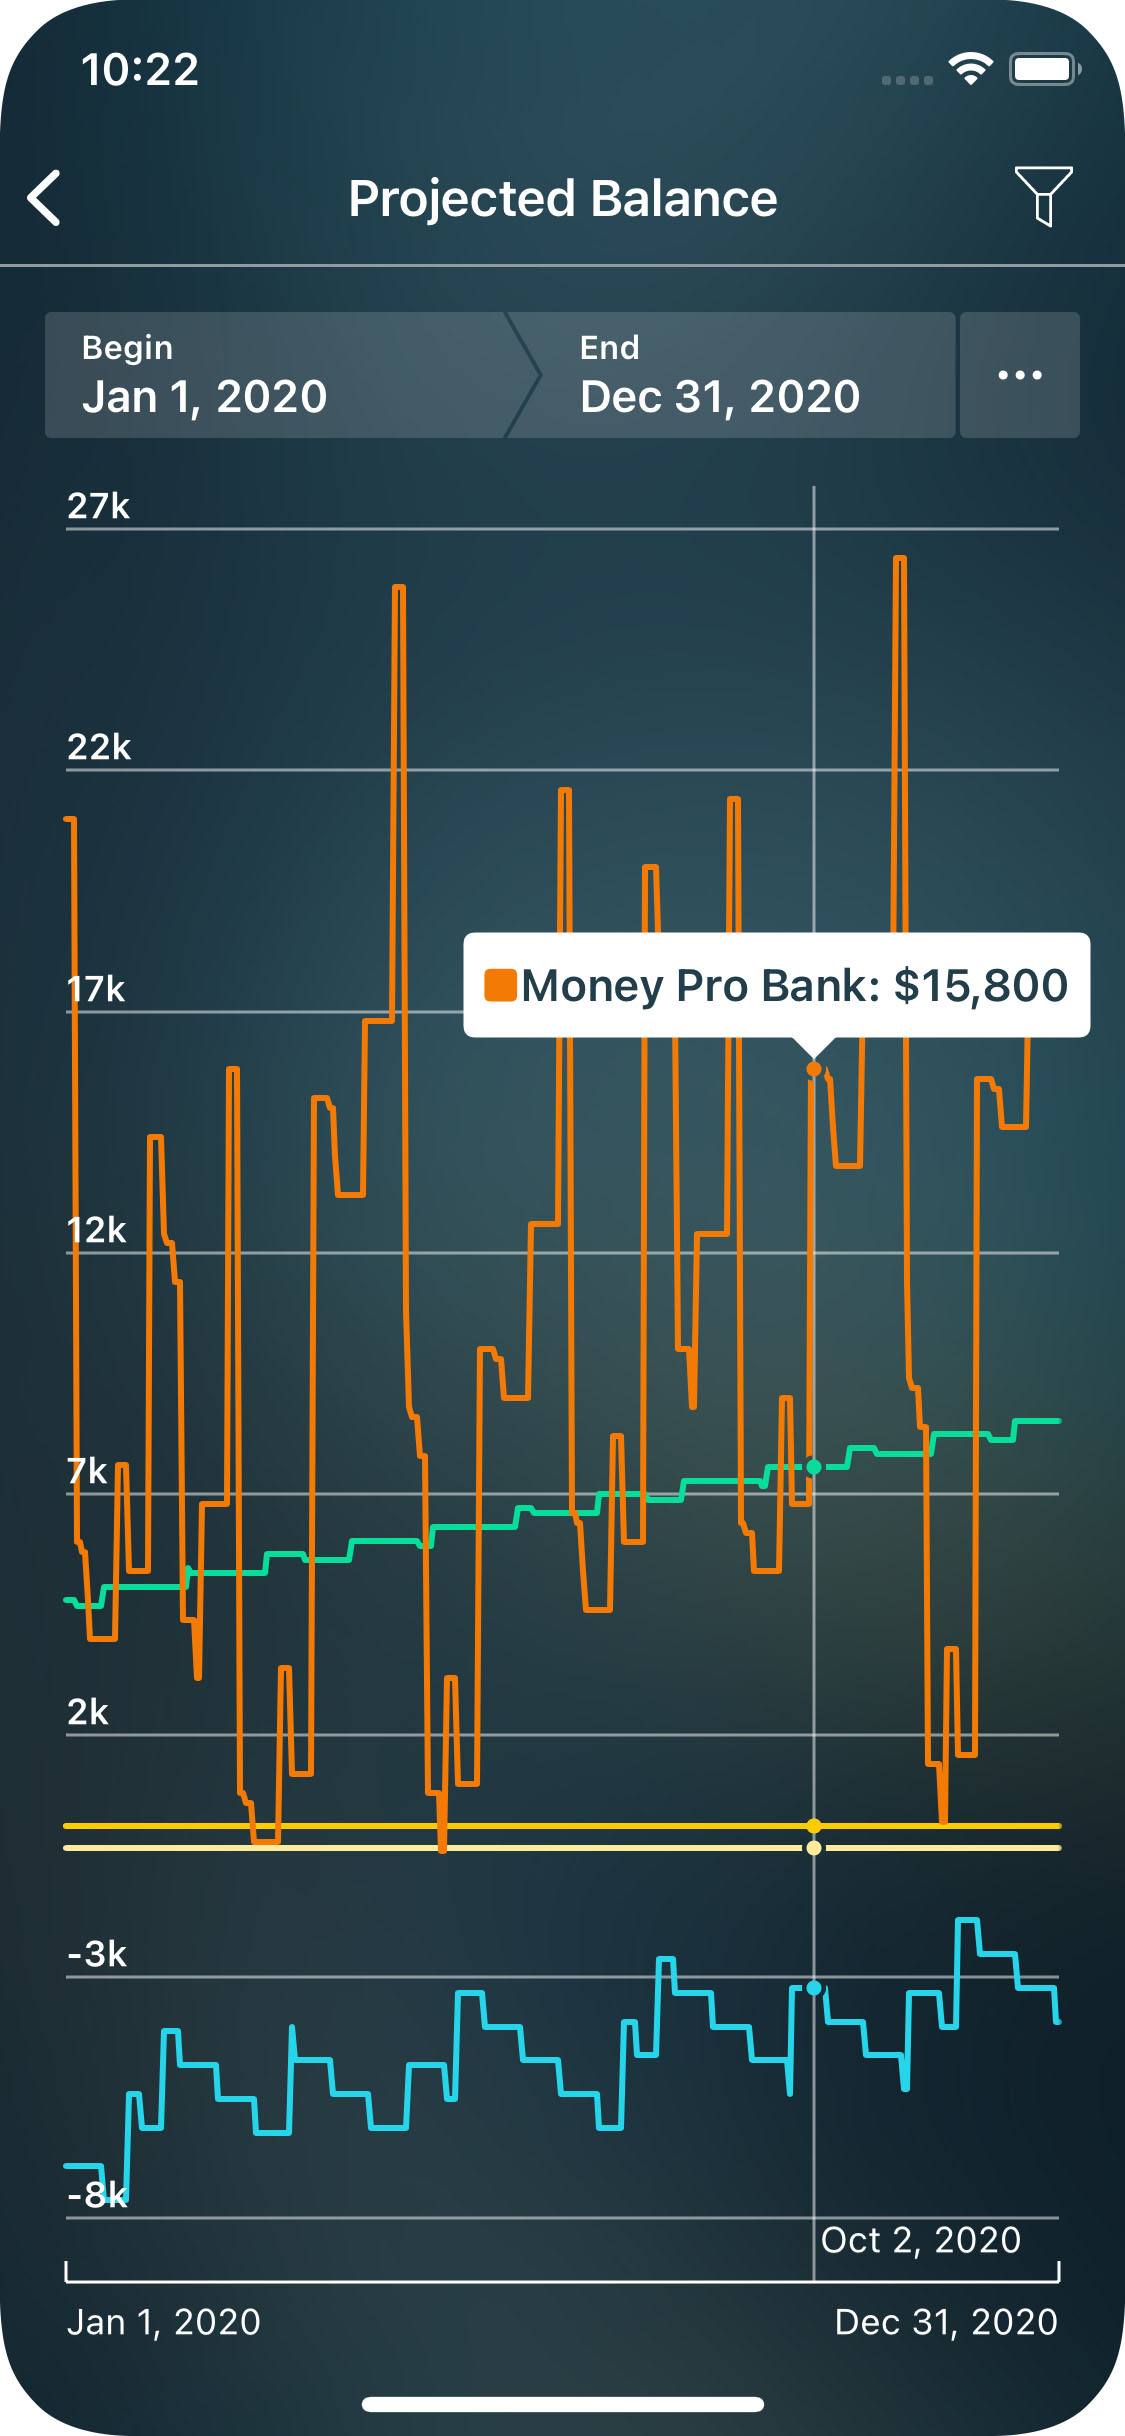
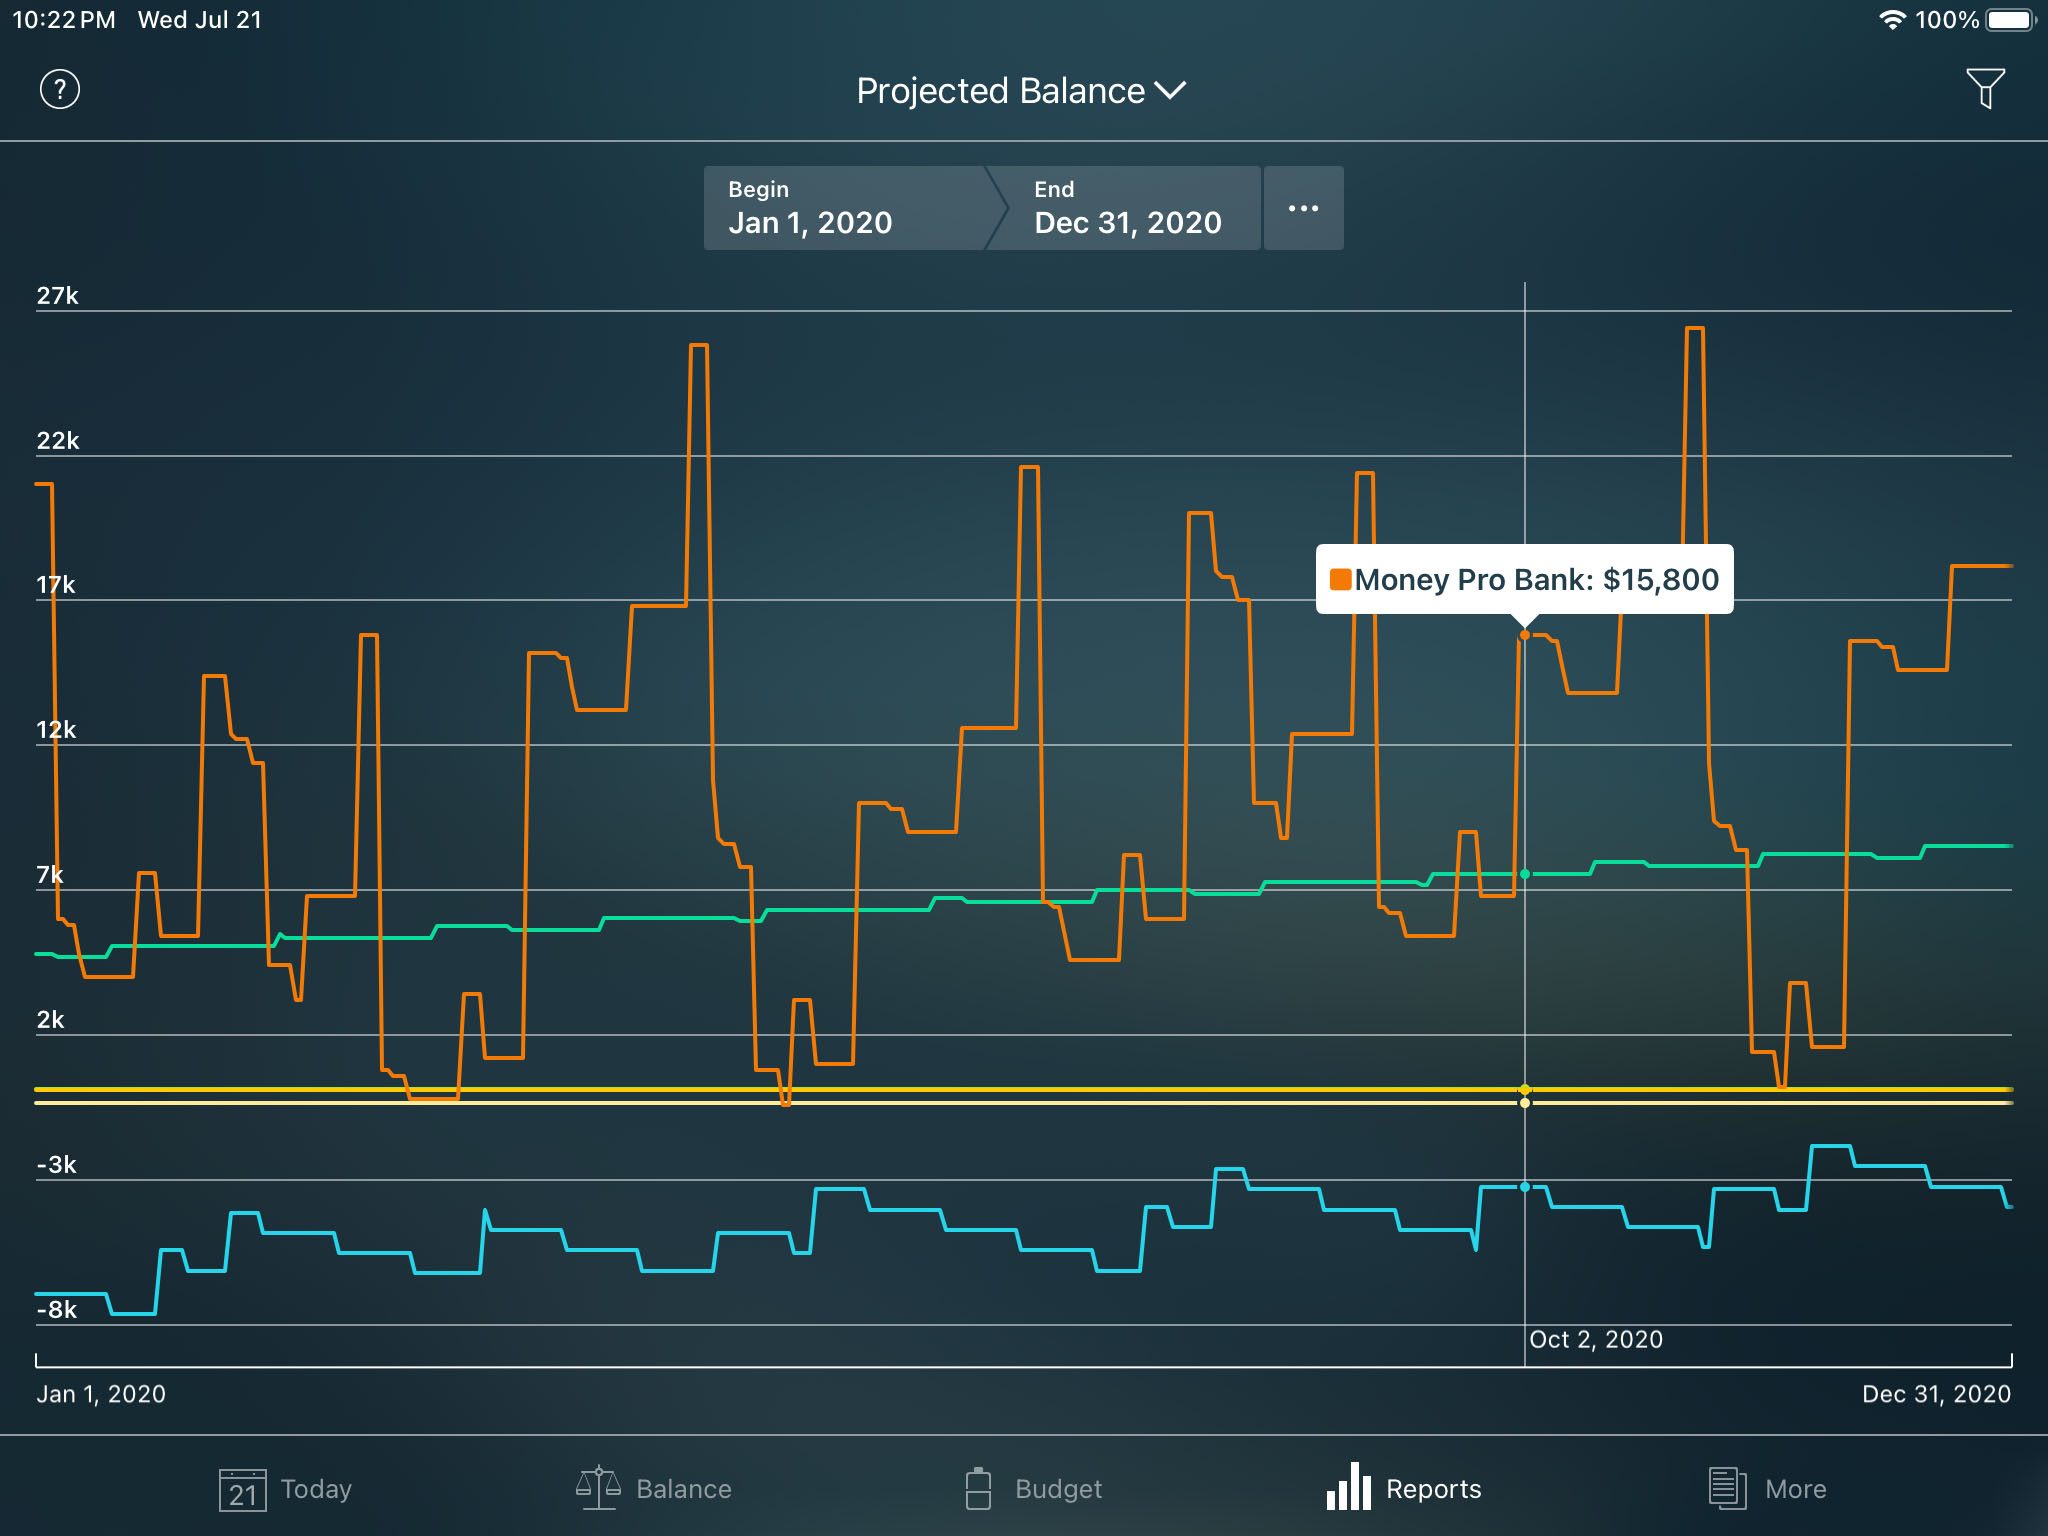
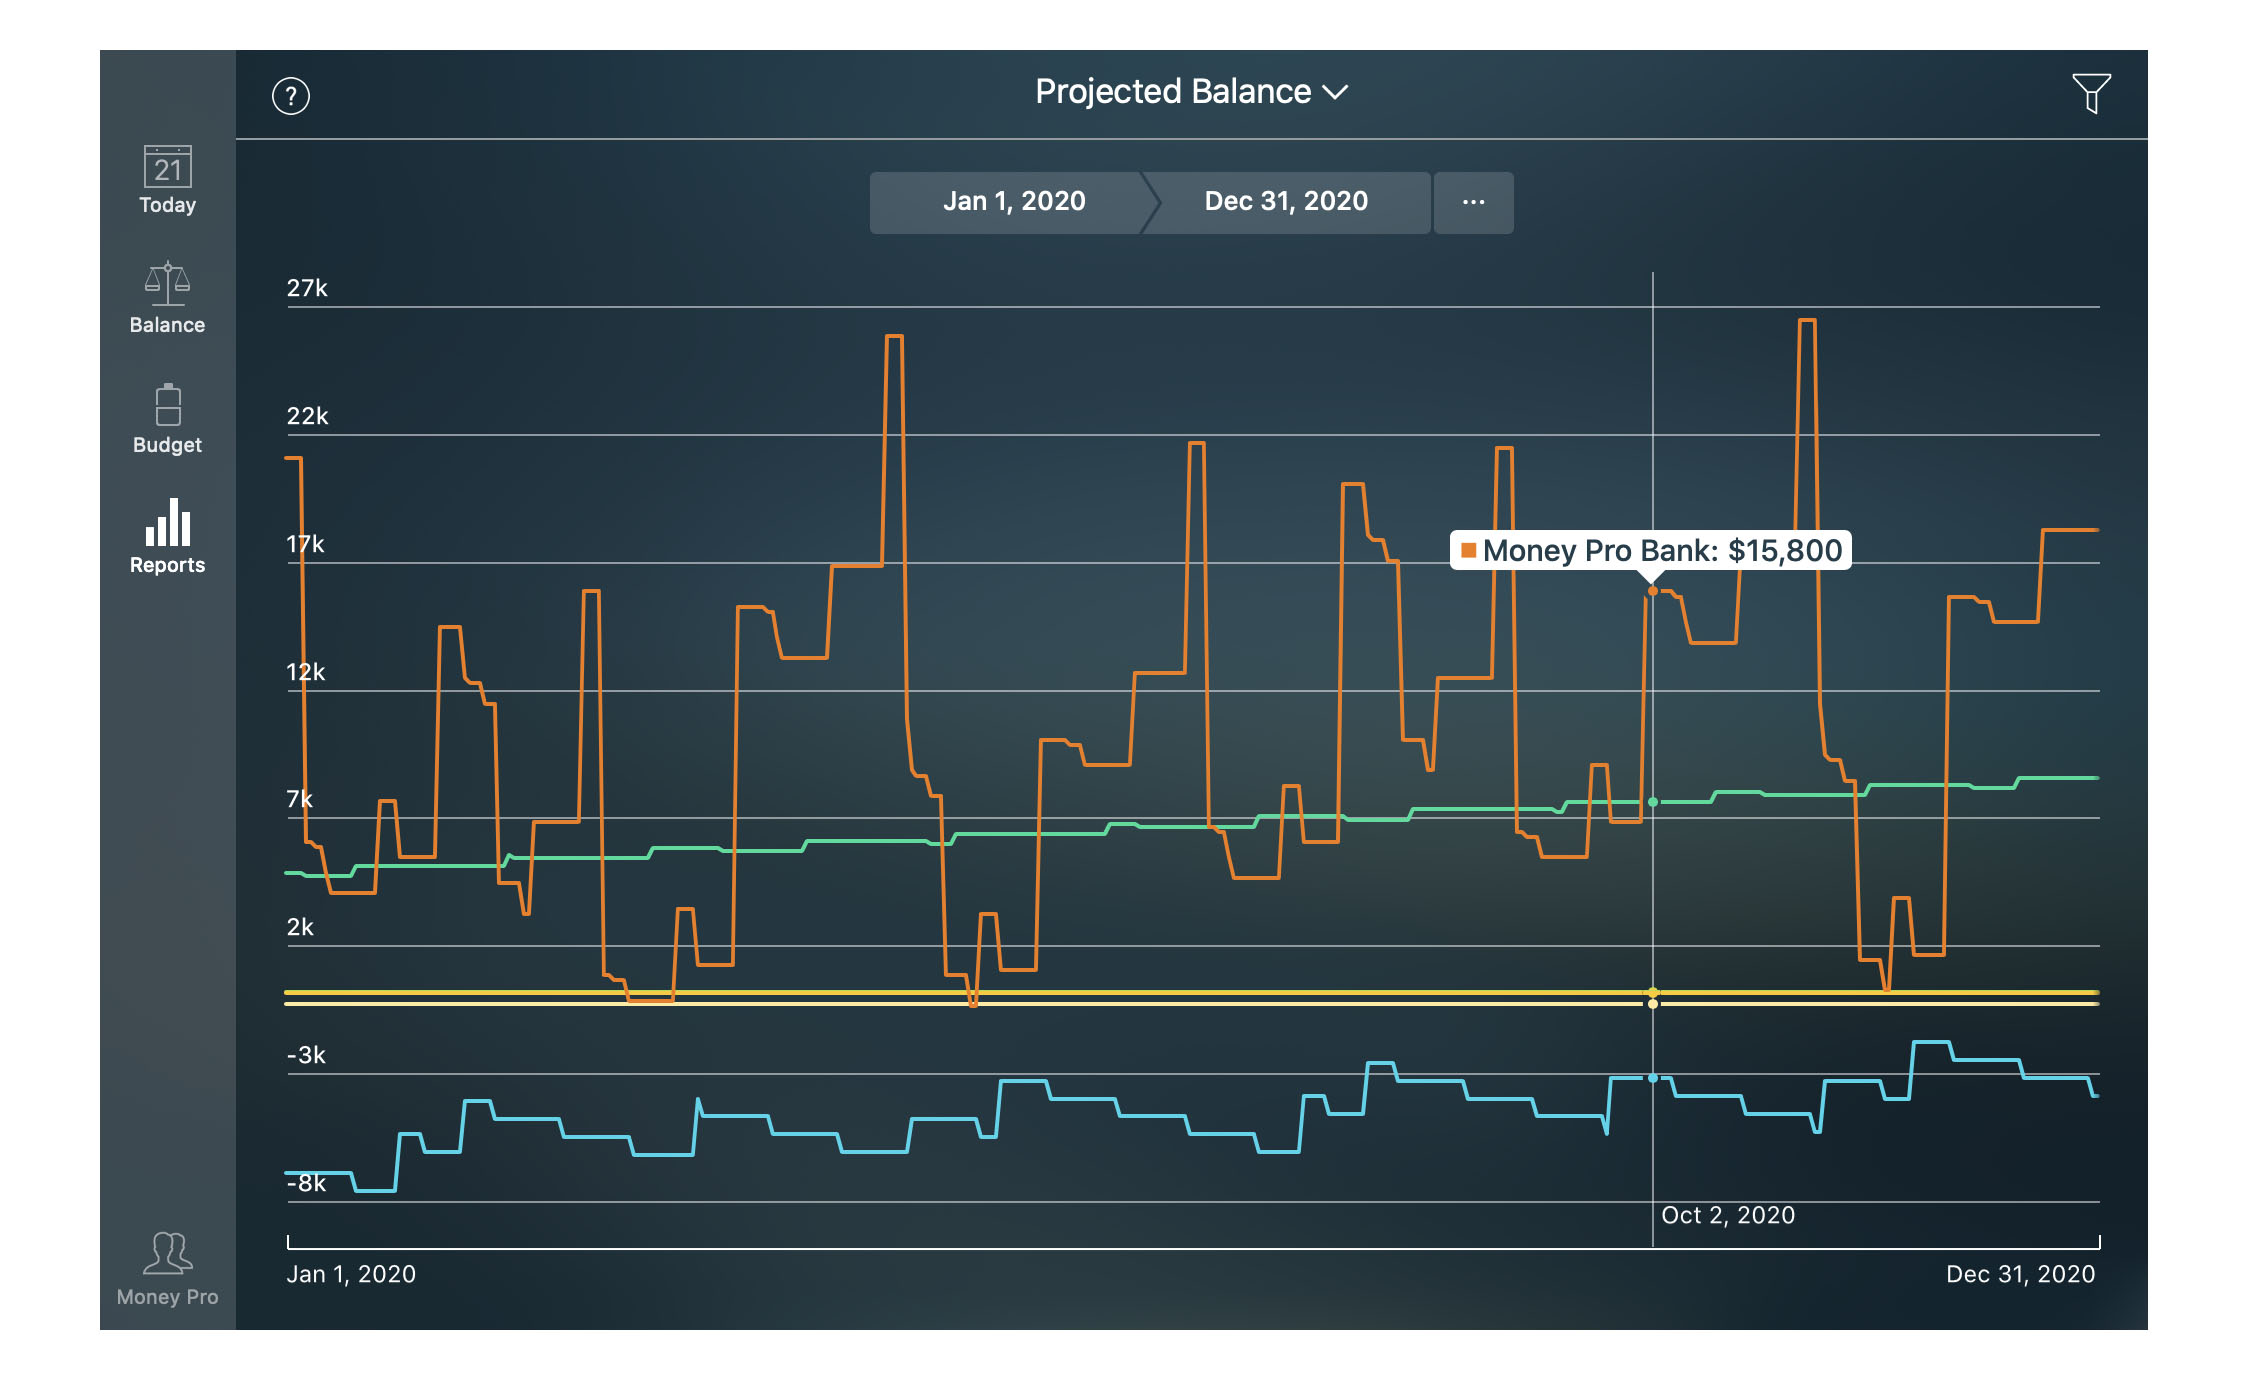
Projected balance report
The report shows historical balances and projected balances for each of your accounts. It takes into consideration your planned transactions scheduled for future periods. If there are no future transactions planned, there will be straight lines for each of your accounts after today’s date.
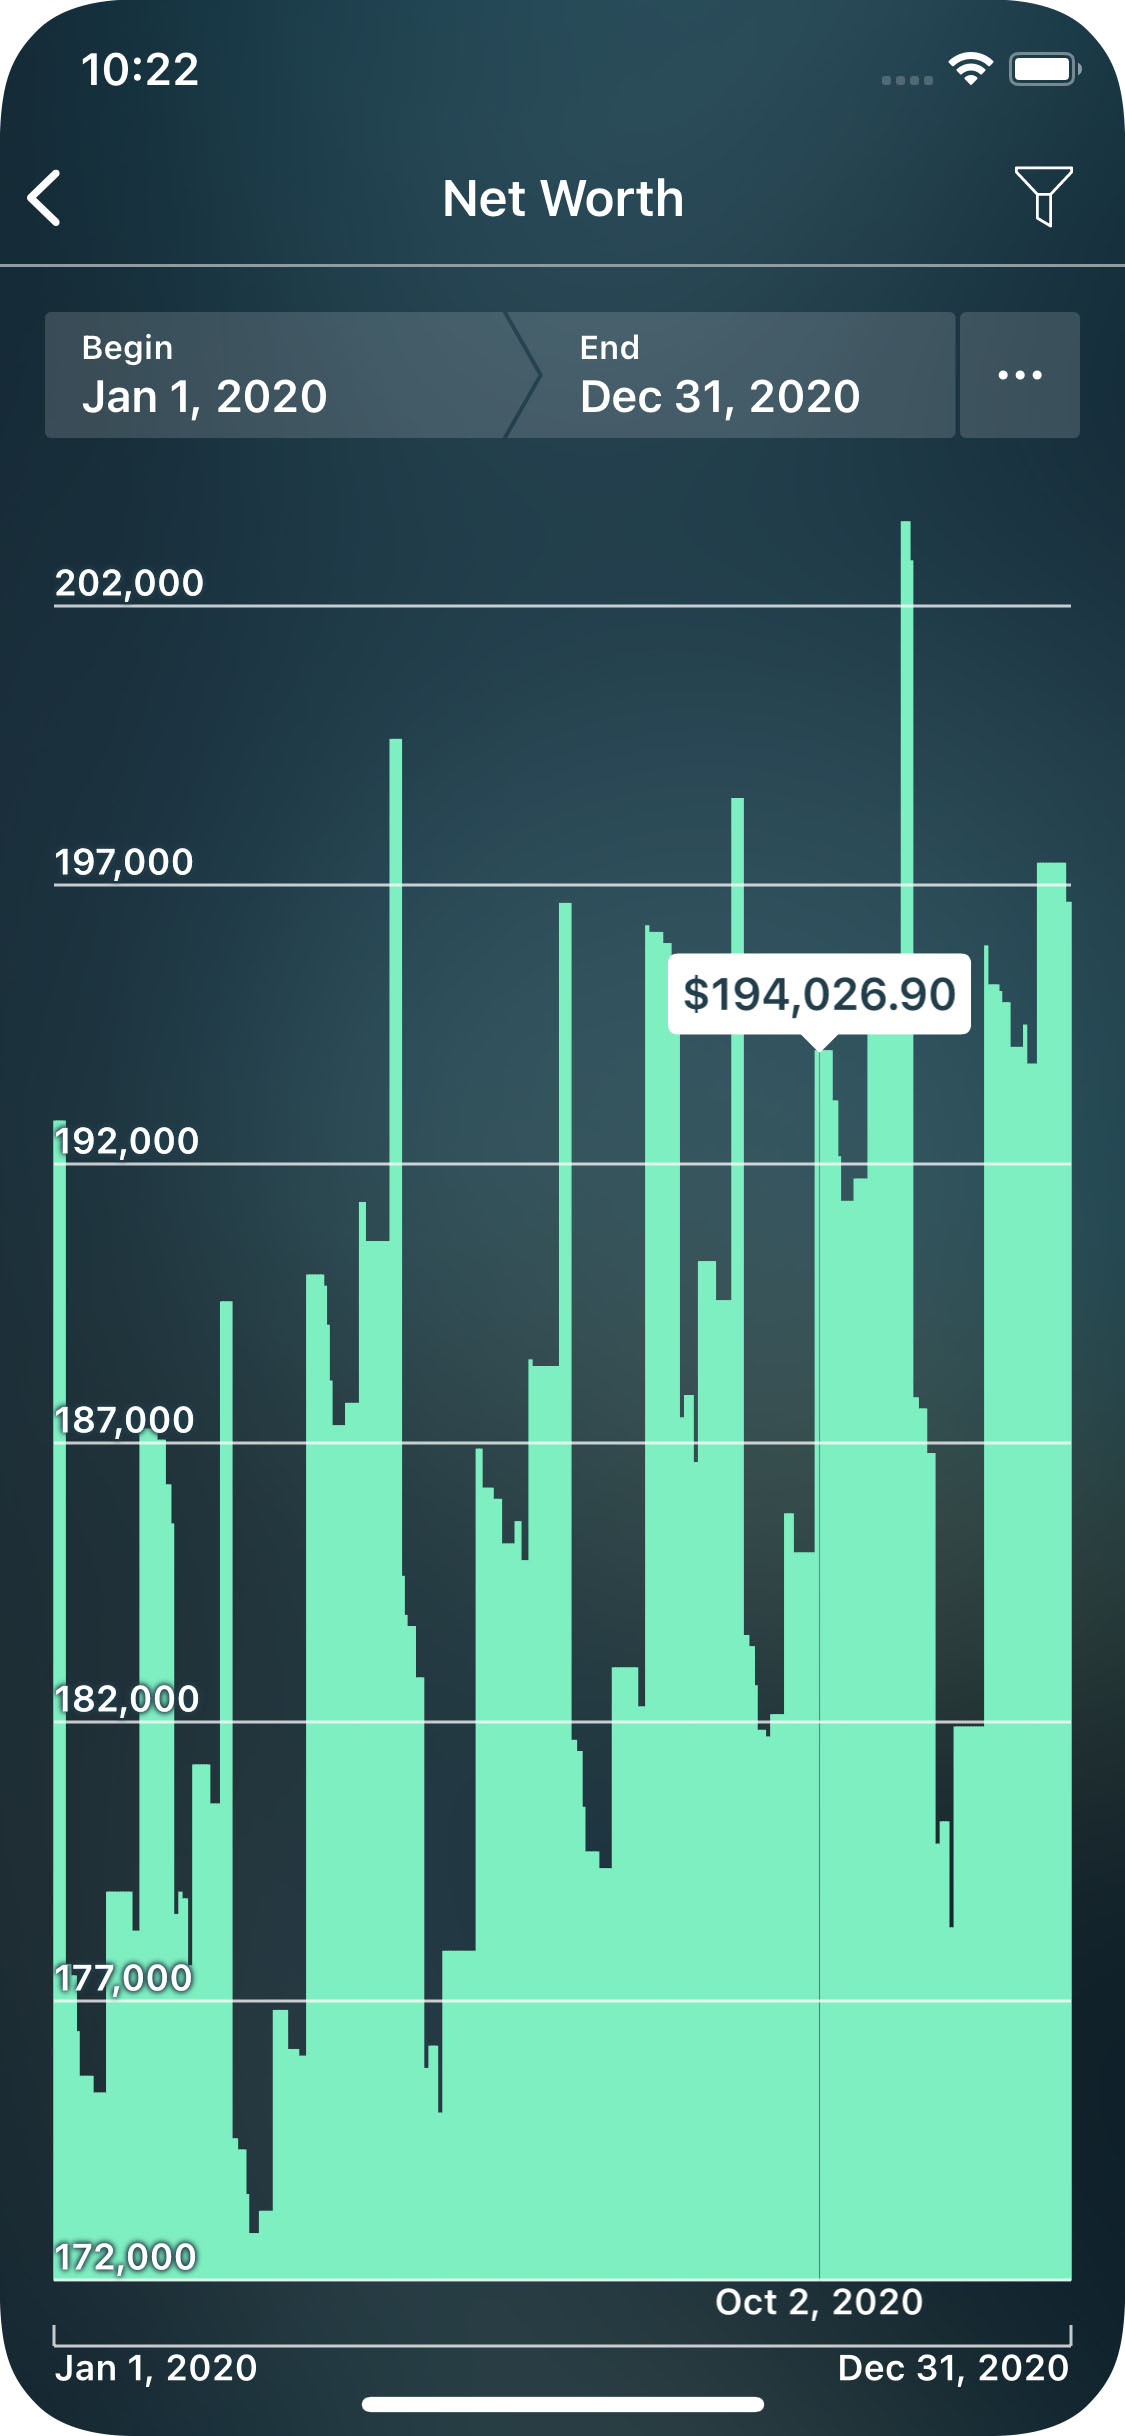
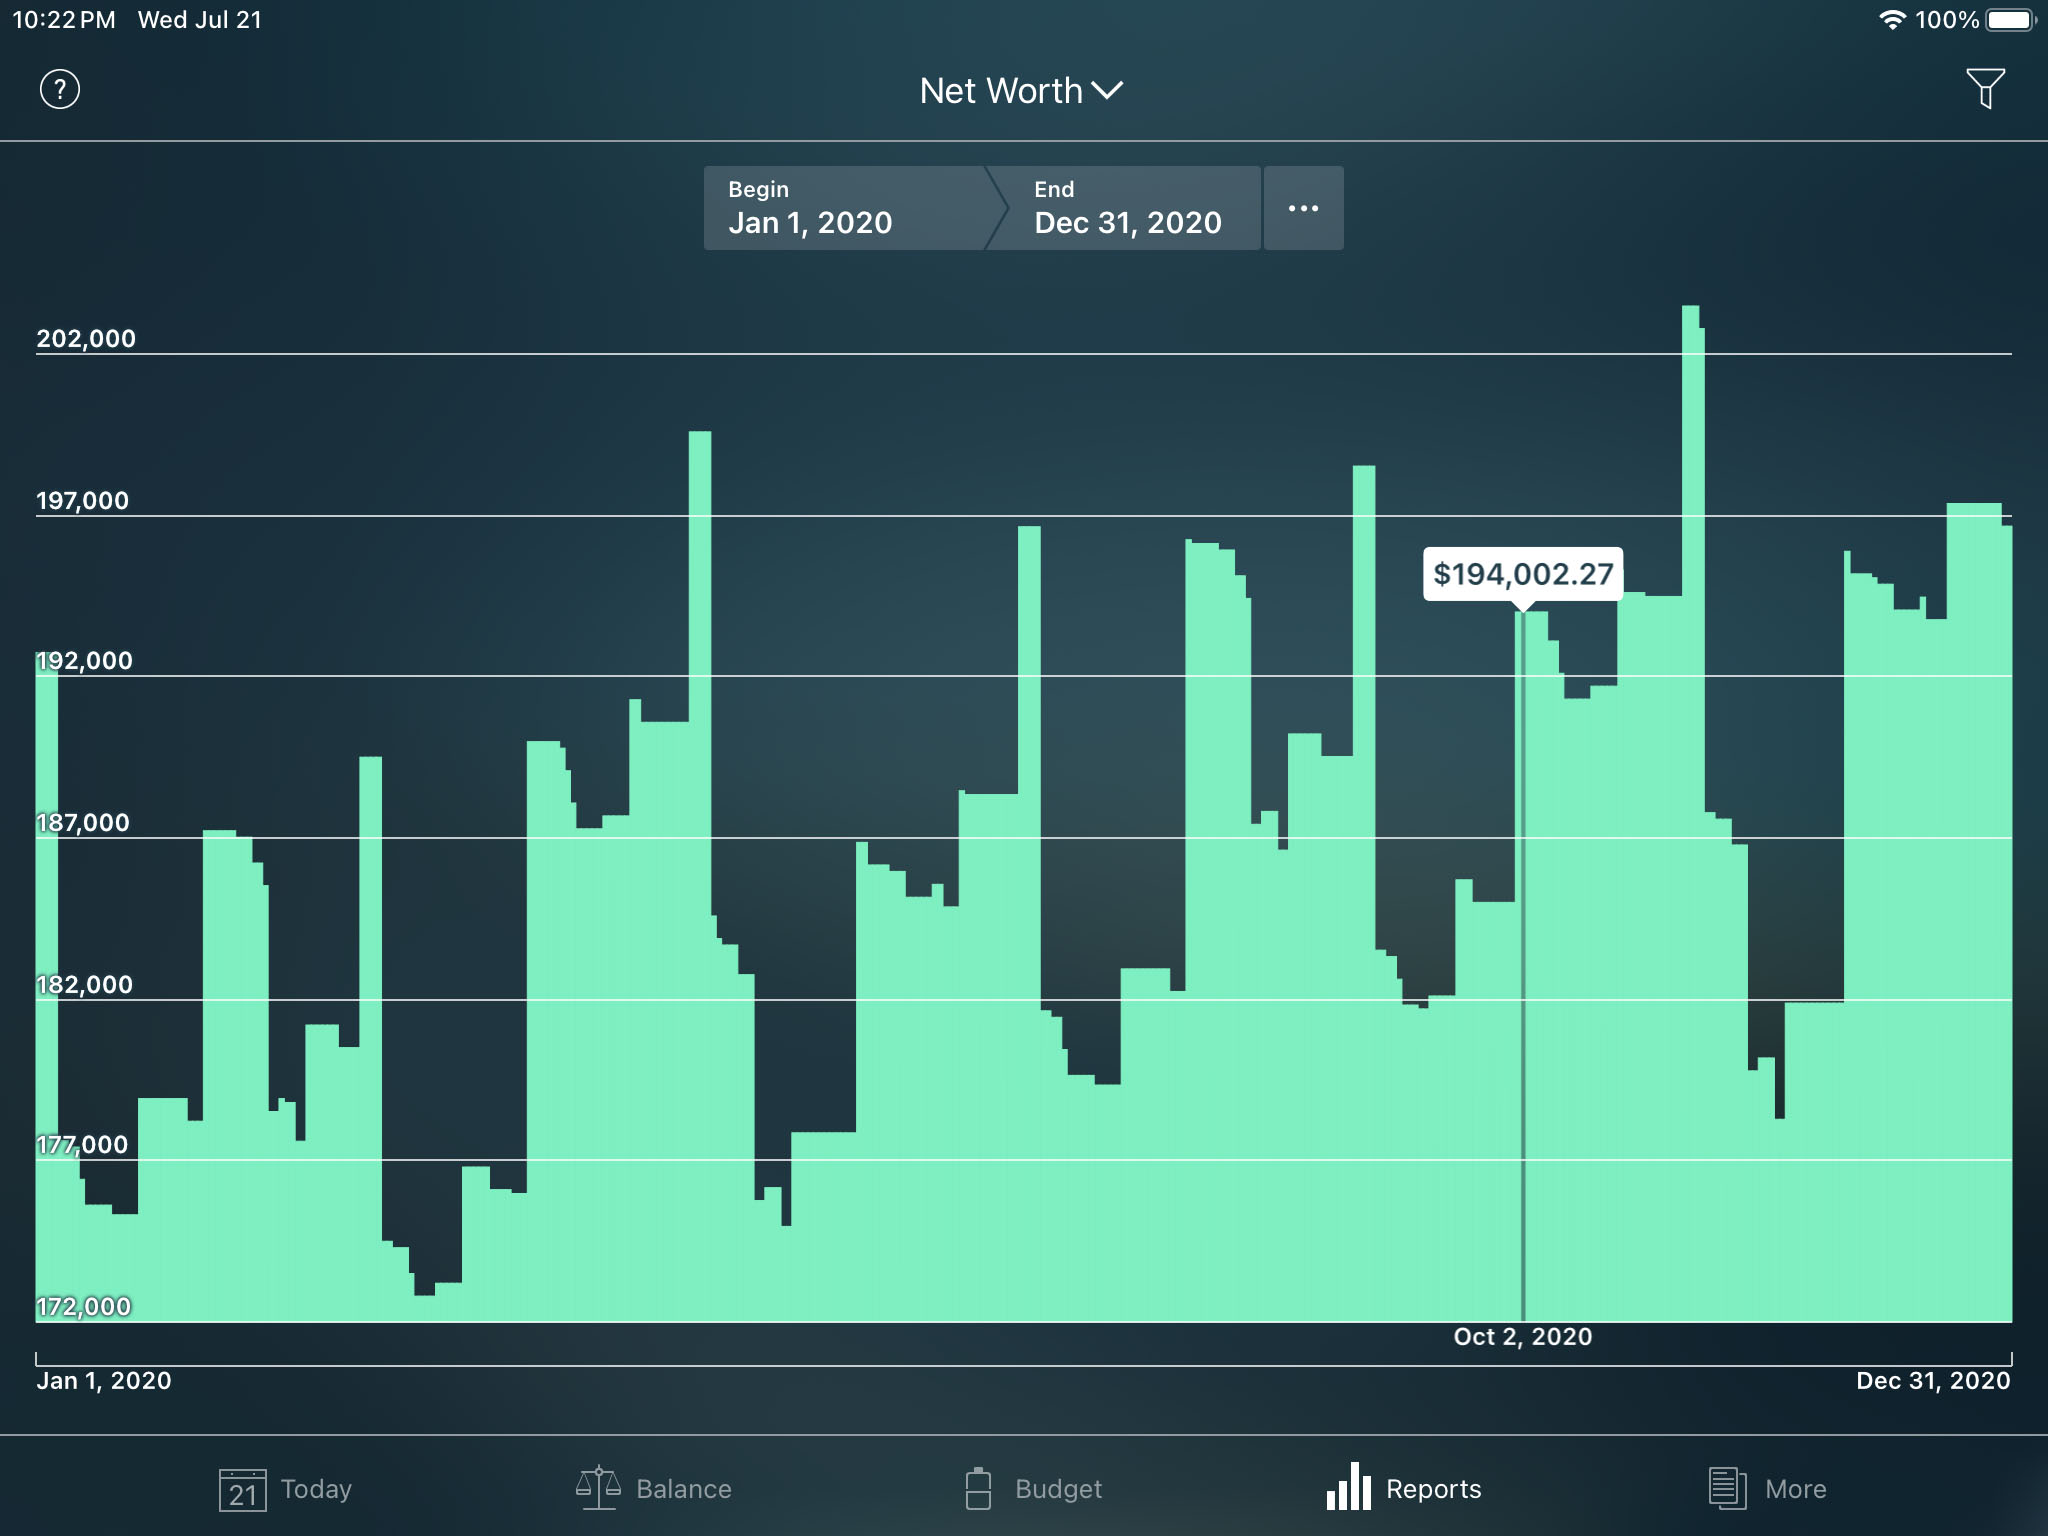
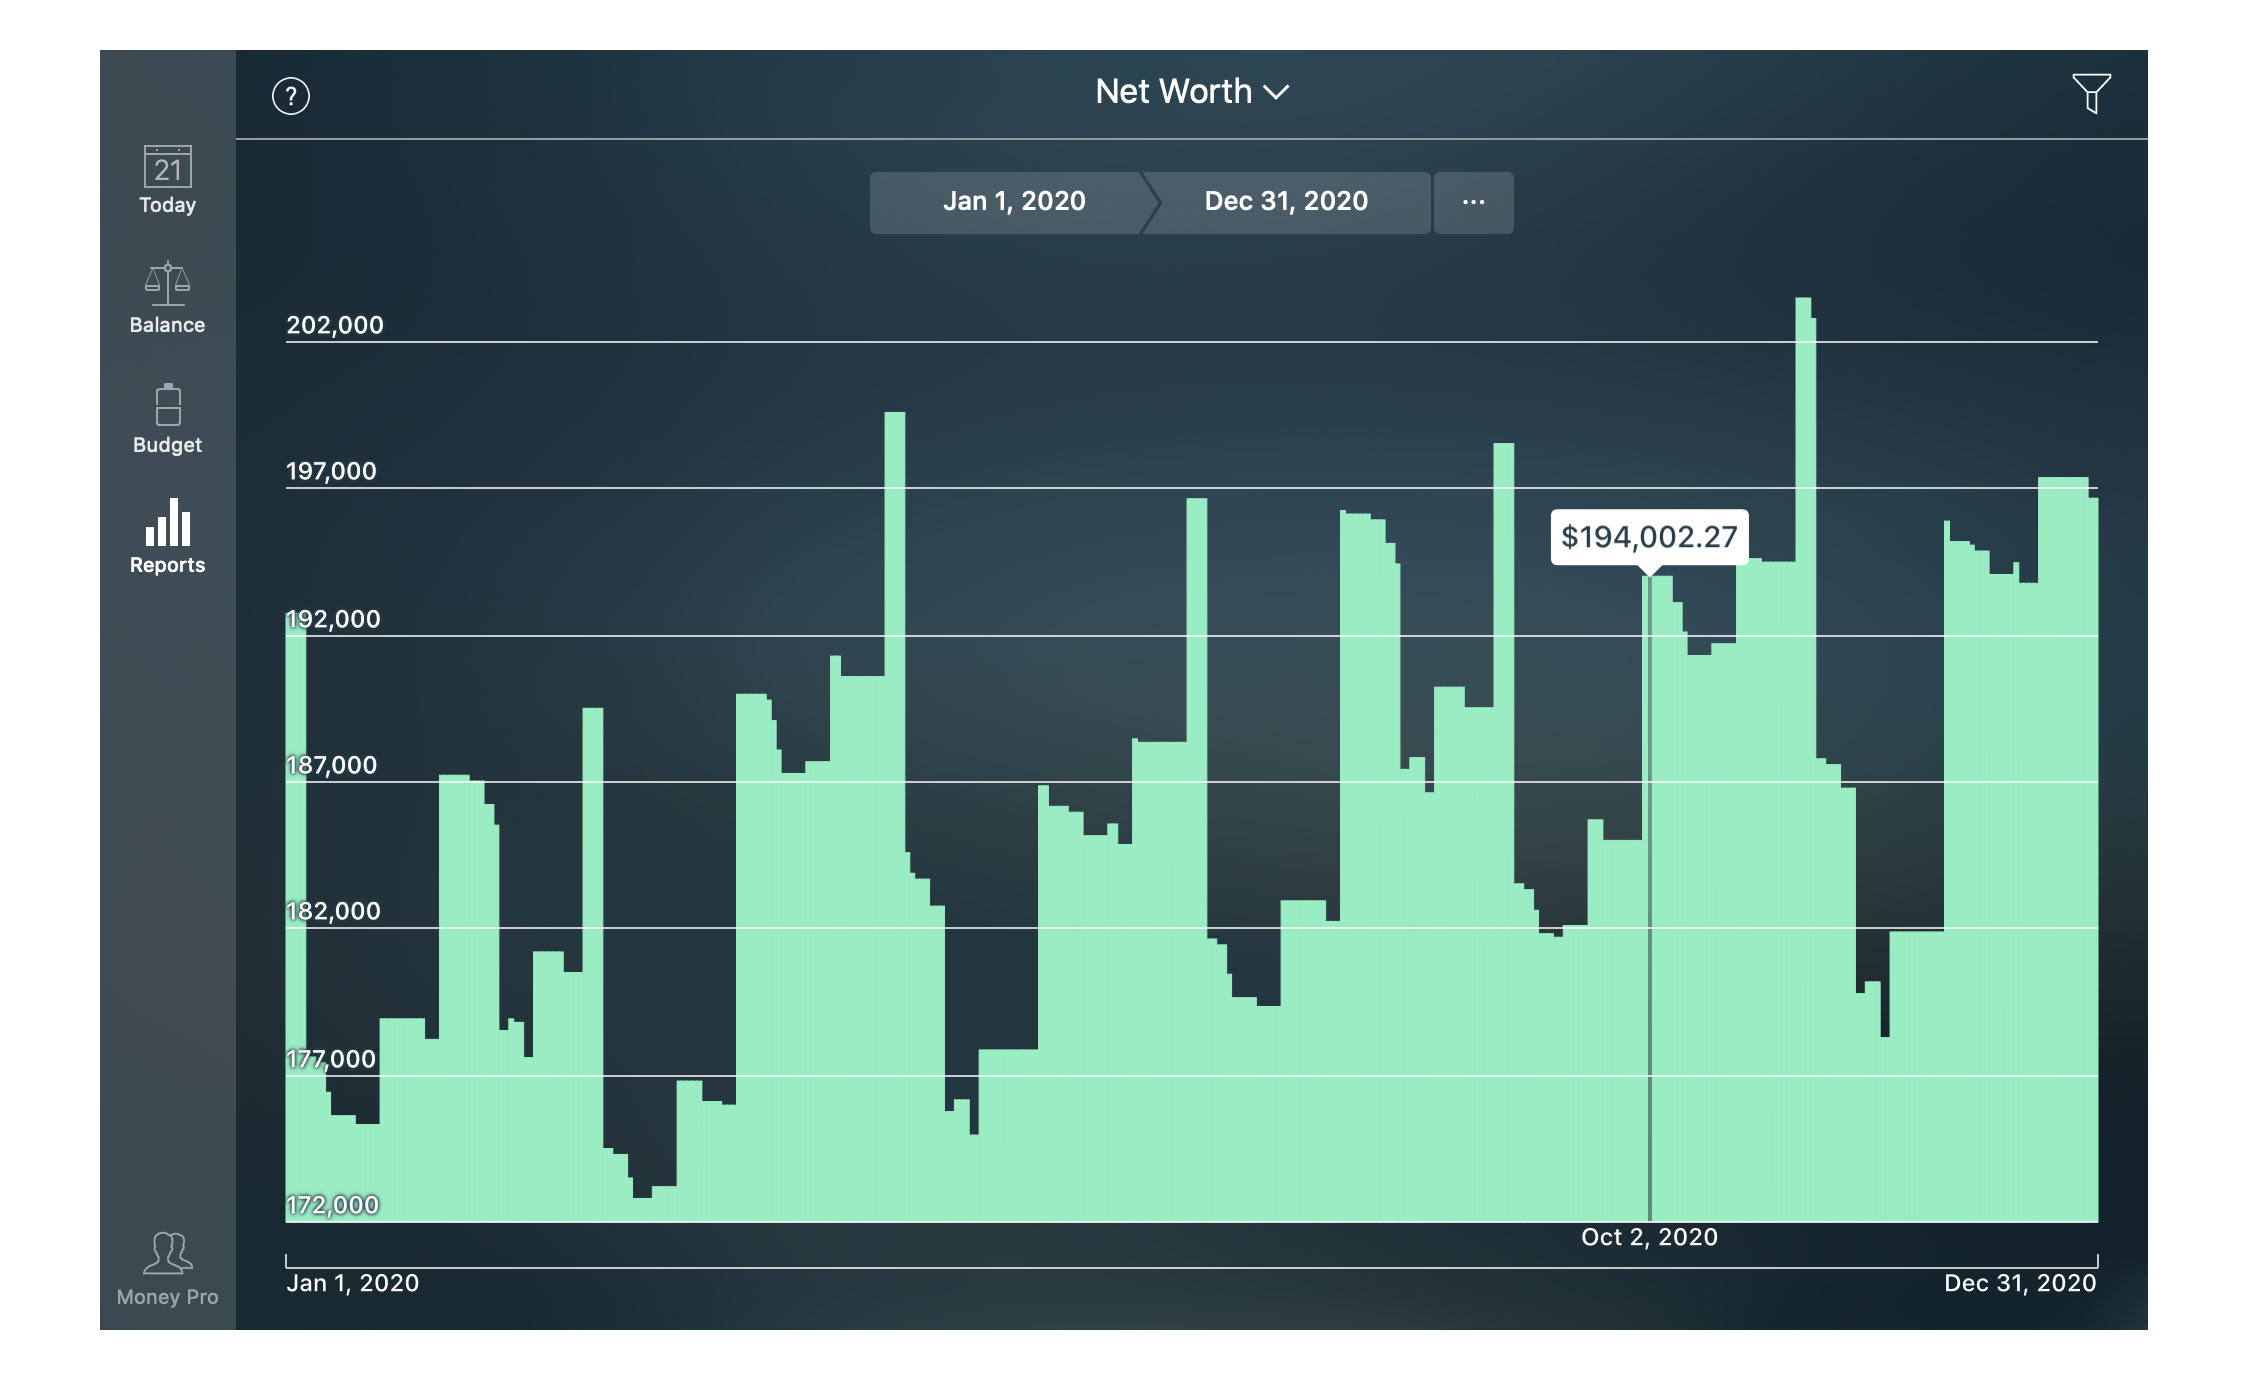
Net Worth report
Net worth shows the difference between your Assets and Liabilities on every date.
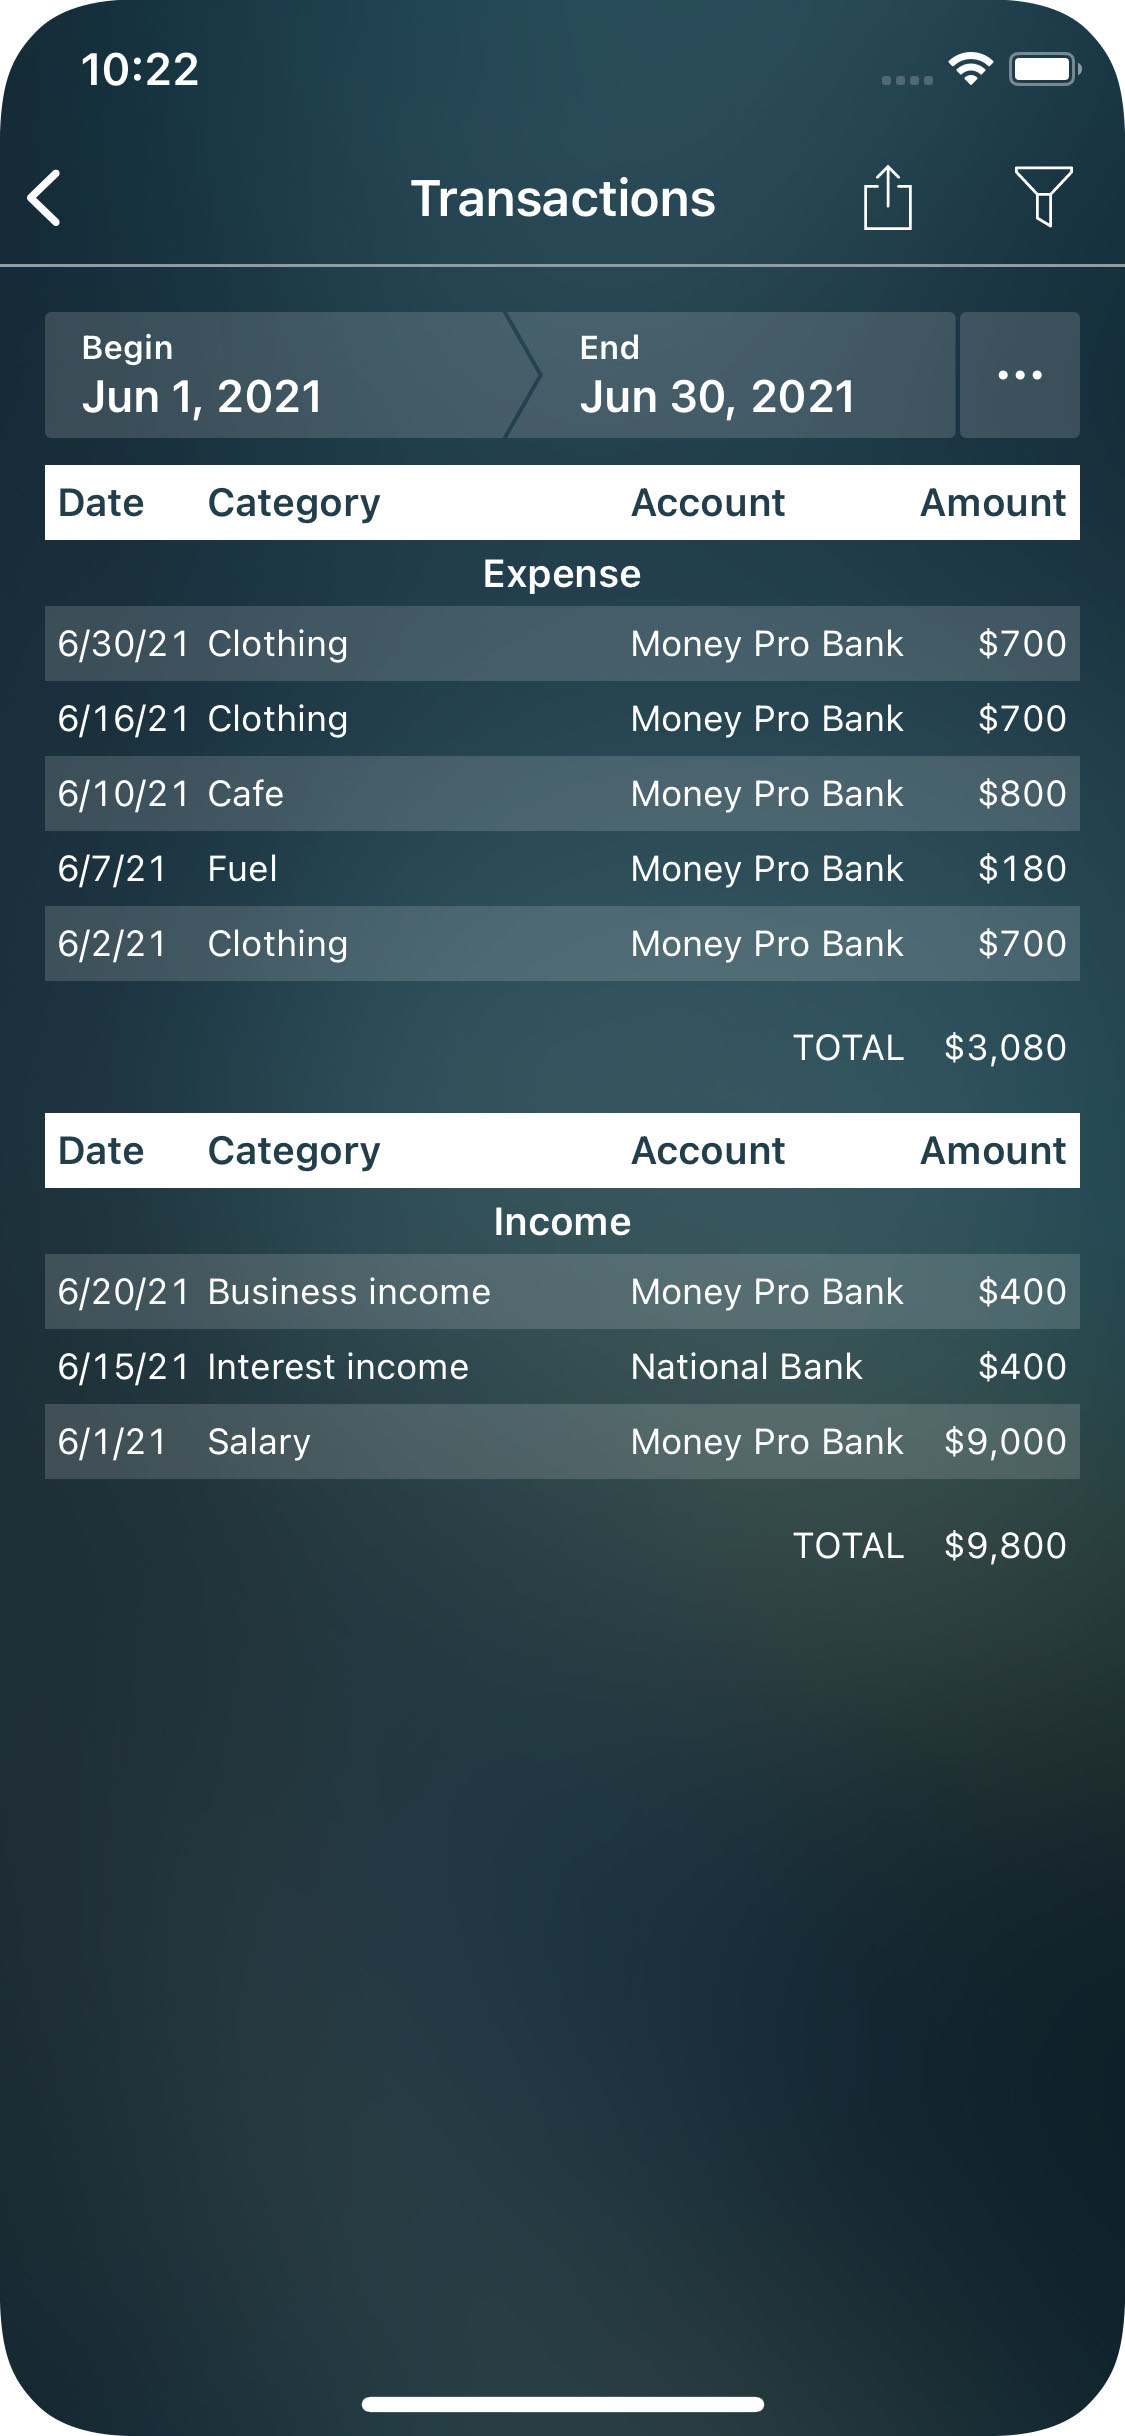
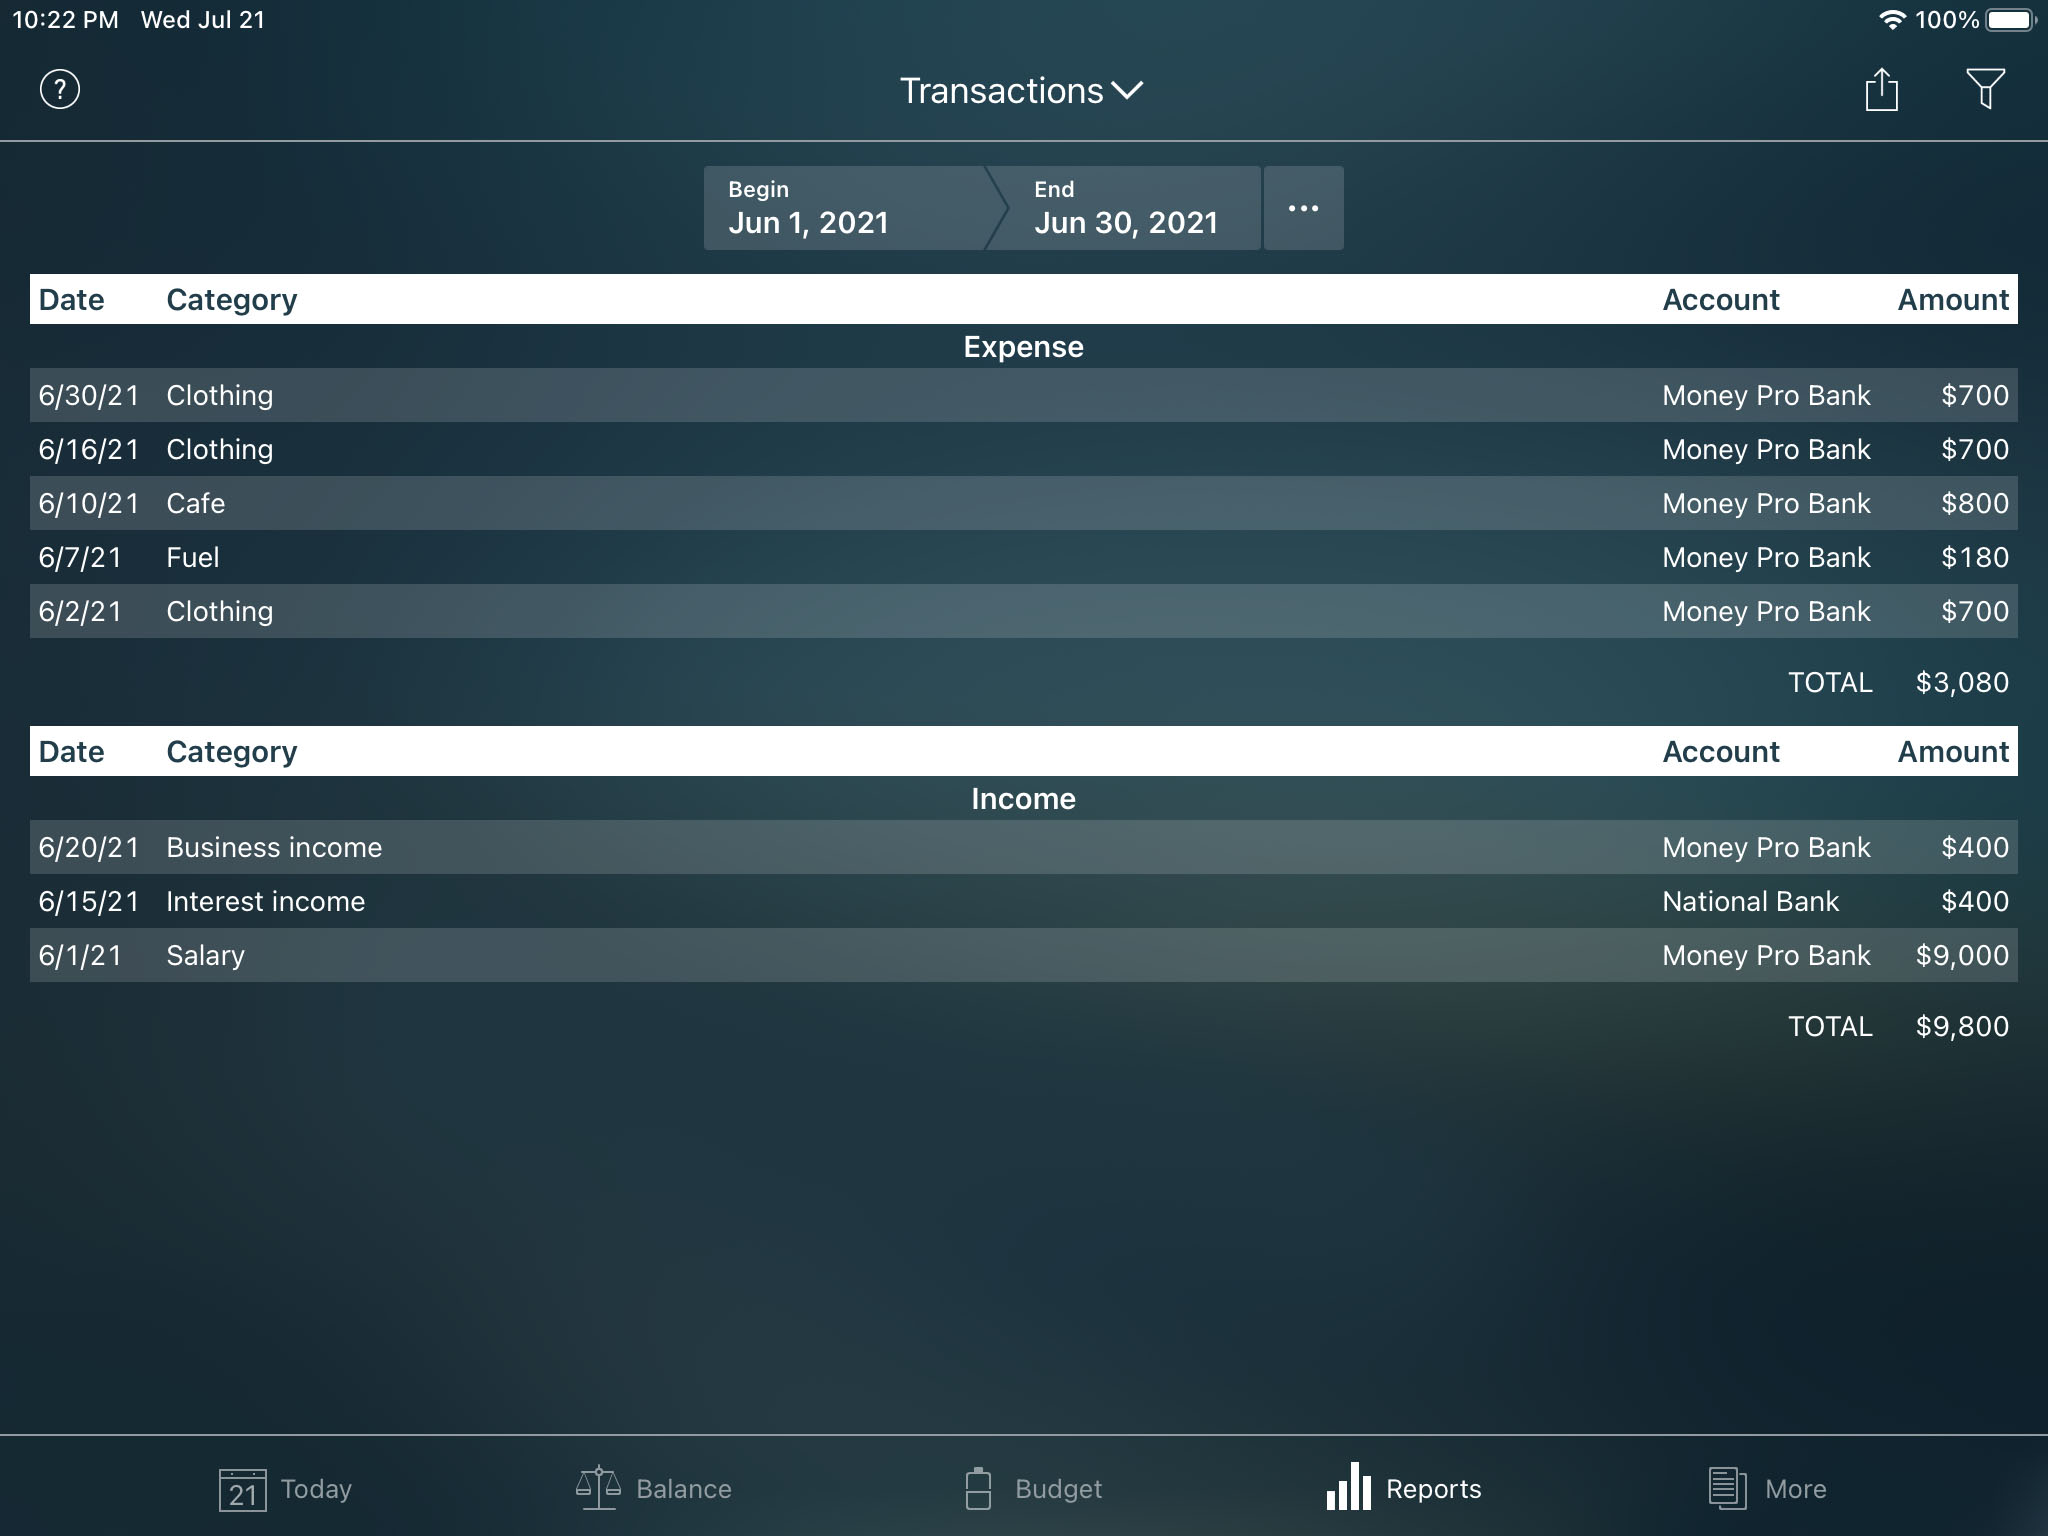
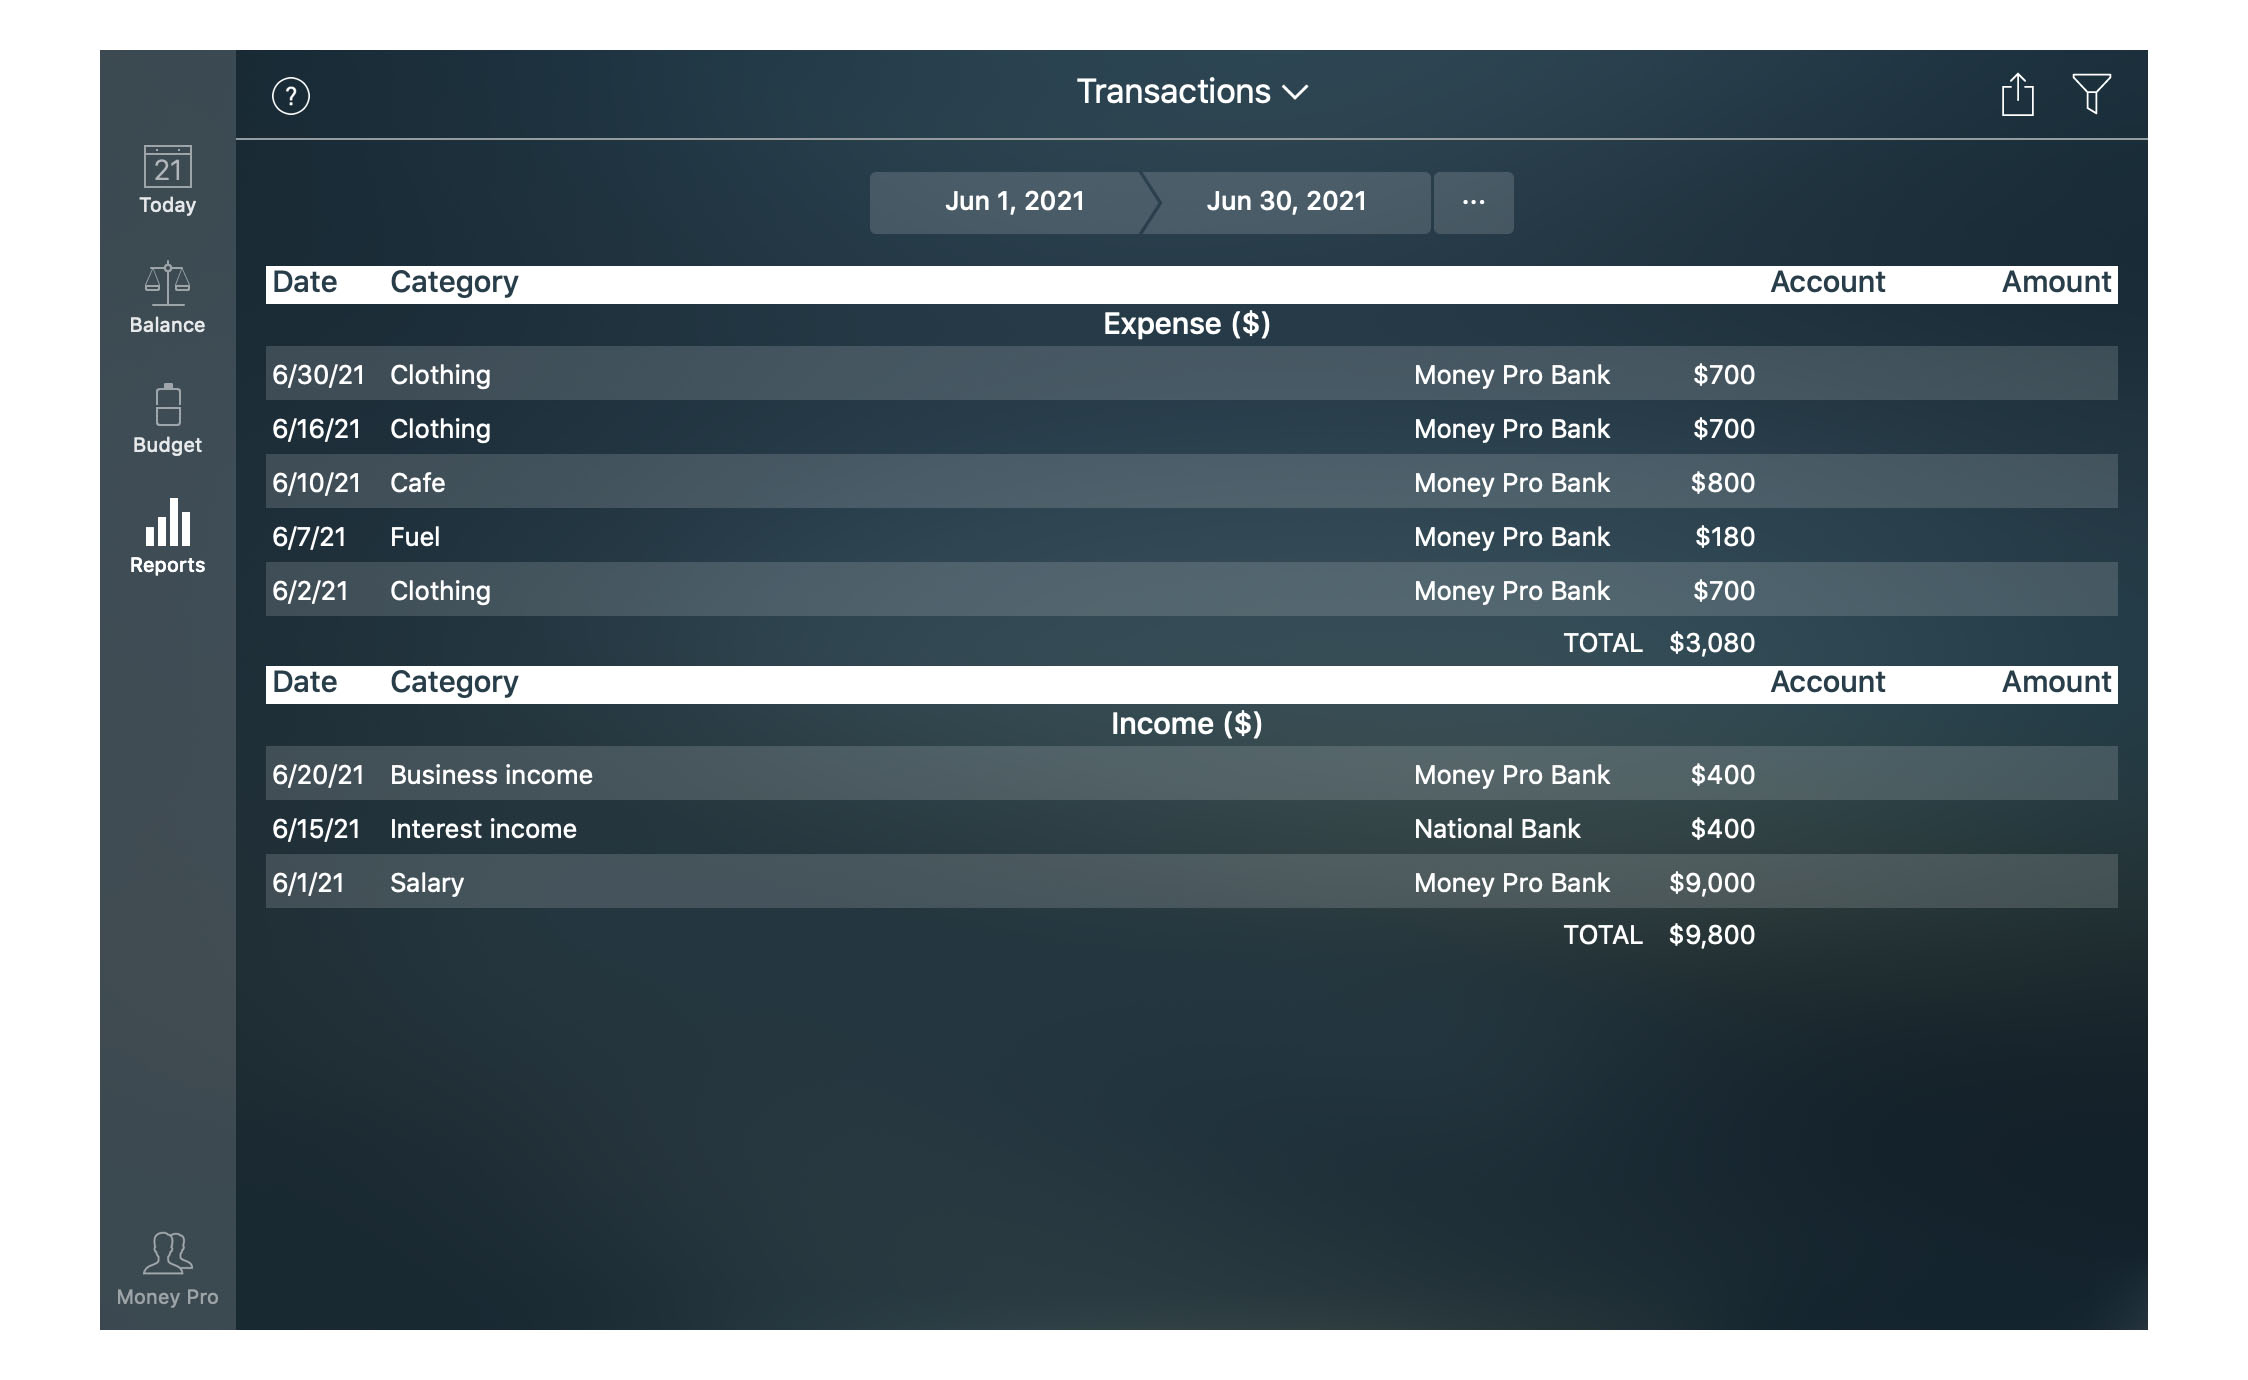
Transactions report
It shows the list of transactions by type (expense, income, money transfer, asset purchase, asset sale, liability acquisition, discharge of liability) for a chosen period.
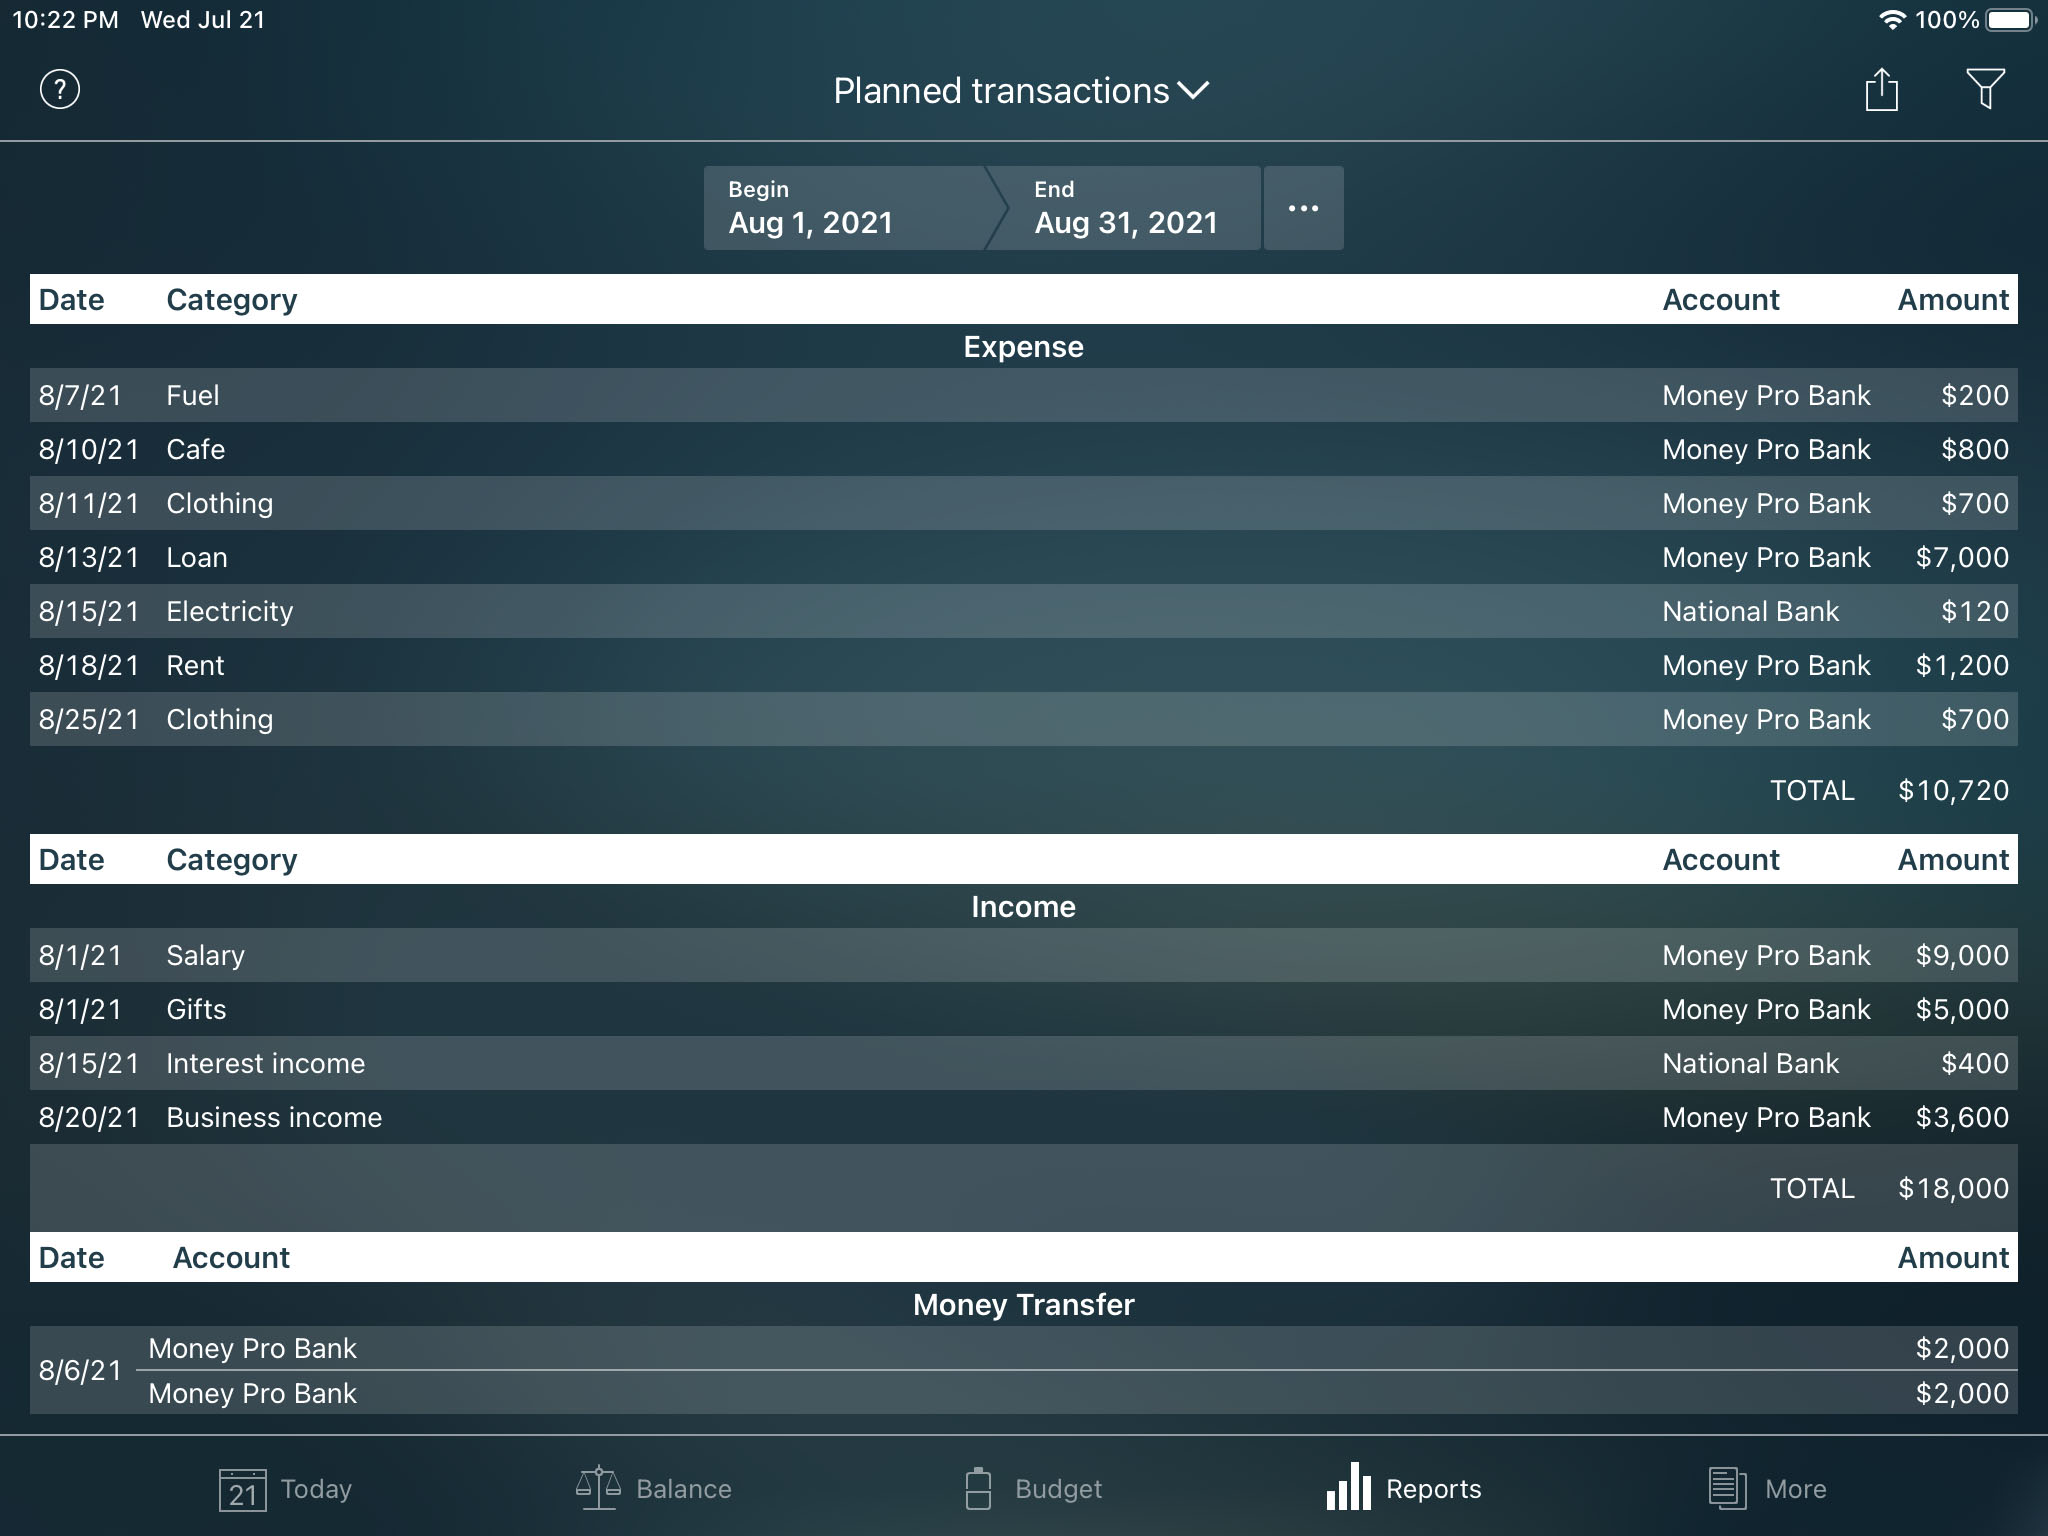
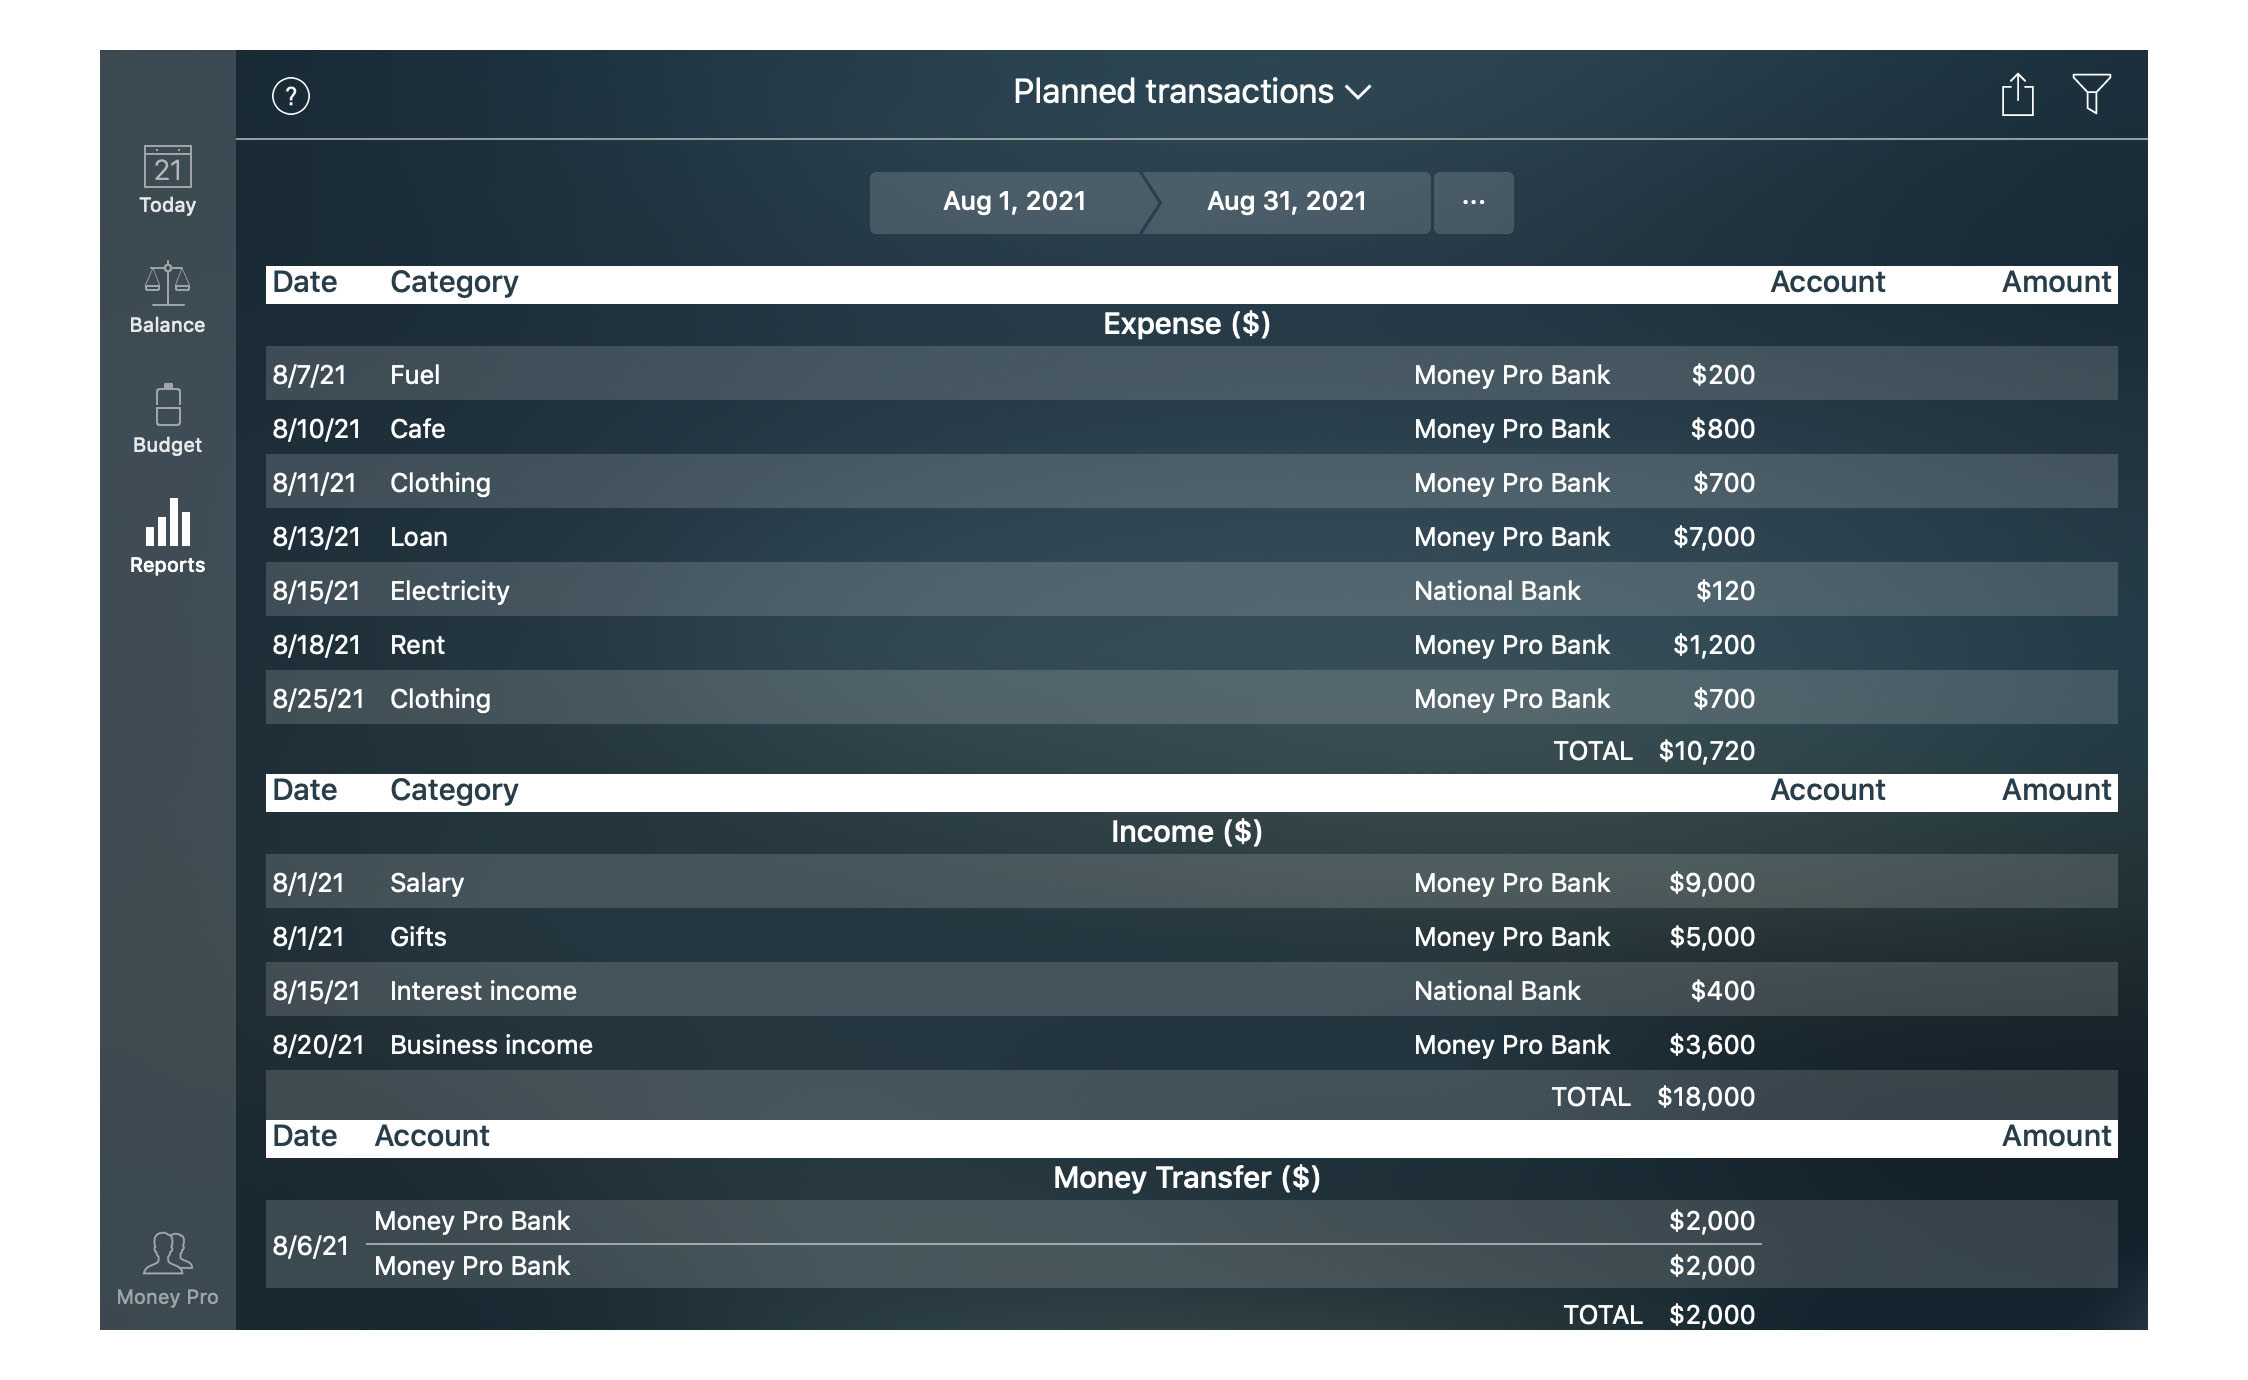
Planned transactions report
The report shows the list of planned transactions by type (expense, income, money transfer, asset purchase, asset sale, liability acquisition, discharge of liability) for a chosen period.

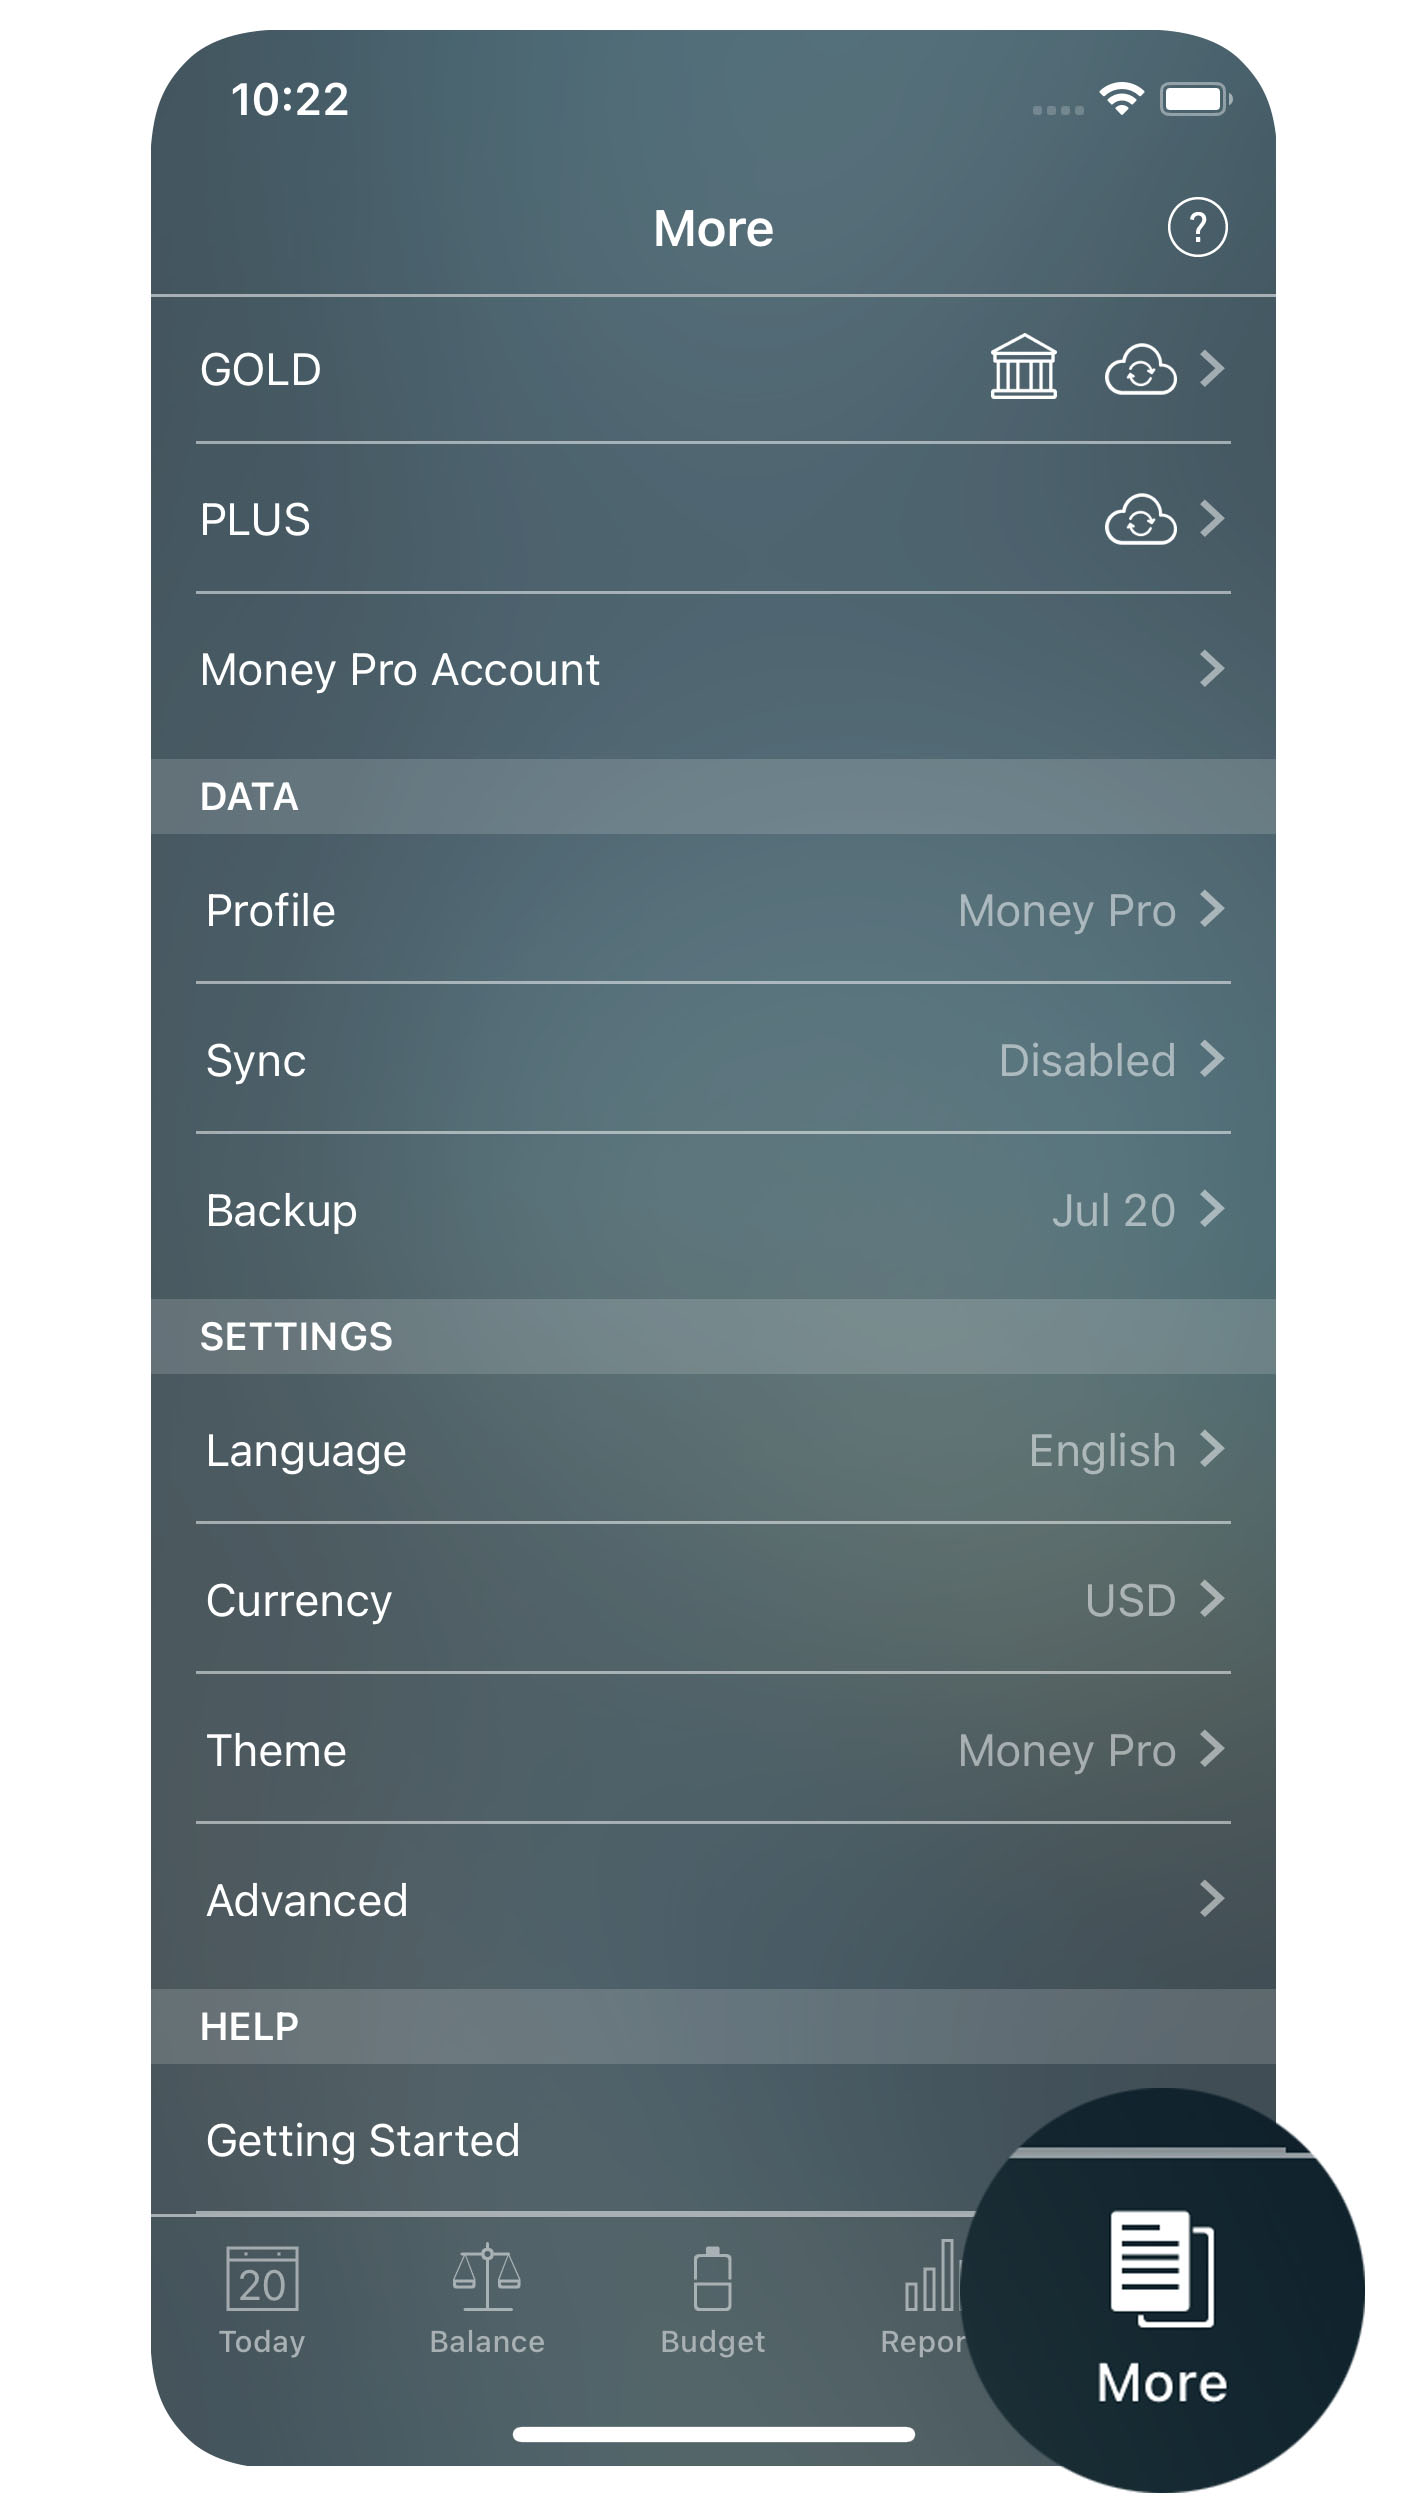
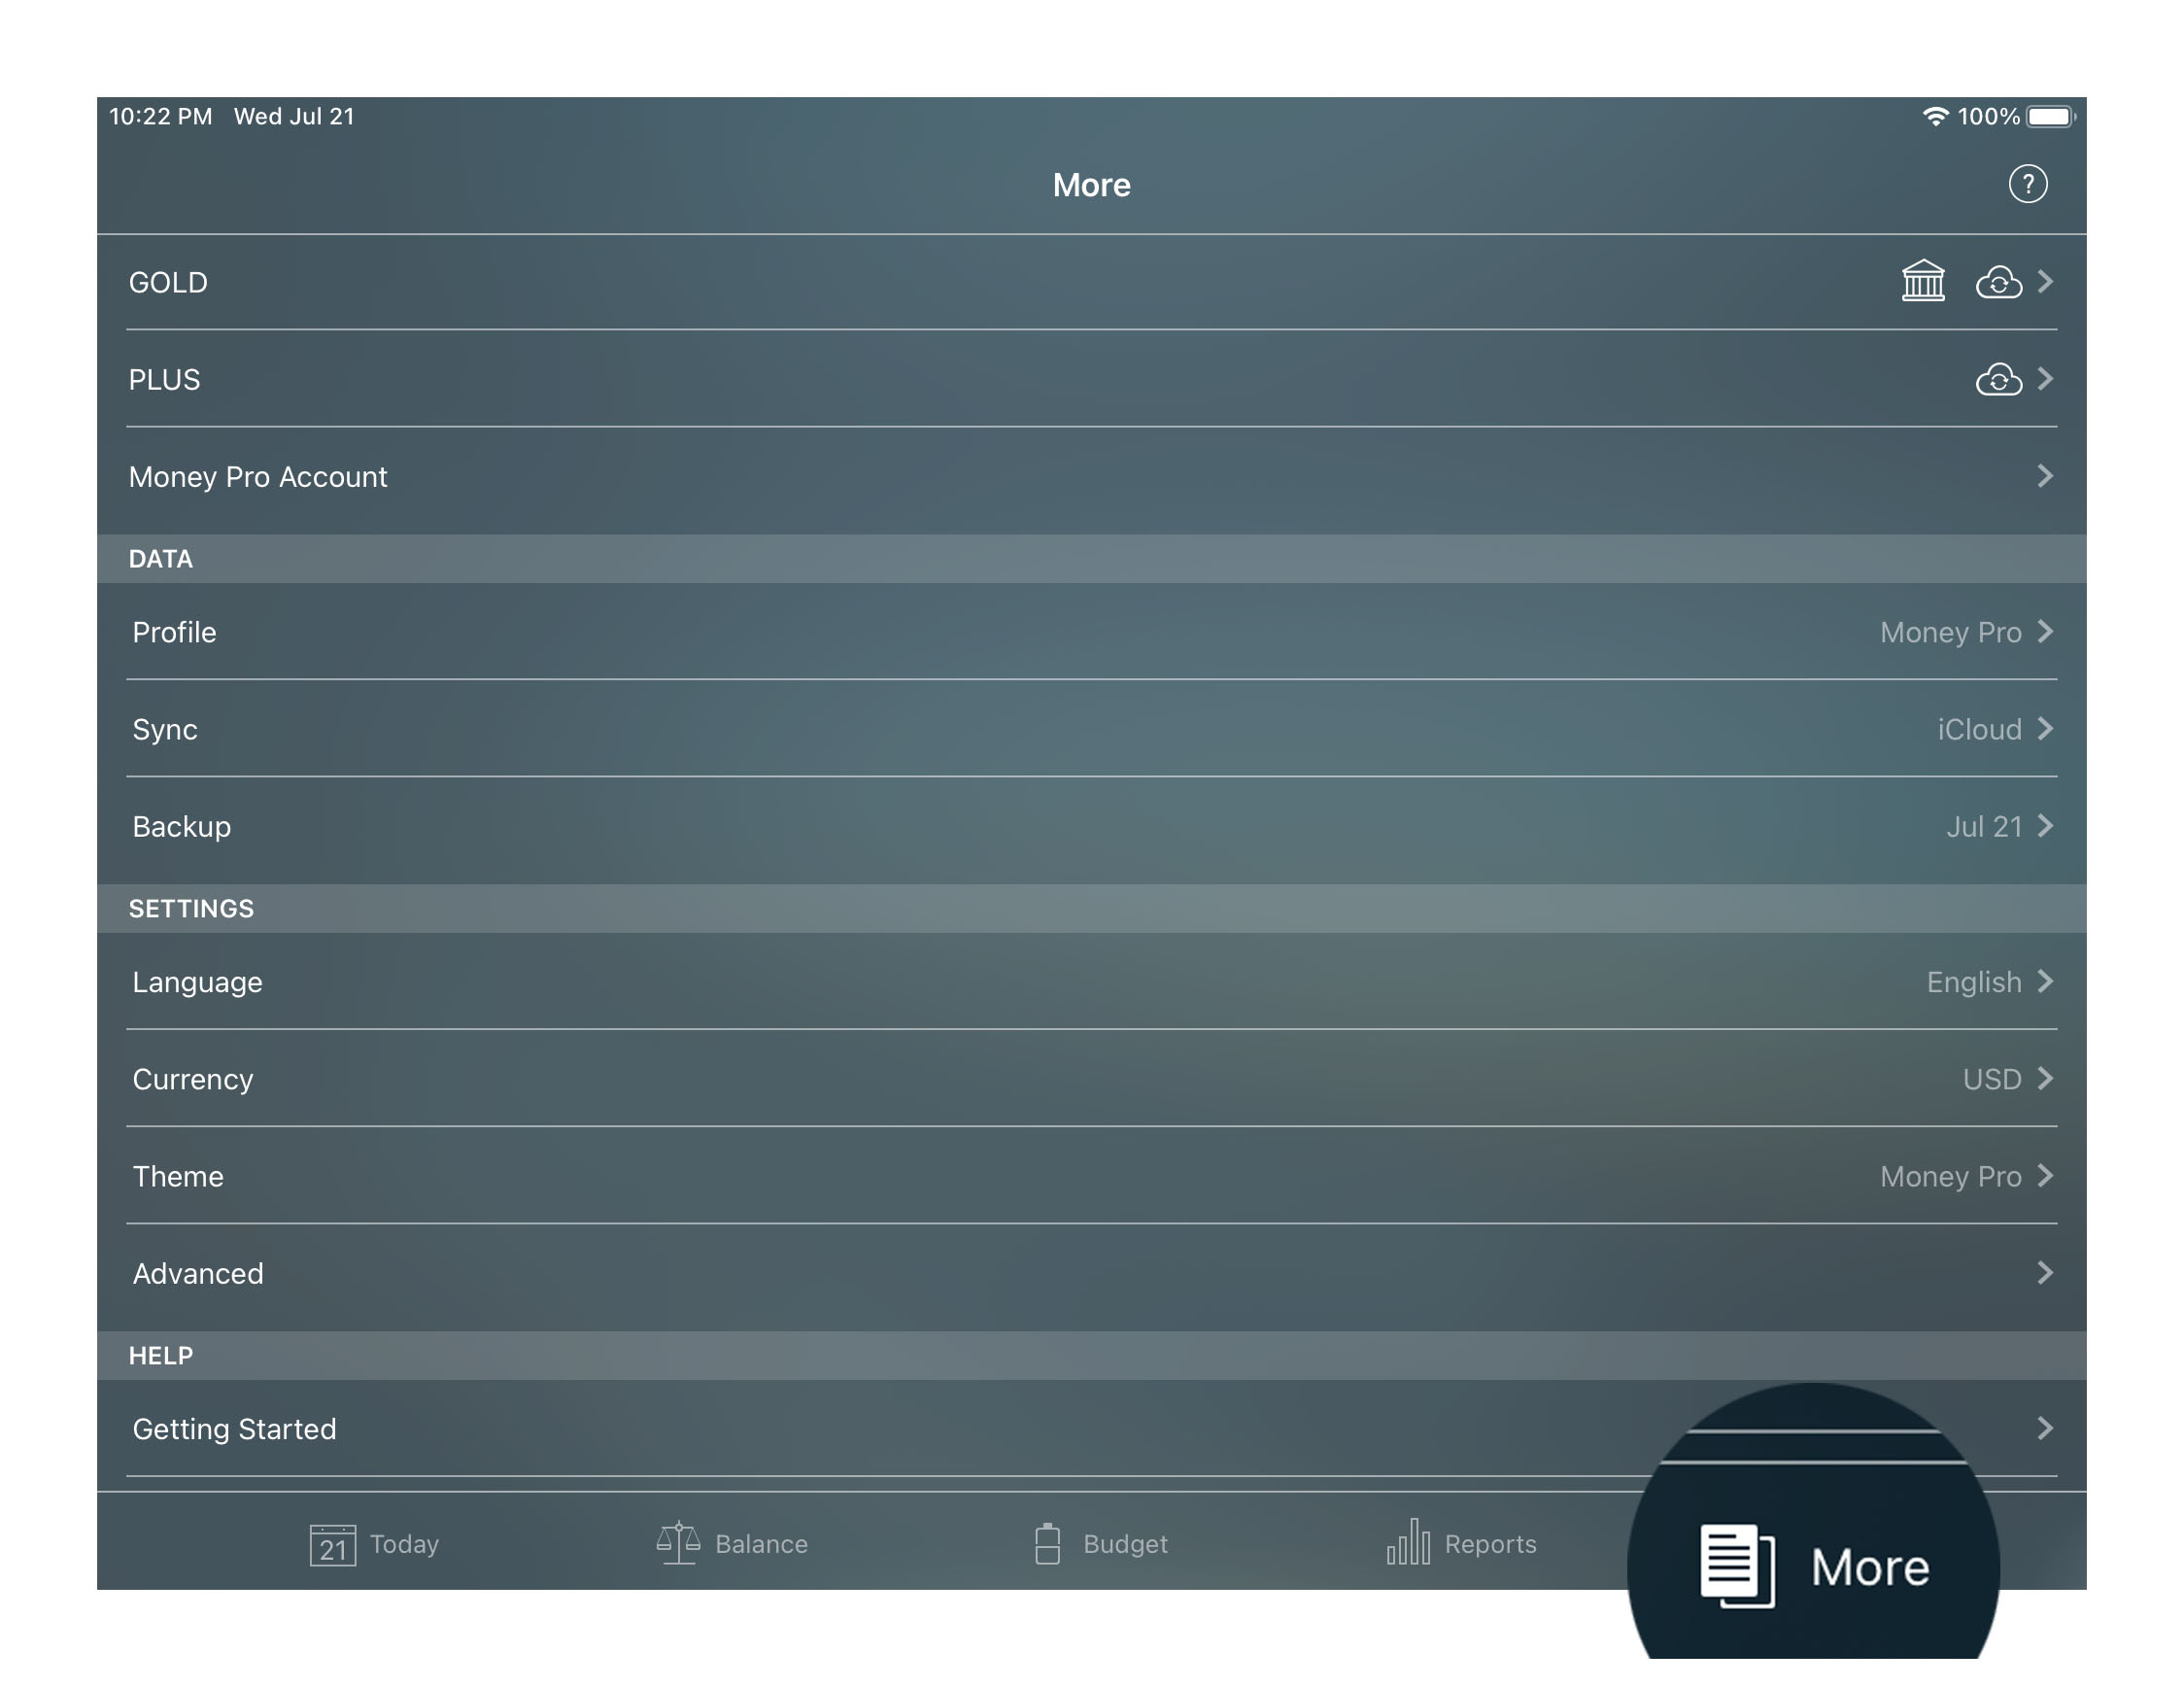
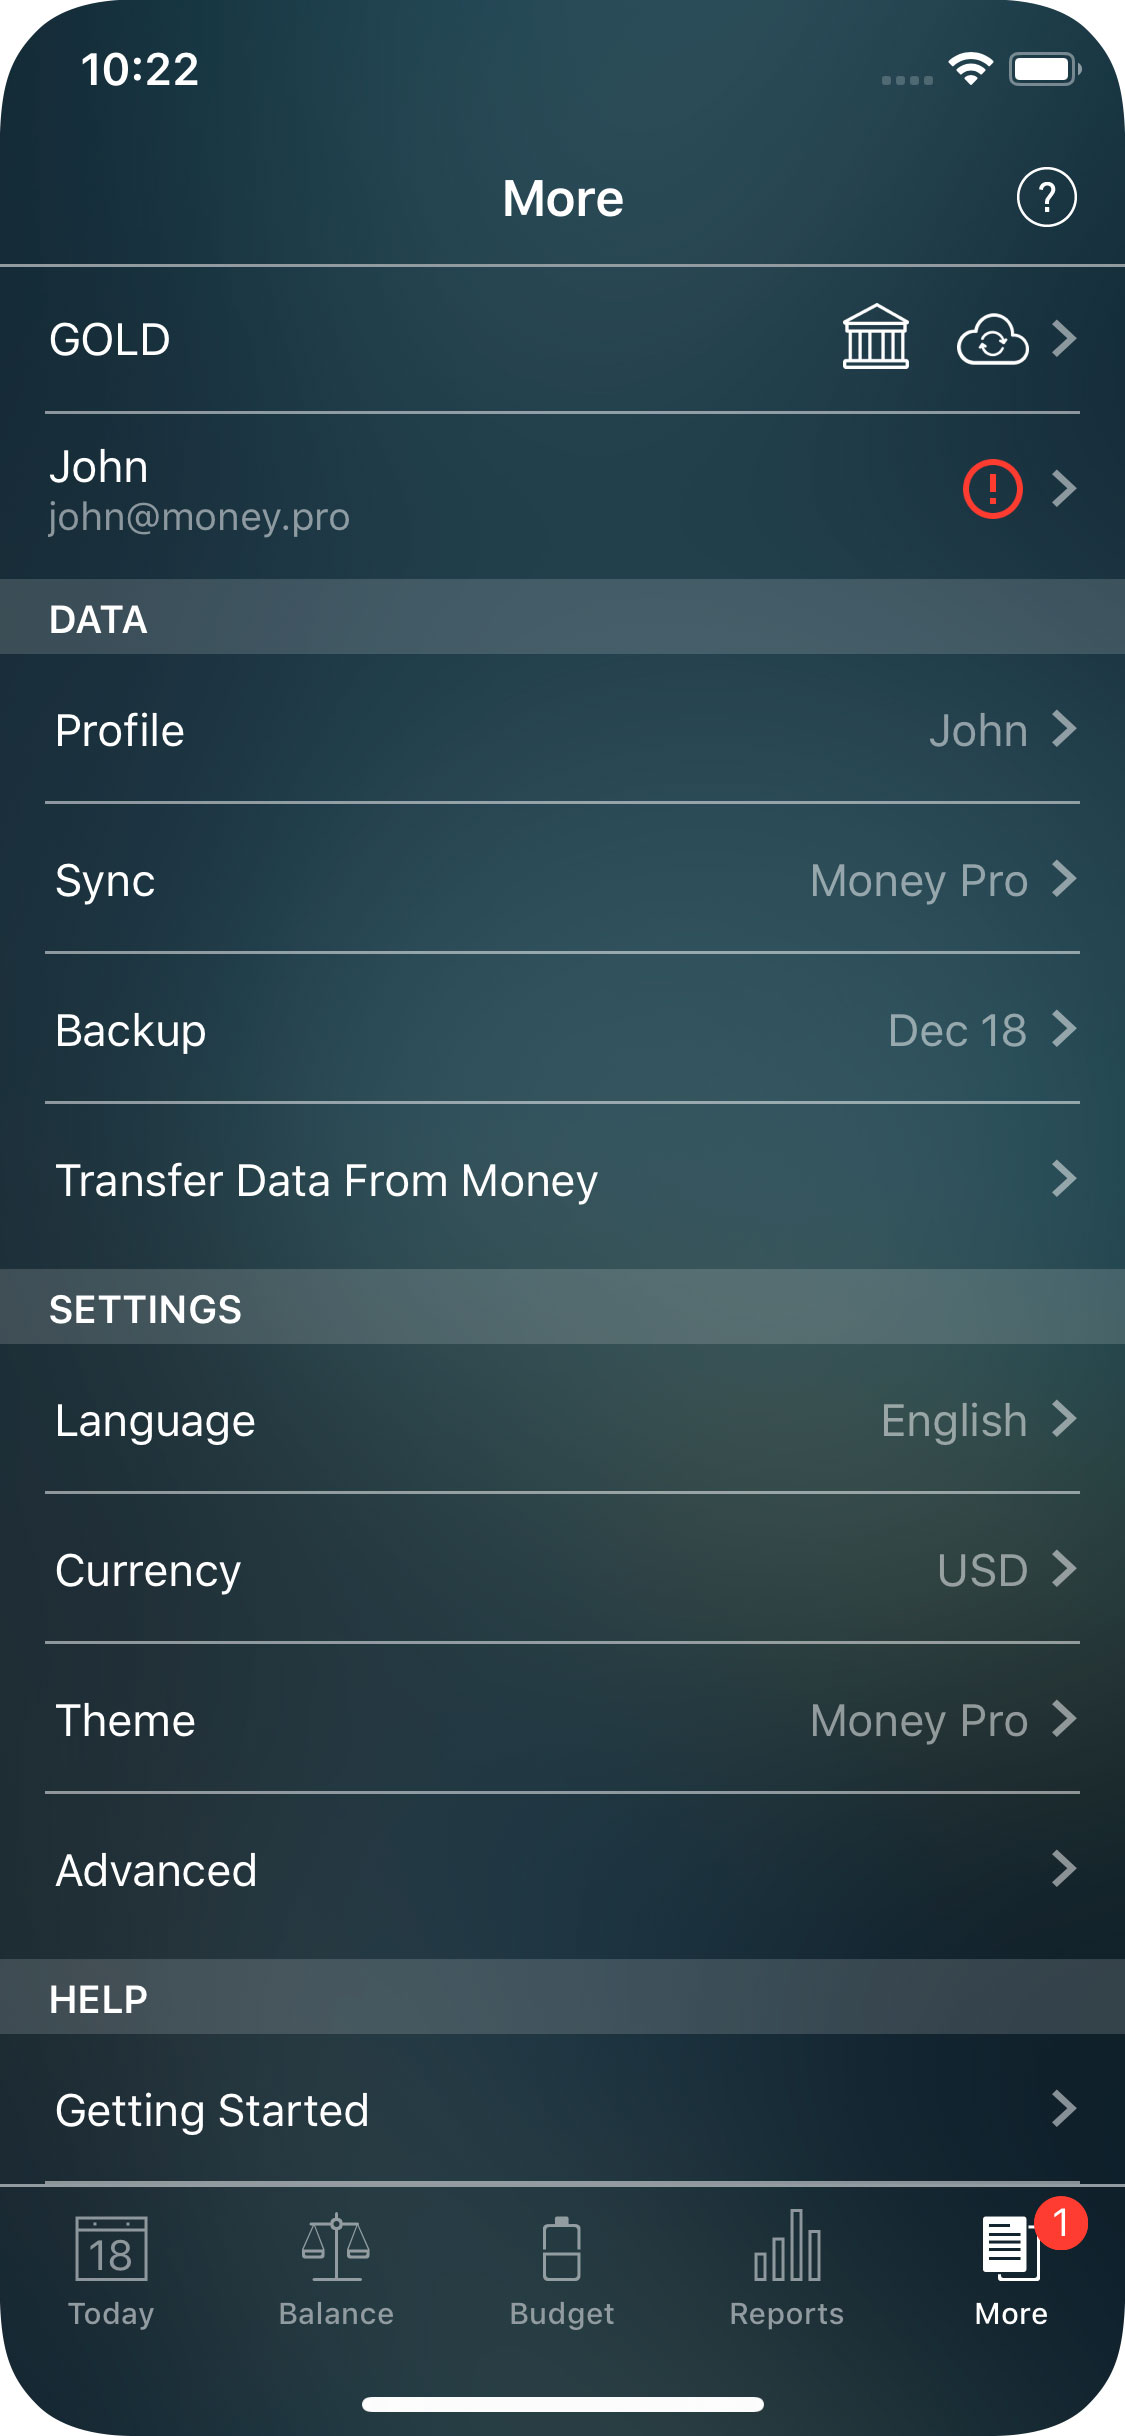
More (backup, profiles, sync)
Backup
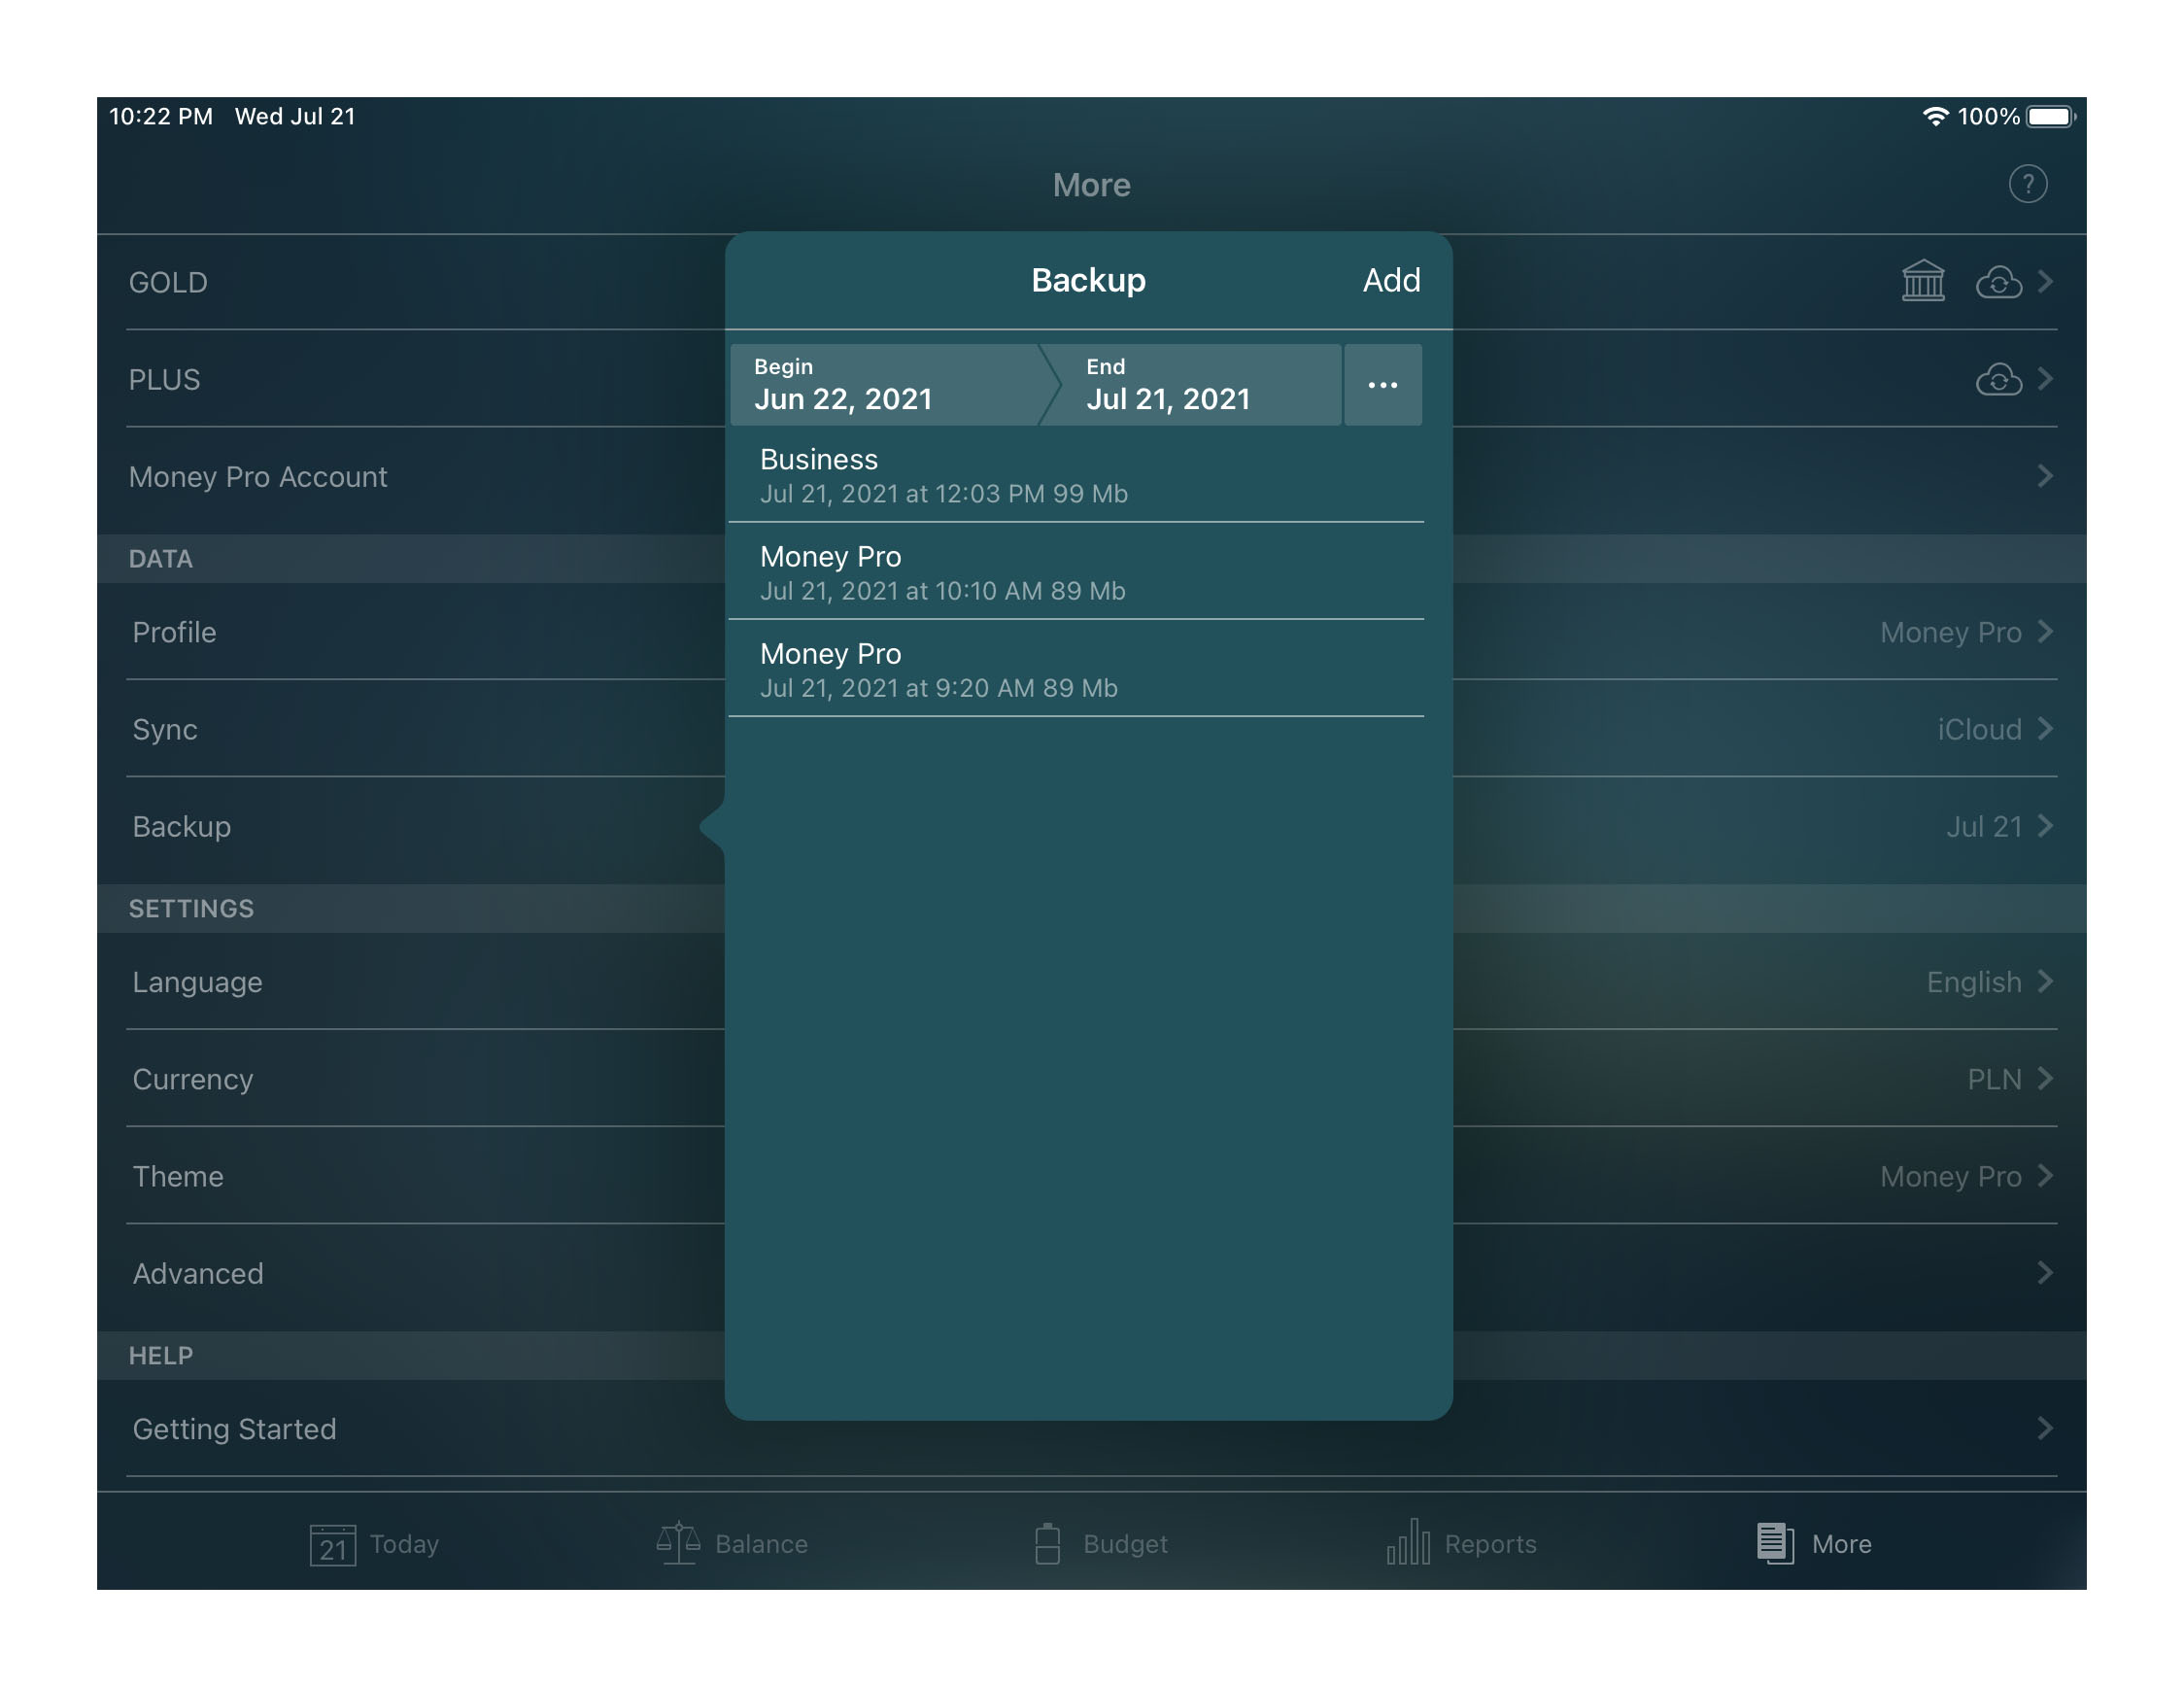
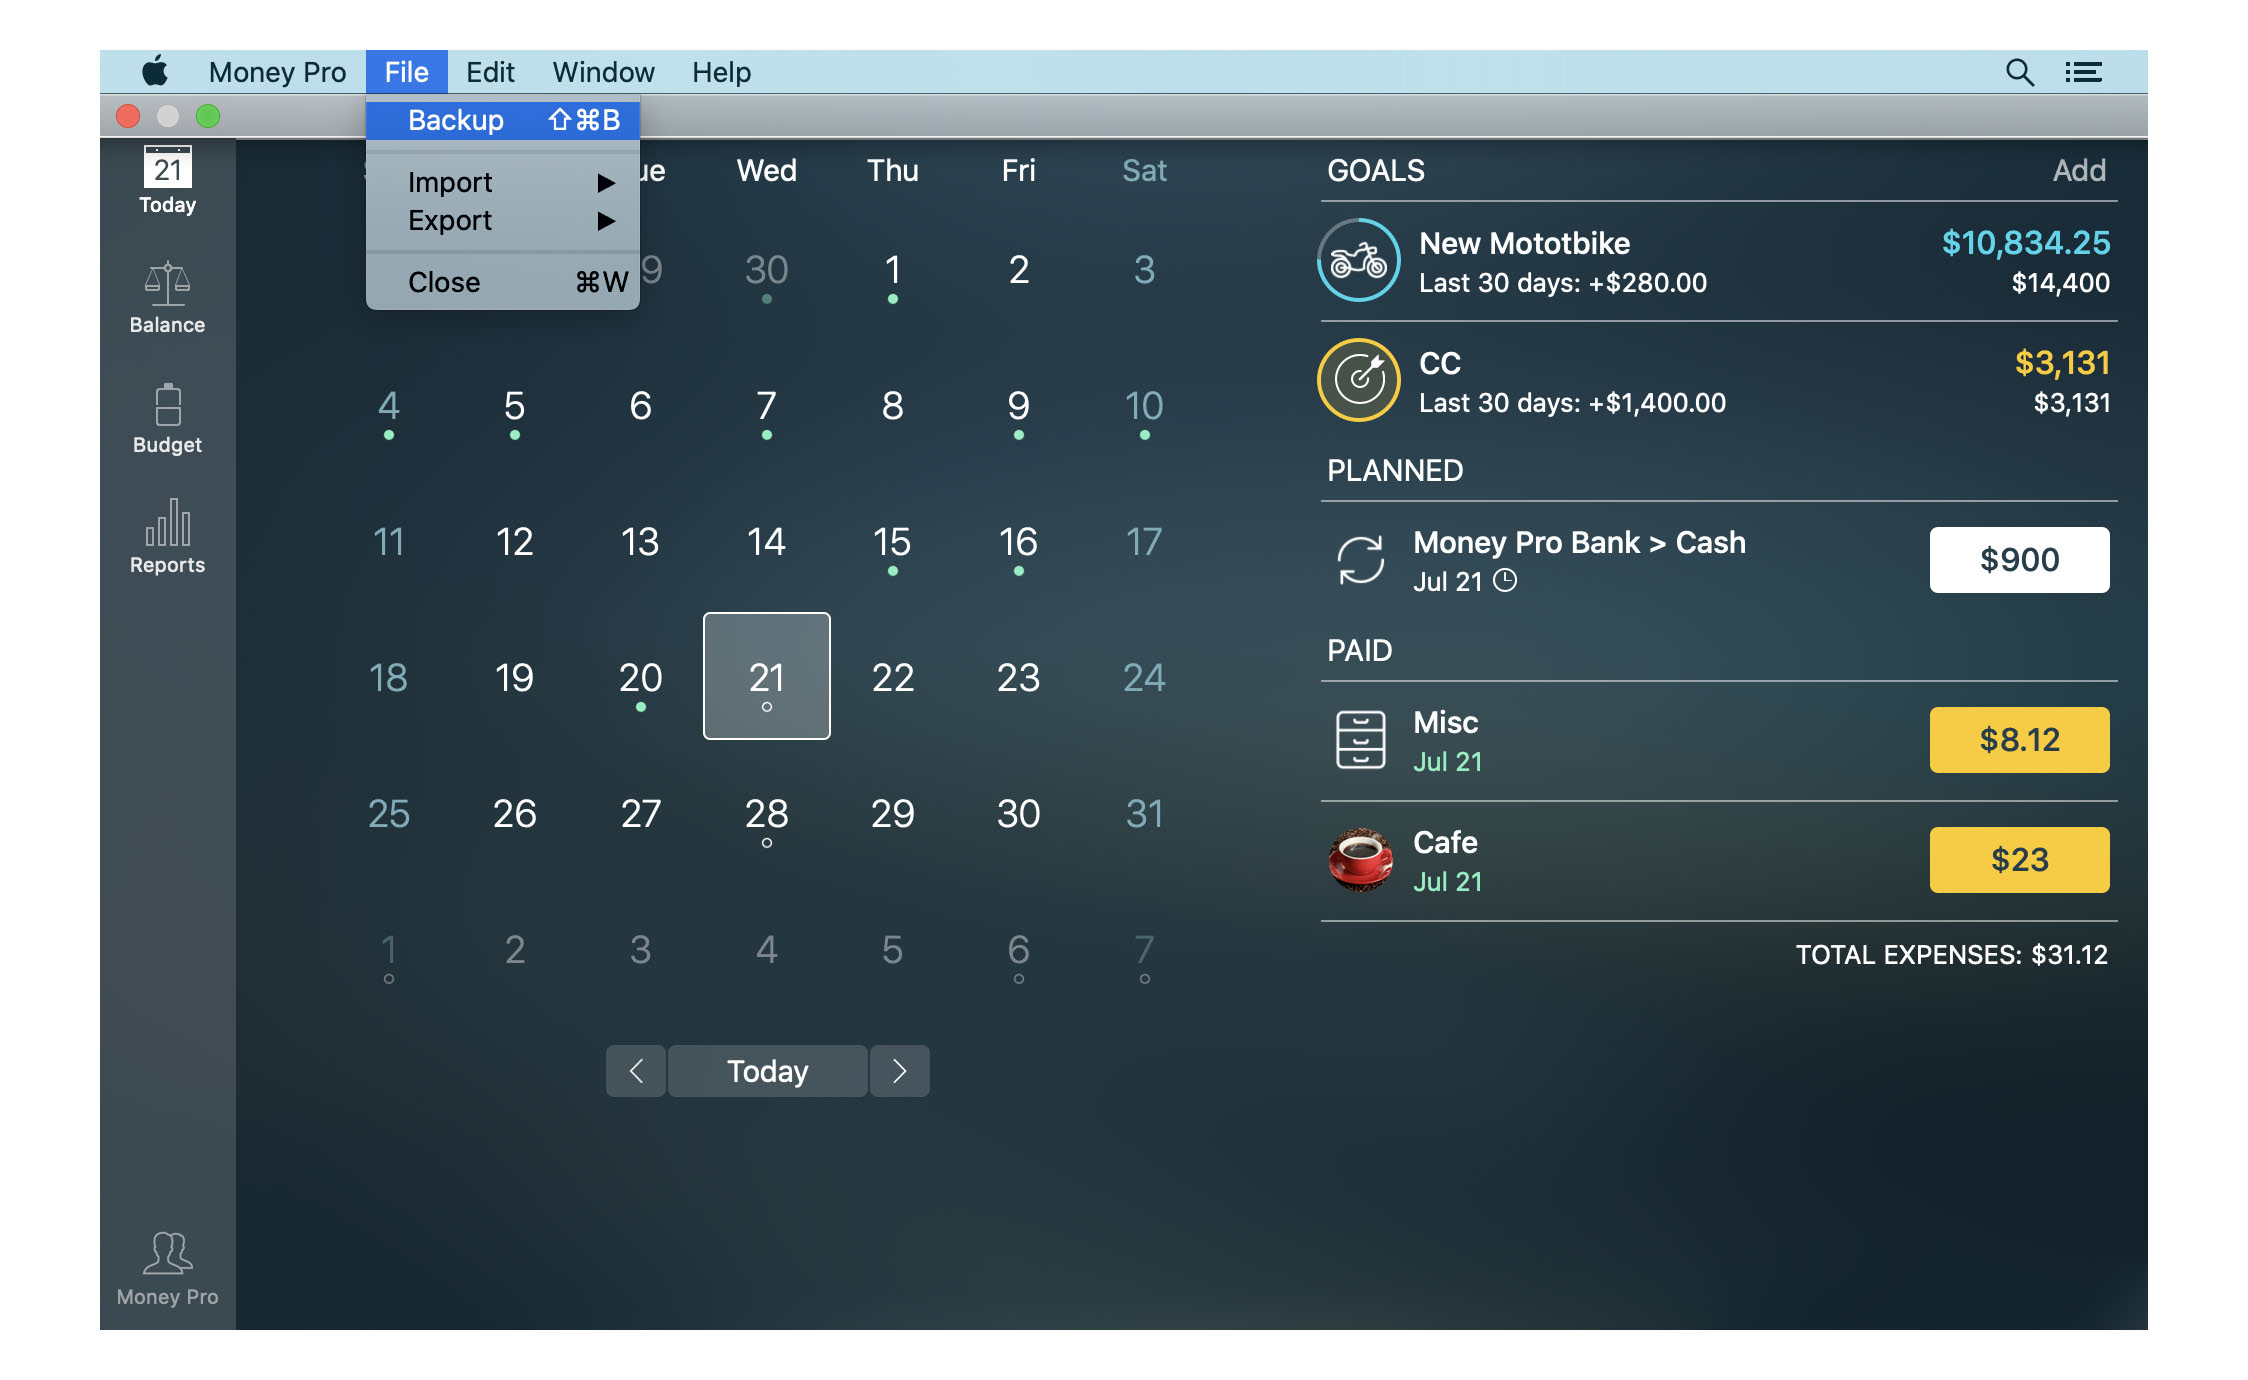
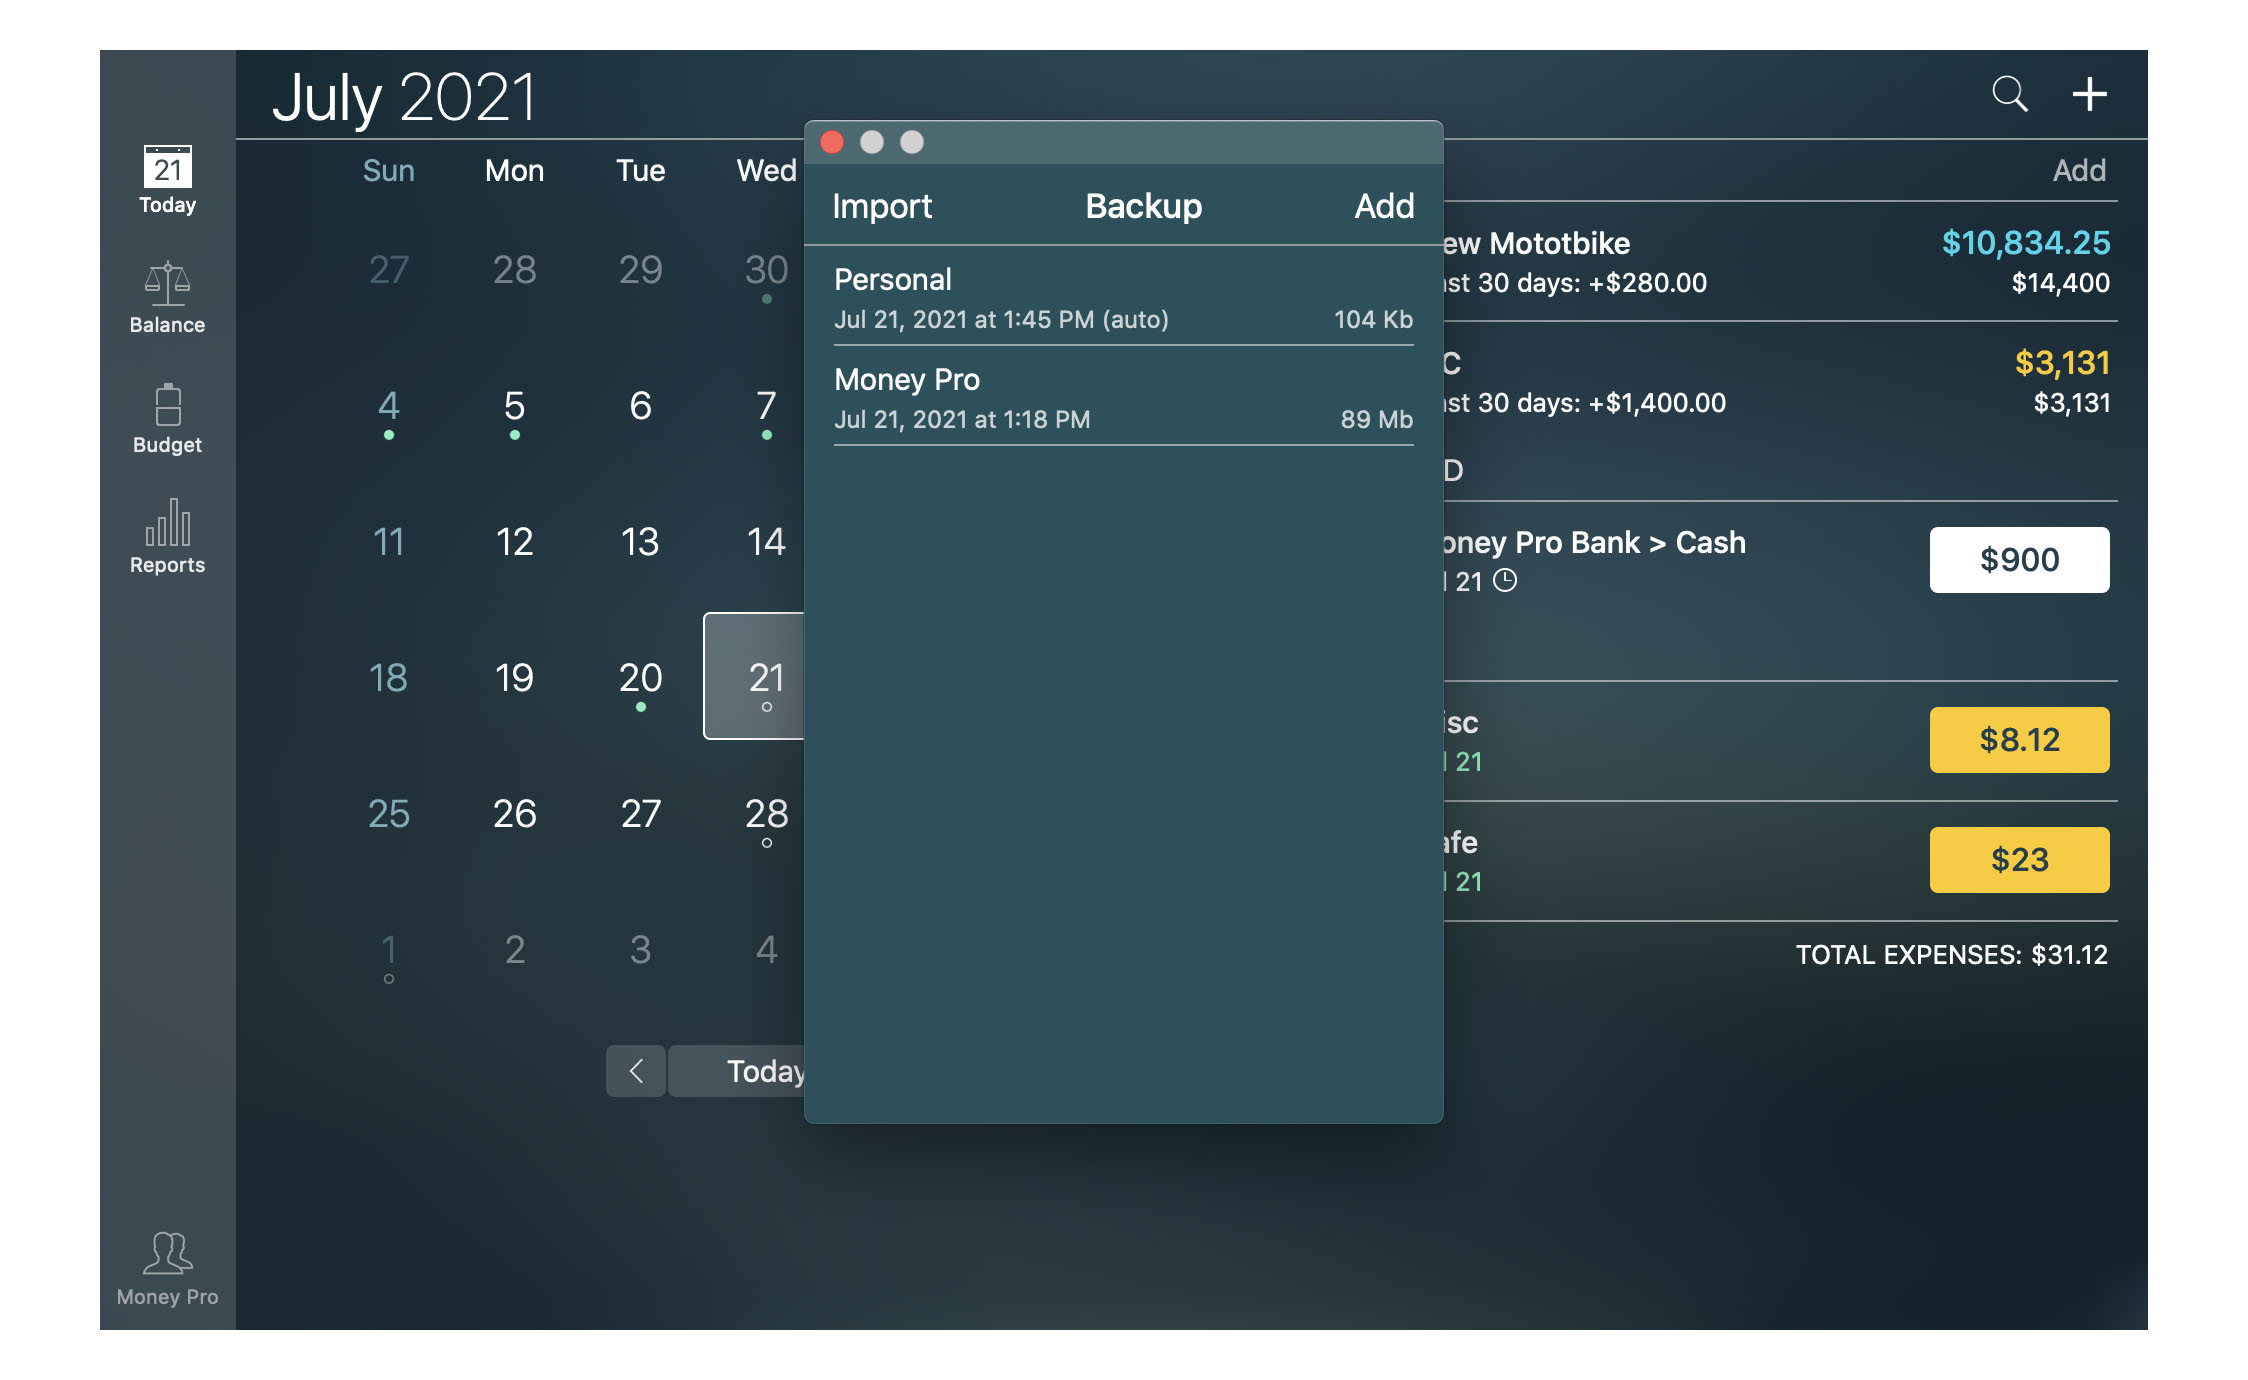
A backup is a snapshot of your financial history made to preserve your data. The best way to protect the data you entered is to back it up regularly. Money Pro automatically backs up your data at all critical moments. To create a backup of your data manually, go to More > Backup (for Mac go to the Main Menu > File > Backup). Then press “Add” in the upper right corner. A new backup will be created. To delete a backup on iOS devices, swipe it to the left and tap a trash bin. To delete a backup on Mac select “Delete” in the context menu.
If you need to restore your data from a backup file, select the needed backup. The current data will be replaced with the data of the backup selected.

Save backup files generated on iPhone or iPad on your computer using iTunes File Sharing:
- connect the device to PC and launch iTunes;
- access the Apps tab under the File Sharing section;
- find Money Pro in the File Sharing section;
- find backup files under the section “Money Pro Documents”;
- save them.
To import backup files into the iOS app, access the section “Money Pro Documents” and “Add " the necessary files.
To import the backup file into the Mac version of Money Pro, go to “Backup “. Click “Import " in the upper left corner of the screen, select the file, which you need to import, click it, and select “Restore”.
Password protection
If you don’t want anyone to have an access to your Money Pro records, protect your data by setting up a password. A password can be set for each profile separately.
To make necessary settings, go to More > Profile (on a Mac, go to the Main Menu > Money Pro > Profiles), press the button “i” next to Profile’s name, and tap “Set Password”. In the opened form set the password for the selected profile and its confirmation.
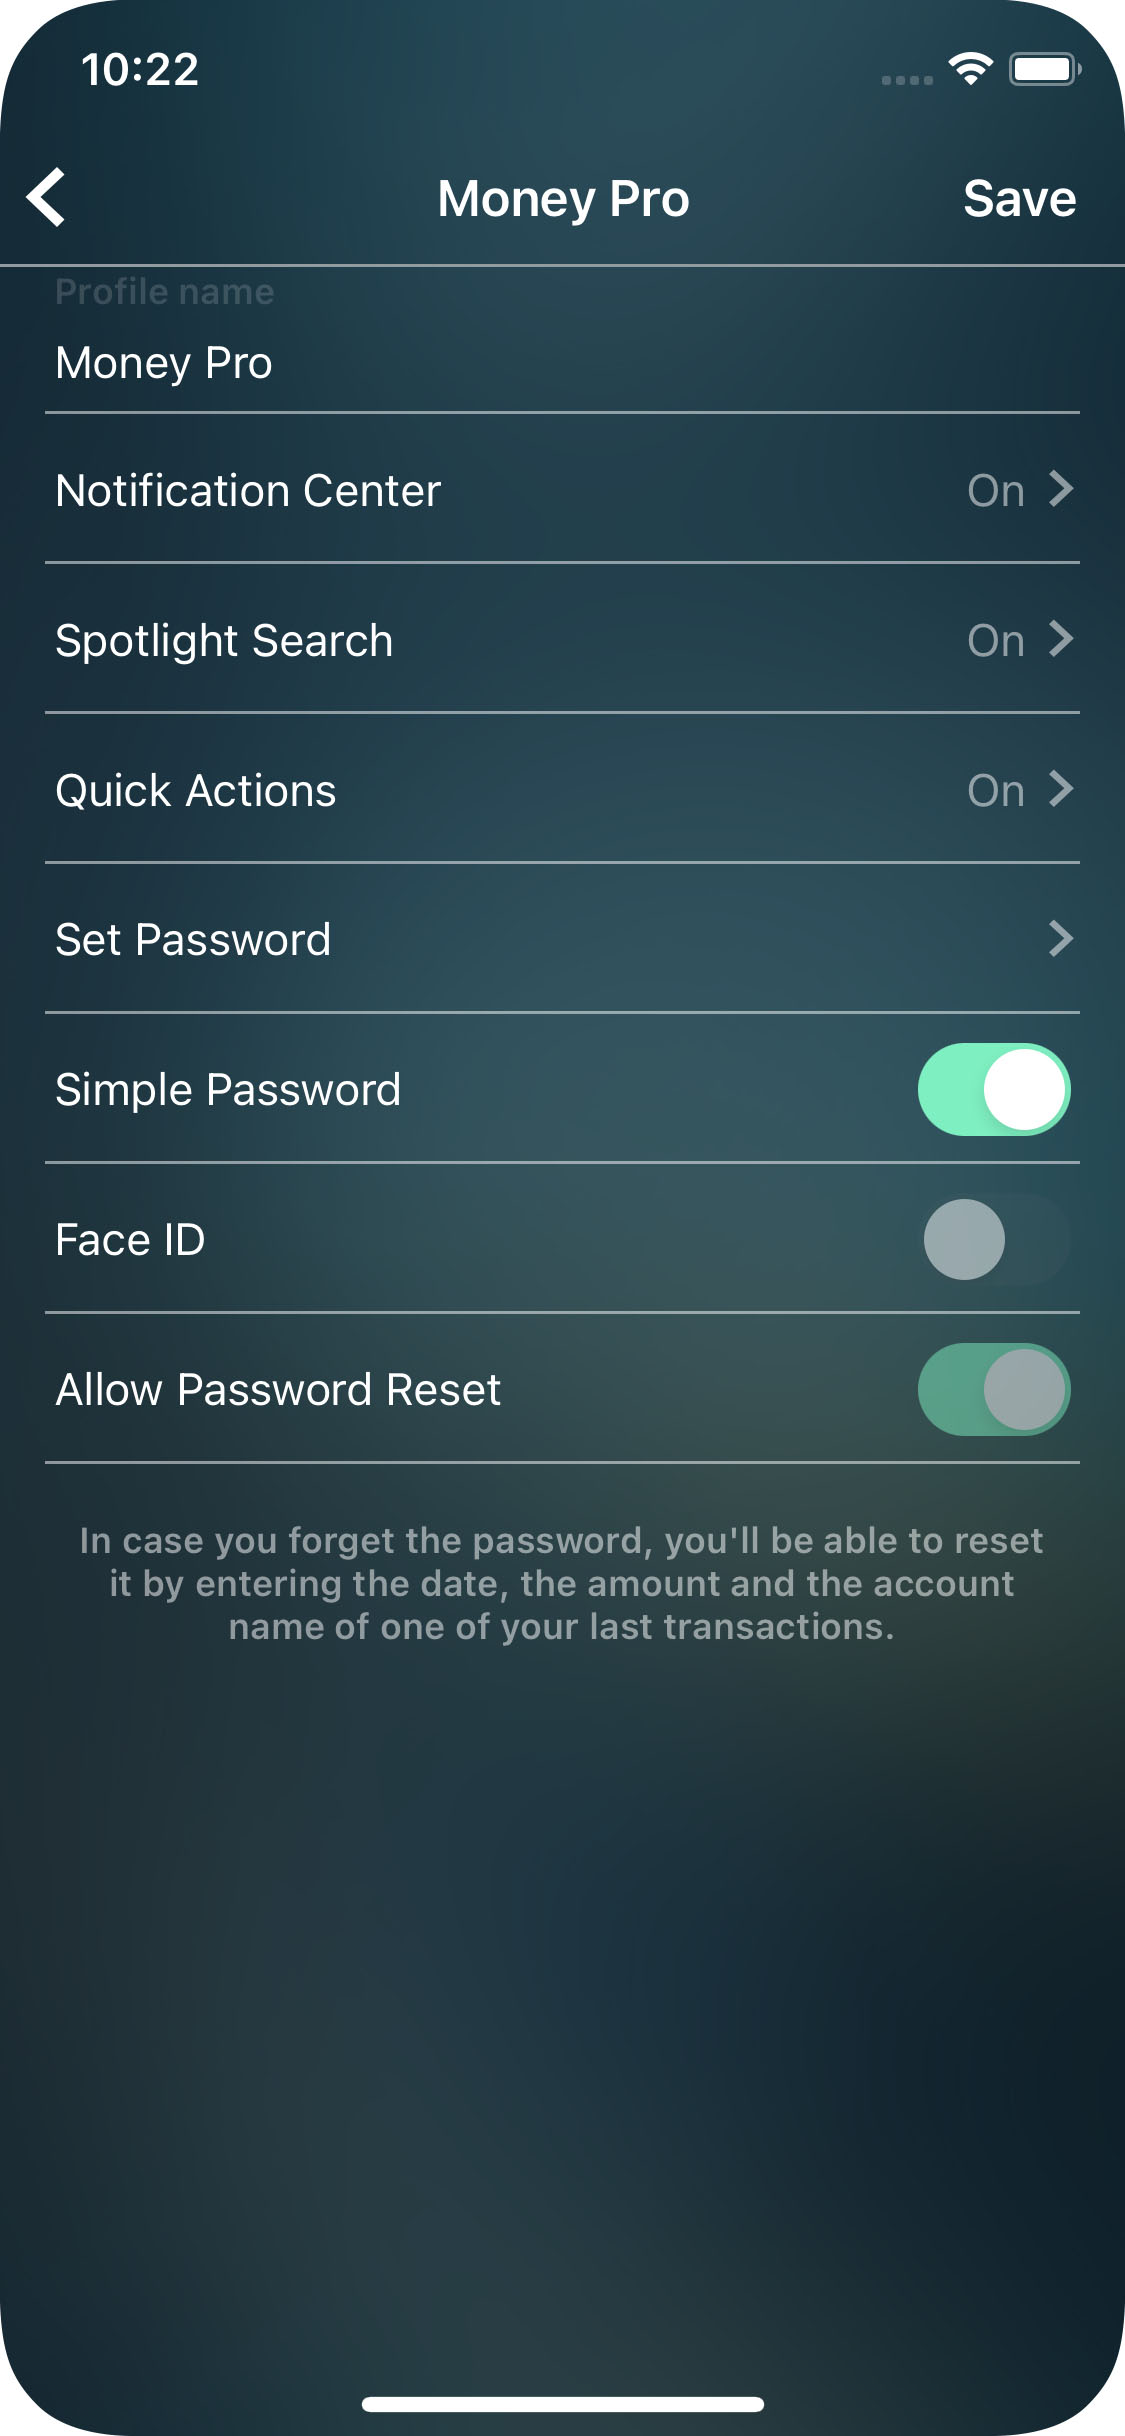
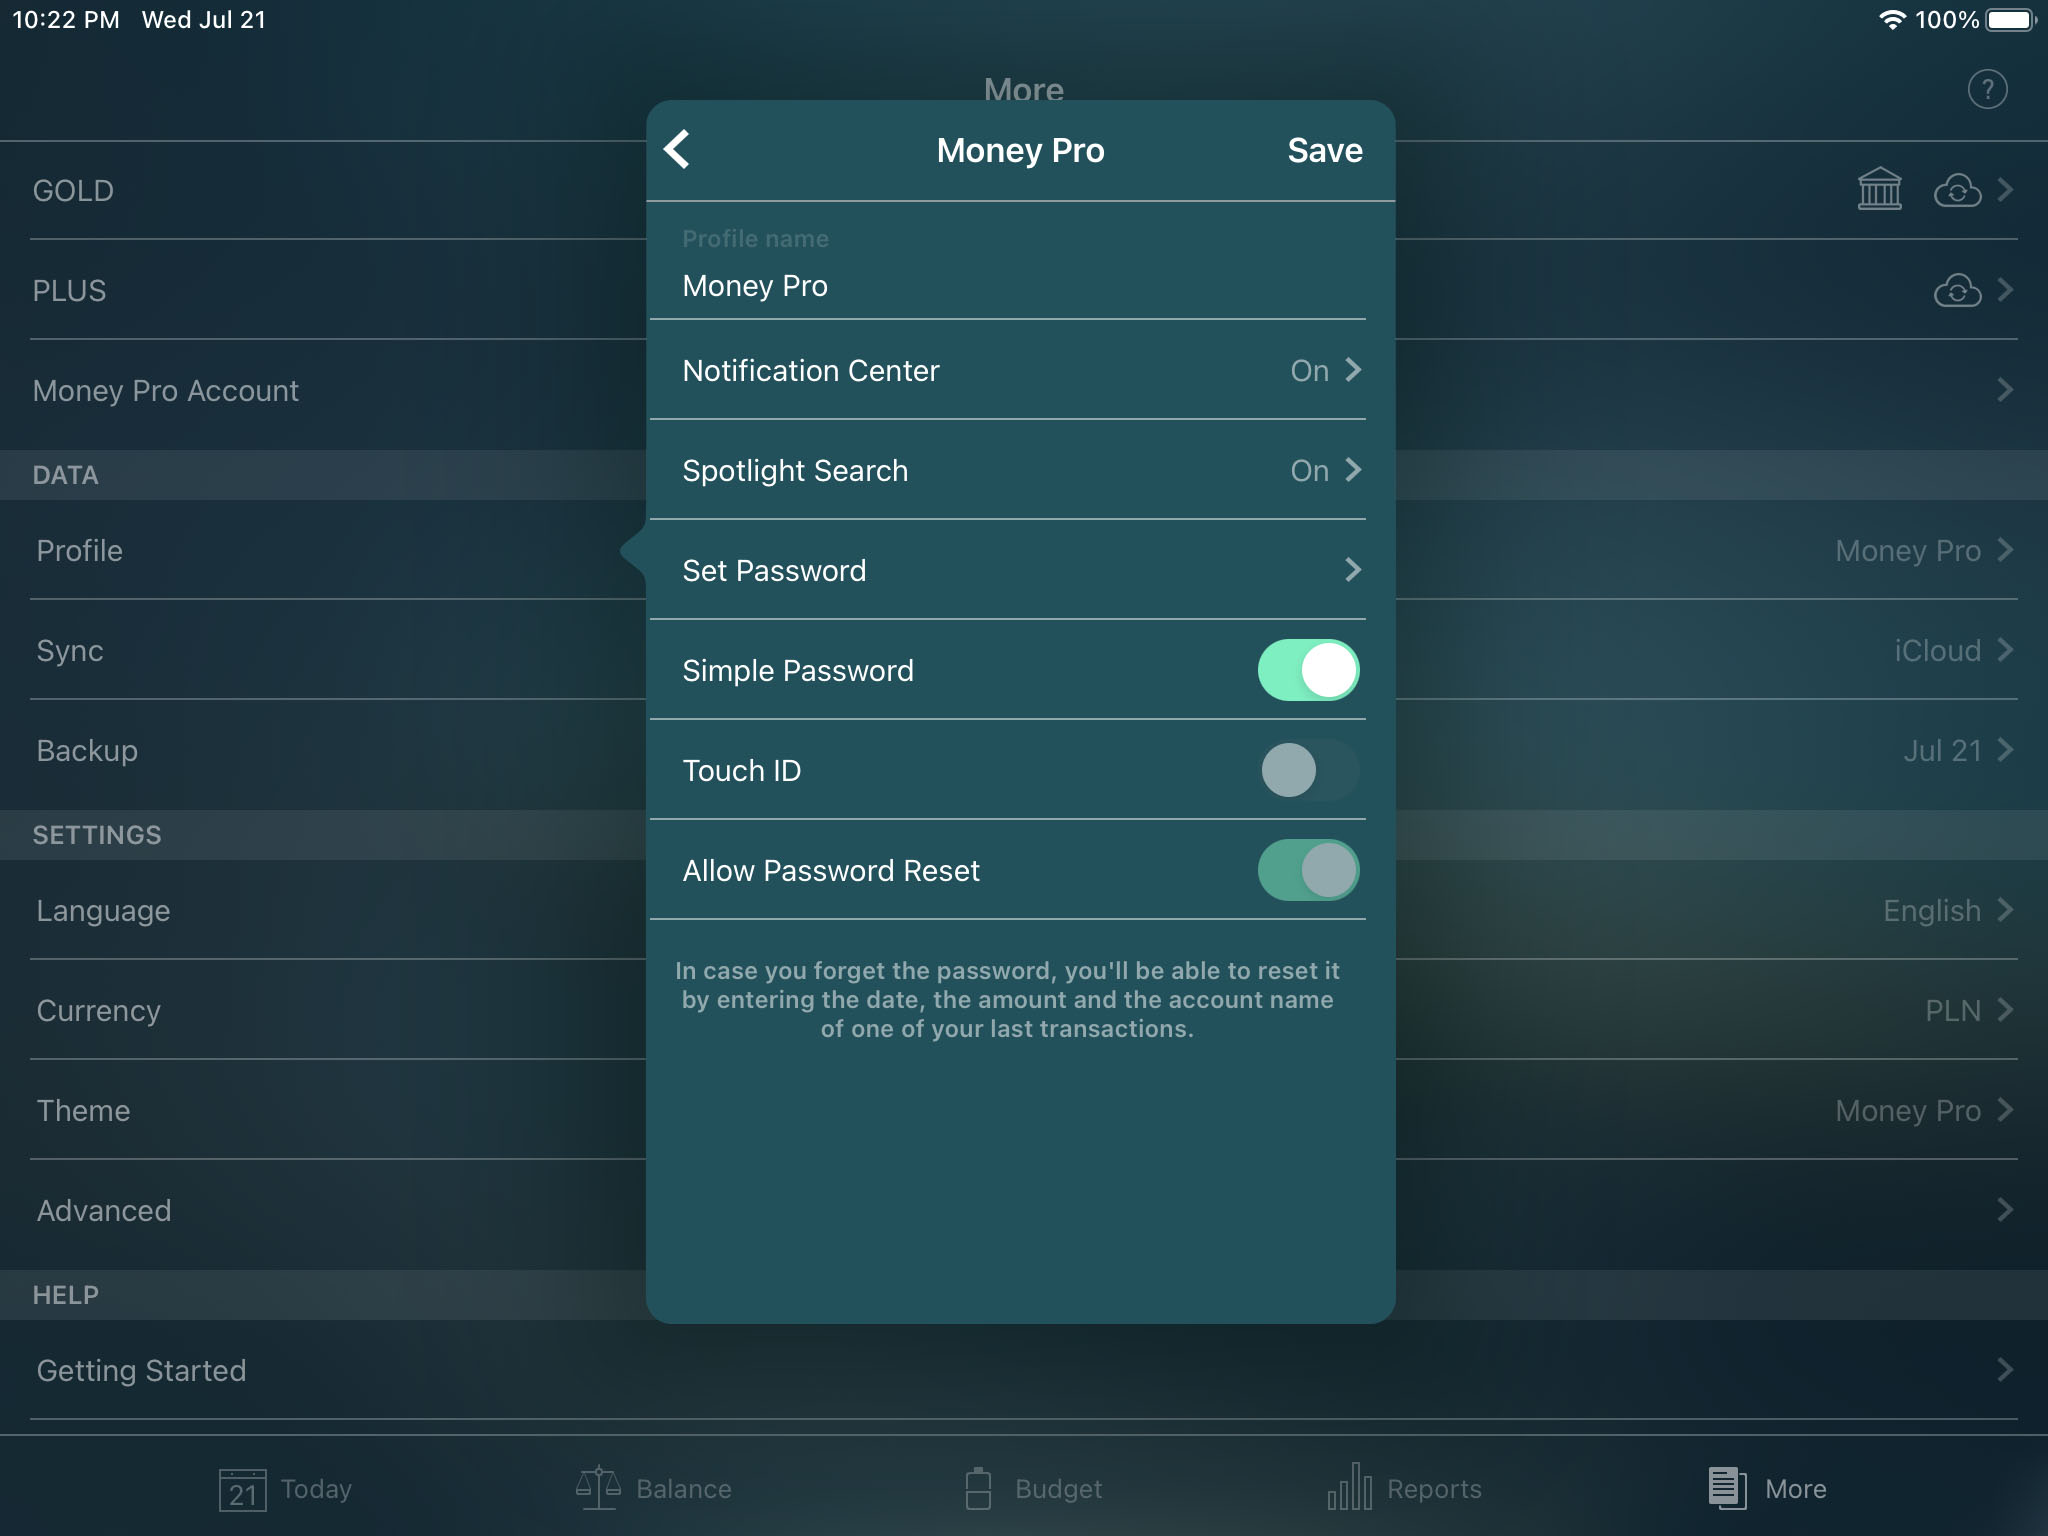
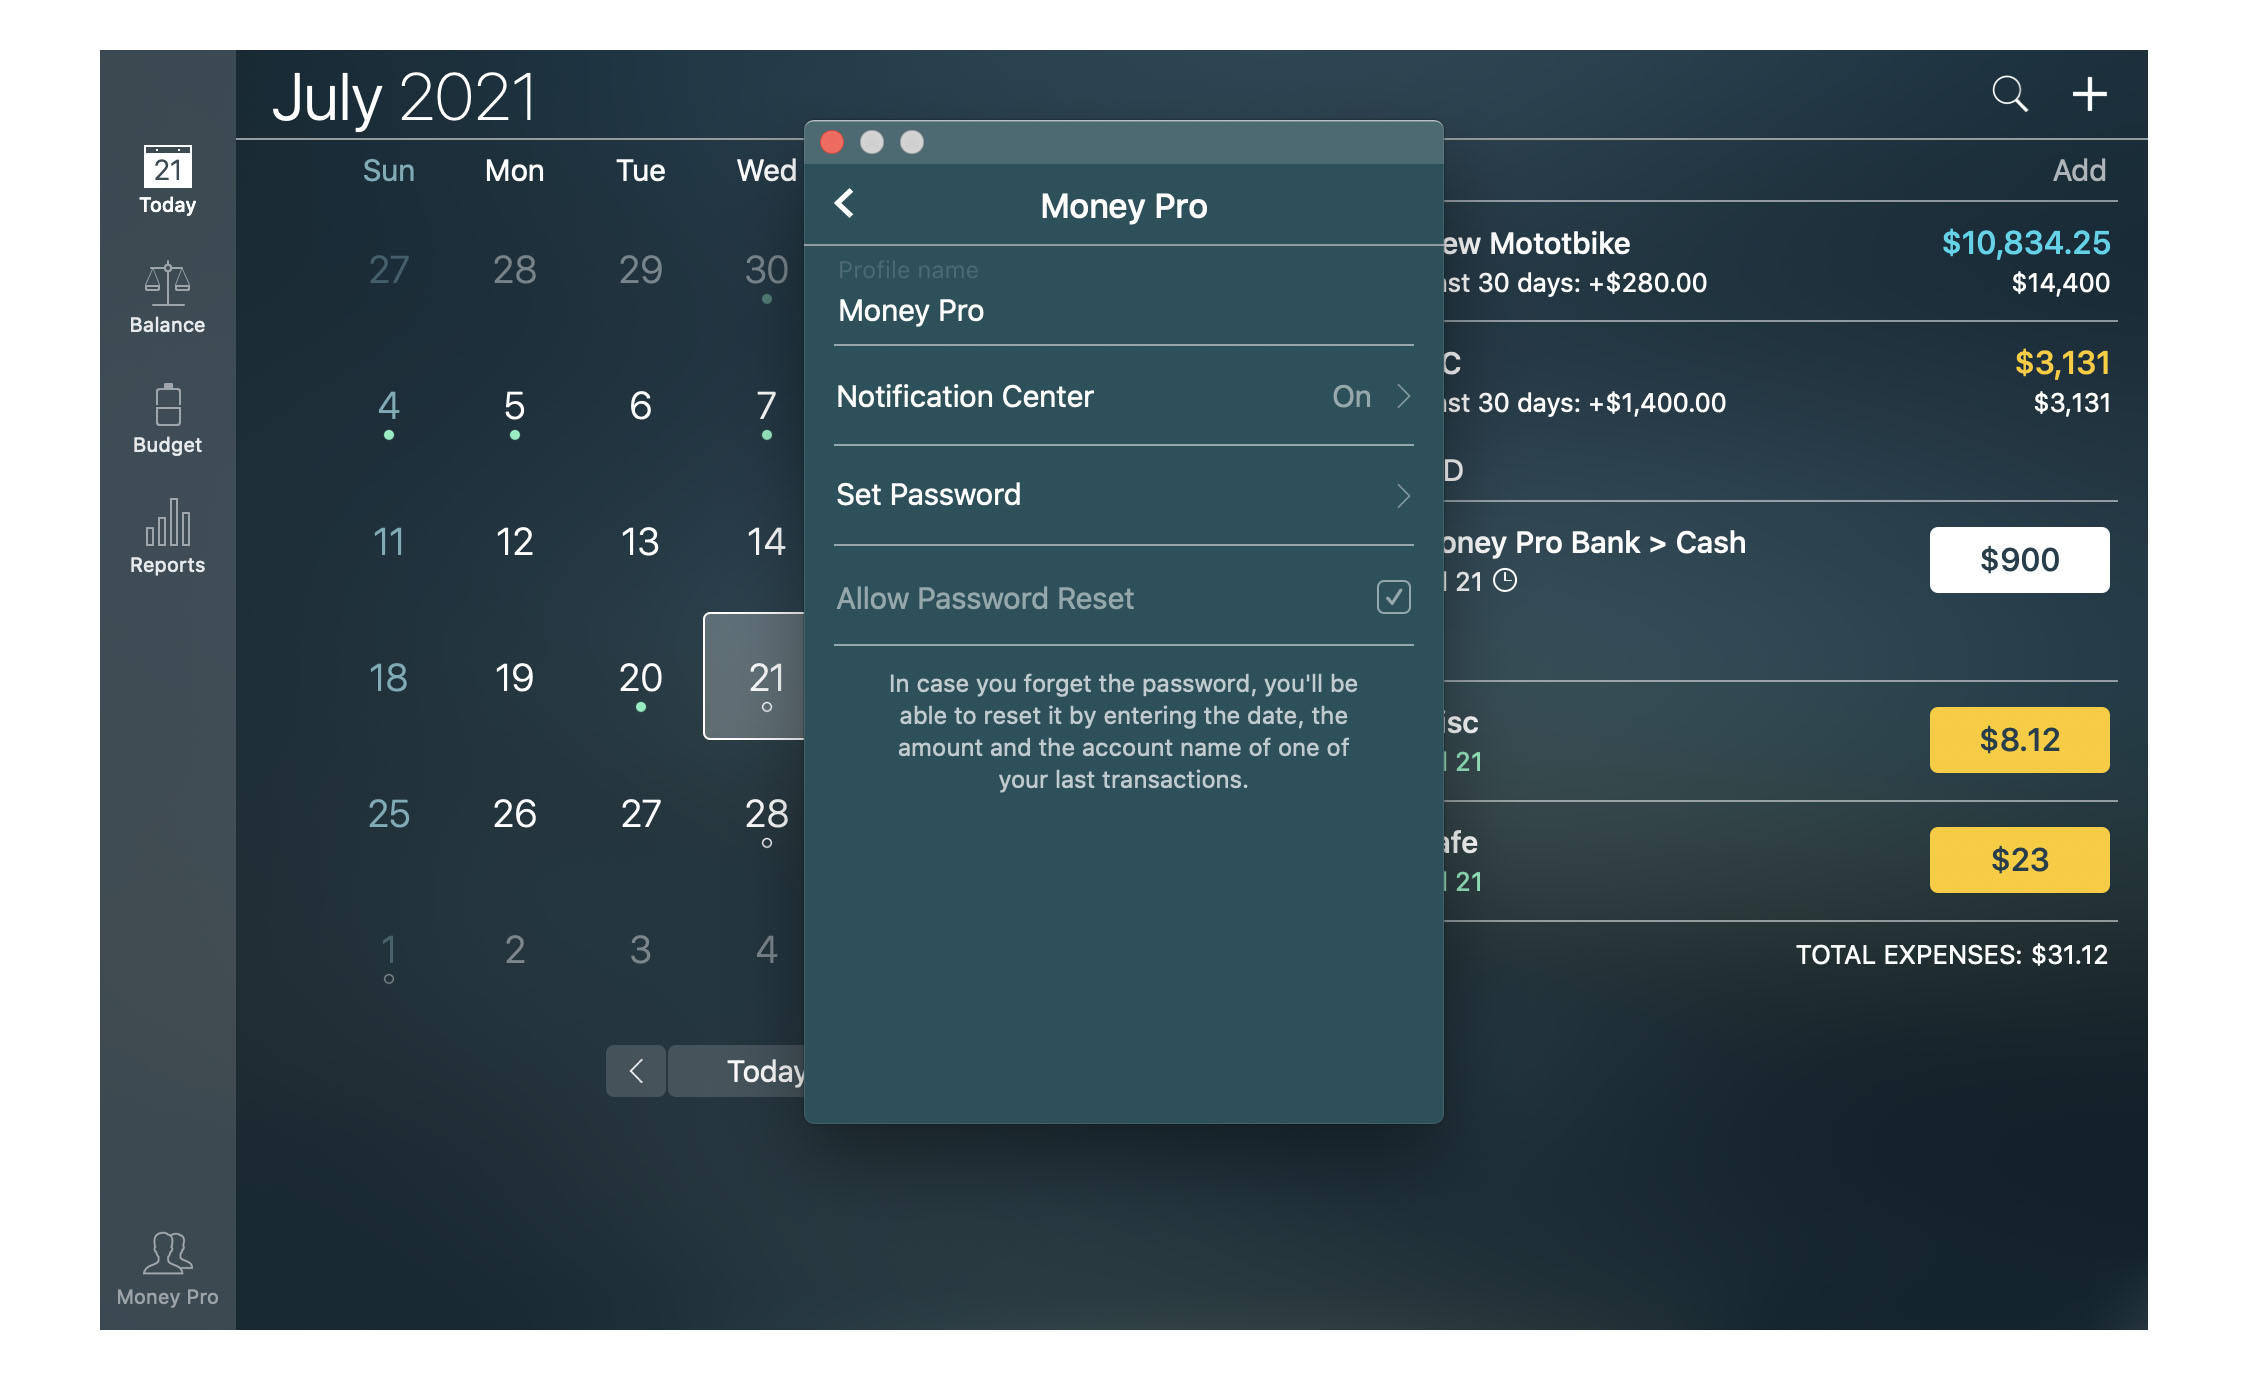
On the same form you can put a tick against the command “Allow Password Reset”. In case you forget the password, you’ll be able to reset it by entering the date, the amount, and the account name of one of your last transactions. If the entered parameters have been correct, the password will be canceled.
If you fail to reset the password, start from scratch either by adding a new profile or reinstalling the app. Please, note that in this case your financial history will be lost.
Two-factor authentication
Two-factor authentication is an extra layer of security for your data.
You can set up two-factor authentication in your Money Pro Account settings on any device.
General settings
To perform the necessary setup, you will need to download a third-party authenticator app (e.g. Google Authenticator, Duo Mobile, or any other). An authenticator app can be downloaded to any of your mobile devices. It is not necessary to have it on the same device you use Money Pro on.
If you have already downloaded an authenticator app, you can start setting up:
1. Open Money Pro and go to the More tab. Make sure you are signed in to your Money Pro Account on the device. If not, go to Money Pro Account and sign in.
2. Go to your Money Pro Account and tap your username to start the setup.
3. Tap the “Two-factor authentication” field. A QR code will be displayed.
- If your authenticator app is downloaded to a different device, scan the QR code with that device.
- If your authenticator app is downloaded to the same device where you use Money Pro, copy the key and paste it into the field in your authenticator app (or enter it using the keyboard)
4. Once the authenticator app has received the key, it will generate its own security code.
5. Copy the security code and go to Money Pro, tap “Next” on the QR code screen.
6. Paste the security code generated by your authenticator app into the Money Pro field and tap “Next”. Please note that the security code will be active for only a few seconds. If it has expired, you will need to use a new one (it will be automatically generated after the current code expires).
7. Once the security code is confirmed, you will see the two-factor authentication confirmation screen.
Sign in using two-factor authentication
When two-factor authentication has been set up:
1. Sign in to your Money Pro Account. After verifying your credentials (email and password), you will be prompted to enter a security code.
2. Go to your authenticator app, find the Money Pro entry, tap it and copy the temporary security code. Note that it will only be active for a few seconds (a new code will be generated automatically after the current one expires).
3. Enter the security code into the field in Money Pro. Once the security code verification is complete, you will be signed in to your Money Pro Account.
Change settings and turn off two-factor authentication
The two-factor authentication settings allow you to:
1. Turn off two-factor authentication or change its process (change the authenticator app)
Go to the two-factor authentication settings.
- Open Money Pro and go to the More tab. Make sure you are signed in to your Money Pro account on the device. If not, go to Money Pro Account and sign in.
- Go to Money Pro Account and tap your username to configure it.
- Go to the “Two-factor authentication” field.
- To change the authentication process (if you change the authentication app), you need to disable authentication by setting the switch to the off position. Then, set up authentication again. (see General settings).
2. Generate a new recovery key in case you have lost the previous one.
- To generate a new recovery key, go to the “Recovery key” field and tap “Get a new recovery key”. A new key will appear on the screen.
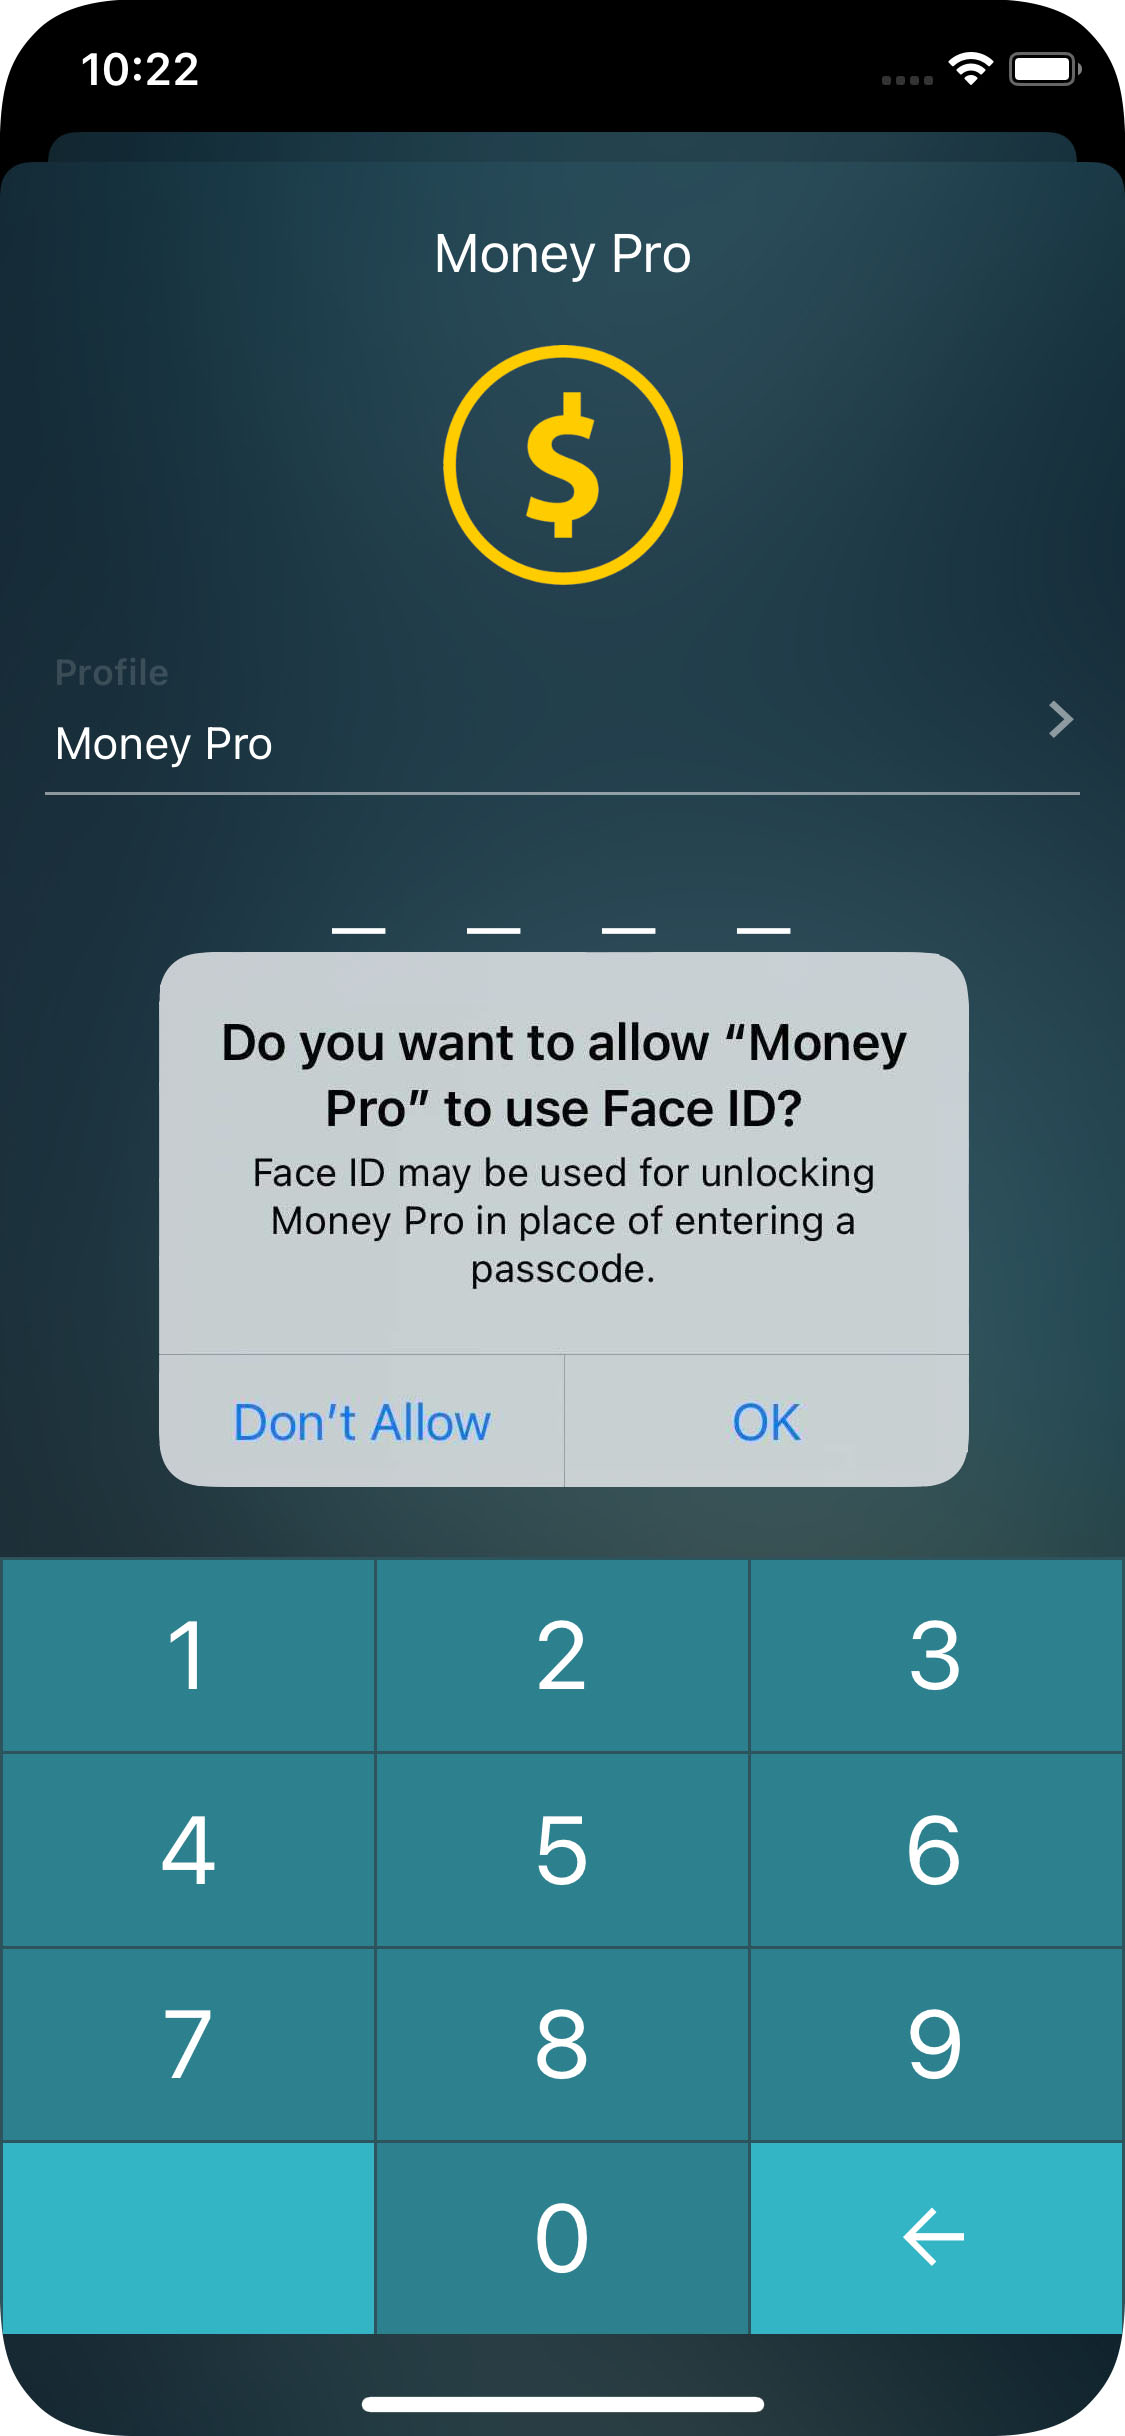
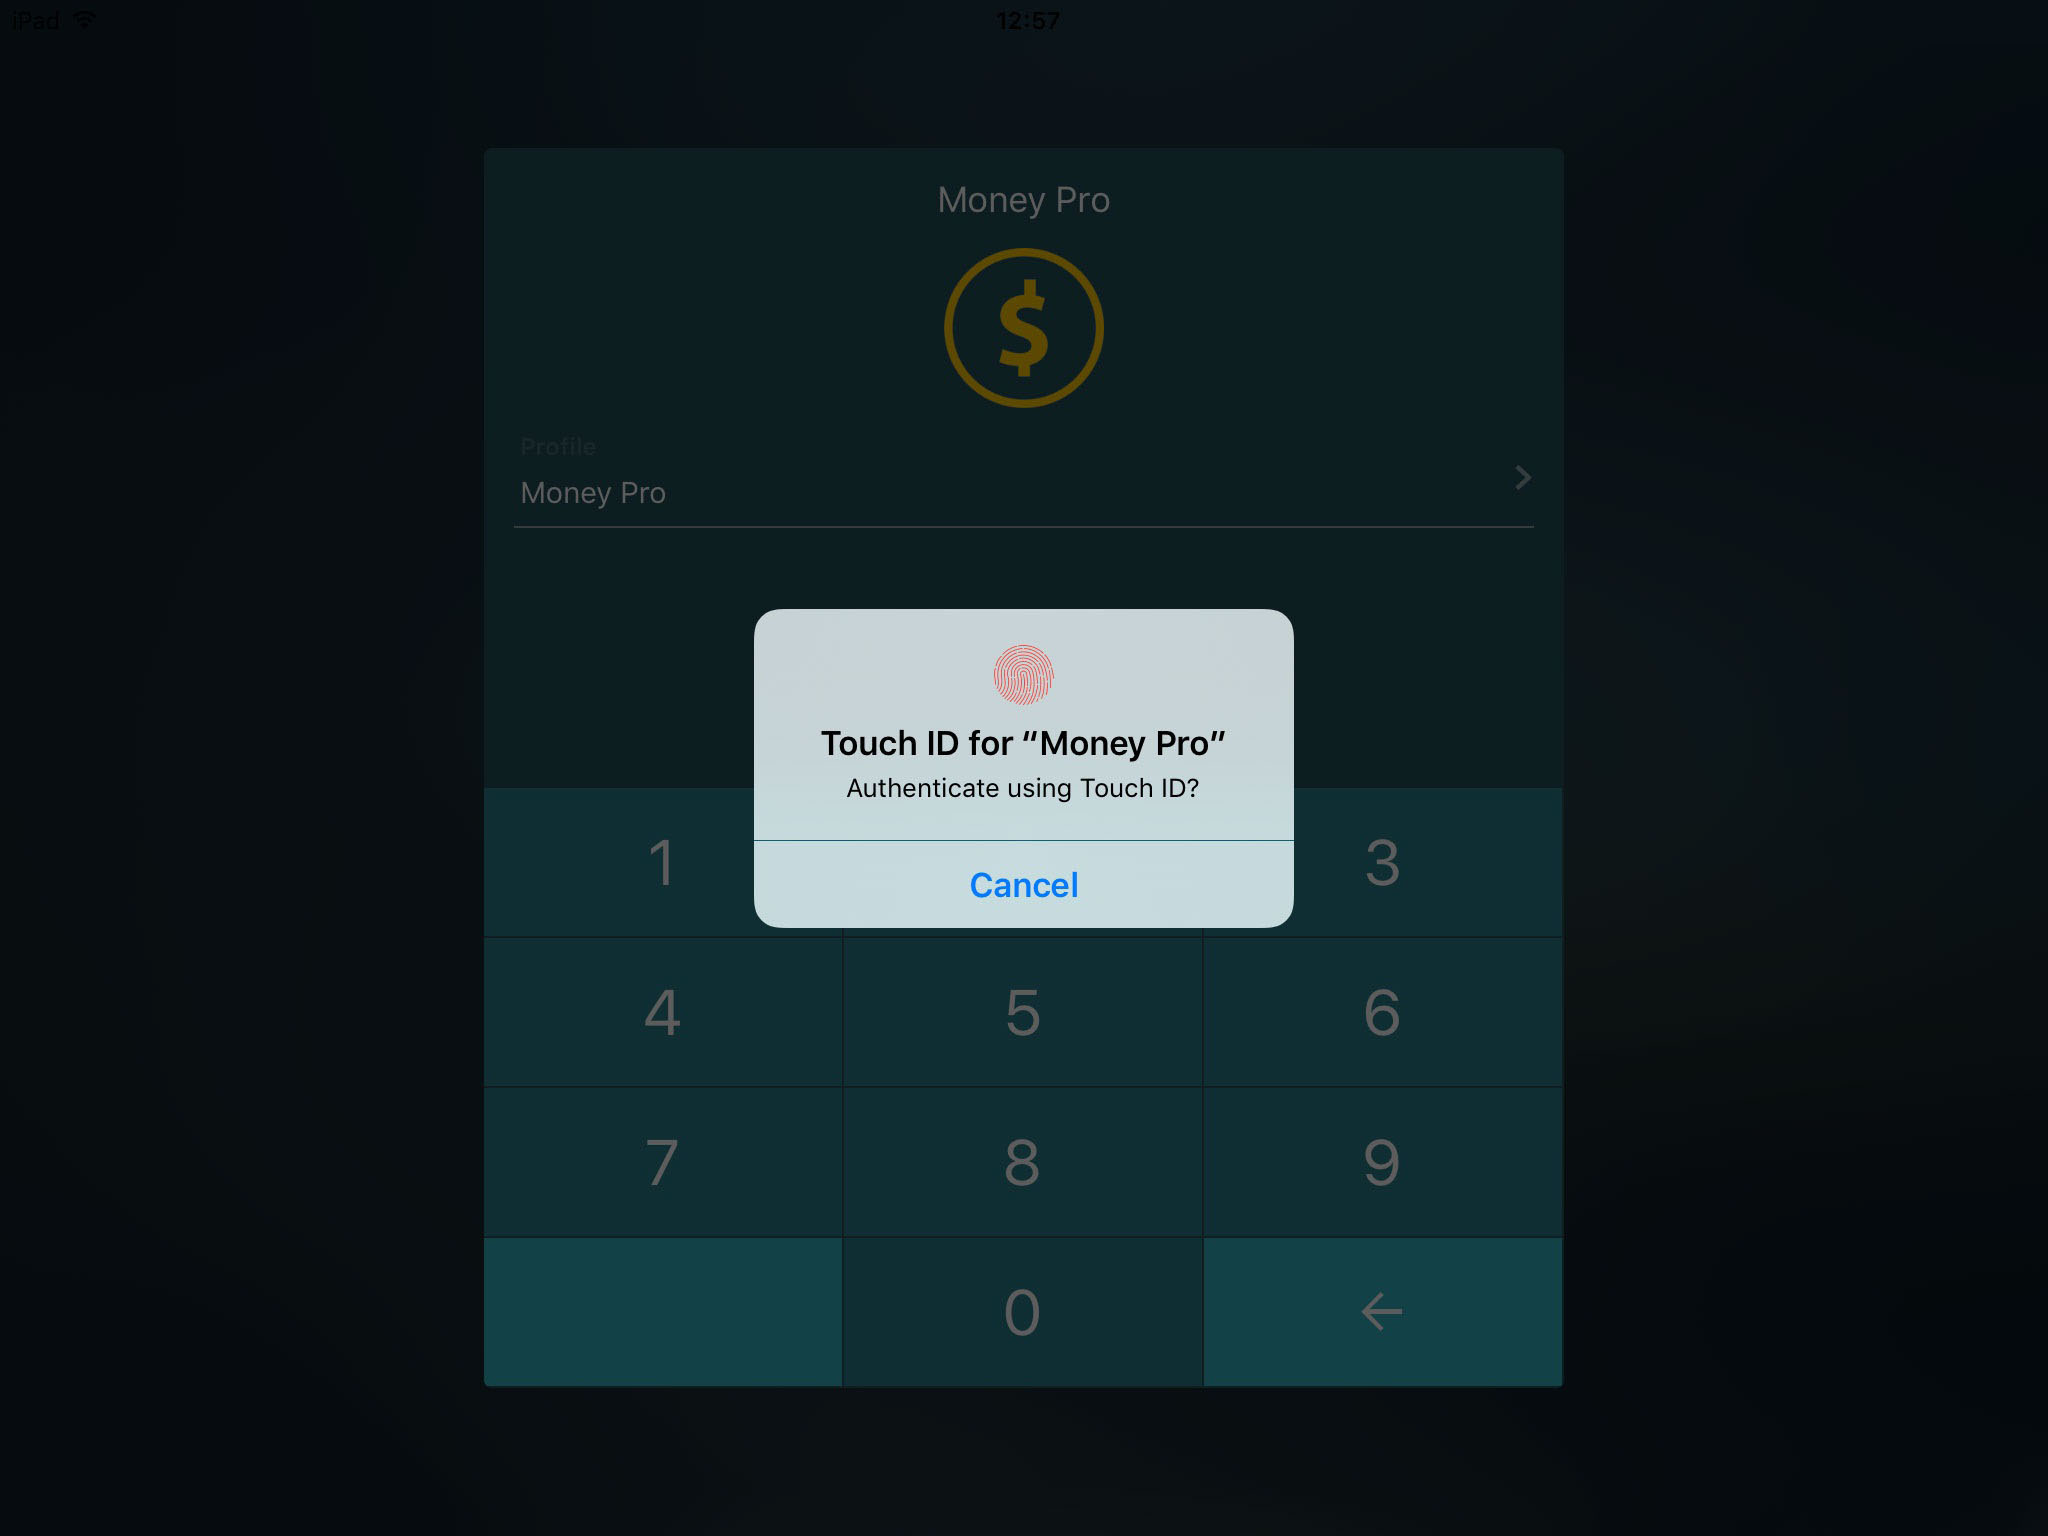
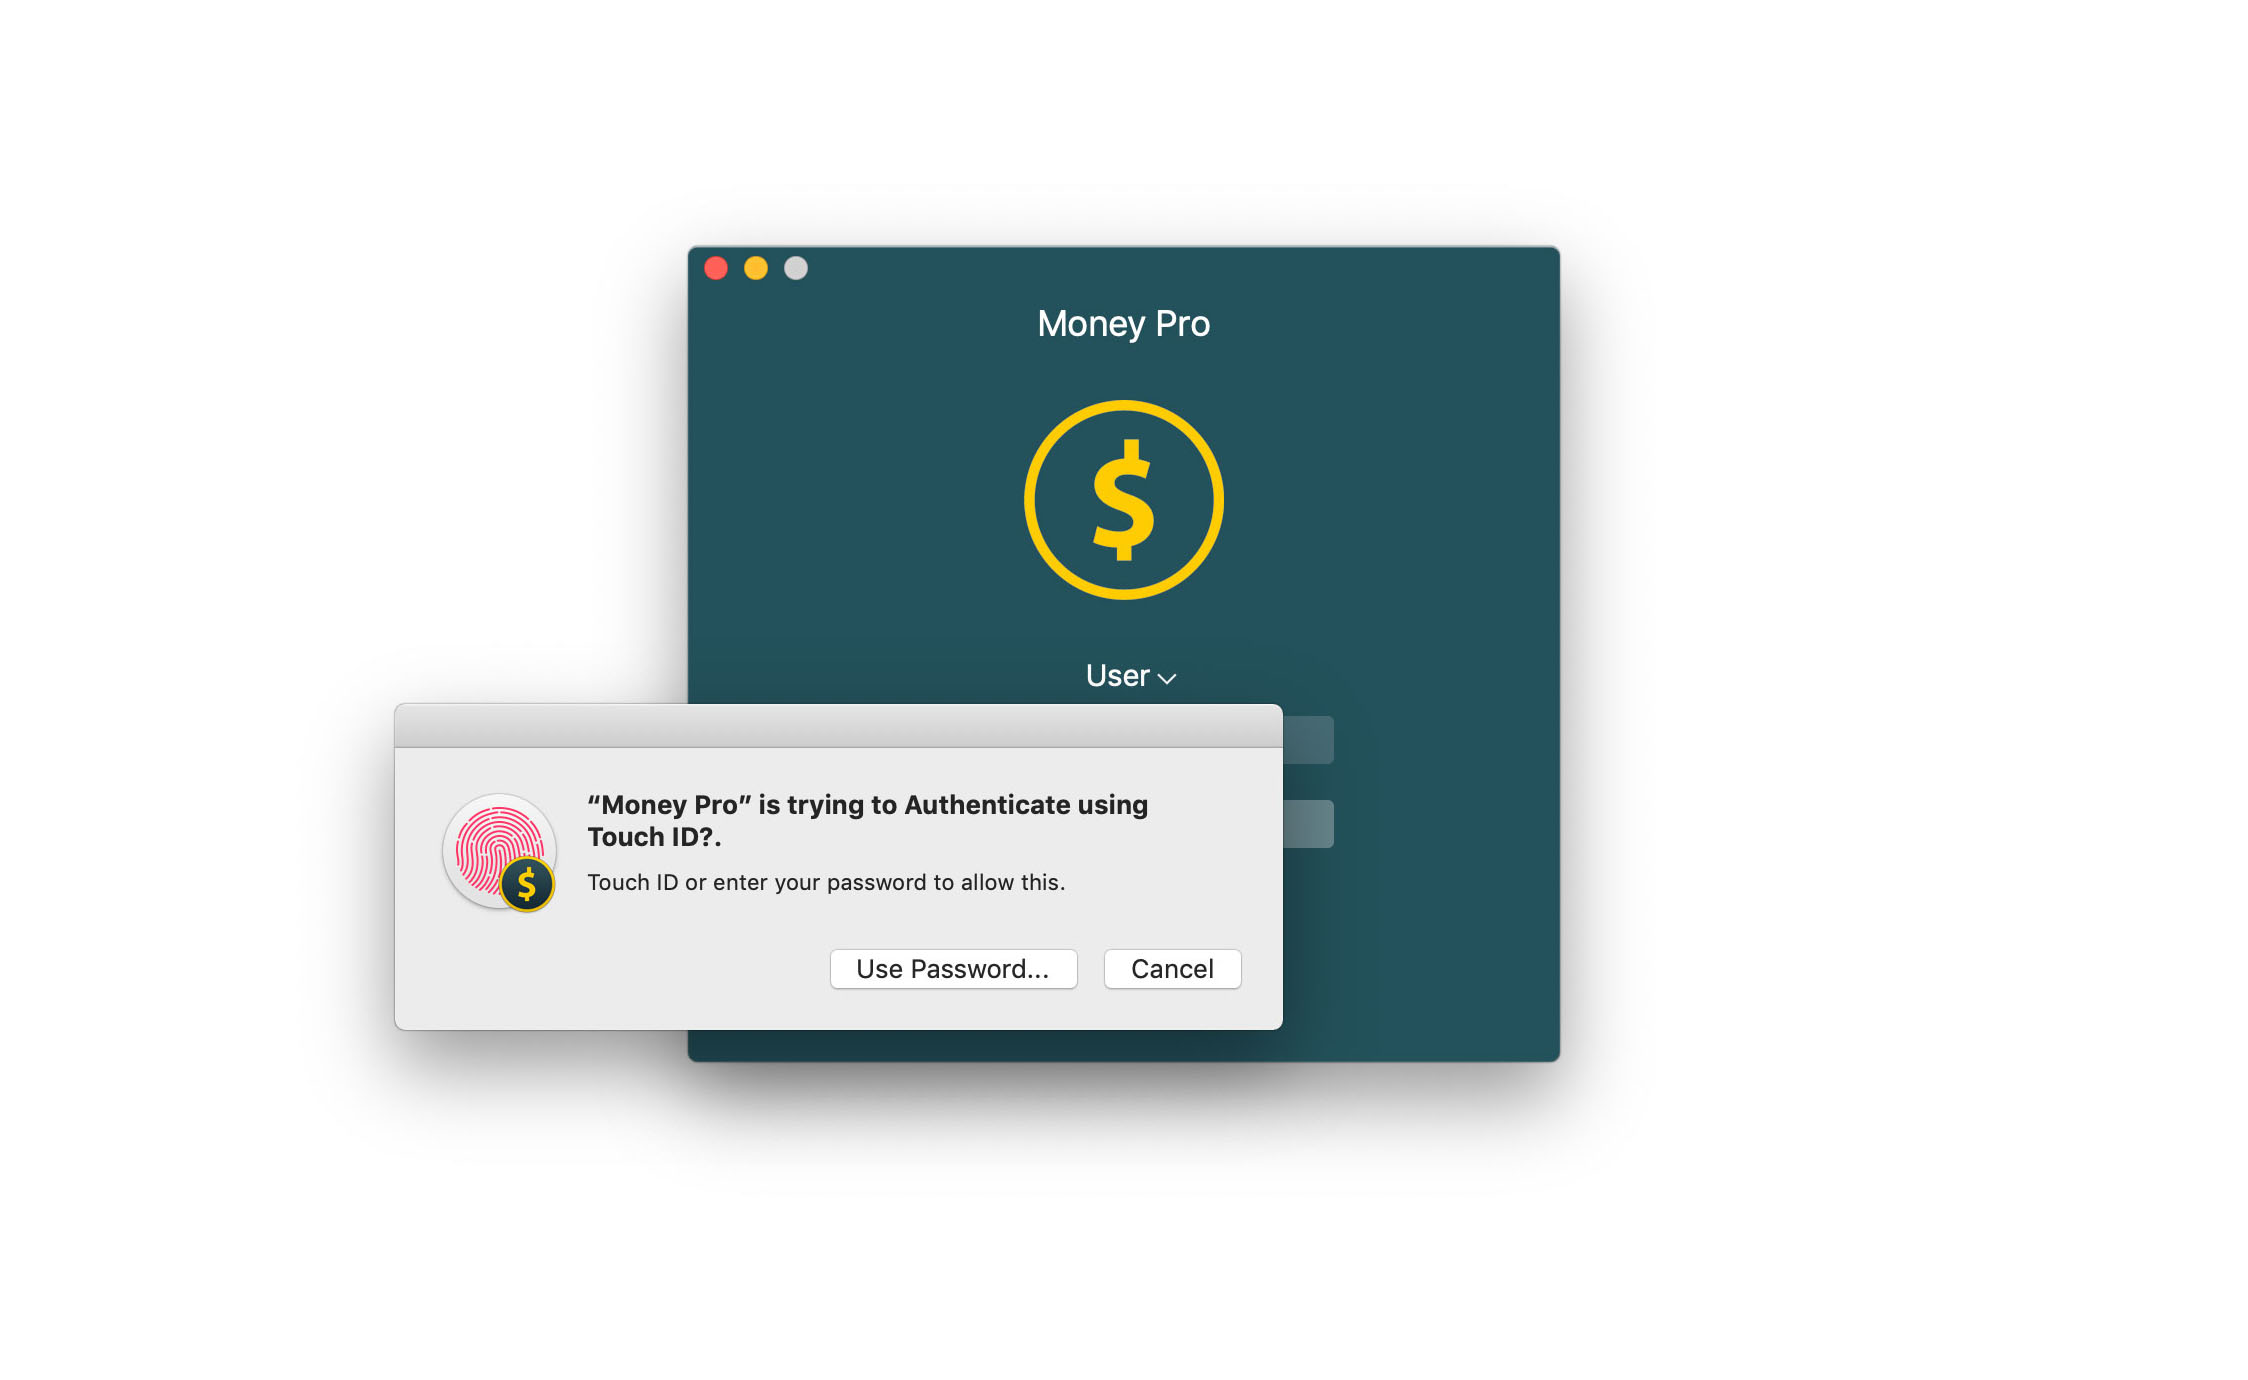
Touch ID (Face ID)
Touch ID enables you to unlock Money Pro automatically with a biometric fingerprint authentication technology instead of entering a password manually. It is a convenient and highly secure way to access your data.
To enable Touch ID for one of your profiles go to More > Profile, tap the button “i” next to Profile’s name and set a password as described above. Then turn on “Touch ID”. Touch ID can be enabled only for password-protected profiles.
To access data, touch your finger to the identified button (but don’t press it) and hold it there for the app to open. You can also choose to enter your password.
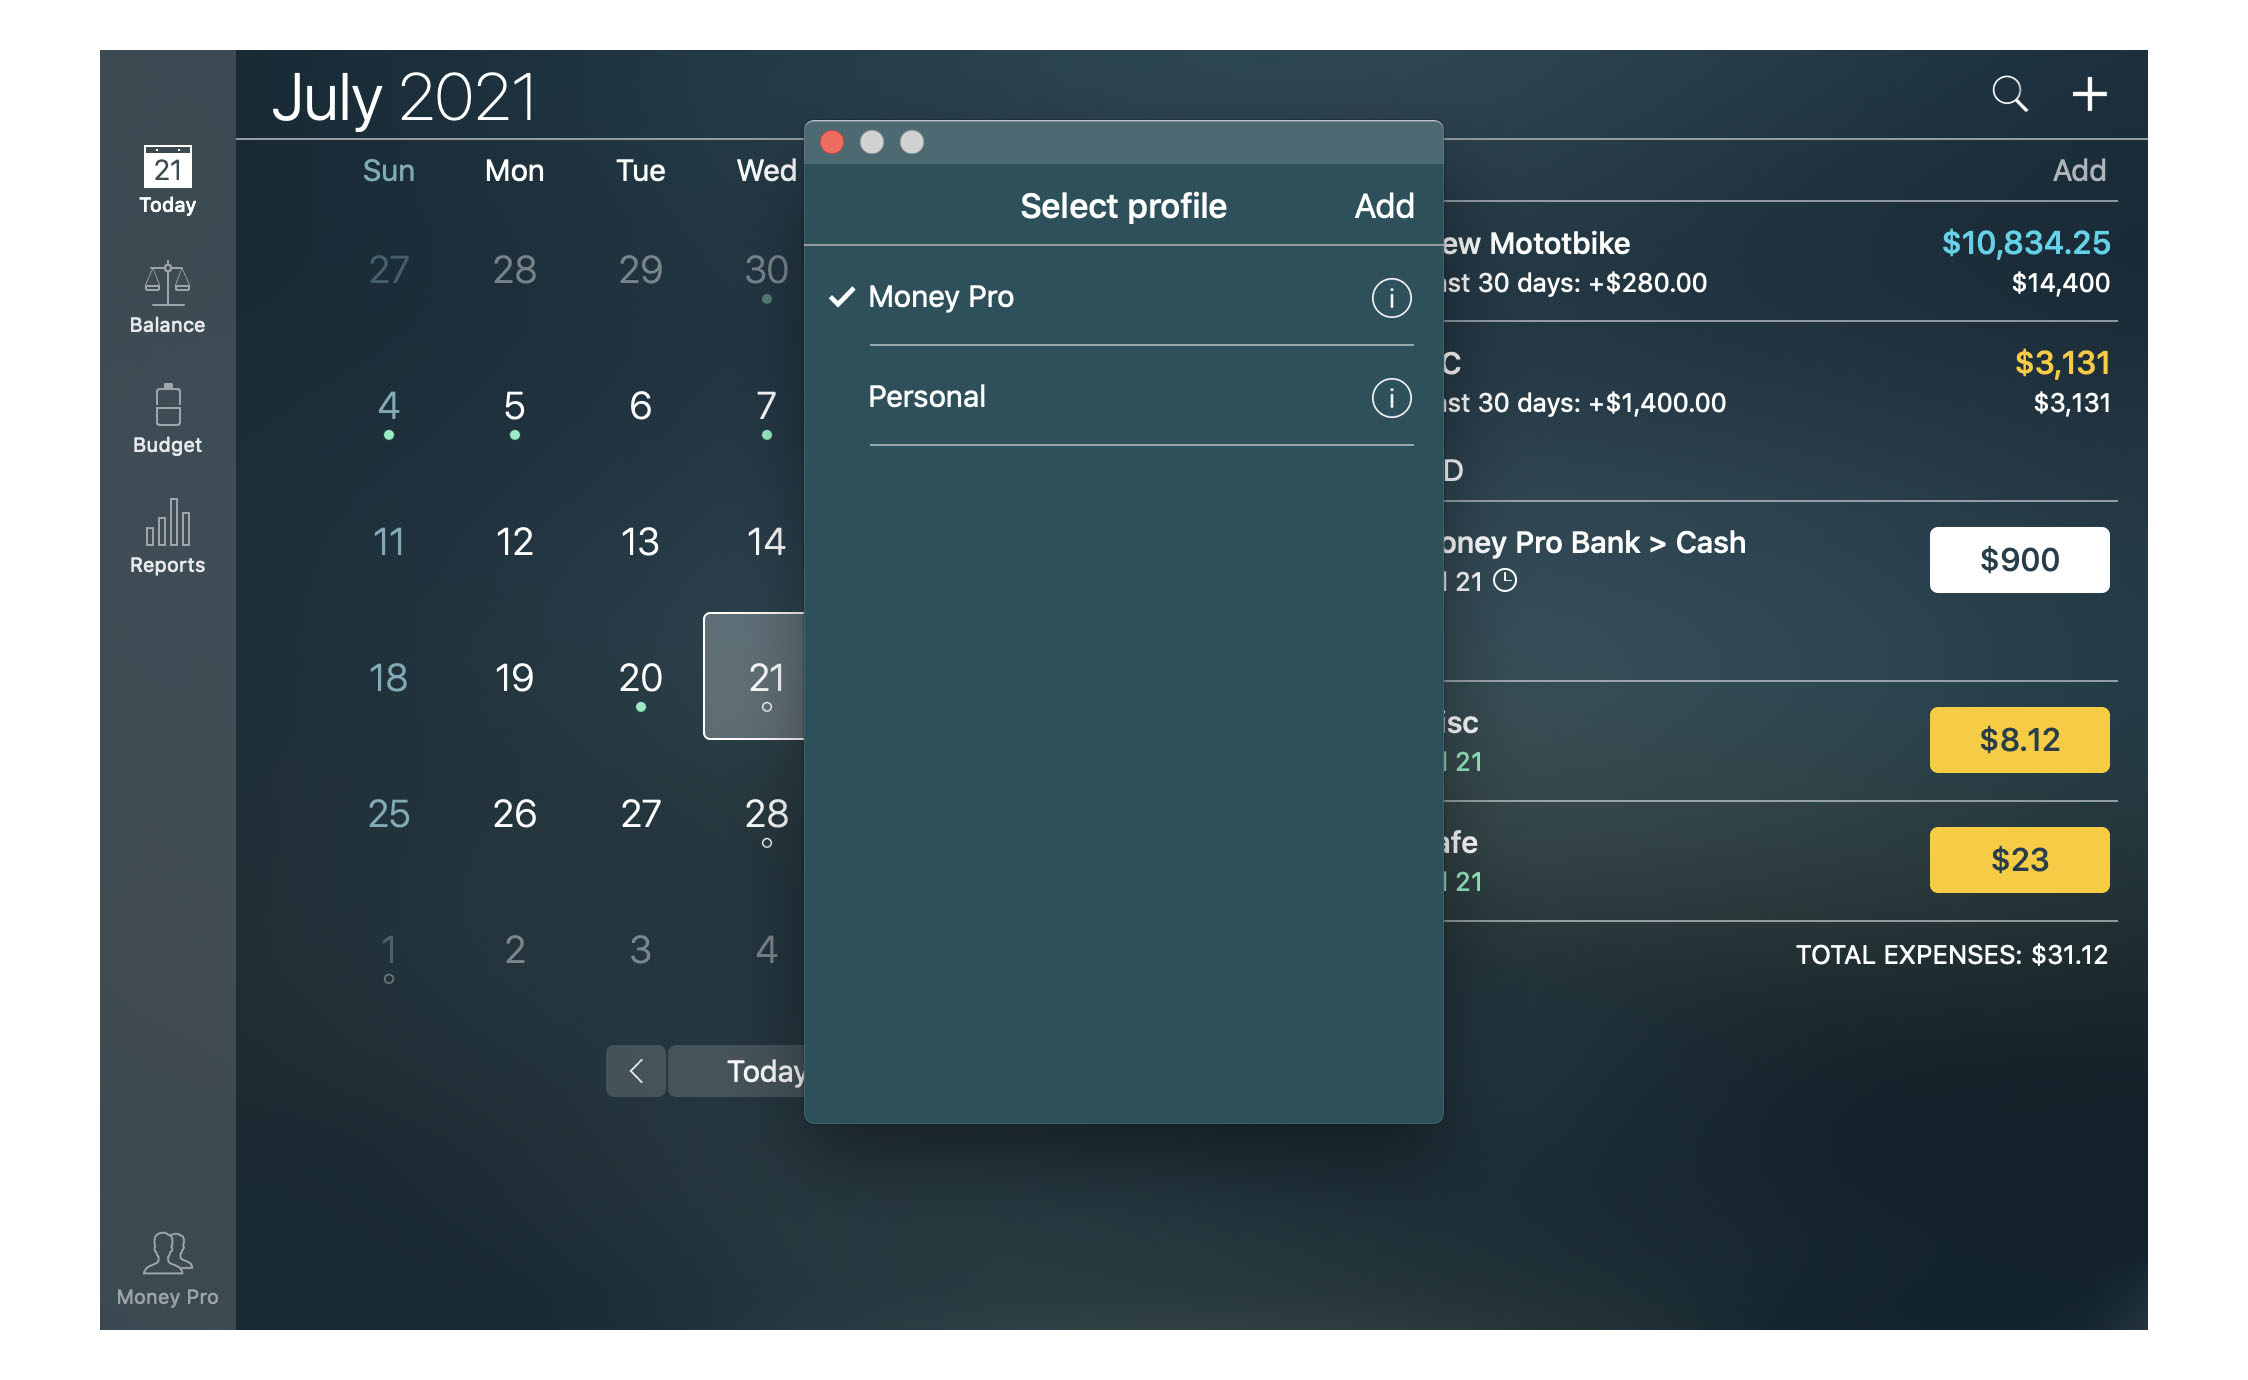
Profiles
You can create separate profiles in the app to keep separate accounting records. This allows for complete financial management of two different entities. You can make detailed reports for each profile and set a separate password for each one.
To create a new profile on iPhone or iPad, go to More > Profile, tap “Add”, type your new profile’s name, set a password (if needed), and save the changes. To create a new profile on Mac go to the Main Menu > Money Pro > Profiles.
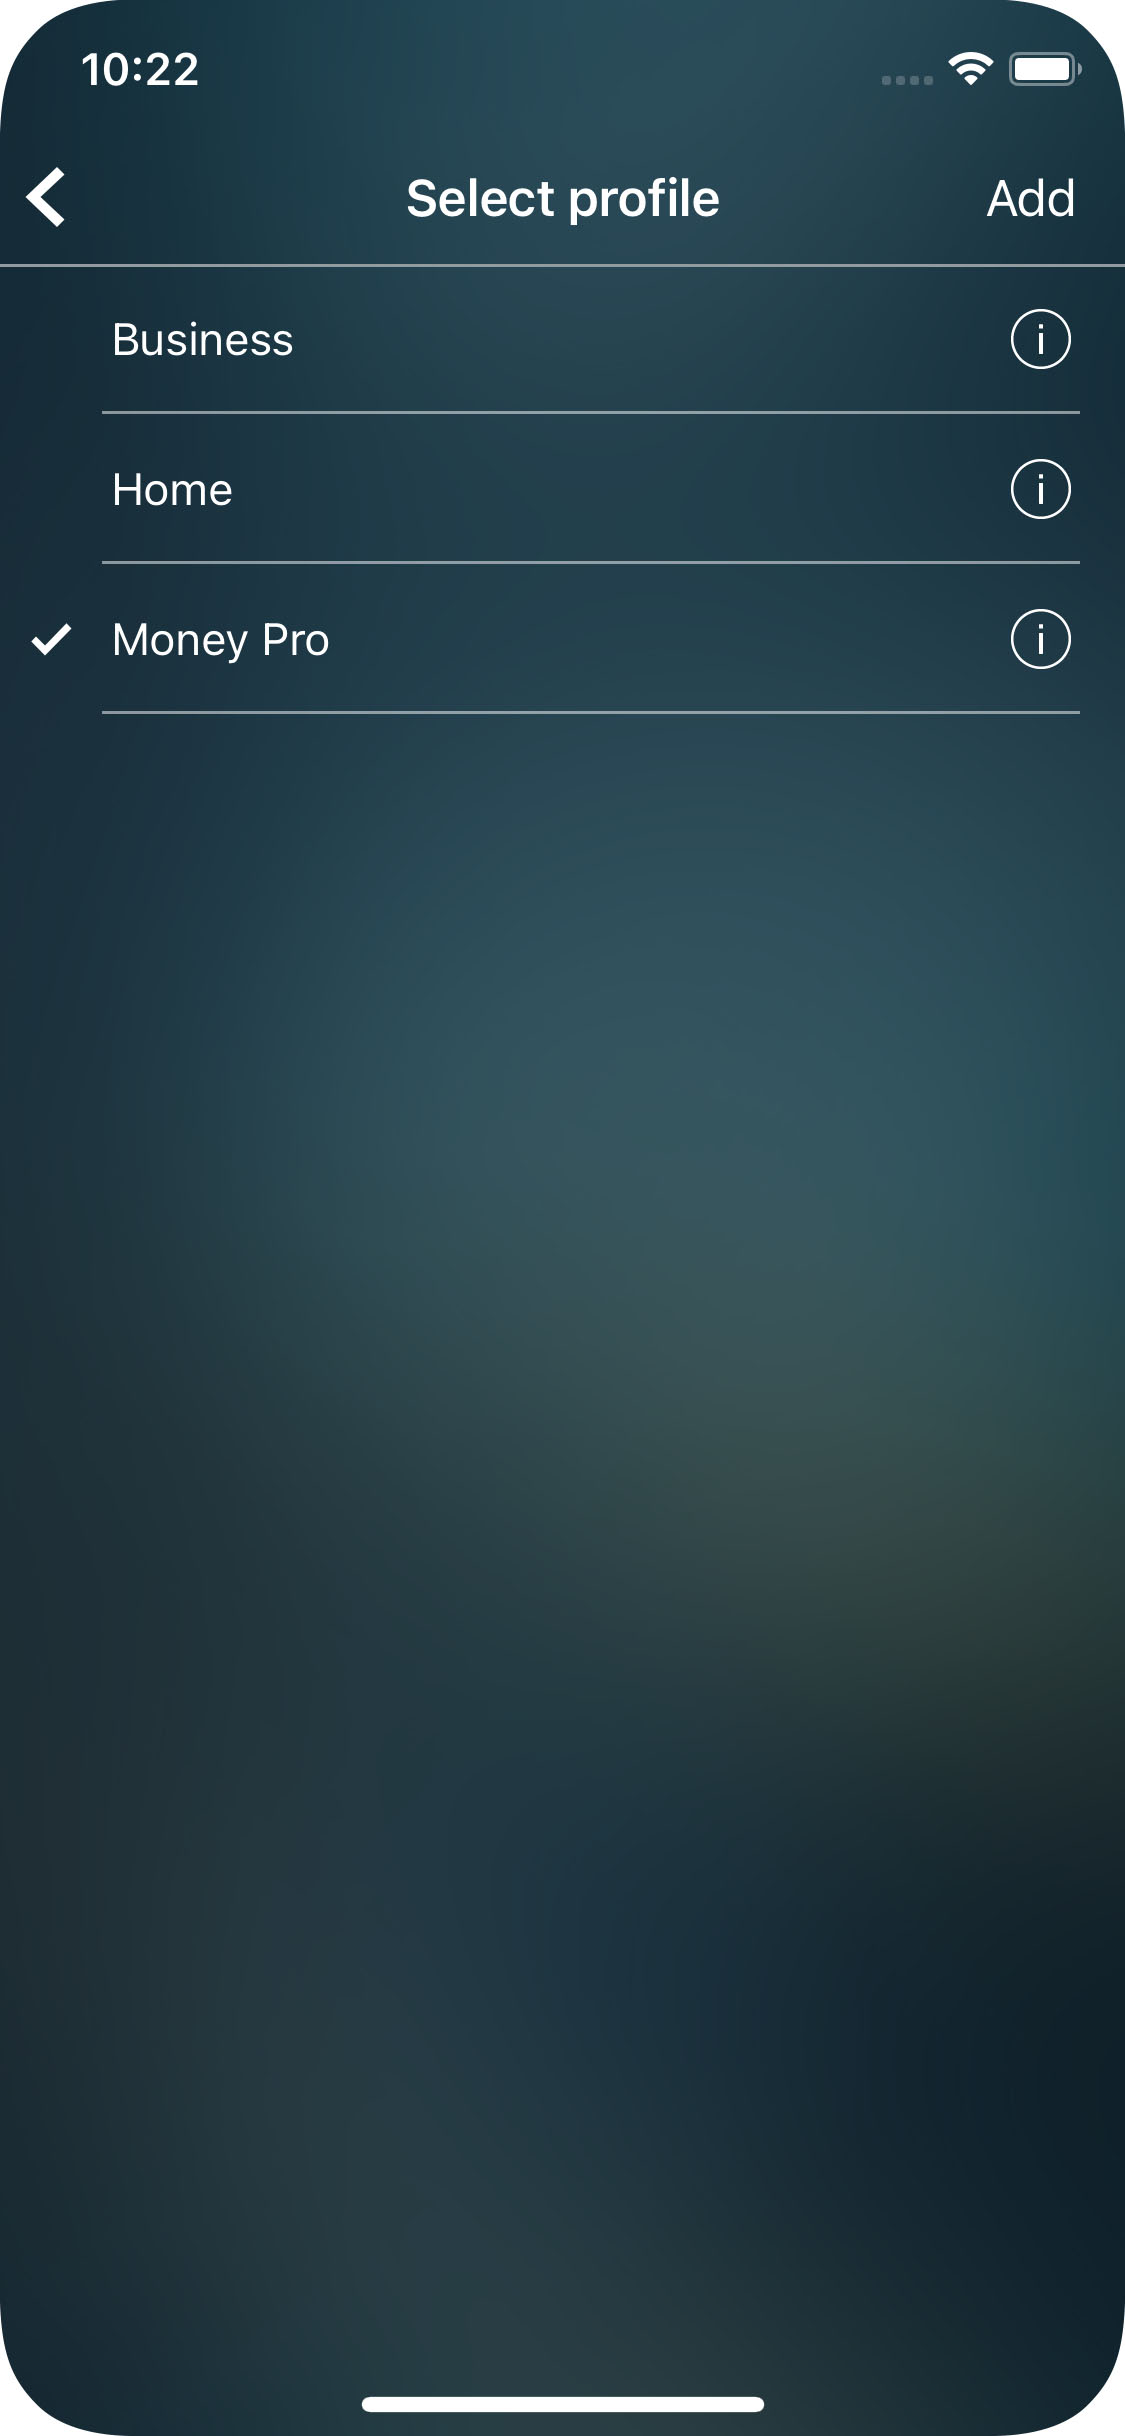

To delete a profile, tap/click the button “i” next to Profile’s name and “Delete”. Make sure to select another profile as active. The current profile cannot be deleted.
Money Pro Sync (iPhone, iPad, Android, Mac, Windows & Family Sharing)
Money Pro Sync allows you to manage family expenses. One user can sync up to 5 devices on different platforms and join up to 10 users to share the same profile.
The service is provided for a small monthly fee and is available with the PLUS (Money Pro Sync) or GOLD (Money Pro Sync and Online Banking) subscriptions.
Money Pro Sync: General Settings
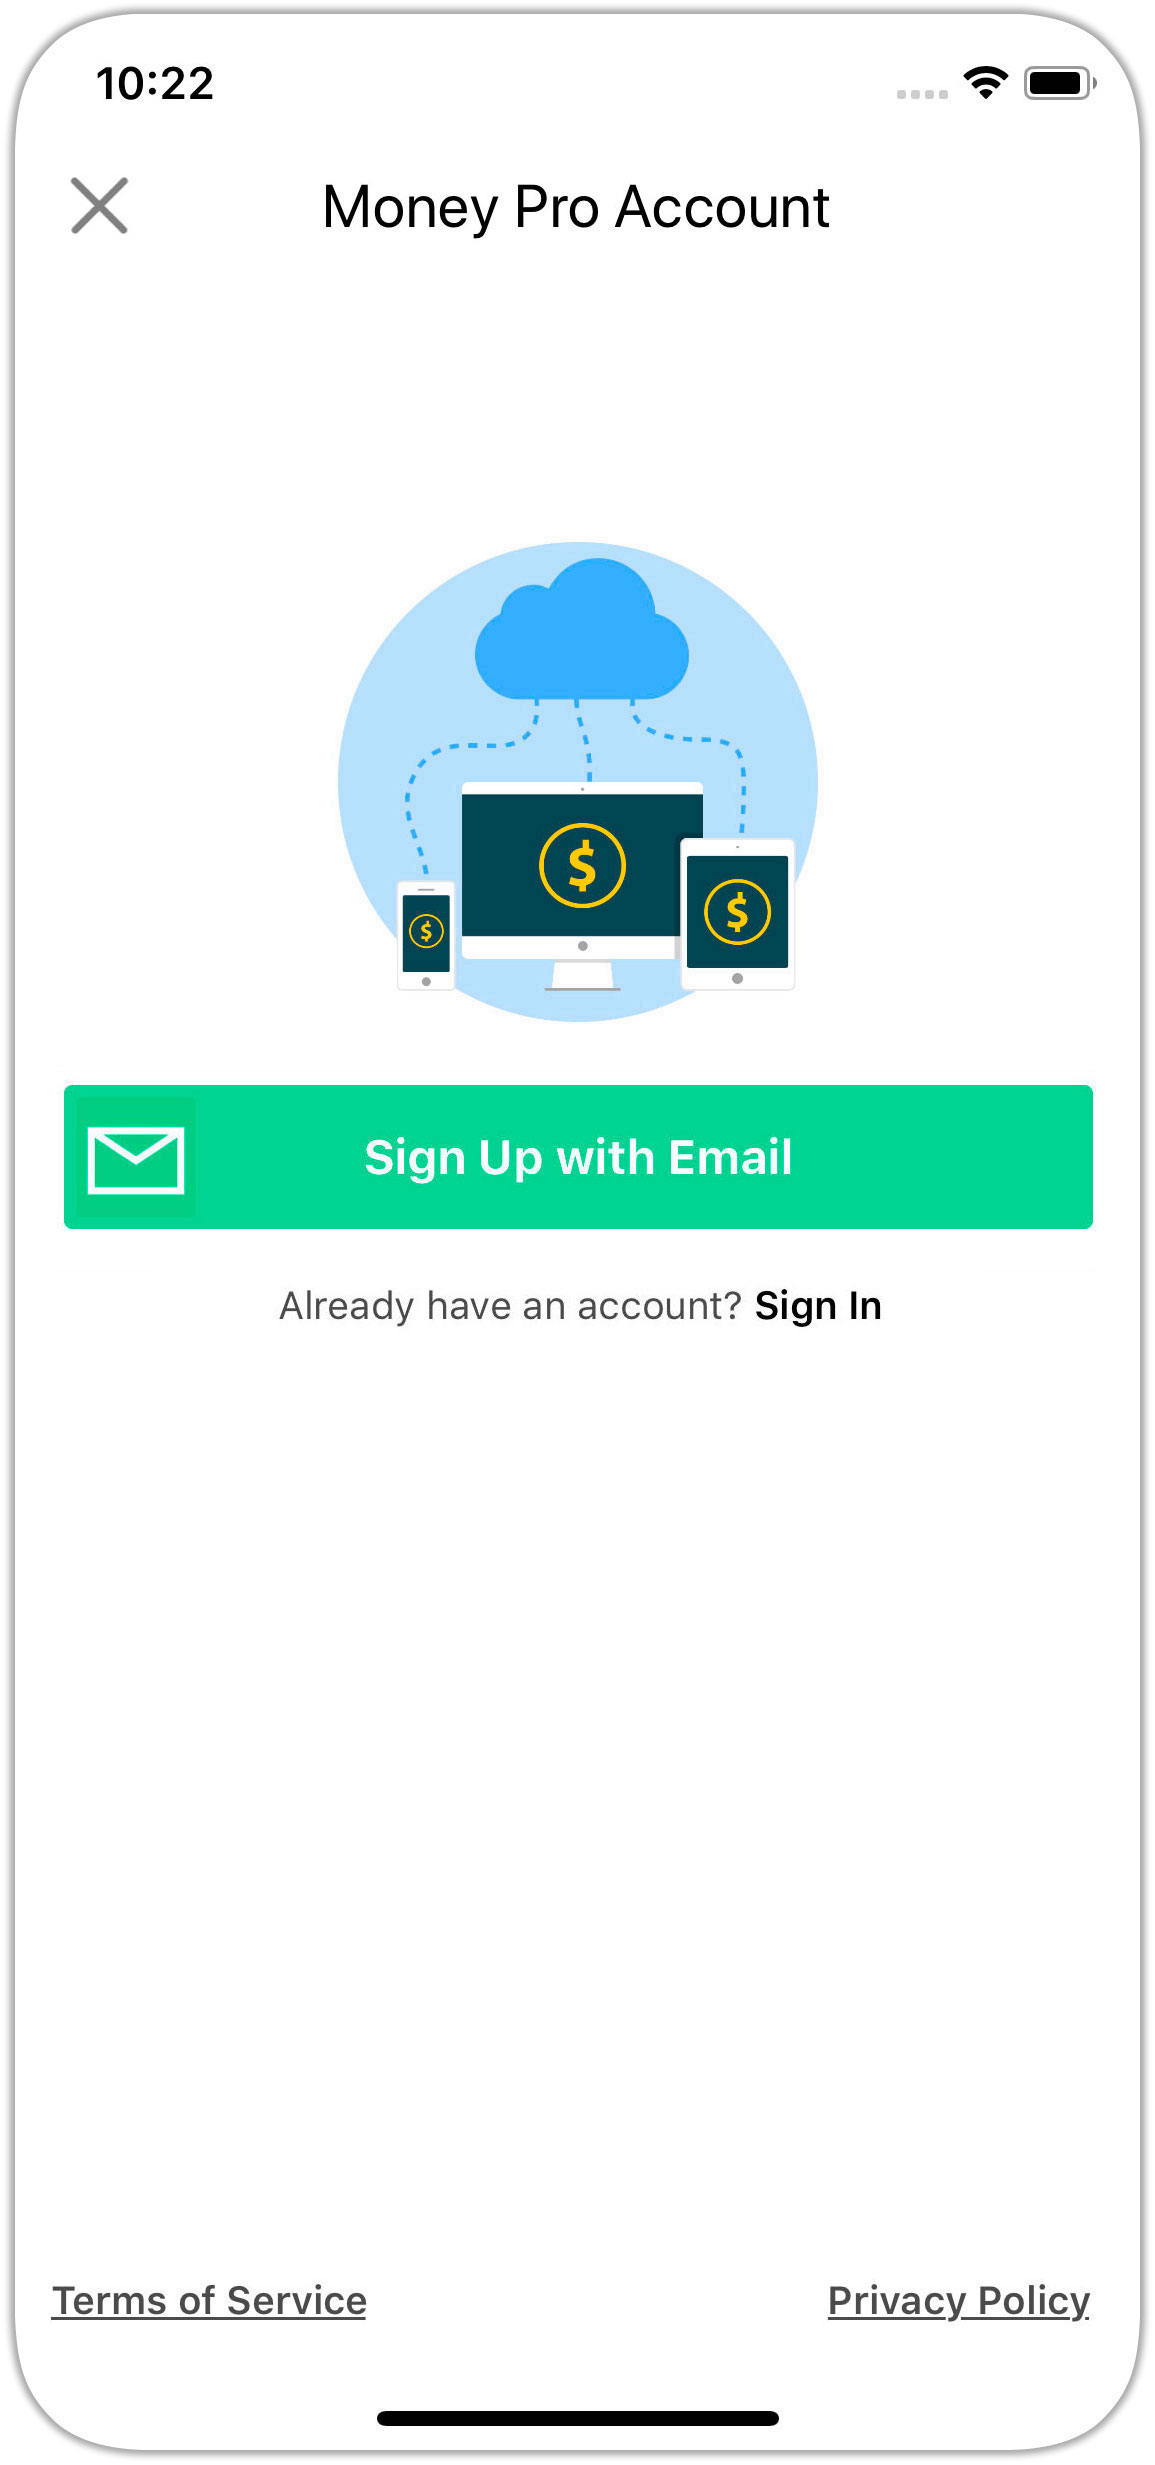
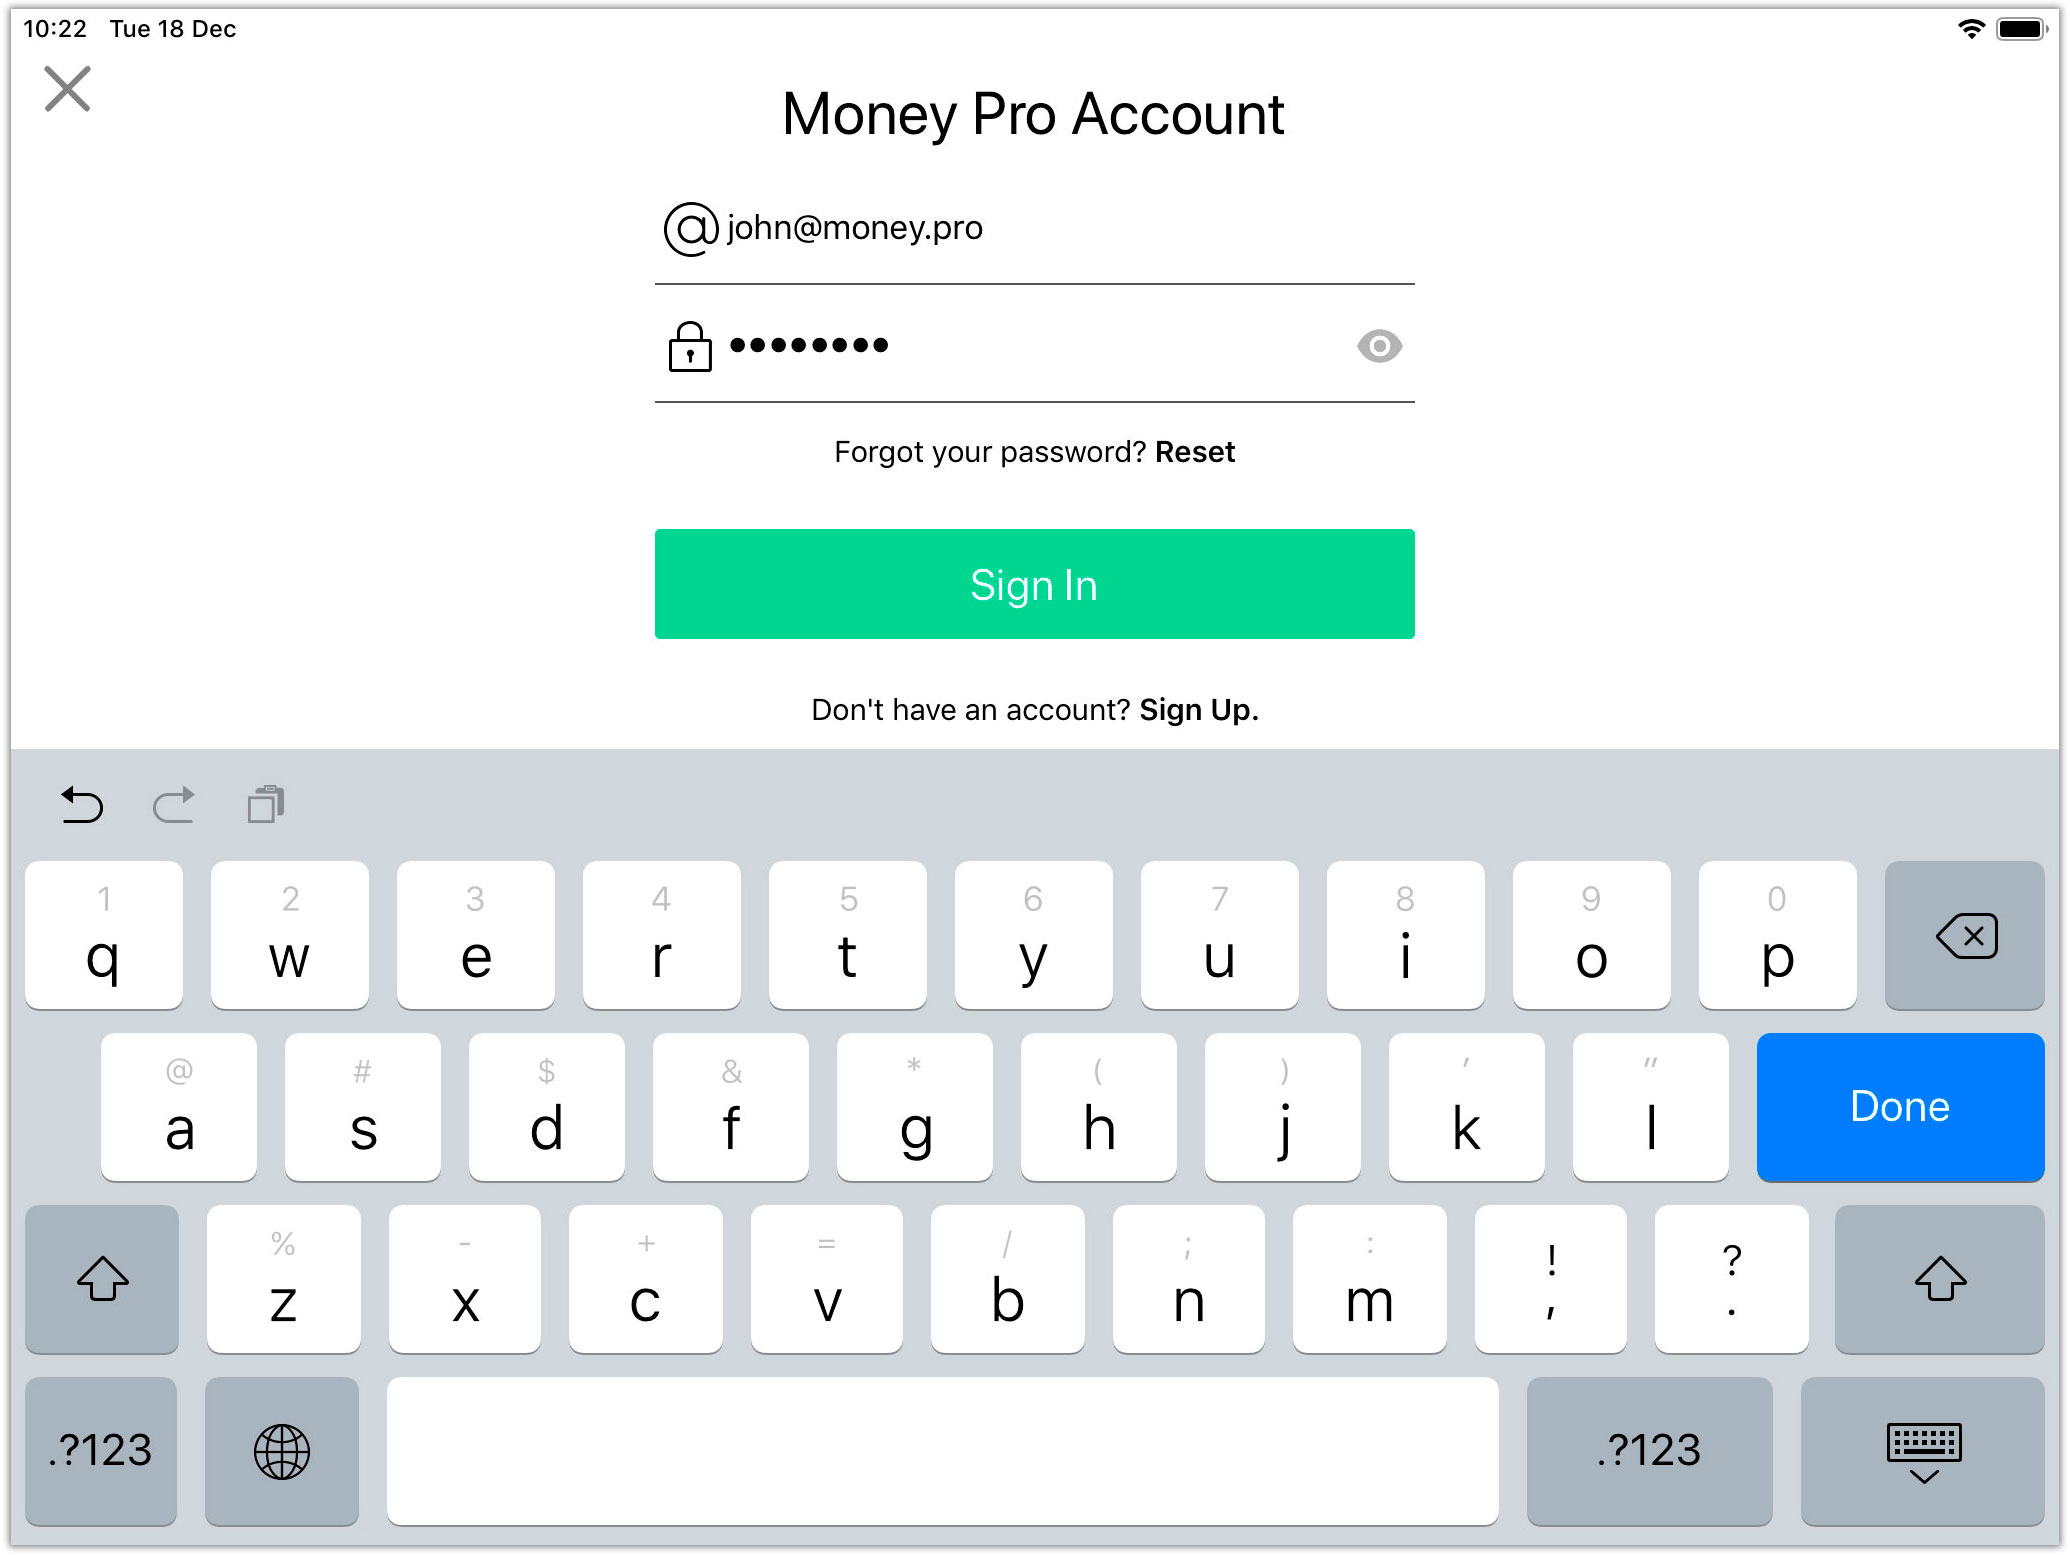
1. Go to More > Money Pro Account (Mac: Main Menu > Money Pro > Preferences > Money Pro Account; Windows: Main Menu > File > Preferences > Money Pro Account) and sign up.
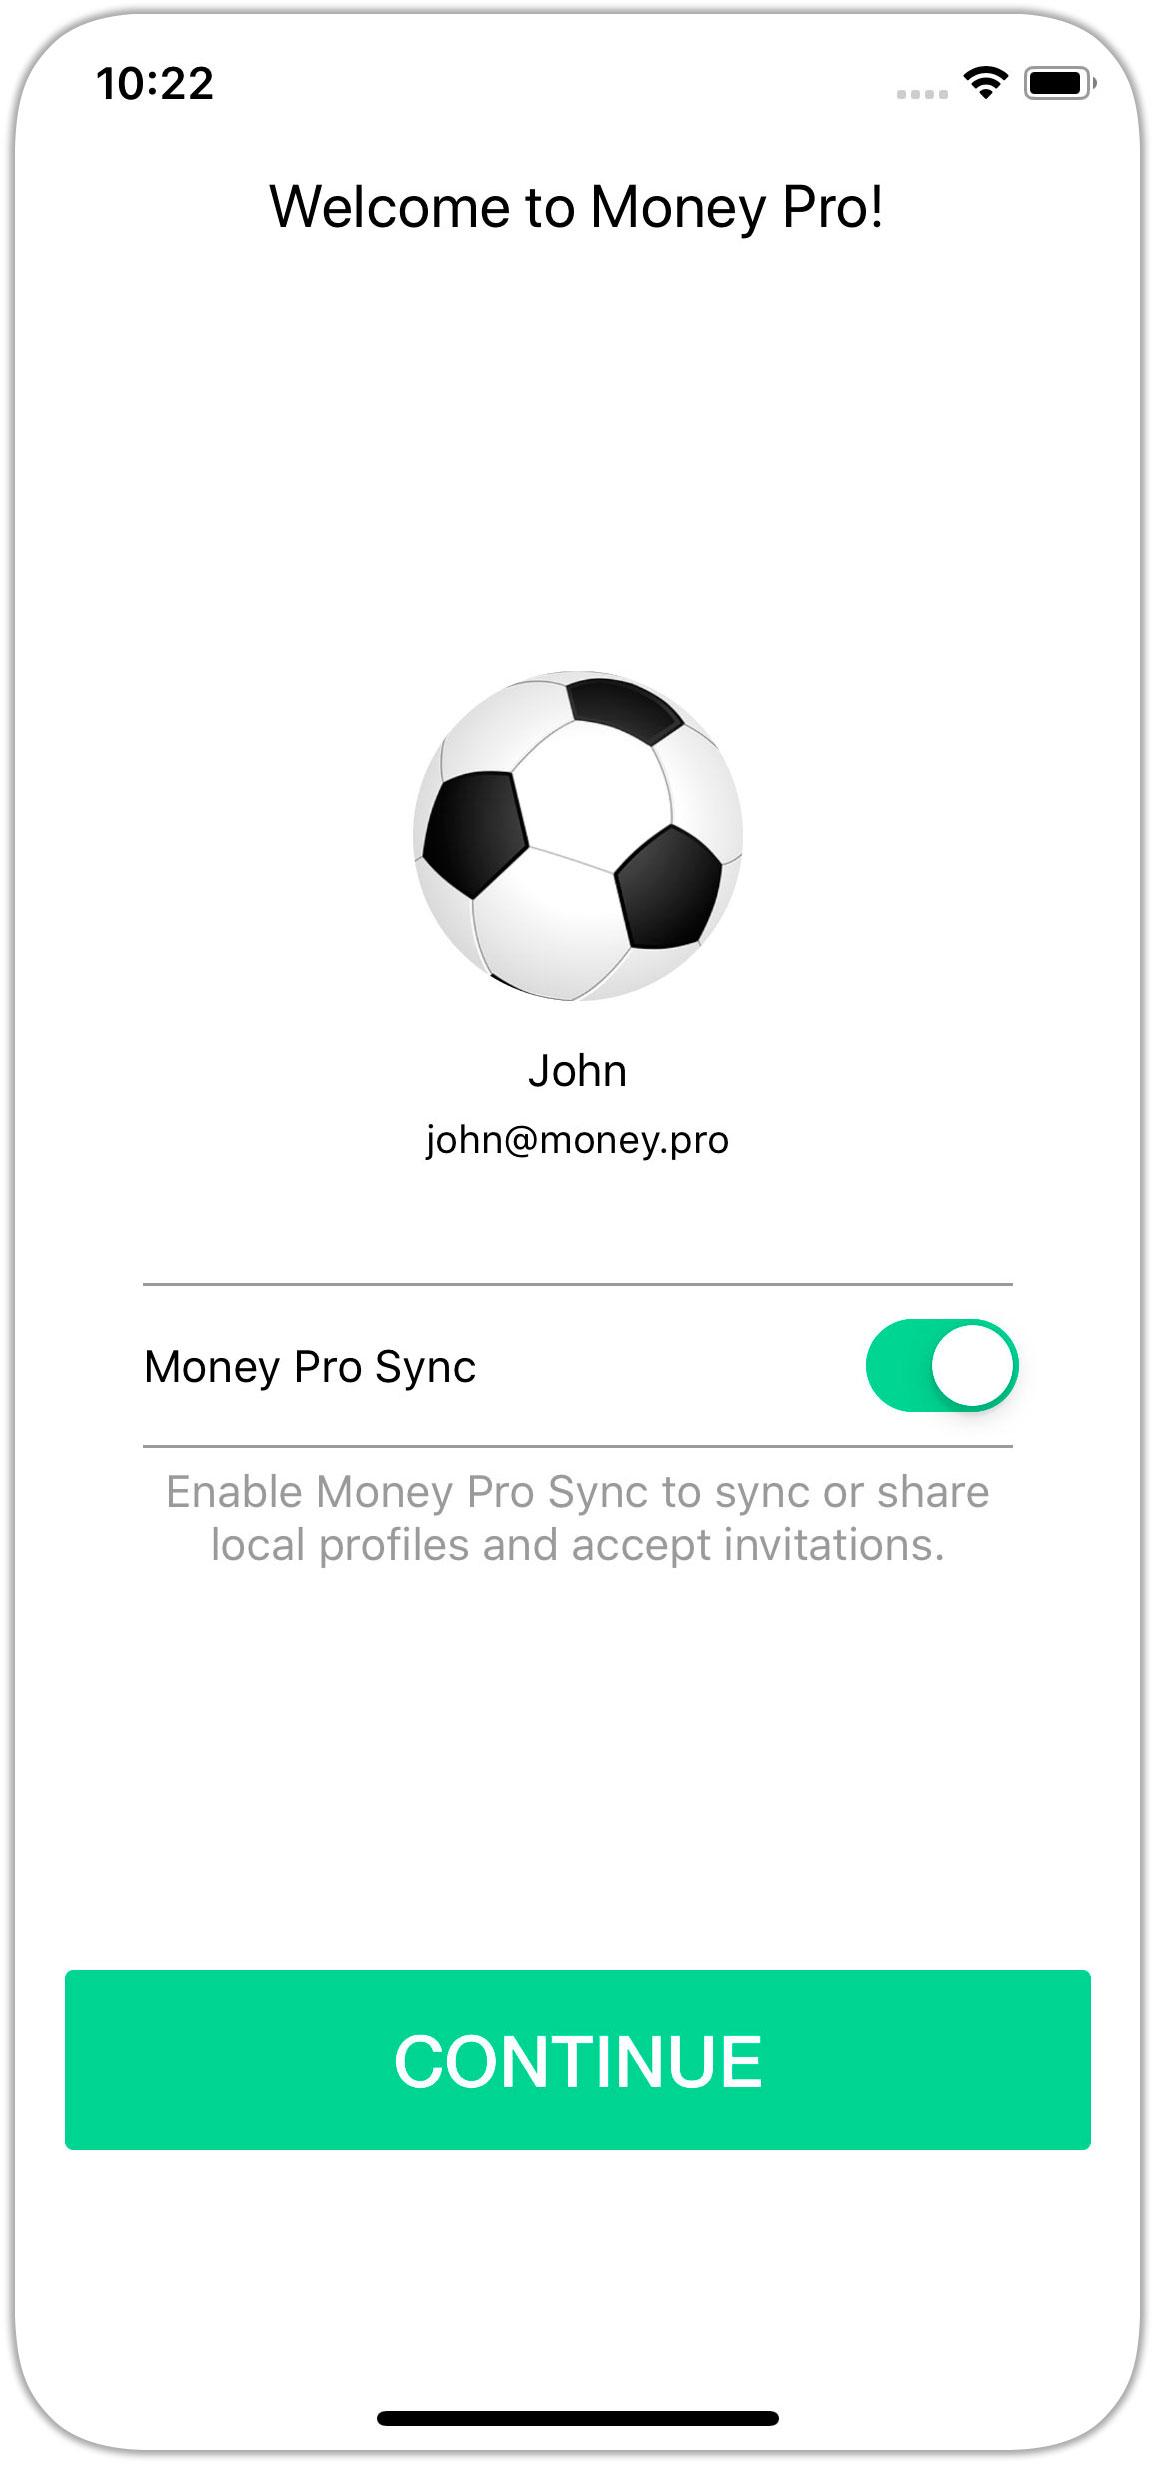
2. Activate Money Pro Sync.
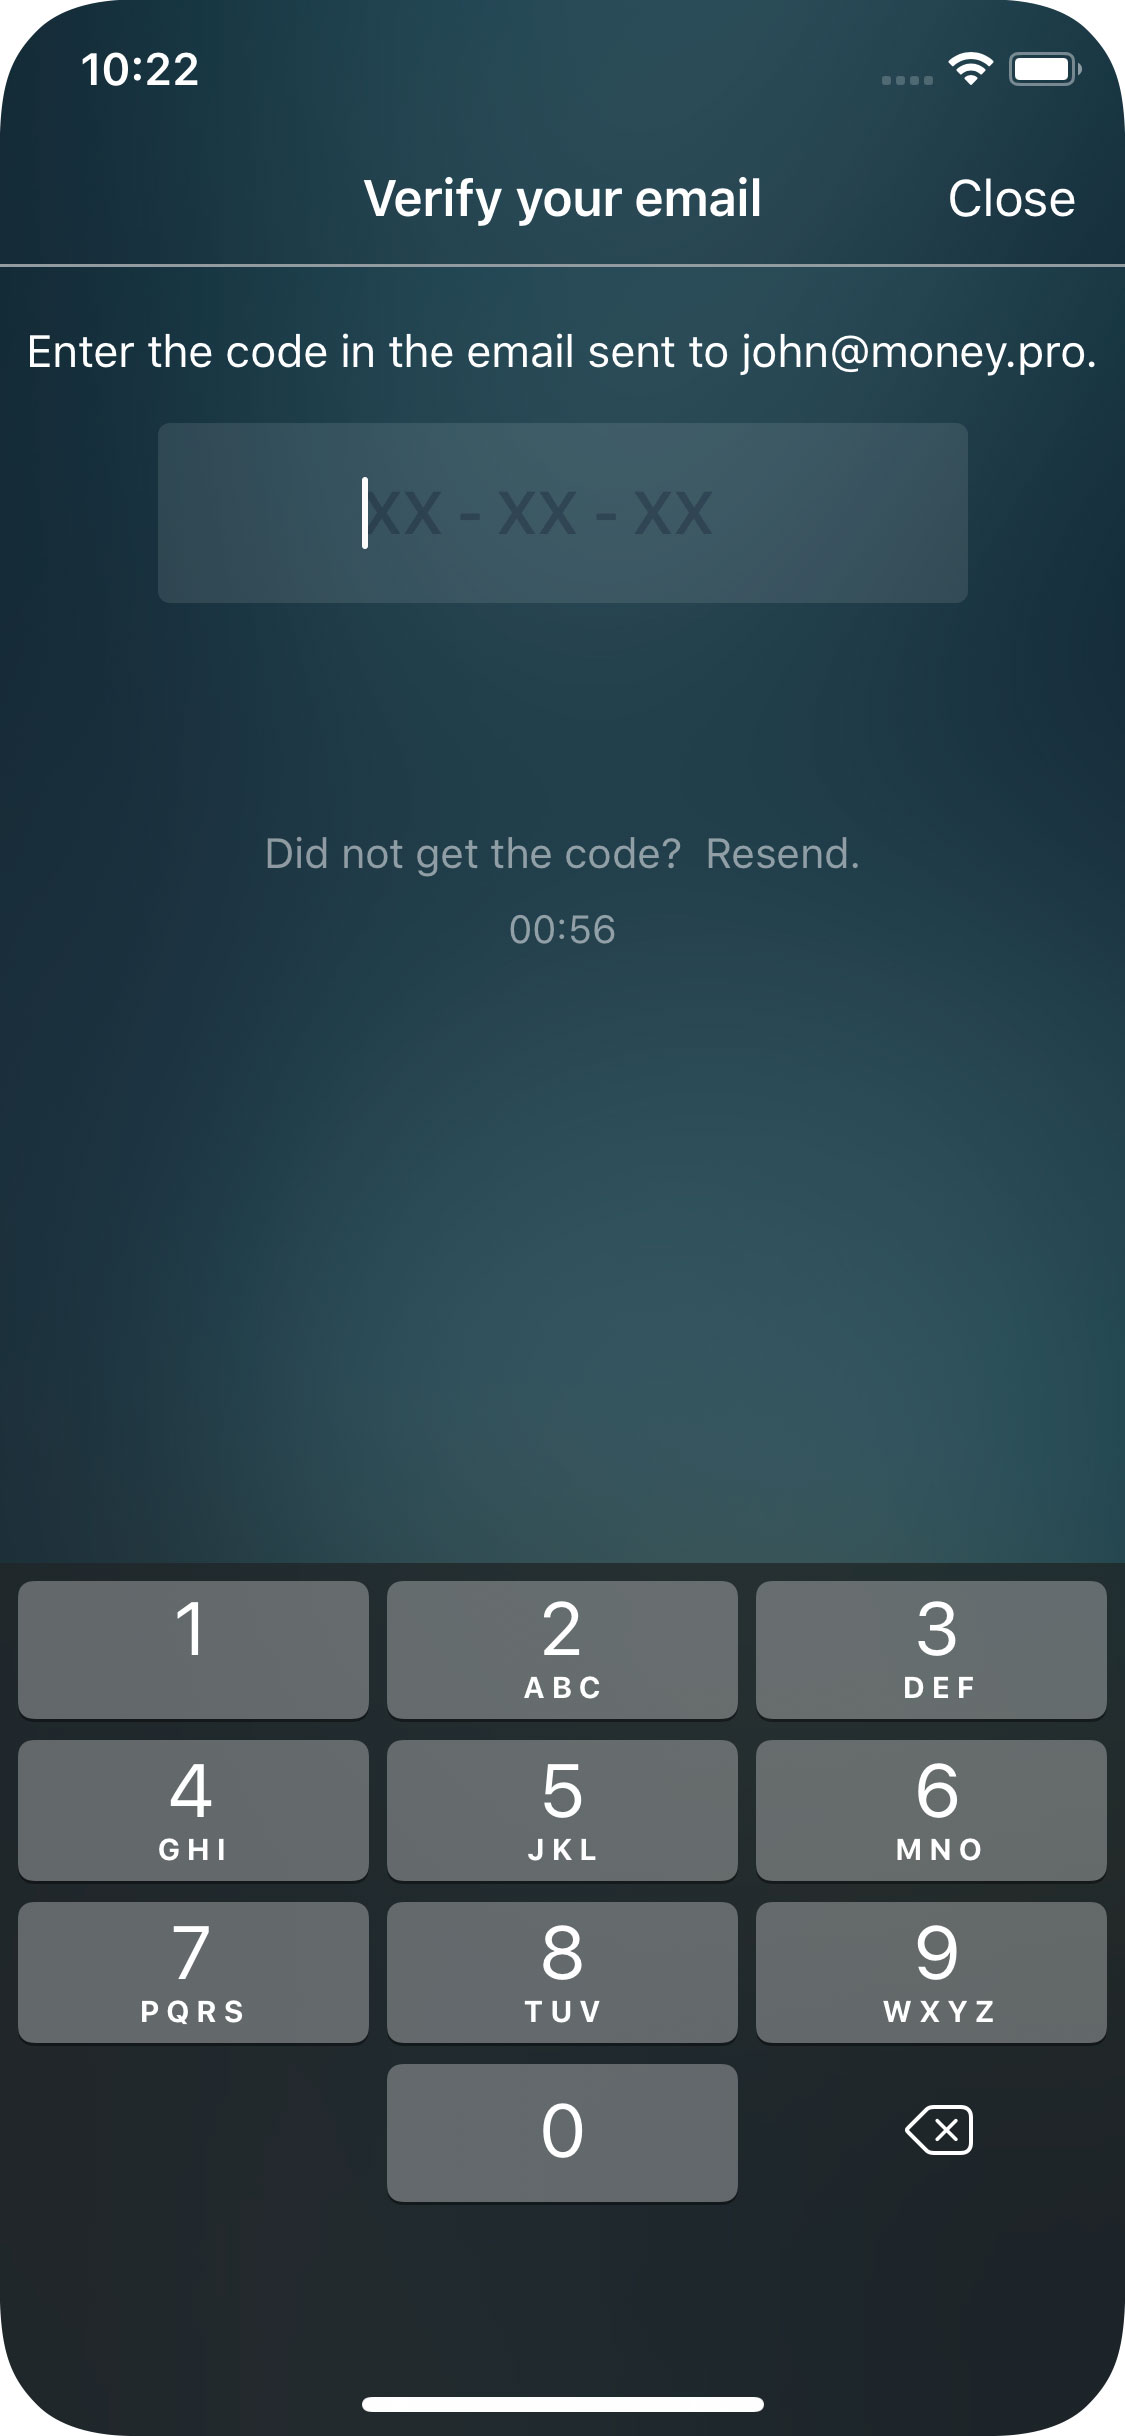
3. The “i” symbol means you need to confirm your email address.
4. Enter the code to confirm your email.
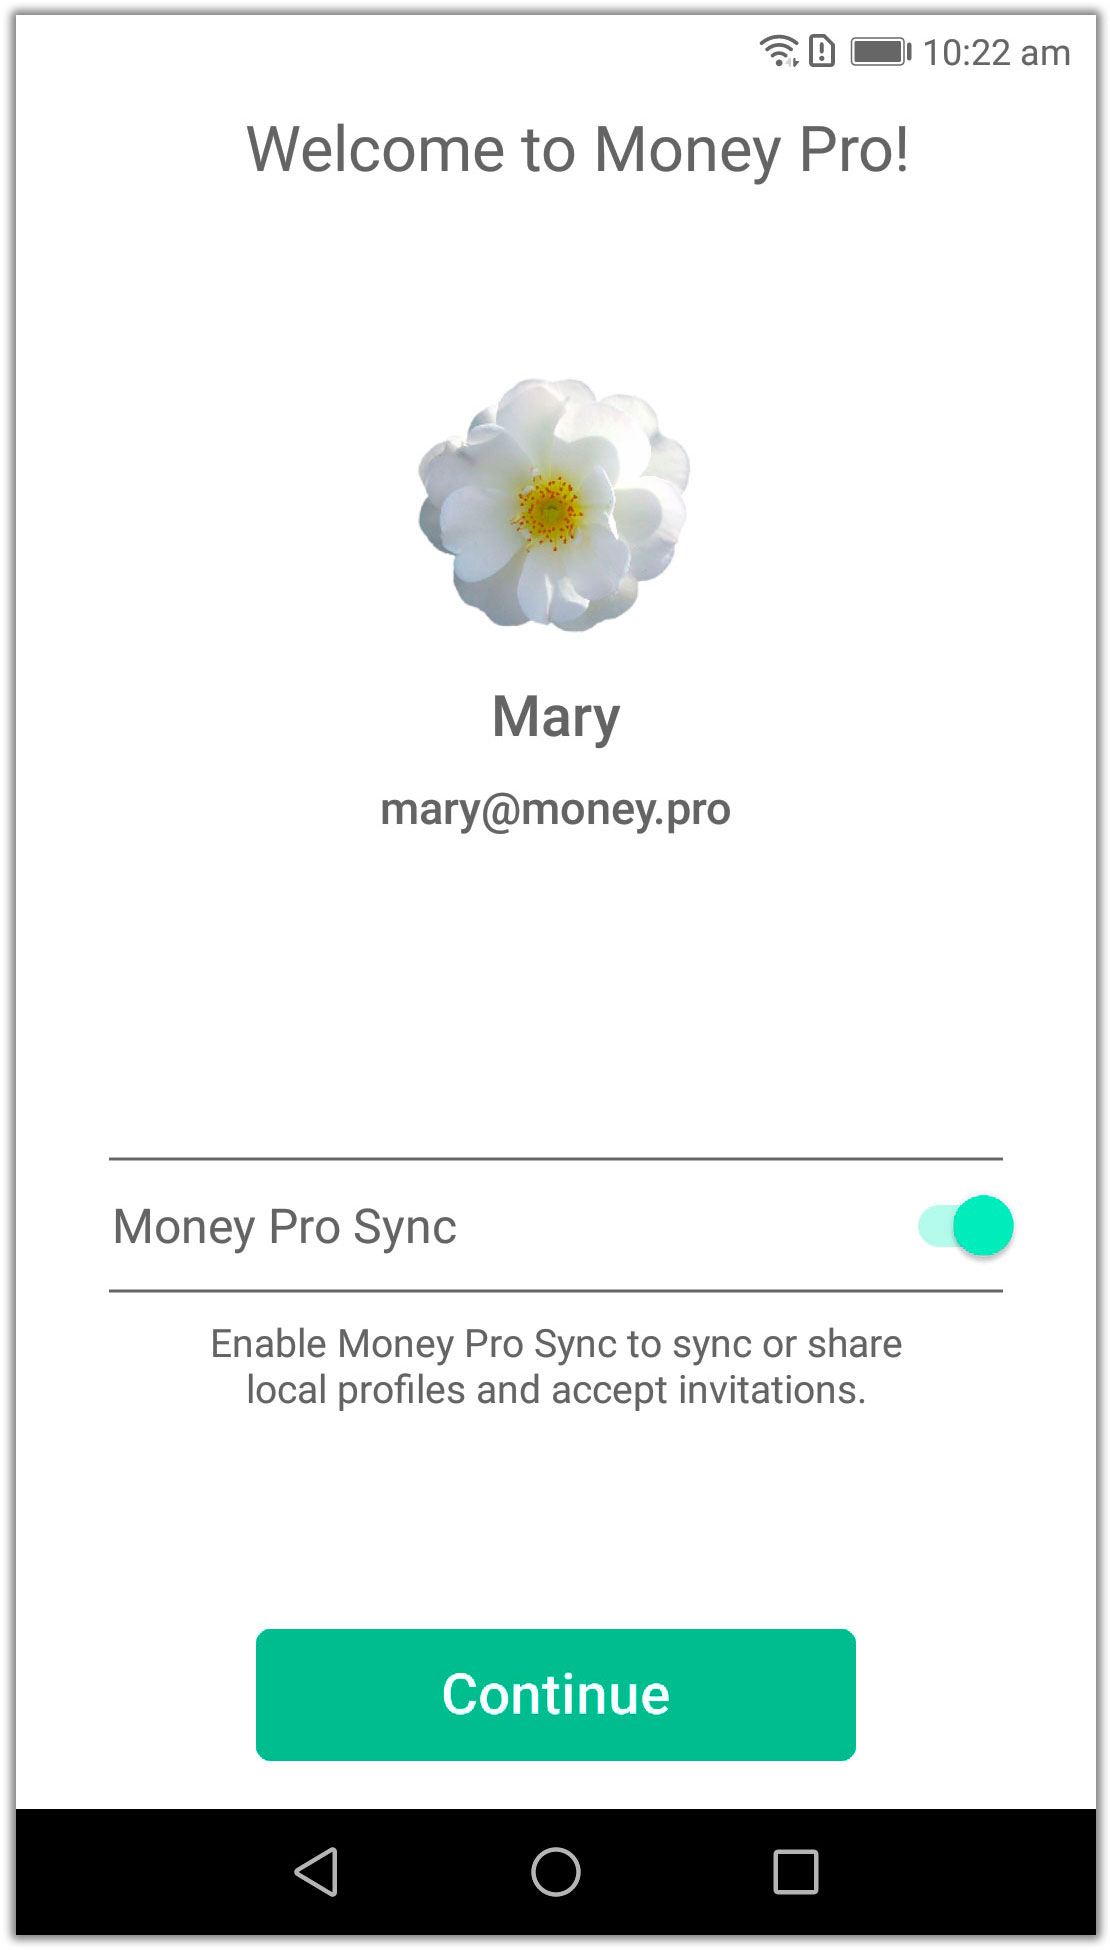
5. To set up another device (iPhone, iPad, Android, Mac, Windows), go to Money Pro Account and sign in.
6. Turn on Money Pro Sync and tap “Continue”. Now your data is automatically synced across all your devices.
Money Pro Sync: Connecting to other users
Profile owner
1. Go to More > Sync (Mac: Main Menu > Money Pro > Preferences > Sync; Windows: Main Menu > File > Preferences > Sync) and tap Share next to the profile name (the one you want to share)
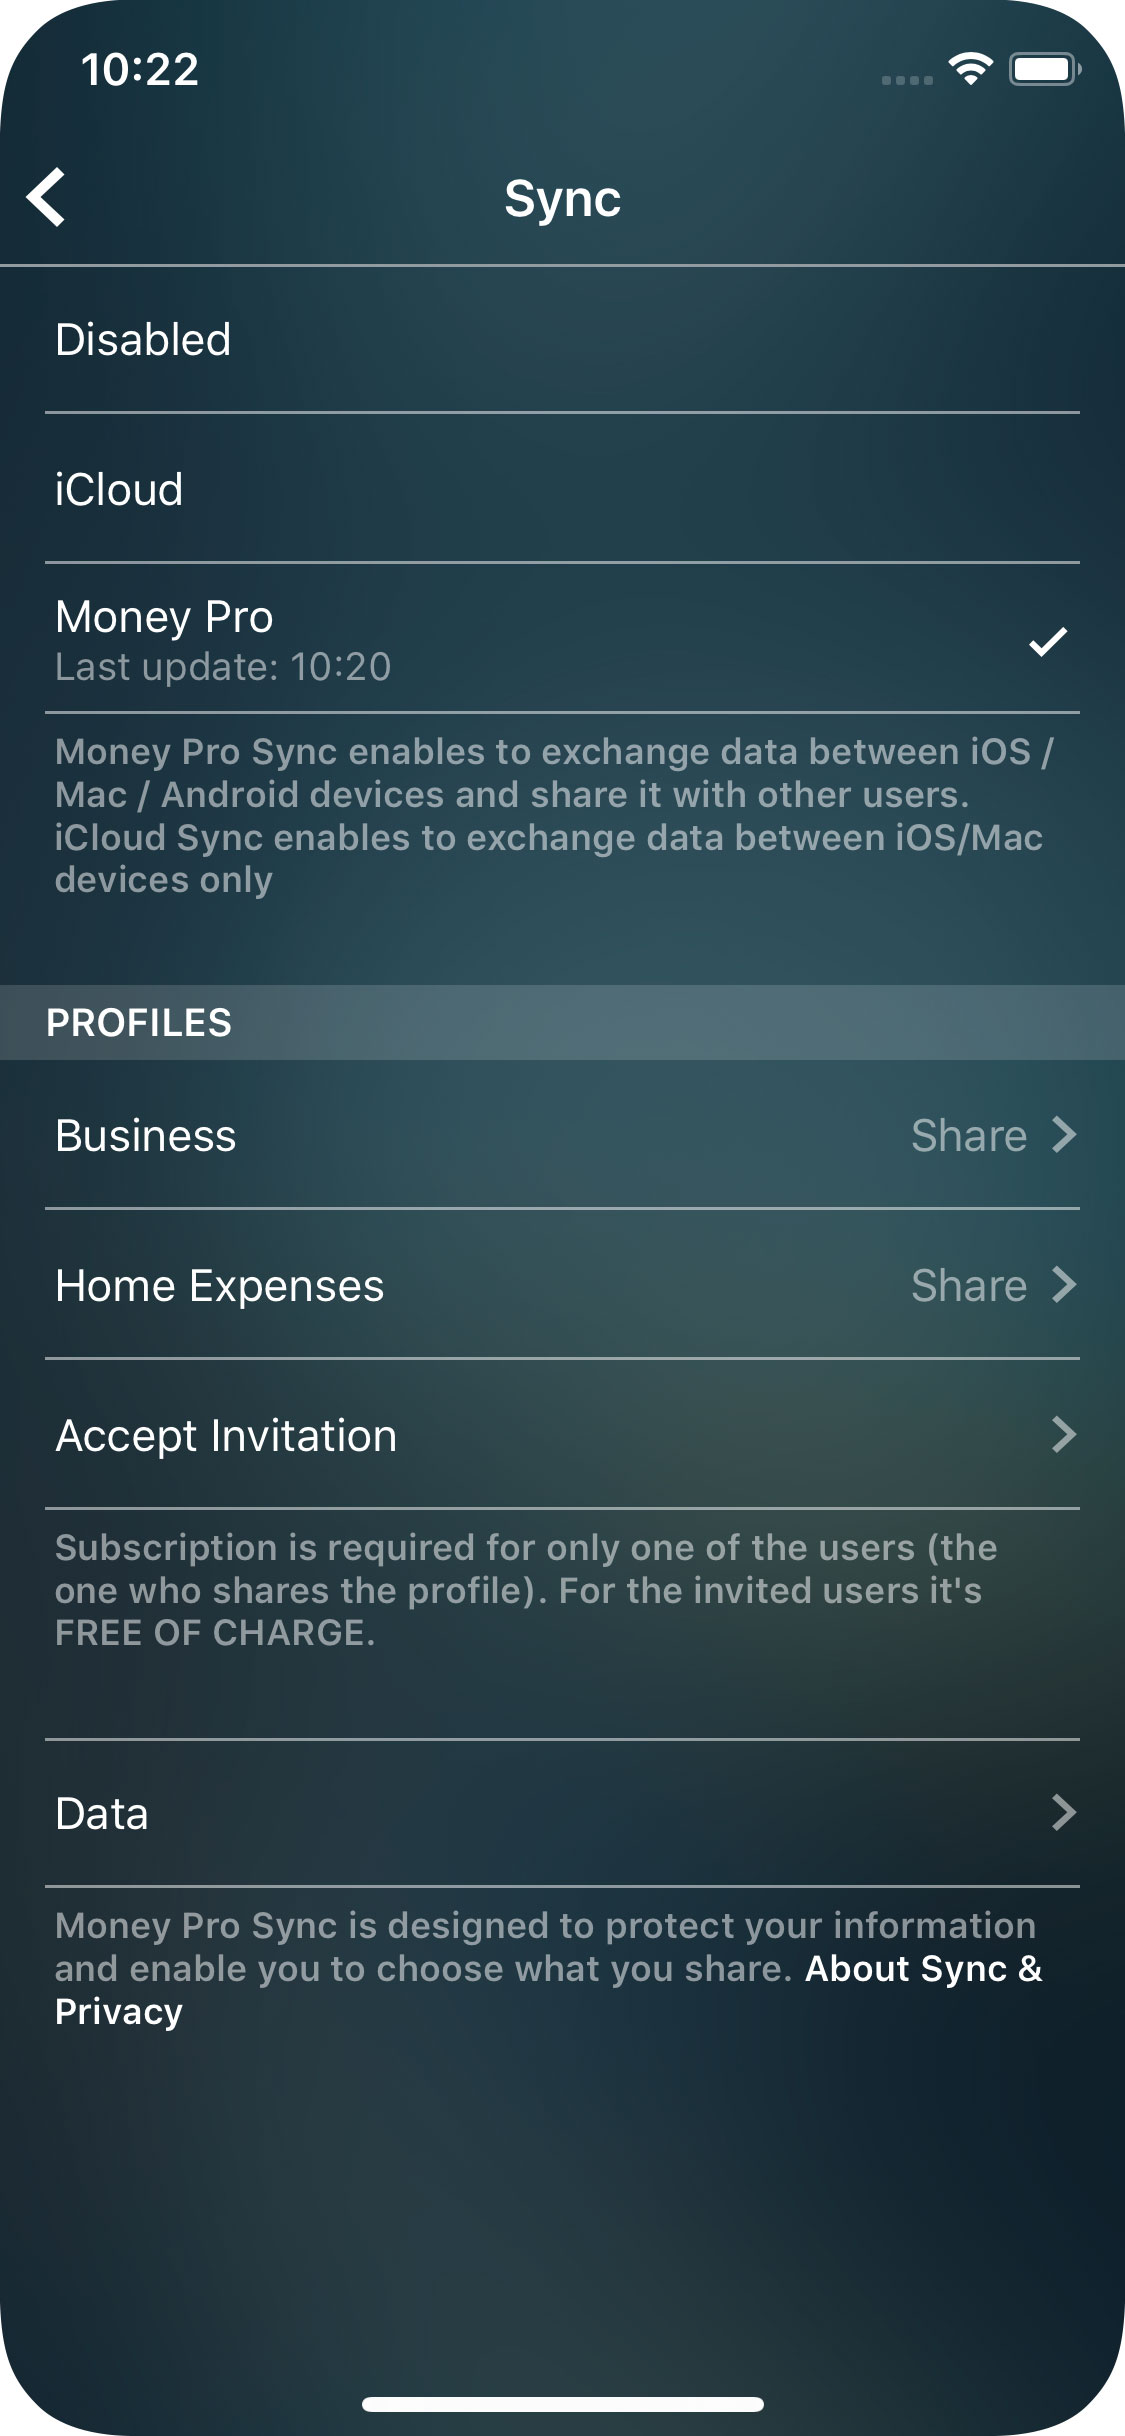
2. The app will generate a QR code and display it on the screen. If the invited user cannot use the camera on their device or is not around, send them an invitation using one of the following methods: SMS, email, Messenger, etc. If you want to share the profile with several people, send a separate invitation with the unique QR code to each of them.

3. The profile owner can delete any user or add another one.
Invited user
1. Sign up with your own Money Pro Account (Money Pro Sync: General Settings) and activate Money Pro Sync.
2. Go to More > Sync > Accept Invitation. Scan the QR code (on the profile owner’s device) with your camera and wait a few seconds, or enter the code provided to you.
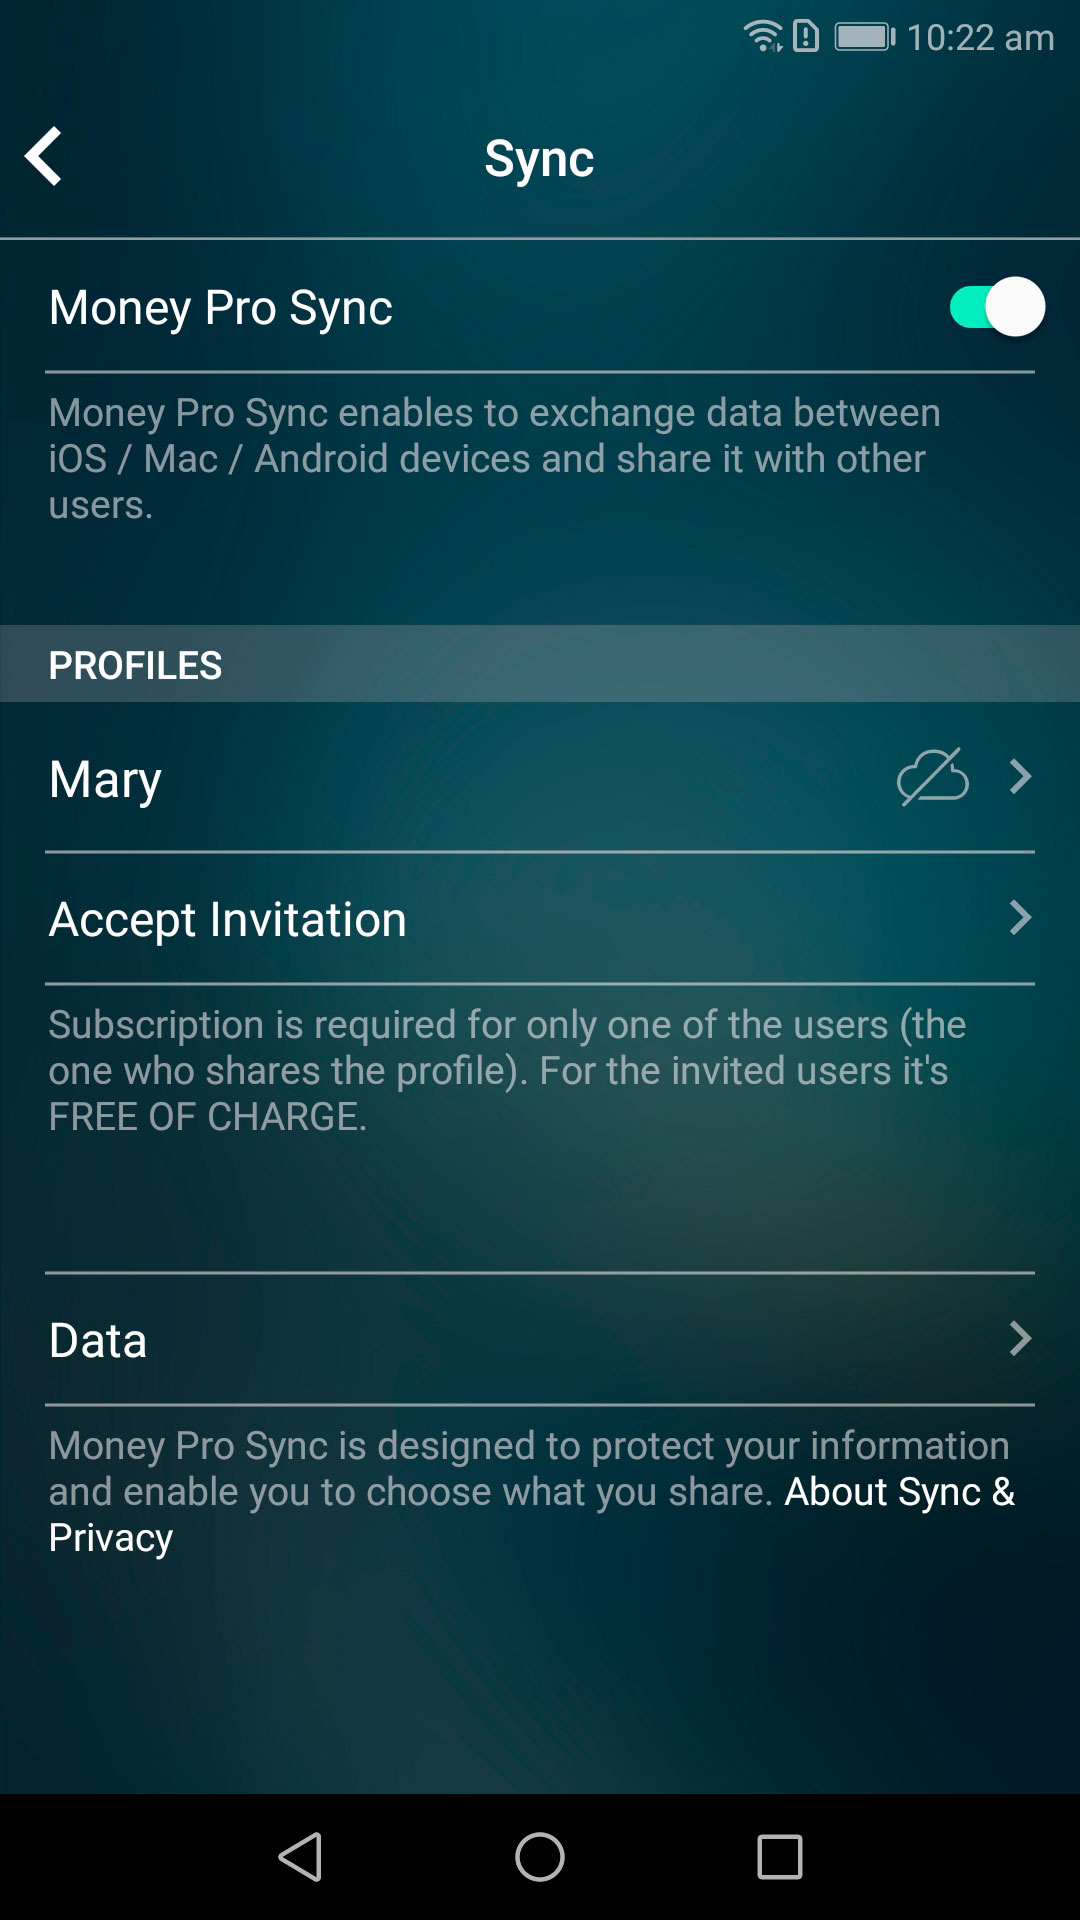
3. The shared profile will appear in the sync screen. It will then be available in the Profiles section (More > Profile/Main Menu > Profiles).
Money Pro Sync: Prices
The service is provided for a small monthly fee and is available with the PLUS or GOLD subscriptions. If there are multiple users who want to share data, only the profile owner needs to subscribe. All invited users can use the service for FREE.
The profile owner can subscribe for one month, 6 months, or one year.
The PLUS subscription includes Money Pro Sync.
The GOLD subscription includes Online Banking and Money Pro Sync.
If you are a GOLD subscriber and have already been using Online Banking, you can also set up Money Pro Sync. You do not need any other subscription.
3D Touch Support (iOS)
You’re able to use 3D Touch in Money Pro if your device supports this technology. For instance, if you peek at one of your accounts or a specific category, you’ll see the transactions list preview. Press a little harder and you’ll get a full view of the list. Peek at a report name and you’ll get a quick view of its chart or graph, press harder and the full report view will fill out the screen.
Besides, 3D Touch allows you to do several Quick Actions without launching the app. Quick Actions refer to quick menus that are available when pressing an app icon. For instance, after pressing the Money Pro icon you can quickly add a new transaction.
Money Pro in different colors (Themes)
You can change the background of the app at any moment. For your convenience, there are 10 themes you can pick from. Shape your mood by choosing the colors appealing to you and never get bored while managing your finances. Go to More/Themes.
Apple Watch
Money Pro works on Apple Watch as well.
Apple Watch features:
- Today screen. Here you can see all the planned and overdue transactions that you can pay/delay/delete. Besides, you can add a new transaction (income, expense, money transfer) on this form.
- Balance screen. It shows the list of your accounts with their balances. Here you can look through the last transactions of a particular account by tapping it.
- Month screen. It shows the budget progress for the current month (above) and the Net Worth (Assets minus Liabilities) graph for the last 30 days (below).
- Expenses screen. It shows the expense dynamics for the current month and the budget progress for each expense category. Tap a category you need and learn about your last transactions assigned to it.
- Income screen. It shows the income dynamics for the current month and the budget progress for each income category.
Add a couple of complications on your Apple Watch clock face to stay up to date with your financial matters. The round complication shows your budget progress for the current month. The text complication shows your overdue and upcoming planned transactions. Learn more details on how to customize your Apple Watch clock face here.

Money Pro for iPhone and iPad
Money Pro for Mac
Money Pro for Android